


6、httpd2.4 编译安装LAMP
www.itjc8.com
新特性:
- MPM支持运营DSO机制(动态共享对象),以模块形式按需加载
- 支持event MPM
- 支持异步读写
- 支持每模块及每个目录分别使用各自的日志级别
- 每请求配置
- 增强版的表达式分析器
- 支持毫秒级的keepalive timeout
- 基于FQDN的虚拟主机不再需要NameVirtualHost指令
- 支持用户自定义变量
新模块:
- mod_proxy_fcgi
- mod_ratelimit
- mod_remoteip
修改了一些配置机制:
- 不再支持使用Order,Deny,Allow来做基于IP的访问控制
httpd依赖于apr-1.4+,apr-util-1.4及以上 ,apr-icon
- apr:apache portable runtime(相当于apache 虚拟机)
编译安装mariadb需要cmake ncurses-devel
 yum install cmake -y
 yum install ncurses-devel.x86_64 -y
LAMP
一、CentOS 7 上编译安装
CentOS6 默认:apr-1.3.9 、apr-util-1.3.9 不建议升级
安装开发包:Development Tools
#yum groupinstall 'Devlopment Tools' Server Platform Development' -y
编译安装httpd-2.4.33
这里我们构建MPM为默认模块,这里需要apr和apr-util 1.5以上的版本
官方网站地址 https://apr.apache.org/
1.1、安装apr
 wget http://archive.apache.org/dist/apr/apr-1.5.1.tar.gz
 tar xvf apr-1.5.1.tar.gz
 cd apr-1.5.1/
 ./configure --prefix=/usr/local/apr
 make && make install
1.2、安装apr-util
 wget http://archive.apache.org/dist/apr/apr-util-1.5.4.tar.gz
 tar xvf apr-util-1.5.4.tar.gz
 cd apr-util-1.5.4/
 ./configure --prefix=/usr/local/apr-util --with-apr=/usr/local/apr
 #with-apr要指明apr的安装目录,apr-util要依赖apr编译
 make && make install
1.3、httpd编译依赖的包yum安装即可,这里提前安装以便编译过程一次通过
  yum install pcre-devel.x86_64 -y  #安装开发环境,安装pcre-devel
  yum install openssl-devel.x86_64 -y
1.4、编译安装httpd
groupadd -r apache
useradd -r -g apache apache
注:此步做了,就无须重复1.5步骤
下载并且编译安装httpd

#wget http://archive.apache.org/dist/httpd/httpd-2.4.33.tar.gz
#tar xvf httpd-2.4.33.tar.gz

#cd httpd-2.4.33
./configure \
--prefix=/usr/local/httpd \
--sysconfdir=/etc/httpd24 \
--enable-so \
--enable-ssl \
--enable-cgi \
--enable-rewrite \
--with-zlib \
--with-pcre \
--with-apr=/usr/local/apr \
--with-apr-util=/usr/local/apr-util \
--enable-modules=most \
--enable-mpms-shared=all \
--with-mpm=event
注释:
    ./configure下的第一行指明编译安装的路径
    第二行指明配置文件的路径
    第三行支持动态装载卸载模块
    第四行支持https通信
    第五行支持cgi协议
    第六行支持url重写
    第七行支持数据压缩
    第八行兼容正则表达式
    第九行和第十行指明apr和apr-util路径
    第十一行 支持大多数模块
    第十二行 支持全部的工作模型
    第十三行 默认工作模式为event
更接近生产环境模块
./configure --prefix=/usr/local/httpd\
--sysconfdir=/etc/httpd24\
--enable-so/\
--enable-rewirte\
--enable-ssl\
--enable-cgi\
--enable-cgid\
--enable-mble-cgi\
--enable-cgid\
--enable-modules=most\
--enable-mods-shared=most\
--with-mpm=event\
--enable-mpms-shared=all\
--with-apr=/usr/local/apr\
--with-apr-util=/usr/local/apr-util
1.5、如果想要更改运行账号和所属组可以通过修改配置文件的user和group字段为apache
useradd -r -s /sbin/nologin apache
chown -R apache:apache /usr/local/apache

1.6、添加环境
编辑/etc/httpd24/httpd.conf,添加如下行即可:
PidFile "/var/run/httpd.pid"
添加man环境
echo "MANPATH=/usr/local/httpd/man" >> /etc/man.config
添加PATH环境变量
echo "export PATH=/usr/local/httpd/bin:$PAHT" > /etc/porfile.d/httpd.sh
source /etc/profile.d/httpd.sh
输出头文件
ln -s /usr/include /usr/local/httpd/include
1.7、添加systemctl服务
首先看下服务列表里有没有这个服务
systemctl list-unit-files --type=service
如果有的话:
systemctl daemon-reload
脚本添加vim /usr/lib/systemd/systemhttpd.service
[Unit]
Description=The Apache HTTP Server
After=network.target remote-fs.target nss-lookup.target
Documentation=man:httpd(8)
Documentation=man:apachectl(8)
[Service]
Type=simple
#EnvironmentFile=/etc/sysconfig/httpd
ExecStart=/usr/local/httpd/bin/httpd $OPTIONS -DFOREGROUND
ExecReload=/usr/local/httpd/bin/httpd $OPTIONS -k graceful
#ExecStop=/bin/kill -WINCH ${MAINPID}
# We want systemd to give httpd some time to finish gracefully, but still want
# it to kill httpd after TimeoutStopSec if something went wrong during the
# graceful stop. Normally, Systemd sends SIGTERM signal right after the
# ExecStop, which would kill httpd. We are sending useless SIGCONT here to give
# httpd time to finish.
KillSignal=SIGCONT
PrivateTmp=true
[Install]
WantedBy=multi-user.target
然后
systemctl daemon-reload //重载系统管理器
1.8、启动
systemctl start httpd.service
开机自启动
systemctl enable httpd
1.9、语法检查
httpd -t 或apachectl -t
检查版本:httpd -V
注:网页默认显示内容
/usr/local/httpd/htdocs/index.html
1.10、CentOS 7 rpm包安装

二、配置
2.1、编译安装后额外的配置文件
[root@localhost httpd]# ls
extra  httpd.conf  magic  mime.types  original
2.2、切换使用MPM
LoadModule mpm_event_module modules/mod_mpm_event.so
#LoadModule mpm_prefork_module modules/mod_mpm_prefork.so
#LoadModule mpm_worker_module modules/mod_mpm_worker.so
2.3、修改“Main” server的DocumentRoot
DocumentRoot "/usr/local/httpd/htdocs"
2.4、基于IP的访问控制法则 (2.4默认拒绝所有文件,写上一个路径后必须在里面定义授权,否则无法访问)
a) 允许所有主机访问:Require all granted
b) 拒绝所有主机访问:Require all denied
<Directory "/usr/local/httpd/htdocs">
Options Indexes FollowSymLinks
AllowOverride None
<RequireAll>
Require not ip 192.168.1.101
Require all granted
</RequireAll>
</Directory>
c)控制特定IP访问 (需要专门放到一个容器里面定义,见b)
- Require ip IPADDR:授权指定来源地址的主机访问
- Require not ip IPADDR:拒绝指定来源地址的主机访问
IPADDR:
IP:192.168.1.10
Network/mask:192.168.1.10/255.255.255.0
Net :192.168
d ) 控制特定主机(HOSTNAME)访问
- Require host HOSTNAME:授权指定来源地址的主机访问
- Require host not HOSTNANE:拒绝指定来源地址的主机访问
HOSTNAME :FQDN(特定主机) 或DOMAIN(指定域内的所有主机)
e) 虚拟主机
基于IP、Port和FQDN都支持;
基于FQDN的不再需要NameVirtualHost指令
f) ssl 启用模块
#LoadModule ssl_module modules/mod_ssl.so
g) centos6 脚本(忽略)
cd /etc/init.d/rc.d
cp httpd httpd2.4
然后修改相应路径
静态资源:静态内容,客户端从服务器获得的资源的表现形式与原文件相同
动态资源:通常是程序文件,需要在服务器执行之后,将执行的结果返回给客户端
注:从磁盘加载数据最终还是会变成数据流形式,即彼此之间是数据流来交流
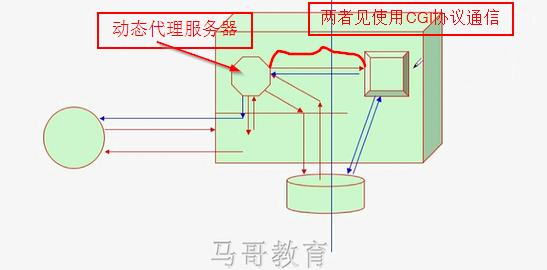
cgi 是简化版httpd协议,仅用于前端web服务器(cgi客户端)与后端应用程序服务器(cgi服务器)之间交互的httpd协议
CGI:通用网关接口
两者间基于CGI协议通信,两者如果结合的?既然是CGI通信,意味着两者要进行进程间的通信(进程间通信形式:消息队列、共享内存、跨主机)
FCGI(fastcig) 因为前段就无须解析CGI,后端可以自行管理
程序=指令+数据
LoadModule proxy_fcgi_module modules/mod_proxy_fcgi.so #当请求动态内容时,此模块就是把httpd扮演成CGI客户端

httpd+php结合方式有三种
- modules:php直接作为httpd的模块方式存在,借助模块来实现,无需创建子进程去请求php-server
- cgi (很少用)---此图讲的是该种方式
- fastcgi (简称fpm)
动态请求流程:Client ---> (http) ---> httpd --->(cgi)--->application server (program file) ---> (mysql) ---> mariadb
三、编译安装MySQL
[Unit]
Description=MySQL Server
Documentation=man:mysqld(8)
Documentation=http://dev.mysql.com/doc/refman/en/using-systemd.html
After=network.target
After=syslog.target

[Install]
WantedBy=multi-user.target

[Service]
User=mysql
Group=mysql

Type=forking

PIDFile=/var/run/mysqld/mysqld.pid

# Disable service start and stop timeout logic of systemd for mysqld service.
TimeoutSec=0

# Start main service
ExecStart=/usr/local/mysql5.7/bin/mysqld --daemonize --pid-file=/var/run/mysqld/mysqld.pid $MYSQLD_OPTS

# Use this to switch malloc implementation
#EnvironmentFile=-/etc/sysconfig/mysql

# Sets open_files_limit
LimitNOFILE = 5000

Restart=on-failure

RestartPreventExitStatus=1

PrivateTmp=false
https://www.cnblogs.com/lynk/p/10407919.html
https://segmentfault.com/a/1190000017801191
https://blog.51cto.com/11010461/2113093
测速网页速度:https://www.17ce.com/

 浙公网安备 33010602011771号