
SonarQube 系列之 — 03 集成CI
一. 集成Jenkins
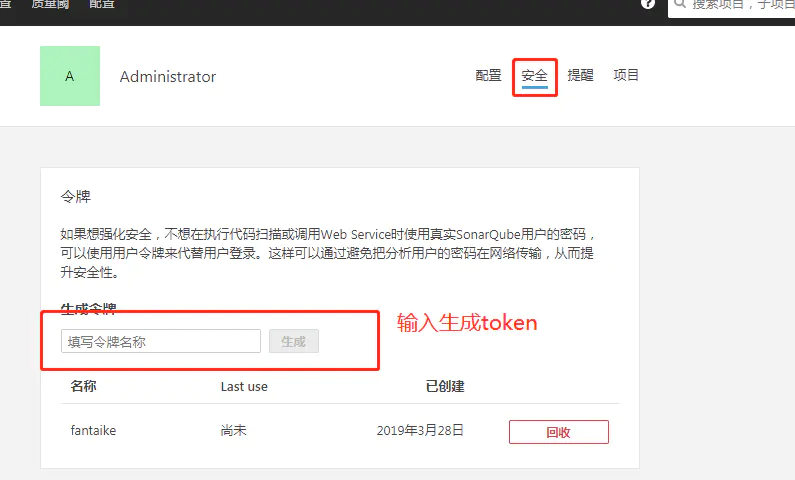
1.1 准备访问 sonar 的 token
访问SonarQube,点击Administration -> Security,将 Force user authentication 设置为true。点击左上角用户头像 -> Security,生成token
1.2 在jenkins上安装 Sonar插件
SonarQube Scanner Plugin,参见jenkins安装插件的说明
1.3 在jenkins中配置 SonarQube服务
进入Jenkins > 系统管理 > 系统设置 > SonarQube servers,点击Add SonarQube,
check Enable injection of SonarQube server configuration as build environment variables
name:自定义即可
ServerUrl:sonar服务地址
Server authentication token: 在sonar服务中生成的令牌token。注意:创建token时,需选择'Secret Text'类型.

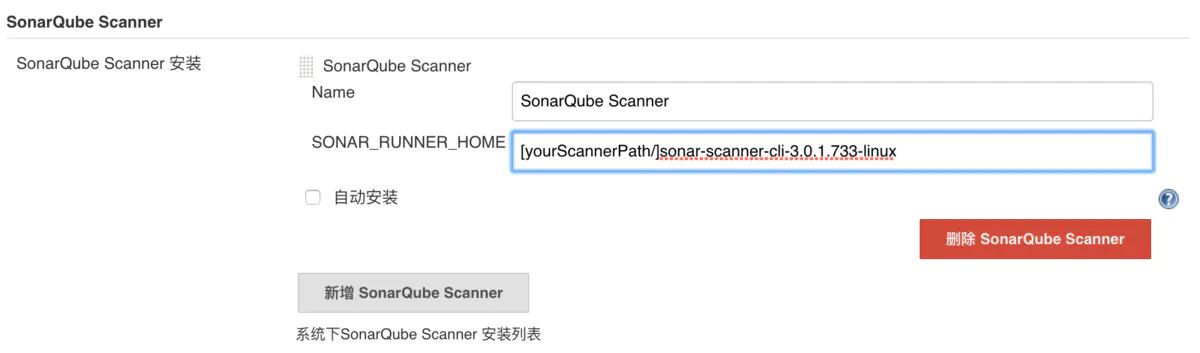
1.4 在jenkins中配置 sonar-scanner
进入 Jenkins > 系统管理 > Global Tool Configuration > 找到 SonarQube Scanner,尽量手动配置,详见下图
1.5 配置 jenkins Job
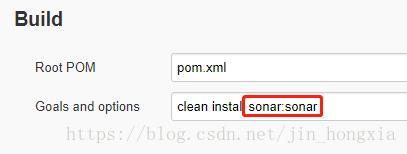
a 配置 Job(基于Maven的 Java 项目为例)
注意:Enable Prepare SonarScanner environment to allow the injection of SonarQube server values into this particular job.
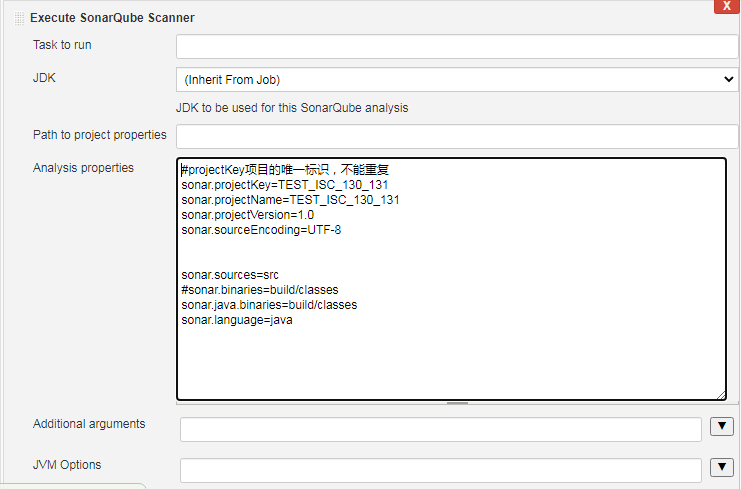
b 配置 Job(Java 项目用sonar-scanner扫描为例)
c 配置 Job(前端项目,用sonar-scanner扫描为例)
#projectKey项目的唯一标识,不能重复
sonar.projectKey=chsop_front
sonar.projectName=chsop_front
sonar.projectVersion=1.0
sonar.sourceEncoding=UTF-8
# JavaScript module
sonar.language=js
sonar.sources=src
二. 集成Jenkins-pipeline
2.1 SonarScanner:
node {
  stage('SCM') {
    git 'https://github.com/foo/bar.git'
  }
  stage('SonarQube analysis') {
    def scannerHome = tool 'SonarScanner 4.0';
    withSonarQubeEnv('My SonarQube Server') { // If you have configured more than one global server connection, you can specify its name
      sh "${scannerHome}/bin/sonar-scanner"
    }
  }
}
2.2 SonarScanner for Maven:
node {
  stage('SCM') {
    git 'https://github.com/foo/bar.git'
  }
  stage('SonarQube analysis') {
    withSonarQubeEnv('My SonarQube Server') {
      sh 'mvn clean package sonar:sonar'
    } // submitted SonarQube taskId is automatically attached to the pipeline context
  }
}
2.3 【补充】接入Sonar质量门禁
有时候sonar扫描结果不满足预期,需停止job的后续步骤,这种情况就要用到质量门禁。
a 在sonar质量阀中设置质量门禁,添加项目
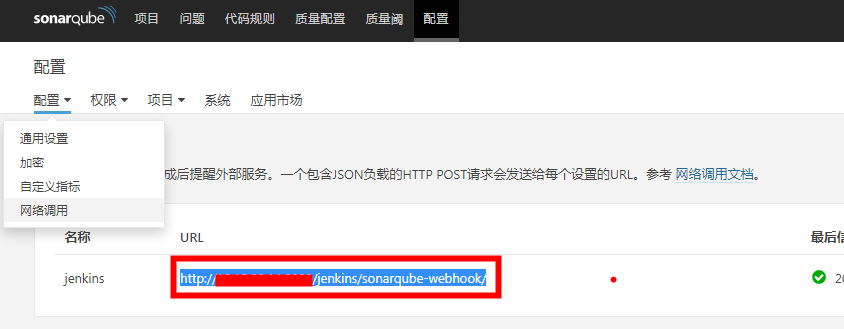
b 在sonar服务端配置中添加webhook,用来回调扫描的结果(配置->网络调用,URL配置为:Jenkins地址+/sonarqube-webhook)
c 在pipeline中使用withSonarQubeEnv 步骤 (so that SonarQube taskId is correctly attached to the pipeline context).
样例
node {
  stage('SCM') {
    git 'https://github.com/foo/bar.git'
  }
  stage('SonarQube analysis') {
    withSonarQubeEnv('My SonarQube Server') {
      sh 'mvn clean package sonar:sonar'
    } // submitted SonarQube taskId is automatically attached to the pipeline context
    script {
    //  未通过代码检查,中断
      timeout(time: 1, unit: 'HOURS') { // Just in case something goes wrong, pipeline will be killed after a timeout
      //利用sonar webhook功能通知pipeline代码检测结果,未通过质量阈,pipeline将会fail
        def qg = waitForQualityGate(webhookSecretId: 'yourSecretID')
        if (qg.status != 'OK') {
        error "未通过Sonarqube的代码质量阈检查,请及时修改!failure: ${qg.status}"
        }
      }
    }
  }
}
配置Sonar质量门禁遇到的坑
-
问题描述:hudson.remoting.ProxyException: net.sf.json.JSONException: Invalid JSON String
原因分析:This may occur due to an invalid URL in the Jenkins configuration.
解决办法:确保 sonarqube url 配置正确并且木有配斜杠【 Manage Jenkins -> SonarQube servers -> Server URL】 -
问题描述:jenkins升级后,pipeline中加上withSonarQubeEnv,job就会跑失败,错误信息为【Not authorized. Please check the properties sonar.login and sonar.password.】
原因分析:猜测jenkins 升级后不兼容的问题,带后续补充
解决办法:

 浙公网安备 33010602011771号