

Docker运行MongoDB及Redis及ssh端口映射远程连接
本节内容简介
在本实验里我们将通过完成 MongoDB 和 Redis 两个容器来学习Dockerfile及Docker的运行机制。
本节中,我们需要依次完成下面几项任务:
- MongoDB 的安装及配置
- Redis 的安装及配置
- Dockerfile 的编写
- 从 Dockerfile 构建镜像
本次实验的需求是完成 Dockerfile,通过 Dockerfile 创建 MongoDB 或 Redis 应用。Dockerhub上已经提供了官方的 MongoDB 和 Redis 镜像,本实验仅仅用于学习Dockerfile及Docker机制。
MongoDB 是一个基于分布式文件存储的数据库。由C++语言编写。旨在为WEB应用提供可扩展的高性能数据存储解决方案。MongoDB 是一个介于关系数据库和非关系数据库之间的产品,是非关系数据库当中功能最丰富,最像关系数据库的。特点是高性能、易部署、易使用,存储数据非常方便。 -来自百度百科

Redis是一个开源的使用ANSI C语言编写、支持网络、可基于内存亦可持久化的日志型、Key-Value数据库,并提供多种语言的API。 -来自百度百科
一、实验准备
1、实验分析
在本实验中,我们除了安装所需的核心服务外,还安装一个ssh服务提供便捷的管理。
为了提高docker build速度,我们直接使用阿里云的Ubuntu源。因此要在Dockerfile开始位置增加下面一句命令:
RUN echo "deb http://mirrors.aliyuncs.com/ubuntu/ trusty main universe" > /etc/apt/sources.list
2、创建 Dockerfile 文件
首先,需要创建一个目录来存放 Dockerfile 文件,目录名称可以任意,在目录里创建Dockerfile文件:
cd /home/shiyanlou
mkdir shiyanloumongodb shiyanlouredis
touch shiyanloumongodb/Dockerfile shiyanlouredis/Dockerfile
使用vim/gedit编辑Dockerfile文件,根据我们的需求输入内容。
二、Dockerfile 基本框架
1、基本框架
按照上一节学习的内容,我们先完成Dockerfile基本框架。
依次输入下面的基本框架内容:
# Version 0.1

# 基础镜像
FROM ubuntu:latest

# 维护者信息
MAINTAINER shiyanlou@shiyanlou.com

# 镜像操作命令
RUN echo "deb http://mirrors.aliyuncs.com/ubuntu/ trusty main universe" > /etc/apt/sources.list
RUN apt-get update && apt-get install -yqq supervisor && apt-get clean

# 容器启动命令
CMD ["supervisord"]
上面的Dockerfile创建了一个简单的镜像,并使用Supervisord启动服务。
2、安装SSH服务
首先安装所需要的软件包:
RUN apt-get install -yqq openssh-server openssh-client
创建运行目录:
RUN mkdir /var/run/sshd
设置root密码及允许root通过ssh登陆:
RUN echo 'root:shiyanlou' | chpasswd
RUN sed -i 's/PermitRootLogin without-password/PermitRootLogin yes/' /etc/ssh/sshd_config
三、完成 MongoDB Dockerfile
在上述基本的架构下,我们根据需求可以增加新的内容到Dockerfile中,完成 MongoDB Dockerfile。
进入到 shiyanloumongodb的目录编辑 Dockerfile:
cd /home/shiyanlou/shiyanloumongodb/
vim Dockerfile
1、安装最新的MongoDB
在Ubuntu最新版本下安装MongoDB非常简单,参考 MongoDB安装文档 (https://docs.mongodb.com/manual/tutorial/install-mongodb-on-ubuntu/)。有两种方法:
方法一是添加mongodb的源,执行 apt-get install mongodb-org 就可以安装下面的所有软件包:
- mongodb-org-server:mongod 服务和配置文件
- mongodb-org-mongos:mongos 服务
- mongodb-org-shell:mongo shell工具
- mongodb-org-tools:mongodump,mongoexport等工具
方法二是下载二进制包,然后解压出来就可以。
由于 MongoDB 的官网连接网速问题,我们使用第二种方案,并把最新的 MongoDB 的包放到阿里云上。
MongoDB 的下载链接如下:
http://labfile.oss-cn-hangzhou-internal.aliyuncs.com/courses/498/mongodb-linux-x86_64-ubuntu1404-3.2.3.tgz
我们完善 Dockerfile,使用 ADD 命令添加压缩包到镜像:
RUN mkdir -p /opt
ADD http://labfile.oss-cn-hangzhou-internal.aliyuncs.com/courses/498/mongodb-linux-x86_64-ubuntu1404-3.2.3.tgz /opt/mongodb.tar.gz
RUN cd /opt && tar zxvf mongodb.tar.gz && rm -rf mongodb.tar.gz
RUN mv /opt/mongodb-linux-x86_64-ubuntu1404-3.2.3 /opt/mongodb
创建 MongoDB 的数据存储目录:
RUN mkdir -p /data/db
将 MongoDB 的执行路径添加到环境变量里:
ENV PATH=/opt/mongodb/bin:$PATH
MongoDB 和 SSH 对外的端口:
EXPOSE 27017 22
2、编写Supervisord配置文件
添加Supervisord配置文件来启动mongodb和ssh,创建文件/home/shiyanlou/shiyanloumongodb/supervisord.conf,添加以下内容:
[supervisord]
nodaemon=true

[program:mongodb]
command=/opt/mongodb/bin/mongod

[program:ssh]
command=/usr/sbin/sshd -D
Dockerfile中增加向镜像内拷贝该文件的命令:
COPY supervisord.conf /etc/supervisor/conf.d/supervisord.conf
3、完整的 Dockerfile
# Version 0.1

# 基础镜像
FROM ubuntu:latest

# 维护者信息
MAINTAINER shiyanlou@shiyanlou.com

# 镜像操作命令
RUN echo "deb http://mirrors.aliyuncs.com/ubuntu/ trusty main universe" > /etc/apt/sources.list
RUN apt-get -yqq update && apt-get install -yqq supervisor
RUN apt-get install -yqq openssh-server openssh-client

RUN mkdir /var/run/sshd
RUN echo 'root:shiyanlou' | chpasswd
RUN sed -i 's/PermitRootLogin without-password/PermitRootLogin yes/' /etc/ssh/sshd_config

RUN mkdir -p /opt
ADD http://labfile.oss-cn-hangzhou-internal.aliyuncs.com/courses/498/mongodb-linux-x86_64-ubuntu1404-3.2.3.tgz /opt/mongodb.tar.gz
RUN cd /opt && tar zxvf mongodb.tar.gz && rm -rf mongodb.tar.gz
RUN mv /opt/mongodb-linux-x86_64-ubuntu1404-3.2.3 /opt/mongodb

RUN mkdir -p /data/db

ENV PATH=/opt/mongodb/bin:$PATH

COPY supervisord.conf /etc/supervisor/conf.d/supervisord.conf

EXPOSE 27017 22

# 容器启动命令
CMD ["supervisord"]
四、完成 Redis Dockerfile
在上述基本的架构下,我们根据需求可以增加新的内容到Dockerfile中,完成 Redis Dockerfile。
进入到 shiyanlouredis 的目录编辑 Dockerfile:
cd /home/shiyanlou/shiyanlouredis/
vim Dockerfile
1、安装 Redis
由于 MongoDB 中我们已经学习了如何通过二进制压缩包安装最新版本MongoDB的过程,在此安装 Redis 我们直接使用 Ubuntu 源中默认的 Redis 版本。
安装方法非常简单:
RUN apt-get install redis-server
添加对外的端口号:
EXPOSE 27017 22
2、编写Supervisord配置文件
添加Supervisord配置文件来启动 redis-server 和 ssh,创建文件/home/shiyanlou/shiyanlouredis/supervisord.conf,添加以下内容:
[supervisord]
nodaemon=true

[program:redis]
command=/usr/bin/redis-server

[program:ssh]
command=/usr/sbin/sshd -D
Dockerfile中增加向镜像内拷贝该文件的命令:
COPY supervisord.conf /etc/supervisor/conf.d/supervisord.conf
3、完整的 Dockerfile
# Version 0.1

# 基础镜像
FROM ubuntu:latest

# 维护者信息
MAINTAINER shiyanlou@shiyanlou.com

# 镜像操作命令
RUN echo "deb http://mirrors.aliyuncs.com/ubuntu/ trusty main universe" > /etc/apt/sources.list
RUN apt-get -yqq update && apt-get install -yqq supervisor redis-server
RUN apt-get install -yqq openssh-server openssh-client

RUN mkdir /var/run/sshd
RUN echo 'root:shiyanlou' | chpasswd
RUN sed -i 's/PermitRootLogin without-password/PermitRootLogin yes/' /etc/ssh/sshd_config

COPY supervisord.conf /etc/supervisor/conf.d/supervisord.conf

EXPOSE 6379 22

# 容器启动命令
CMD ["supervisord"]
五、从 Dockerfile 创建镜像
1、创建 MongoDB 镜像
进入到/home/shiyanlou/shiyanloumongodb/目录,执行创建命令。
docker build 执行创建,-t参数指定镜像名称:
docker build -t shiyanloumongodb:0.1 /home/shiyanlou/shiyanloumongodb/
docker images 查看创建的新镜像已经出现在了镜像列表中:
由该镜像创建新的容器mongodb:
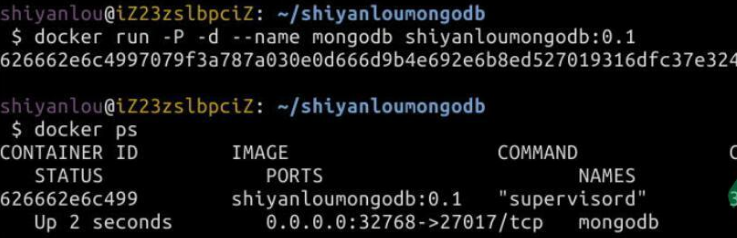
上述docker ps命令的输出可以看到 MongoDB 的端口号已经被自动映射到了本地的 32768 端口,后续步骤我们对 MongoDB 是否启动进行测试。
打开 Xfce 终端中输入下面的命令连接 mongodb 容器中的服务:

2、创建 Redis 镜像
进入到/home/shiyanlou/shiyanlouredis/目录,执行创建命令。
docker build 执行创建,-t参数指定镜像名称:

docker images 查看创建的新镜像已经出现在了镜像列表中:
由该镜像创建新的容器redis:

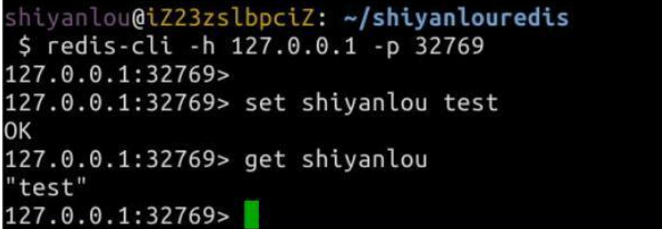
上述docker ps命令的输出可以看到 redis 的端口号已经被自动映射到了本地的 32769 端口,SSH服务的端口号也映射到了 32770 端口。
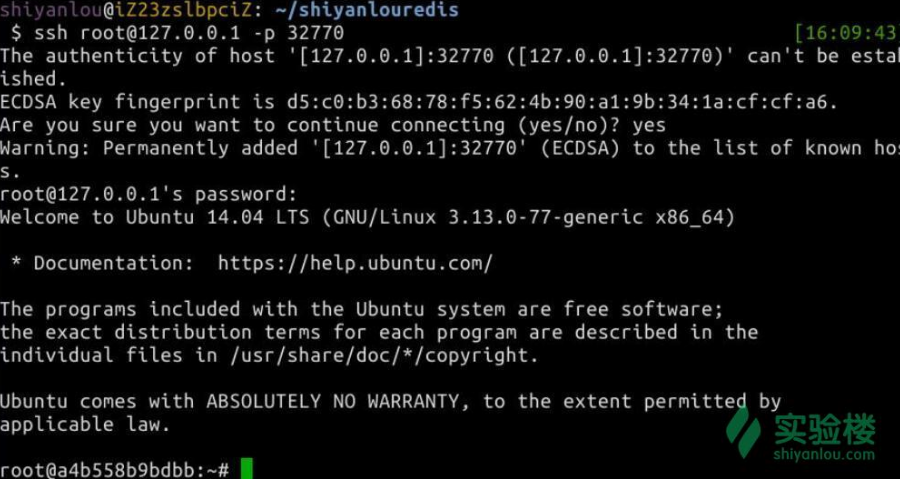
打开 Xfce 终端中输入下面的命令连接 redis 容器中的 ssh 和 redis 服务:
总结
- MongoDB 的安装
- Redis 的安装
- Dockerfile 的编写
- 从 Dockerfile 构建镜像
请务必保证自己能够动手完成整个实验,只看文字很简单,真正操作的时候会遇到各种各样的问题,解决问题的过程才是收获的过程。
作者: 东邪西毒
本文版权归作者和博客园共有,欢迎转载,但未经作者同意必须保留此段声明,且在文章页面明显位置给出原文链接,负责保留追究法律责任的权利。
