

openstack环境部署
openstack基础环境部署
配置
| 主机名 | 内存 | 硬盘 | 网卡 | 处理器 | 系统 |
| CT | 8G | 300G+300G | nat:192.168.120.10 | 4核 |
centos7.6 |
| vmnat1:192.168.100.10 | |||||
| C1 | 8G | 300G+300G | nat:192.168.120.20 | 4核 | centos7.6 |
| vmnat1:192.168.100.20 | |||||
| C2 | 8G | 300G+300G | nat:192.168.120.30 | 4核 | centos7.6 |
| vmnat1:192.168.100.30 |
环境配置
一、修改主机名
[root@server1 ~]#  hostnamectl set-hostname ct
[root@server1 ~]#  su

[root@server2 ~]#  hostnamectl set-hostname c1
[root@server2 ~]#  su

[root@server3 ~]#  hostnamectl set-hostname c2
[root@server3 ~]#  su
二、关闭防火墙,核心防护
[root@ct ~]# systemctl stop firewalld
[root@ct ~]# setenforce 0
三、修改网卡地址
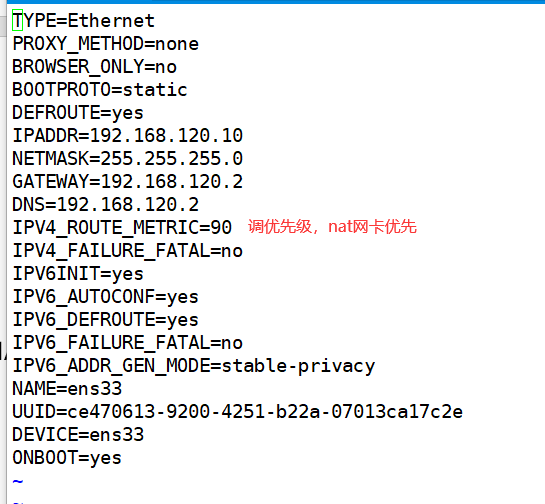
[root@ct ~]# vi /etc/sysconfig/network-scripts/ifcfg-ens33
[root@ct ~]# vi /etc/sysconfig/network-scripts/ifcfg-ens34
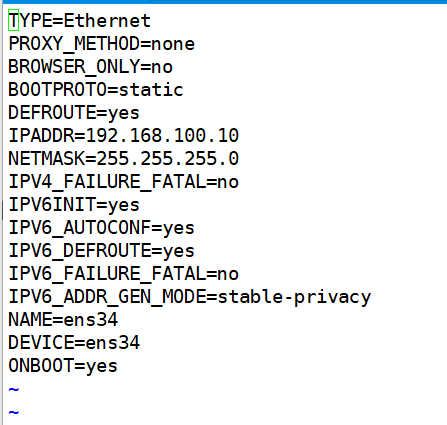
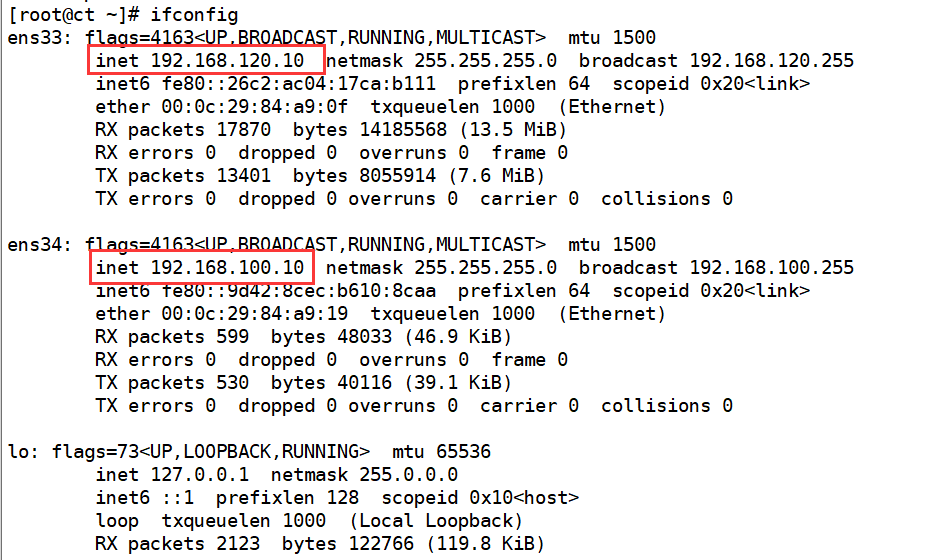
[root@ct ~]# systemctl restart network
查看
四、安装基础环境依赖包(三台均要安装)
[root@ct ~]# yum -y install net-tools bash-completion vim gcc gcc-c++ make pcre pcre-devel expat-devel cmake bzip2

[root@ct ~]# yum -y install centos-release-openstack-train python-openstackclient openstack-selinux openstack-utils
五、配置hosts
[root@ct ~]# vi /etc/hosts

[root@ct ~]# systemctl stop firewalld
[root@ct ~]# systemctl disable firewalld
[root@ct ~]# setenforce 0
六、免交互
(1)配置DNS
[root@ct ~]# vi /etc/resolv.conf

(2) 非对称秘钥
[root@ct ~]# ssh-keygen -t rsa
[root@ct ~]# ssh-copy-id ct
[root@ct ~]# ssh-copy-id c1
[root@ct ~]# ssh-copy-id c2
(3)安装时间同步环境包
[root@ct ~]# yum install chrony -y
[root@ct ~]# vim /etc/chrony.conf
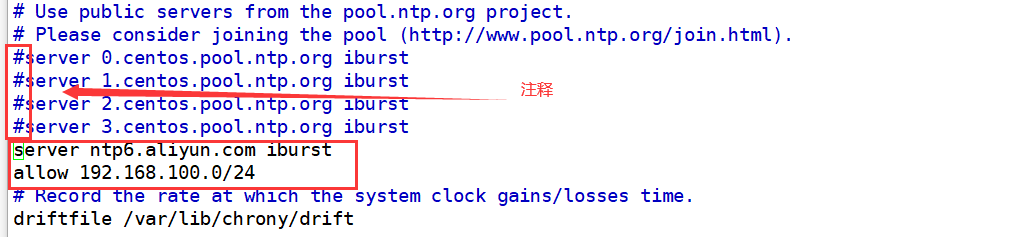
[root@ct ~]# systemctl enable chronyd
[root@ct ~]# systemctl restart chronyd
使用chronyc sources 命令查询时间同步信息

[root@ct ~]# chronyc sources

设置周期任务
[root@ct ~]# crontab -l

七、系统环境配置,配置服务(控制节点)
[root@ct ~]# yum -y install mariadb mariadb-server python2-PyMySQL
###此包用于openstack的控制端连接mysql所需要的模块,如果不安装,则无法连接数据库;此包只安装在控制
[root@ct ~]# yum -y install libibverbs
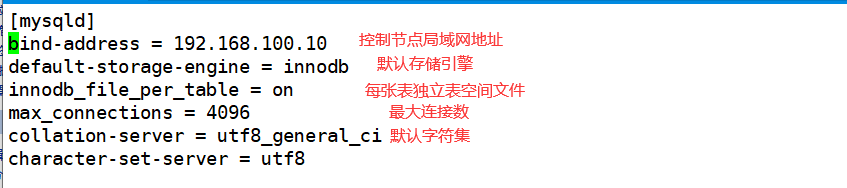
添加MySQL子配置文件,增加如下内容
[root@ct ~]# vim /etc/my.cnf.d/openstack.cnf
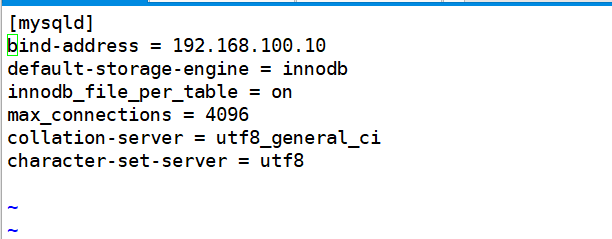
[root@ct ~]# vim /etc/my.cnf.d/openstack.cnf
设置服务开机启动
[root@ct my.cnf.d]# systemctl enable mariadb
[root@ct my.cnf.d]# systemctl start mariadb
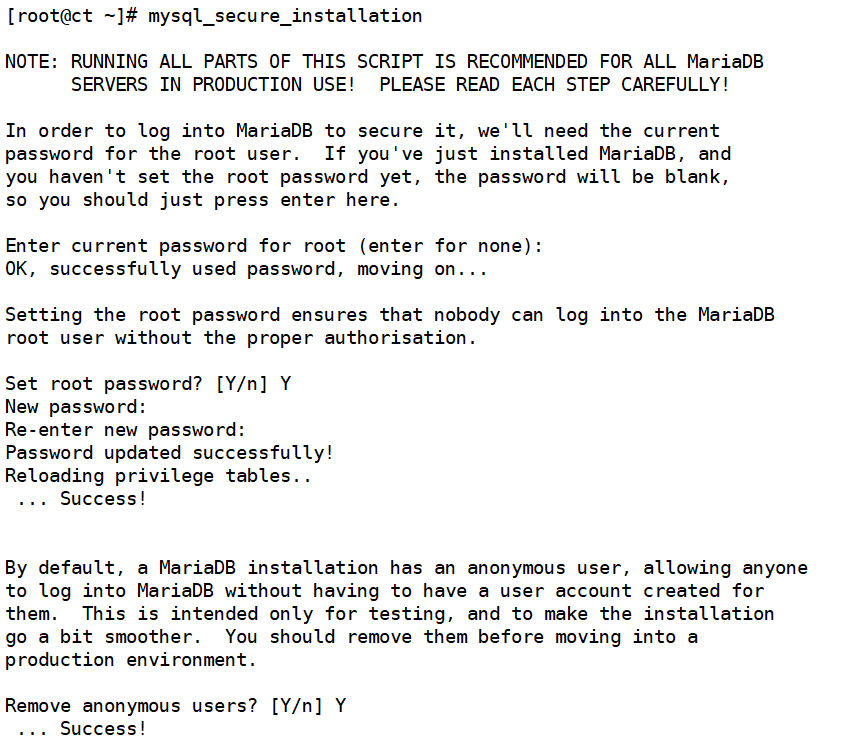
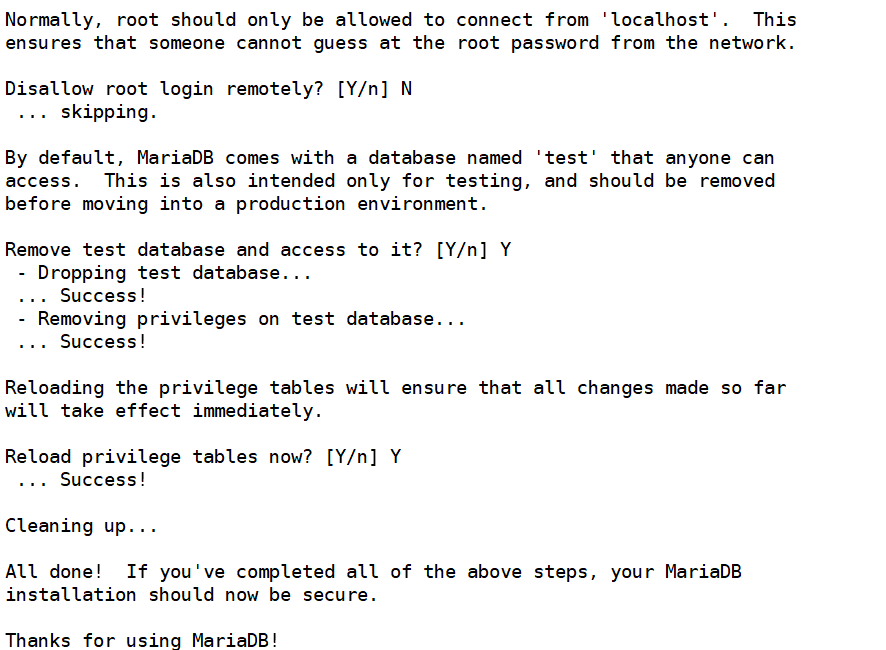
执行MariaDB安全配置脚本
[root@ct ~]# mysql_secure_installation
八、安装RabbitMQ
所有创建虚拟机的指令,控制端都会发送到rabbitmq,node节点监听rabbitmq
[root@ct ~]# yum -y install rabbitmq-server
配置服务,启动RabbitMQ服务,并设置其开机启动。
[root@ct ~]# systemctl enable rabbitmq-server.service
[root@ct ~]# systemctl start rabbitmq-server.service
创建消息队列用户,用于controler和node节点连接rabbitmq的认证
[root@ct ~]# rabbitmqctl add_user openstack RABBIT_PASS
Creating user "openstack"
配置openstack用户的操作权限(正则,配置读写权限)
[root@ct ~]# rabbitmqctl set_permissions openstack ".*" ".*" ".*"
Setting permissions for user "openstack" in vhost "/"
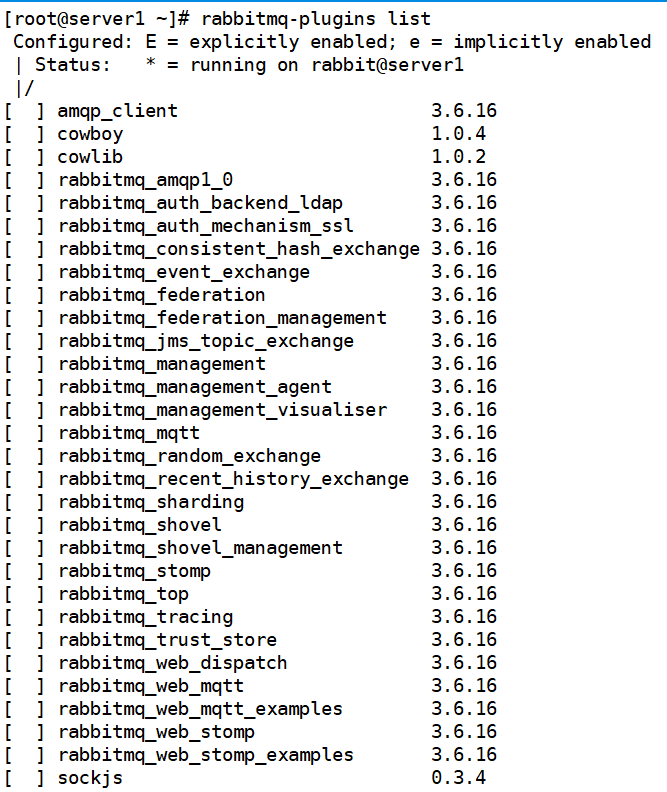
查看rabbitmq插件列表
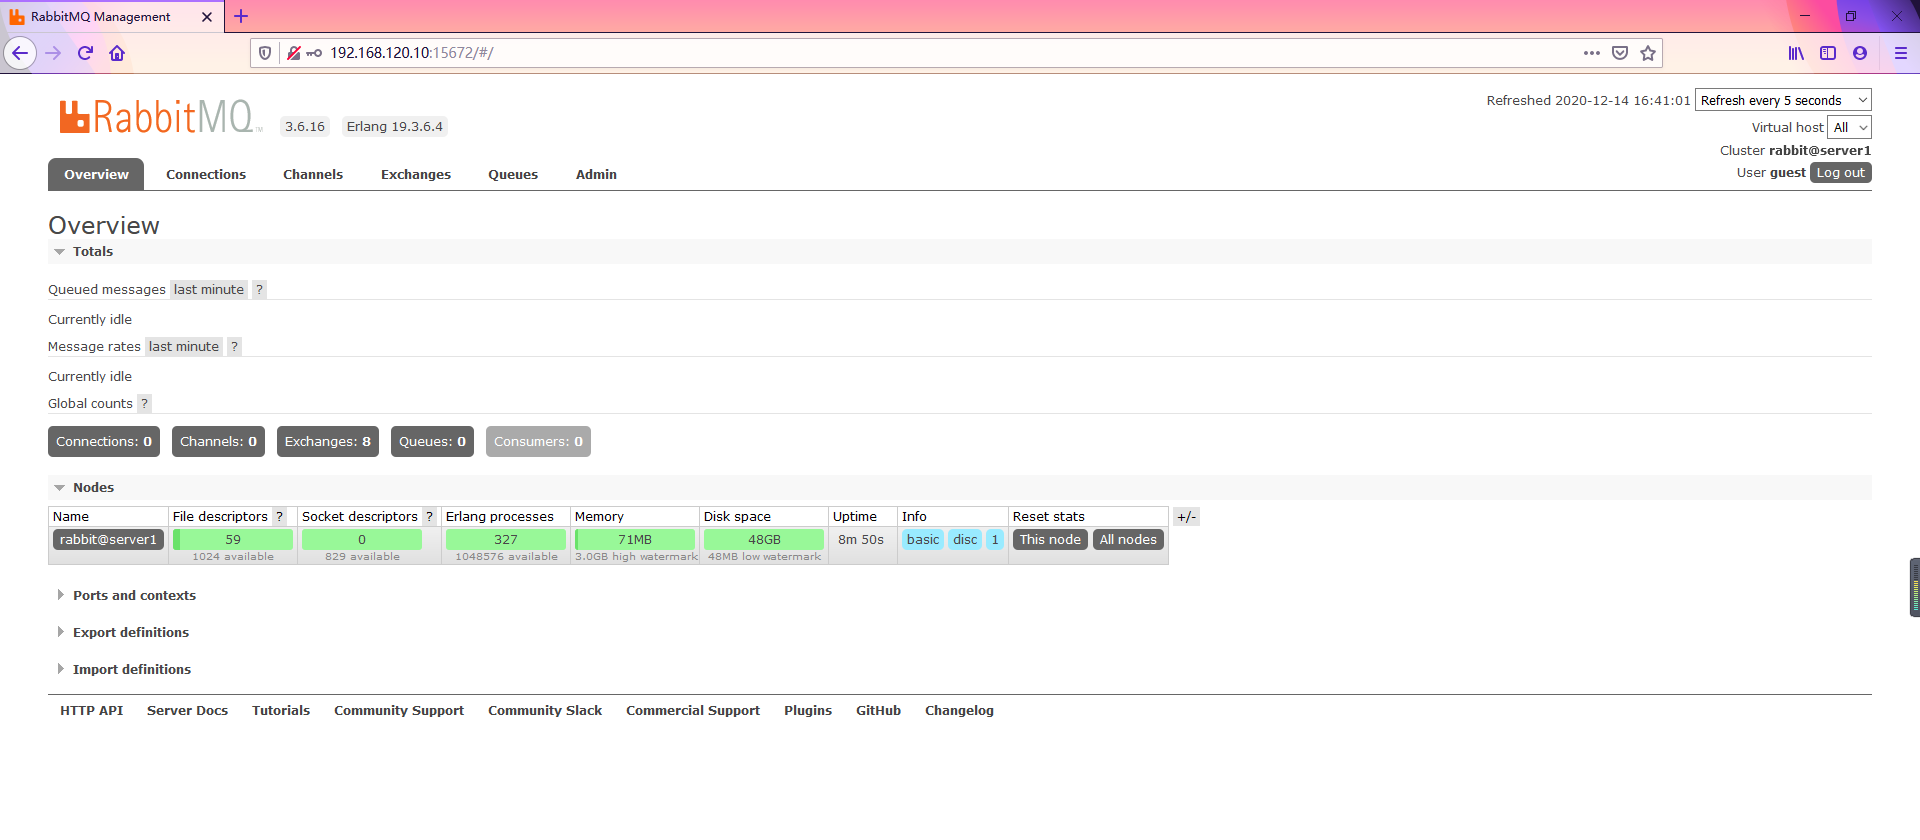
开启rabbitmq的web管理界面的插件,端口为15672
[root@ct ~]# rabbitmq-plugins enable rabbitmq_management
查看25672和5672 两个端口(5672是Rabbitmq默认端口,25672是Rabbit的测试工具CLI的端口)

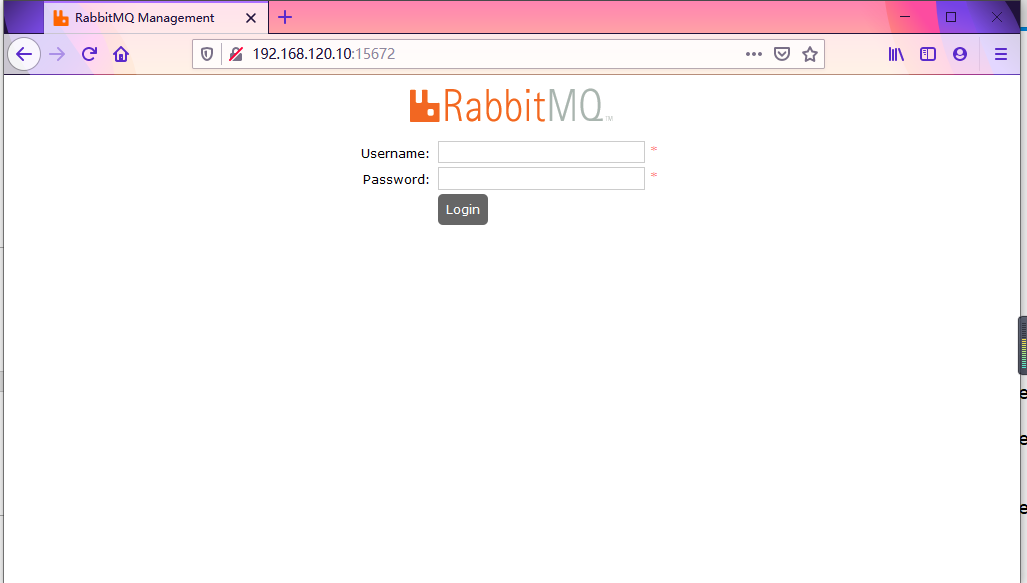
网页访问http://192.168.120.10:15672
帐号密码默认都是guest
九、安装memcached
作用:安装memcached是用于存储session信息;服务身份验证机制使用Memcached来缓存令牌 在登录openstack的dashboard时,会产生一些session信息,这些session信息会存放到memcached中
安装memcached
[root@ct ~]# yum install -y memcached python-memcached
#python-*模块在OpenStack中起到连接数据库的作用
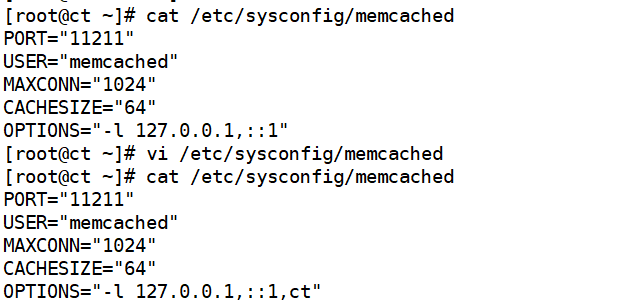
修改Memcached配置文件
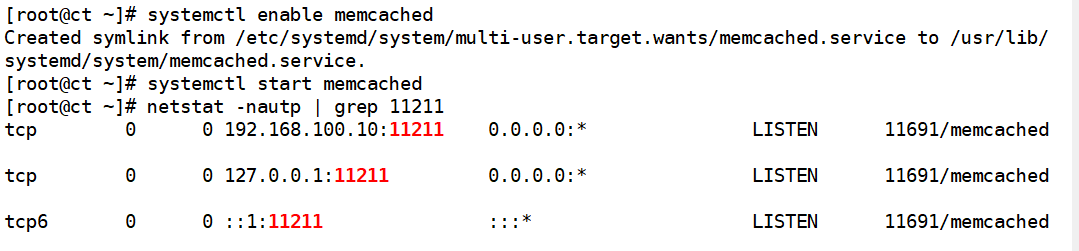
[root@ct ~]# systemctl enable memcached
[root@ct ~]# systemctl start memcached
十、etcd
安装
[root@ct ~]# yum -y install etcd
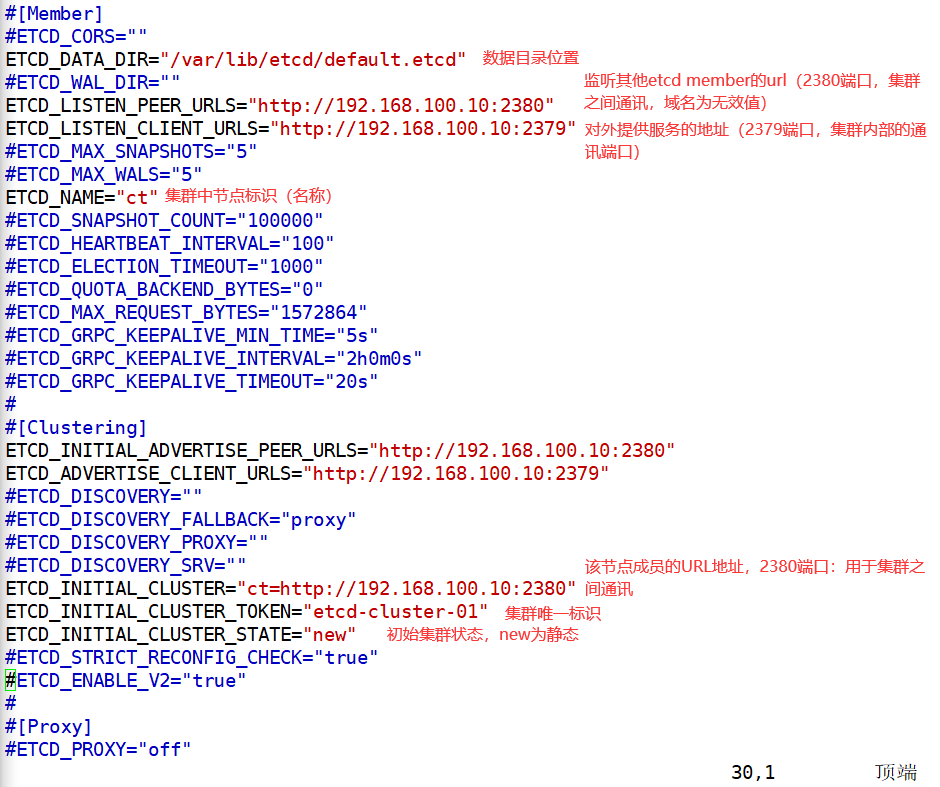
修改etcd配置文件
[root@ct ~]# vim /etc/etcd/etcd.conf
开机自启动、开启服务,检测端口
[root@ct ~]# systemctl enable etcd.service
[root@ct ~]# systemctl start etcd.service
[root@ct ~]# netstat -anutp |grep 2379
[root@ct ~]# netstat -anutp |grep 2380


部署keystone服务部署
配置
| 主机名 | 内存 | 硬盘 | 网卡 | 处理器 | 系统 |
| CT | 8G | 300G+300G | nat:192.168.120.10 | 4核 |
centos7.6 |
| vmnat1:192.168.100.10 | |||||
| C1 | 8G | 300G+300G | nat:192.168.120.20 | 4核 | centos7.6 |
| vmnat1:192.168.100.20 | |||||
| C2 | 8G | 300G+300G | nat:192.168.120.30 | 4核 | centos7.6 |
| vmnat1:192.168.100.30 |
keystone组件部署
在部署openstack组件时,需先行安装认证服务(keystone),而认证服务是使用Apache运行的,安装完成后才可以创建、管理账号,然后安装镜像服务(glance)、计算服务(nova)、网络服务(neutron)
其中计算服务和网络服务分为管理端和客户端,所以需要在openstack的管理端安装计算服务和网络服务的管理端,在创建虚拟机的node节点上安装计算服务和网络服务的客户端,最后安装dashboard服务,openstack各种组件的API都是通过apache运行的;
openstack的管理端负责创建虚拟机过程的调度
通过openstack管理端创建虚拟机的相关数据最终都会记录到mysql(mariadb)中;node节点没有权限往数据库中写数据,只有控制端有权限,并且node节点与控制端通讯是通过rabbitmq间接通讯,node节点会监听rabbitmq,控制端也会监听rabbitmq,控制端把创建虚拟机的指令发送到rabbitmq,由监听rabbitmq指定队列的node节点接收消息并创建虚拟机;
创建数据库实例和数据库用户
[root@ct ~]# mysql -u root -p
MariaDB [(none)]> create database keystone;
MariaDB [(none)]> GRANT ALL PRIVILEGES ON keystone.* TO 'keystone'@'localhost' IDENTIFIED BY 'KEYSTONE_DBPASS';
MariaDB [(none)]> GRANT ALL PRIVILEGES ON keystone.* TO 'keystone'@'%' IDENTIFIED BY 'KEYSTONE_DBPASS';
MariaDB [(none)]> flush privileges;
MariaDB [(none)]> exit
安装、配置keystone、数据库、Apache
安装keystone、httpd、mod_wsgi
mod_wsgi包的作用是让apache能够代理pythone程序的组件;openstack的各个组件,包括API都是用python写的,但访问的是apache,apache会把请求转发给python去处理,这些包只安装在controler节点
[root@ct ~]# yum -y install openstack-keystone httpd mod_wsgi
[root@ct ~]# cp -a /etc/keystone/keystone.conf{,.bak}
[root@ct ~]# grep -Ev "^$|#" /etc/keystone/keystone.conf.bak > /etc/keystone/keystone.conf
  通过pymysql模块访问mysql,指定用户名密码、数据库的域名、数据库名
[root@ct ~]# openstack-config --set /etc/keystone/keystone.conf database connection mysql+pymysql://keystone:KEYSTONE_DBPASS@ct/keystone
指定token的提供者;提供者就是keystone自己本身
[root@ct ~]# openstack-config --set /etc/keystone/keystone.conf token provider fernet
####Fernet:一种安全的消息传递格式
初始化认证服务数据库
[root@ct ~]# su -s /bin/sh -c "keystone-manage db_sync" keystone
初始化fernet 密钥存储库(以下命令会生成两个密钥,生成的密钥放于/etc/keystone/目录下,用于加密数据)
[root@ct keystone]# keystone-manage fernet_setup --keystone-user keystone --keystone-group keystone
[root@ct keystone]# keystone-manage credential_setup --keystone-user keystone --keystone-group keystone
配置bootstrap身份认证服务
[root@ct ~]# keystone-manage bootstrap --bootstrap-password ADMIN_PASS \
--bootstrap-admin-url http://ct:5000/v3/ \
--bootstrap-internal-url http://ct:5000/v3/ \
--bootstrap-public-url http://ct:5000/v3/ \
--bootstrap-region-id RegionOne        #指定一个区域名称
配置Apache HTTP服务器
[root@ct ~]# echo "ServerName controller" >> /etc/httpd/conf/httpd.conf
创建配置文件
安装完mod_wsgi包后,会生成 wsgi-keystone.conf 这个文件,文件中配置了虚拟主机及监听了5000端口,mod_wsgi就是python的网关
[root@ct ~]# ln -s /usr/share/keystone/wsgi-keystone.conf /etc/httpd/conf.d/
[root@ct conf.d]# systemctl enable httpd
Created symlink from /etc/systemd/system/multi-user.target.wants/httpd.service to /usr/lib/systemd/system/httpd.service.
[root@ct conf.d]# systemctl start httpd          ####开启服务
配置管理员账户的环境变量
这些环境变量用于创建角色和项目使用,但是创建角色和项目需要有认证信息,所以通过环境变量声明用户名和密码等认证信息,欺骗openstack已经登录且通过认证,这样就可以创建项目和角色;也就是把admin用户的验证信息通过声明环境变量的方式传递给openstack进行验证,实现针对openstack的非交互式操作
[root@ct ~]# cat >> ~/.bashrc << EOF
export OS_USERNAME=admin            #控制台登陆用户名
export OS_PASSWORD=ADMIN_PASS    #控制台登陆密码
export OS_PROJECT_NAME=admin
export OS_USER_DOMAIN_NAME=Default
export OS_PROJECT_DOMAIN_NAME=Default
export OS_AUTH_URL=http://ct:5000/v3
export OS_IDENTITY_API_VERSION=3
export OS_IMAGE_API_VERSION=2
EOF
[root@ct ~]# source ~/.bashrc
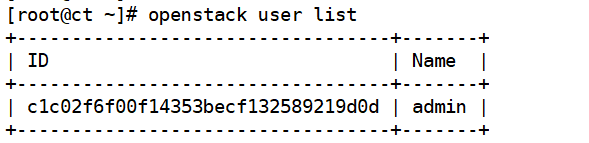
通过配置环境变量,可以使用openstack命令进行一些操作,示例:
[root@ct ~]# openstack user list
创建OpenStack 域、项目、用户和角色
创建域和项目
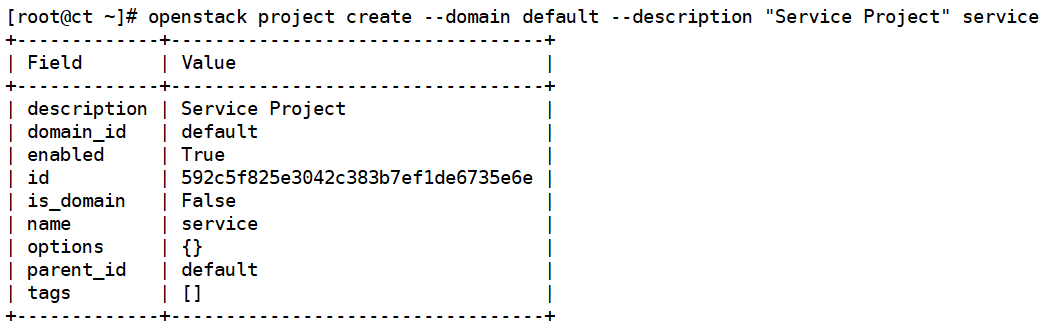
创建一个项目(project),创建在指定的domain(域)中,指定描述信息,project名称为service(可使用openstack domain list 查询)
[root@ct ~]# openstack project create --domain default --description "Service Project" service
创建角色
[root@ct ~]# openstack role create user

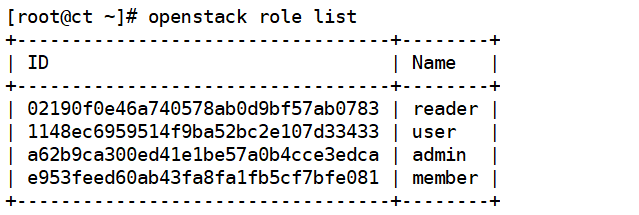
查看openstack 角色列表
[root@ct ~]# openstack role list
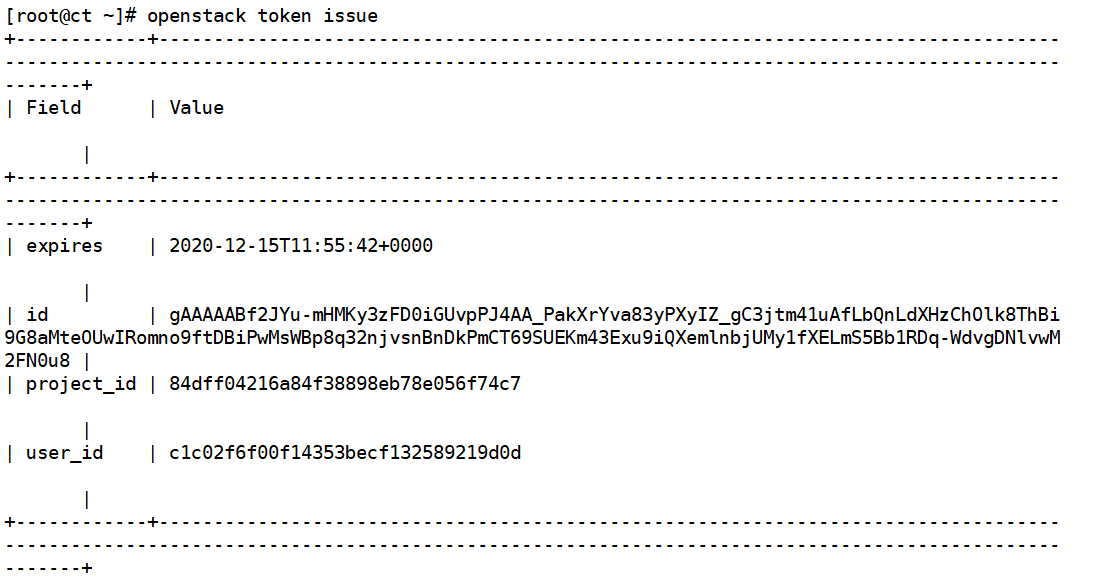
查看是否可以不指定密码就可以获取到token信息(验证认证服务)
[root@ct ~]# openstack token issue
glance镜像服务部署
一、Openstack镜像服务组件
glance-api
接收镜像API的调用,诸如镜像发现、恢复、存储。
glance-registry
存储、处理和恢复镜像的元数据,元数据包括项诸如大小和类型。
数据库
存放镜像元数据,用户是可以依据个人喜好选择数据库的,多数的部署使用MySQL或SQLite。
镜像文件的存储仓库
支持各种存储库类型,包括普通文件系统(或安装在glance-api控制器节点上的任何文件系统),对象存储,RADOS块设备,VMware数据存储区和HTTP。 请注意,某些存储库仅支持只读用法。
元数据定义服务
通用的API,是用于为厂商,管理员,服务,以及用户自定义元数据。这种元数据可用于不同的资源,例如镜像,工件,卷,配额以及集合。一个定义包括了新属性的键,描述,约束以及可以与之关联的资源的类型。
二、安装和配置镜像服务
一、创建数据库实例和数据库用户
[root@ct ~]# mysql -u root -p
MariaDB [(none)]> CREATE DATABASE glance;
MariaDB [(none)]> GRANT ALL PRIVILEGES ON glance.* TO 'glance'@'localhost' IDENTIFIED BY 'GLANCE_DBPASS';
MariaDB [(none)]> GRANT ALL PRIVILEGES ON glance.* TO 'glance'@'%' IDENTIFIED BY 'GLANCE_DBPASS';
MariaDB [(none)]> flush privileges;
MariaDB [(none)]> exit
二、创建用户、修改配置文件
创建OpenStack的Glance用户
#创建用户前,需要首先执行管理员环境变量脚本(此处已经在~/.bashrc 中定义过了)
[root@ct ~]# openstack user create --domain default --password GLANCE_PASS glance ###创建glance用户

[root@ct ~]# openstack role add --project service --user glance admin #将glance用户添加到service项目中,并且针对这个项目拥有admin权限;注册glance的API,需要对service项目有admin权限
[root@ct ~]# openstack service create --name glance --description "OpenStack Image" image 创建一个service服务,service名称为glance,类型为image;创建完成后可以通过 openstack service list 查看

● 创建镜像服务 API 端点,OpenStack使用三种API端点代表三种服务:admin、internal、public
[root@ct ~]# openstack endpoint create --region RegionOne image public http://ct:9292

[root@ct ~]# openstack endpoint create --region RegionOne image internal http://ct:9292

[root@ct ~]# openstack endpoint create --region RegionOne image admin http://ct:9292

● 安装 openstack-glance 软件包。
[root@ct ~]# yum -y install openstack-glance
● 修改glance配置文件,glance有两个配置文件:/etc/glance/glance-api.conf
/etc/glance/glance-registry.conf
[root@ct ~]# cp -a /etc/glance/glance-api.conf{,.bak}
[root@ct ~]# grep -Ev '^$|#' /etc/glance/glance-api.conf.bak > /etc/glance/glance-api.conf
修改glance-api.conf配置
[root@ct ~]# cp -a /etc/glance/glance-api.conf{,.bak}
[root@ct ~]# grep -Ev '^$|#' /etc/glance/glance-api.conf.bak > /etc/glance/glance-api.conf
openstack-config --set /etc/glance/glance-api.conf database connection mysql+pymysql://glance:GLANCE_DBPASS@ct/glance
openstack-config --set /etc/glance/glance-api.conf keystone_authtoken www_authenticate_uri http://ct:5000
openstack-config --set /etc/glance/glance-api.conf keystone_authtoken auth_url http://ct:5000
openstack-config --set /etc/glance/glance-api.conf keystone_authtoken memcached_servers ct:11211
openstack-config --set /etc/glance/glance-api.conf keystone_authtoken auth_type password
openstack-config --set /etc/glance/glance-api.conf keystone_authtoken project_domain_name Default
openstack-config --set /etc/glance/glance-api.conf keystone_authtoken user_domain_name Default
openstack-config --set /etc/glance/glance-api.conf keystone_authtoken project_name service
openstack-config --set /etc/glance/glance-api.conf keystone_authtoken username glance
openstack-config --set /etc/glance/glance-api.conf keystone_authtoken password GLANCE_PASS
openstack-config --set /etc/glance/glance-api.conf paste_deploy flavor keystone
openstack-config --set /etc/glance/glance-api.conf glance_store stores file,http
openstack-config --set /etc/glance/glance-api.conf glance_store default_store file
openstack-config --set /etc/glance/glance-api.conf glance_store filesystem_store_datadir /var/lib/glance/images/
修改glance-registry.conf 配置文件
[root@ct ~]# cp -a /etc/glance/glance-registry.conf{,.bak}
[root@ct ~]# grep -Ev '^$|#' /etc/glance/glance-registry.conf.bak > /etc/glance/glance-registry.conf
openstack-config --set /etc/glance/glance-registry.conf database connection mysql+pymysql://glance:GLANCE_DBPASS@ct/glance
openstack-config --set /etc/glance/glance-registry.conf keystone_authtoken www_authenticate_uri http://ct:5000
openstack-config --set /etc/glance/glance-registry.conf keystone_authtoken auth_url http://ct:5000
openstack-config --set /etc/glance/glance-registry.conf keystone_authtoken memcached_servers ct:11211
openstack-config --set /etc/glance/glance-registry.conf keystone_authtoken auth_type password
openstack-config --set /etc/glance/glance-registry.conf keystone_authtoken project_domain_name Default
openstack-config --set /etc/glance/glance-registry.conf keystone_authtoken user_domain_name Default
openstack-config --set /etc/glance/glance-registry.conf keystone_authtoken project_name service
openstack-config --set /etc/glance/glance-registry.conf keystone_authtoken username glance
openstack-config --set /etc/glance/glance-registry.conf keystone_authtoken password GLANCE_PASS
openstack-config --set /etc/glance/glance-registry.conf paste_deploy flavor keystone
openstack-config --set /etc/glance/glance-registry.conf glance_store stores file,http
openstack-config --set /etc/glance/glance-registry.conf glance_store default_store file
openstack-config --set /etc/glance/glance-registry.conf glance_store filesystem_store_datadir /var/lib/glance/images/
● 初始化glance数据库,生成相关表结构;(不管有多少个controler,只需要初始化一次即可)
su -s /bin/sh -c "glance-manage db_sync" glance
● 开启glance服务(此处开启之后会生成存放镜像的目录/var/lib/glance/image)
[root@ct ~]# systemctl enable openstack-glance-api.service
[root@ct ~]# systemctl start openstack-glance-api.service
● 查看端口(也可以使用lsof -i:9292 )
[root@ct glance]# netstat -natp | grep 9292

● 赋予openstack-glance-api.service服务对存储设备的可写权限(-h:值对符号连接/软链接的文件修改)
[root@ct ~]# chown -hR glance:glance /var/lib/glance/

 浙公网安备 33010602011771号