

rsync远程同步
关于rsync
Remote Sync,远程同步,它是一个开源的快速增量备份工具,可以在不同主机之间镜像同步整个目录树
支持增量备份、保持连接和权限,且采用优化的同步算法,传输前执行压缩,因此分床适用于异地备份、镜像服务器等应用
支持本地复制,或者与其他SSH、rsync主机同步
配置rsync源服务器
rsync同步源:指备份操作的远程服务器,也称为备份源
一、配置rsync源
在同步源服务器上操作
安装httpd环境
[root@localhost ~]# yum -y install httpd
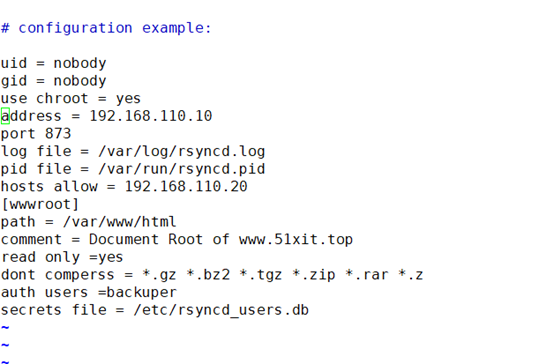
配置文件rsyncd.conf
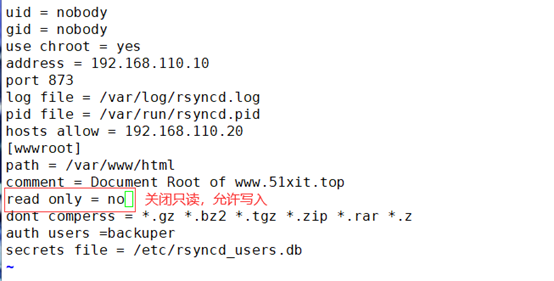
uid = nobody
gid = nobody
use chroot = yes
address = 192.168.110.10
port 873
log file = /var/log/rsyncd.log
pid file = /var/run/rsyncd.pid
hosts allow = 192.168.110.20
[wwwroot]
path = /var/www/html
comment = Document Root of www.51xit.top
read only =yes
dont comperss = *.gz *.bz2 *.tgz *.zip *.rar *.z
auth users =backuper
secrets file = /etc/rsyncd_users.db
rsync账号文件
[root@localhost ~]# vim /etc/rsyncd_users.db
backuper:liu123
[root@localhost ~]# chmod 600 /etc/rsyncd_users.db

启用rsync服务
[root@localhost ~]# rsync –daemon

在 /var/www/html目录中,新建文件
[root@localhost ~# cd /var/www/html/
[root@localhost html]# vim liu.html
this is liu
[root@localhost html]# vim wei.html
this is wei
此时服务端的源就设置好了
二、本地端(客户端)配置
1、使用rsync备份工具
rsync命令的用法与cp命令差不多
2、示例
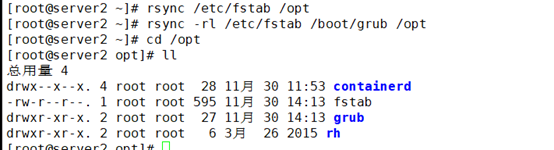
[root@localhost ~]# rsync /etc/fstab /opt
[root@localhost ~]# rsync -rl /etc/fstab /boot/grub /opt
配置源的两种表示方法
格式1:用户名@主机地址::共享模块名
格式2: rsync://用户名@主机地址/共享模块名
rsync [选项] 原始位置 目标位置
常用选项
-a:归档模式,递归并保留对象属性,等同于 -rlptgoD
-v:显示同步过程的详细(verbose)信息
-z:在传输文件时进行压缩(compress)
-H:保留硬连接文件
-A:保留ACL属性信息
–delete:删除目标位置有而原始位置没有的文件
–checksum:根据对象的校验和来决定是否跳过文件
1)格式1示例
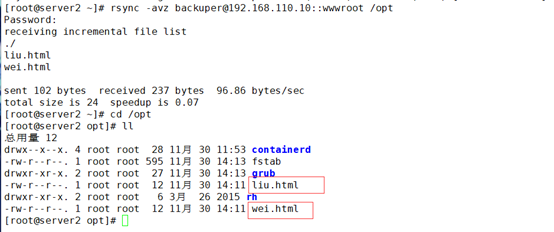
rsync -avz backuper@192.168.110.10::wwwroot /opt
2)格式2示例
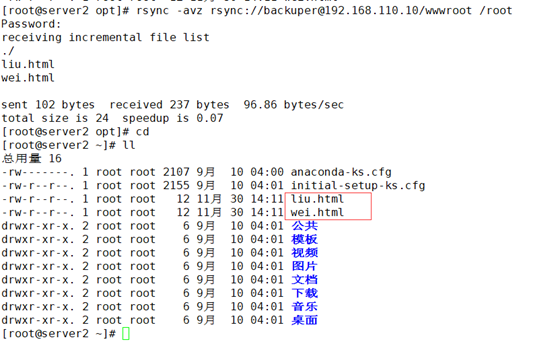
rsync -avz rsync://backuper@192.168.110.10/wwwroot /root
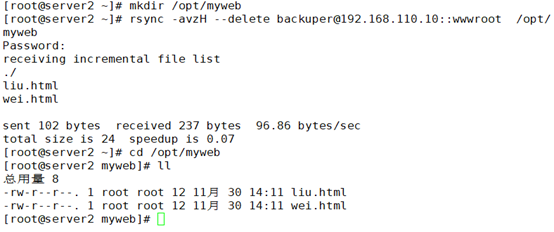
3)rsync同步操作
在客户机上操作192.168.110.20
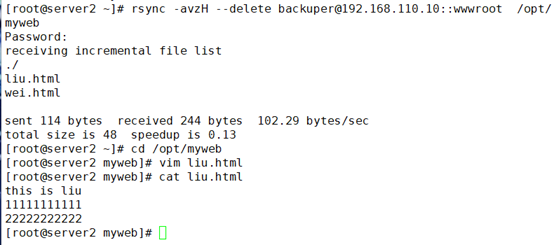
[root@server2 ~]# rsync -avzH --delete backuper@192.168.110.10::wwwroot /opt/myweb
Password:
receiving incremental file list
./
liu.html
wei.html
sent 102 bytes received 237 bytes 96.86 bytes/sec
total size is 24 speedup is 0.07
[root@server2 ~]# cd /opt/myweb
[root@server2 myweb]# ll
总用量 8
-rw-r--r--. 1 root root 12 11月 30 14:11 liu.html
-rw-r--r--. 1 root root 12 11月 30 14:11 wei.html
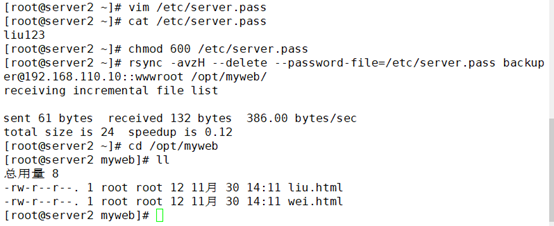
4)免交互
rsync源的免交互处理:使用 --password-file= 密码文件
在rsync源上更改kgc.html文件以及在客户端更改accp.html文件,重新同步后查看:
未变更前
rsync源文件: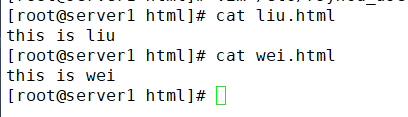
客户端文件: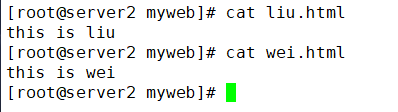
变更后
Rsync源文件:
客户端文件: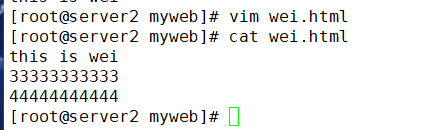
重新同步后查看
rsync源文件变更后,客户端重新同步会覆盖之前的老文件,更新为rsync源变更后的新文件;而客户端文件变更,重新同步后还是会同步rsync源文件。所以,同步是以rsync源文件为基准的,只参照rsync源
#添加周期性计划任务
每天晚上10点半对服务器网站目录更新一次
[root@server2 myweb]# crontab -e
30 22 * * * /usr/bin/rsync -az --delete --password-file=/etc/server.pass backuper@192.168.110.10::wwwroot /opt/myweb/
[root@server2 myweb]# systemctl restart crond
[root@server2 myweb]# systemctl enable crond
rsync实时同步
1、定期同步的不足
执行备份的时间固定,延迟明显、实时性差
当同步源长期不变化时,密集的定期任务是不必要的
2、实时同步的优点
一旦同步源出现变化,立即启动备份
只要同步源无变化,则不执行备份
源端设置
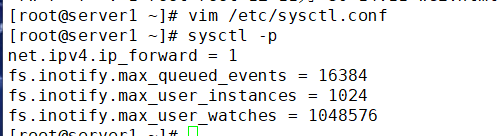
[root@server1 ~]# vim /etc/rsyncd.conf
rsync+inotify实时同步
max_queue_events:监控队列大小
max_user_instances:最多监控实例数
max_user_watches:每个实例最多监控文件数
在本端客户端建立监控机制
调整inotify内核参数,末尾添加
重启rsync服务
[root@server1 ~]# kill $(cat /var/run/rsyncd.pid)
[root@server1 ~]# rsync --daemon
[root@server1 ~]# netstat -anpt |grep rsync
tcp 0 0 192.168.110.10:873 0.0.0.0:* LISTEN 56366/rsync
客户端配置
#安装inotify-tools辅助工具
inotifywait:用于持续监控,实时输出结果
inotifywatch:用于短期监控,任务完成后再出结果
上传inotify-tools-3.14.tar.gz到/opt目录下
[root@server2 myweb]# cd /opt
[root@server2 opt]# tar xzvf inotify-tools-3.14.tar.gz
[root@server2 opt]# cd inotify-tools-3.14/
[root@server2 inotify-tools-3.14]# ./configure
[root@server2 inotify-tools-3.14]# make && make install
测试inotifywait监控命令是否正常使用
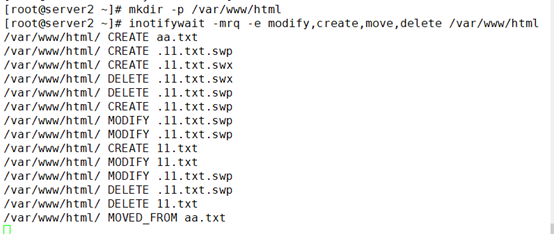
[root@server2 ~]# mkdir -p /var/www/html
[root@server2 ~]# inotifywait -mrq -e modify,create,move,delete /var/www/html
上面命令执行后处于监控状态,不能操作,开启一个新的终端设备
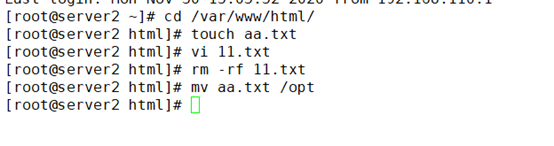
监控端查看
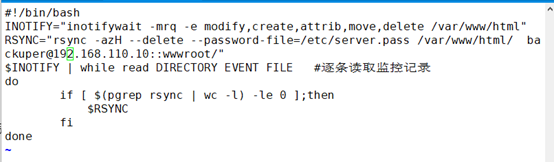
编写触发式同步脚本
vi /opt/inotify.sh
#!/bin/bash
INOTIFY="inotifywait -mrq -e modify,create,attrib,move,delete /var/www/html"
RSYNC="rsync -azH --delete --password-file=/etc/server.pass /var/www/html/ backuper@192.168.110.10::wwwroot/"
$INOTIFY | while read DIRECTORY EVENT FILE #逐条读取监控记录
do
if [ $(pgrep rsync | wc -l) -le 0 ];then
$RSYNC
fi
done
[root@server2 ~]# chmod +x /opt/inotify.sh 添加执行权限
两边的同步目录权限都设置为777
[root@server1 ~]# chmod 777 /var/www/html/
[root@server2 opt]# chmod 777 /var/www/html/
运行脚本
[root@server2 opt]# ./inotify.sh
客户端/var/www/html目录下创建目录
[root@server2 html]# touch liu.txt
[root@server2 html]# touch wei.txt
[root@server2 html]# touch 007.txt
查看源端/var/www/html目录,新建的和原来就存在的文件都成功同步,且属主属组均为nobody用户
[root@server1 ~]# cd /var/www/html/
[root@server1 html]# ll
总用量 0
-rw-r--r--. 1 nobody nobody 0 11月 30 15:45 liu.txt
-rw-r--r--. 1 nobody nobody 0 11月 30 15:45 wei.txt
-rw-r--r--. 1 nobody nobody 0 11月 30 15:47 007.txt

 浙公网安备 33010602011771号