12-关于DOM操作的相关案例
12-关于DOM操作的相关案例
1.模态框案例
需求:
打开网页时有一个普通的按钮,点击当前按钮显示一个背景图,中心并弹出一个弹出框,点击X的时候会关闭当前的模态框
代码如下:

<!DOCTYPE html>
<html>
    <head>
        <meta charset="UTF-8">
        <title></title>
        <style type="text/css">
            *{
                padding: 0;
                margin: 0;
            }
            html,body{
                height: 100%;
            }
            #box{
                width: 100%;
                height: 100%;
                background: rgba(0,0,0,.3);
            }
            #content{
                position: relative;
                top: 150px;
                width: 400px;
                height: 200px;
                line-height: 200px;
                text-align: center;
                color: red;
                background-color: #fff;
                margin: auto;
            }
            #span1{
                position: absolute;
                background-color: red;
                top: 0;
                right: 0;
                width: 30px;
                height: 30px;
                line-height: 30px;
                text-align: center;
                color: #fff;

            }
        </style>
    </head>
    <body>
        <button id="btn">弹出</button>
    </body>
    <script type="text/javascript">
        //获取dom元素 1.获取事件源
        var oBtn = document.getElementById('btn');
        //创建弹出模态框的相关DOM对象
        var oDiv = document.createElement('div');
        var oP = document.createElement('p');
        var oSpan = document.createElement('span');


        // 设置属性
        oDiv.id = 'box';
        oP.id = 'content'
        oP.innerHTML = '模态框成功弹出'
        oSpan.innerHTML = 'X';
        oSpan.id = 'span1'

        // 追加元素
        oDiv.appendChild(oP);
        oP.appendChild(oSpan);

        // 点击弹出按钮 弹出模态框
        oBtn.onclick = function(){
            //动态的添加到body中一个div
            this.parentNode.insertBefore(oDiv,oBtn)

        }
        // 点击X 关闭模态框
        oSpan.onclick = function(){
            // 移除oDiv元素
            oDiv.parentNode.removeChild(oDiv)
        }

    </script>
</html>
2.简易留言板
需求:
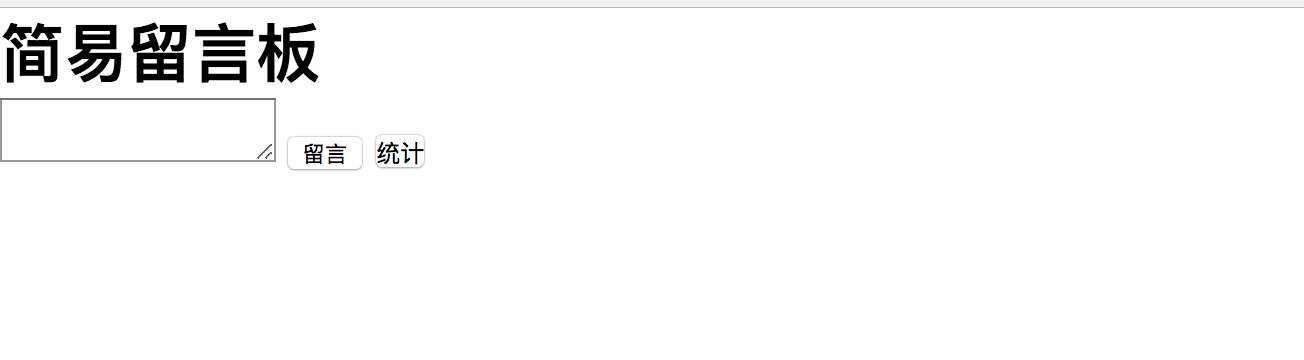
当在textarea中输入内容,点击留言按钮,会添加到浏览器中
图如下:
代码如下:
<!DOCTYPE html>
<html>
    <head>
        <meta charset="UTF-8">
        <title>留言板</title>
        <style type="text/css">
            *{
                padding: 0;
                margin: 0;
            }
            .close{
                display: inline-block;
                width: 20px;
                height: 20px;
                line-height: 20px;
                text-align: center;
                cursor: pointer;
                background-color: rgba(0,0,0,.1);
                margin-left: 20px;
            }
        </style>
    </head>
    <body>
        <h1>简易留言板</h1>
        <div id="box">
            <!--<ul>

            </ul>-->

        </div>
        <textarea id="msg"></textarea>
        <input type="button" id="btn" value="留言"/>
        <button onclick="sum()">统计</button>
    </body>
    <script type="text/javascript">

        // 0 将ul标签添加到div#box标签中
        var oUl = document.createElement('ul');
        var oBox = document.getElementById('box');
        oBox.appendChild(oUl);

        var oBtn = document.getElementById('btn');
        var oMsg = document.getElementById('msg')
        // 控制留言的总数量
        var count = 0;
        oBtn.onclick = function(){


            // 点击留言按钮事件操作
            // 1.创建li标签
            var oLi = document.createElement('li');
            //2.设置内容
            oLi.innerHTML = oMsg.value + "<span class='close'>X</span>"

            // 3.如果想在插入的第一个li获取的前面继续添加li标签
            //3.1获取li标签
            var olis = document.getElementsByTagName('li');
             //3.2 如果是第一次添加的li标签,则直接添加到ul的后面
            if(olis.length == 0){
                oUl.appendChild(oLi);
                count++;

            }else{
                // 3.3 如果不是第一次添加的li标签,则插入到第一个li标签的前面
                oUl.insertBefore(oLi,olis[0]);
                count++;
            }
            // 4.添加完成之后 清空textarea的值
            oMsg.value = '';


            // 5.点击X的时候删除当前的一条数据
            //5.1先获取所有的X
            var oSpans = document.getElementsByTagName('span');

            // 5.2for循环 对所有的X添加点击事件
            for(var i = 0; i< oSpans.length; i++){
                oSpans[i].onclick  = function(){
                    // 5.3 移除当前的li标签
                    oUl.removeChild(this.parentNode)
                    count--;
                }
            }


        }

        function sum(){
            alert('一共发布了'+count+'条留言');

        }
    </script>
</html>
3.使用js模拟选择器中hover
<!DOCTYPE html>
<html>
<head lang="en">
    <meta charset="UTF-8">
    <title></title>
    <style>
        button {
            margin: 10px;
            width: 100px;
            height: 40px;
            cursor: pointer;
        }
        .current {
            background-color: red;
        }
    </style>
</head>
<body>
<button>按钮1</button>
<button>按钮2</button>
<button>按钮3</button>
<button>按钮4</button>
<button>按钮5</button>

<script>
    //需求:鼠标放到哪个button上,改button变成黄色背景(添加类)


    var btnArr = document.getElementsByTagName("button");
    //绑定事件
    for(var i=0;i<btnArr.length;i++){   //要为每一个按钮绑定事件,所以用到了for循环
        btnArr[i].onmouseover = function () {
            //【重要】排他思想:先把所有按钮的className设置为空,然后把我(this)这个按钮的className设置为current
            //排他思想和for循环连用
            for(var j=0;j<btnArr.length;j++){
                btnArr[j].className = "";
            }
            this.className = "current";  //【重要】核心代码
        }
    }

    //鼠标离开current时,还原背景色
    for(var i=0;i<btnArr.length;i++){   //要为每一个按钮绑定事件,所以用到了for循环
        btnArr[i].onmouseout = function () { //鼠标离开任何一个按钮时,就把按钮的背景色还原
            this.className = "";
        }
    }

</script>

</body>


</html>
代码解释:
鼠标悬停时,current栏变色,这里用到了排他思想:先把所有按钮的className设置为空,然后把我(this)这个按钮的className设置为current,就可以达到变色的效果。核心代码是:
            //排他思想:先把所有按钮的className设置为空,然后把我(this)这个按钮的className设置为current
            //排他思想和for循环连用
            for(var j=0;j<btnArr.length;j++){
                btnArr[j].className = "";
            }
            this.className = "current";
4.tab栏选项卡
代码如下:
<!DOCTYPE html>
<html>
    <head>
        <meta charset="UTF-8">
        <title></title>
        <style type="text/css">
            *{
                padding: 0;
                margin: 0;
            }
            ul{
                list-style: none;
            }
            #tab{
                width: 480px;
                margin: 20px auto;
                border: 1px solid red;
            }
            ul{
                width: 100%;
                overflow: hidden;
            }
            ul li{
                float: left;
                width: 160px;
                height: 60px;
                line-height: 60px;
                text-align: center;
                background-color: #cccccc;
            }

            ul li a{
                text-decoration: none;
                color:black;
            }
            li.active{
                background-color: red;
            }
            p{
                display: none;
                height: 200px;
                text-align: center;
                line-height: 200px;
                background-color: red;
            }
            p.active{
                display: block;

            }

        </style>
    </head>
    <body>
        <div id="tab">
            <ul>
                <li class="active">
                    <a href="#">首页</a>
                </li>
                <li>
                    <a href="#">新闻</a>
                </li>
                <li>
                    <a href="#">图片</a>
                </li>
            </ul>
            <p class="active">首页内容</p>
            <p>新闻内容</p>
            <p>图片内容</p>


        </div>
    </body>
    <script type="text/javascript">
        window.onload = function(){
            // //需求:鼠标放到上面的li上,li本身变色(添加类),对应的p也显示出来(添加类);
                    //思路:1.点亮上面的盒子。   2.利用索引值显示下面的盒子。

            var tabli = document.getElementsByTagName('li');
            var tabContent = document.getElementsByTagName('p')

            for(var i = 0; i < tabli.length; i++){
                // 绑定索引值(新增一个自定义属性:index属性)
                tabli[i].index  = i;
                tabli[i].onclick = function(){

                    // 1.点亮上面的盒子。   2.利用索引值显示下面的盒子。(排他思想)
                    for(var j = 0; j < tabli.length; j++){
                        tabli[j].className = '';
                        tabContent[j].className = '';
                    }
                    this.className = 'active'

                    tabContent[this.index].className = 'active';//【重要代码】
                }
        }
        }

    </script>
</html>


<!DOCTYPE html>
<html lang="en">
<head>
    <meta charset="UTF-8">
    <title>Document</title>
</head>
<body>
<a href="#/home">首页</a>
<a href="#/kecheng">课程</a>
<div id="app"></div>
<script>
    window.onhashchange = function () {
        //location.hash 打印出href属性
        console.log(location.hash);
        switch (location.hash){
            case '#/home':
                document.getElementById('app').innerHTML='<h1>这个是首页</h1>';
                break;
            case '#/kecheng':
                document.getElementById('app').innerHTML = '<h1>这个课程首页</h1>';
                break;
            default:
                break;
        }
    }
</script>
</body>
</html>
<!DOCTYPE html>
<html>
    <head>
        <meta charset="UTF-8">
        <title></title>
        <style>
            *{
                padding: 0px;
            }
            ul{
                list-style: none;
            }
            #tab{
                width: 480px;
                border: 1px solid red;
                margin: 20px auto;
            }
            ul{
                overflow: hidden;
                width: 100%;
            }
            ul li {
                float: left;
                width: 160px;
                height: 60px;
                line-height: 60px;
                background-color: #ccc;
                text-align: center;
            }
            ul li a{
                text-decoration: none;
                color: black;
            }
            li.active{
                background-color: red;
            }
            p{
                display: none;
                height: 200px;
                text-align: center;
                line-height: 200px;
                background-color: red;
            }
            p.active{
                display: block;
            }
        </style>
    </head>
    <body>
    <div id="tab">
        <ul>
            <li class="active">
                <a href="#">首页</a>
            </li>
            <li>
                <a href="#">新闻</a>
            </li>
            <li>
                <a href="#">图片</a>
            </li>
        </ul>
        <p class="active">首页内容</p>
        <p >新闻内容</p>
        <p>图片内容</p>
    </div>
    <script>
        var oli = document.getElementsByTagName('li');
        var ops = document.getElementsByTagName('p');
        var i ;
        for(i=0 ;i<oli.length;i++){
            oli[i].index = i;
            console.log(oli[i]);
            oli[i].onclick=function () {
                for(var j =0;j<oli.length;j++){
                    oli[j].className='';
                    ops[j].className='';
                }
                this.className ='active';
                ops[this.index].className ='active';
            }
        }
//        console.log(oli);
    </script>
    </body>
</html>
<!DOCTYPE html>
<html>
    <head>
        <meta charset="UTF-8">
        <title></title>

    </head>
    <body>
    <script>
       //变量提升
       /*  单独执行这个模块
       var a
        console.log(a);   //执行结果undefined
        a = 2;
        console.log(a);  //执行结果为2
  */
     /*
      单独执行这个模块
        var a;
        console.log(a); //执行结果undefined
        {
             a = 3;
            console.log(a);  //执行结果为3
        }
        console.log(a); //执行结果为3  因为变量提升了
*/
     /*
     单独执行这个模块
        var a ;
         console.log(a); //执行结果undefined
        {
            //let声明的变量不会存在变量提升,属于局部作用域
            let a  = 3;
            console.log(a);   //执行结果为3
        }
         console.log(a); //执行结果undefined
*/

    </script>

    </body>
</html>
<!DOCTYPE html>
<html>
    <head>
        <meta charset="UTF-8">
        <title></title>
        <style>
            *{
                padding: 0px;
            }
            ul{
                list-style: none;
            }
            #tab{
                width: 480px;
                border: 1px solid red;
                margin: 20px auto;
            }
            ul{
                overflow: hidden;
                width: 100%;
            }
            ul li {
                float: left;
                width: 160px;
                height: 60px;
                line-height: 60px;
                background-color: #ccc;
                text-align: center;
            }
            ul li a{
                text-decoration: none;
                color: black;
            }
            li.active{
                background-color: red;
            }
            p{
                display: none;
                height: 200px;
                text-align: center;
                line-height: 200px;
                background-color: red;
            }
            p.active{
                display: block;
            }
        </style>
    </head>
    <body>
    <div id="tab">
        <ul>
            <li class="active">
                <a href="#">首页</a>
            </li>
            <li>
                <a href="#">新闻</a>
            </li>
            <li>
                <a href="#">图片</a>
            </li>
        </ul>
        <p class="active">首页内容</p>
        <p >新闻内容</p>
        <p>图片内容</p>
    </div>
    <script>
        let oli = document.getElementsByTagName('li');
        let op = document.getElementsByTagName('p');
        //let只在局部变量生效
        for (let i = 0;i<oli.length;i++){
            console.log(oli[i]);
//            oli[i].index = i;
            oli[i].onclick =function () {
                for(let j = 0;j<oli.length;j++){
                    oli[j].className='';
                    op[j].className='';
                }
                this.className='active';
                op[i].className='active';
//                op[this.index].className='active';
            }
        }
    </script>
    </body>
</html>
5、购物车案例
代码如下:
<!DOCTYPE html>
<html lang="en">
<head>
    <meta charset="UTF-8">
    <title></title>
    <style type="text/css">
        *{
            padding: 0;
            margin: 0;
        }
        .box{
            width: 500px;
            height: 400px;
            margin: 100px auto;
            background-color: rgba(255,255,255,0.4);
            position: relative;

        }
        .car{
            width: 150px;
            height: 30px;
            background-color: #fff;
            padding-left: 30px;
            position: absolute;
            left: 130px;
            top: 3px;
            z-index: 3;
            border: 1px solid green;

        }
        .shop{
            width: 310px;
            height: 70px;
            background-color: #fff;
            position: absolute;
            top:33px;
            left: 0;
            display: none;

        }
        div.c{

            border-bottom-width: 0;

        }
        div.t{
            border:  1px solid green;
        }
    </style>
</head>
<body>
    <div class="box">
        <div class="car" id="myCar">我的购物车</div>
        <div class="shop t" id="shop"></div>
    </div>
    <script type="text/javascript">
        var myCar =  document.getElementById('myCar');
        var shop  = document.getElementById('shop');
        myCar.onmouseover = function(){
            shop.style.display = 'block';
            myCar.className +=' c';
        }
        myCar.onmouseout = function(){
            shop.style.display = 'none';
            myCar.removeAttribute('class');
            myCar.className = 'car';
        }
    </script>
</body>
</html>

 浙公网安备 33010602011771号