6.集合 数据结构
【1】算法:
(1)可以解决具体问题 :例如 1+2+3+4+。。。+99+100
解题流程=算法
(2)有设计解决的具体的流程
算法1: 1+2=3 3+3=6 6+4=10.....加到100 --》5050
算法2:(1+100)*50=101*50=5050-->高斯算法
(3)有评价这个算法的具体的指标 --》时间复杂度 空间复杂度(从数学角度考虑)
---------------------------------------------------------------------
【2】数据结构:就是在计算机的缓存,内存,硬盘 如何组织管理数据的。重点在结构上,是按照什么结构来组织管理我们的数据。
数据结构分为:
(1)逻辑结构 :--》思想上的结构--》卧室,厨房,卫生间 ---》线性表(数组,链表),图,树,栈,队列
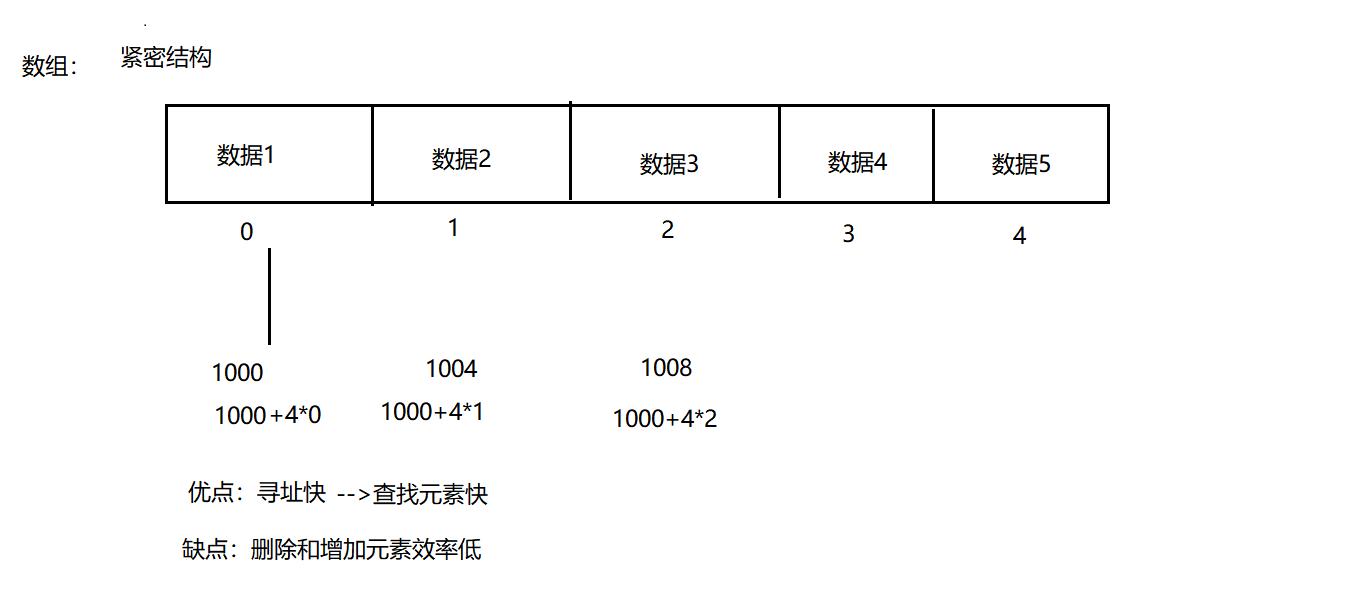
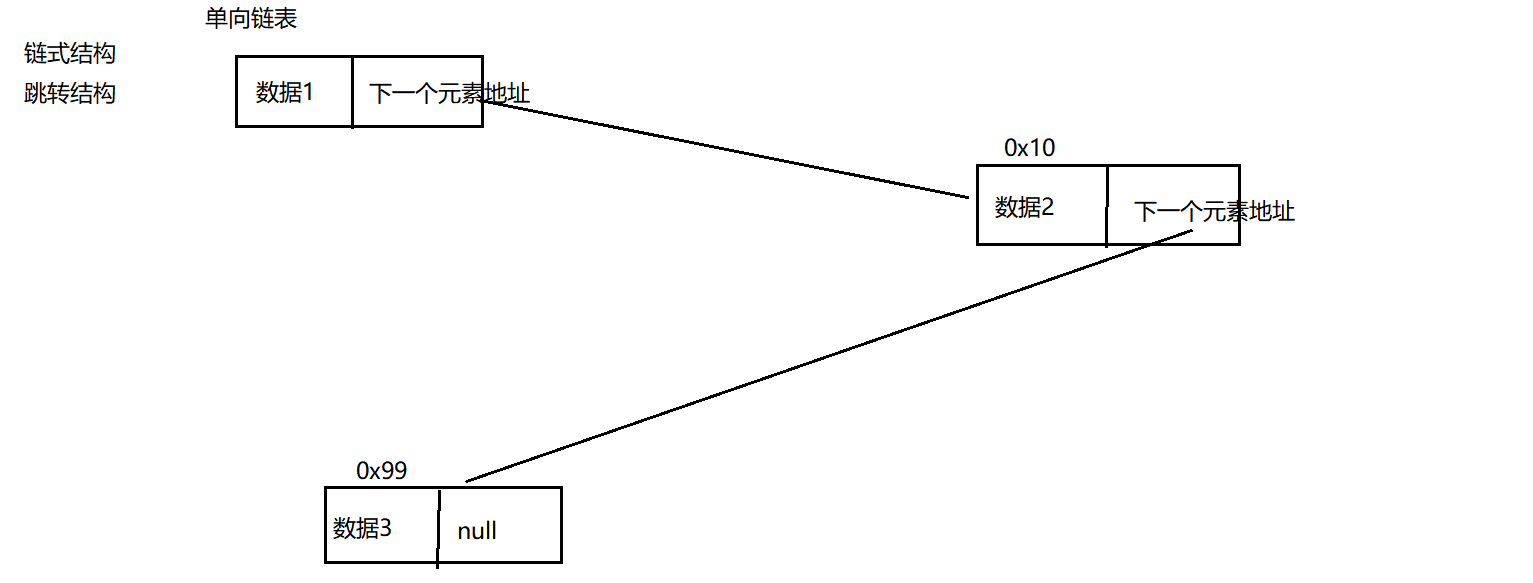
(2)物理结构 :--》真实结构--》钢筋混凝土+牛顿力学------》紧密结构(顺序结构),跳转结构(链式结构)
【3】紧密结构(顺序结构),跳转结构(链式结构)
以线性表为例:
线性表的逻辑结构如图所示:

线性表特点:
线性表是n个类型相同数据元素的有限序列,通常记作a0,a1,,,ai-1,ai,ai+1,,,,,an-1)。
1.相同数据类型
在线性表的定义中,我们看到从a0到an-1的n个数据元素是具有相同属件的亓素。
比如说可以都是数字,例如(12,23,45,56,45);
也可以是宇符,例如(A,B,....Z)
当然也可以是具有更复杂结构的数据元素,例如学生、商品、装备等。
相同数据类型意味着在内存中存储时,每个元素会占用相同的内存空间,便于后续的查询定位。
2.序列(顺序性)
在线性表的相邻数据元素之间存在若序偶关系,
即ai-1是ai的直接前驱,则ai是ai-1的直接后续,
同时ai又是ai+1的直接前驱,ai+1是ai的直接后续。
唯一没有直接前驱的元素a0 一端称为表头,唯一没有后续的元素an-1一端称为表尾。
除了表头和表尾元素外,任何一个元素都有且仅有一个直接前驱和直接后继。
3.有限
线件表中数据元素的个数n定义为线性表的长度, n是个有限值。
当n=0时线性表为空表,
在非空的线性表中每个数据元索在线性表中都有唯一确定的序号,
例如a0的序号是0 ,ai的序号是i。
在一个具有n>0个数据元素的线性表中,数据元素序号的范围是[O, n-1]。
逻辑结构和物理结构的关系:
线性表逻辑结构,对应的真实结构如果是紧密结构---》典型就是 数组:
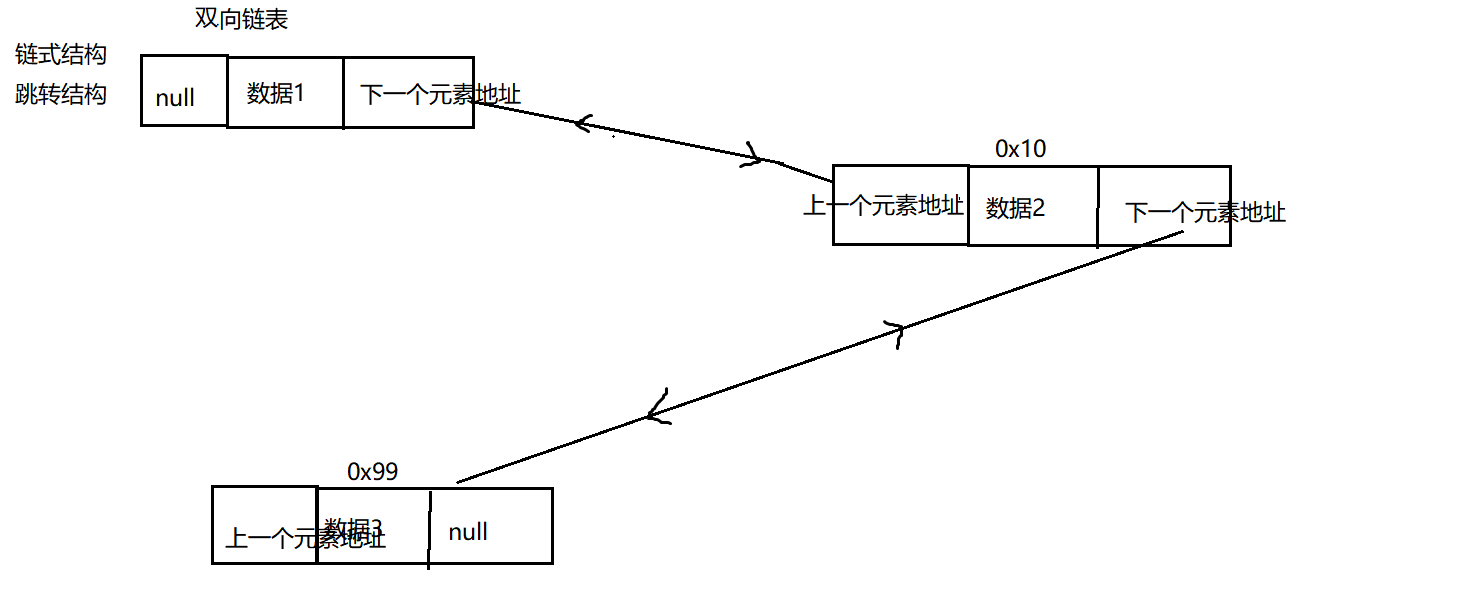
线性表逻辑结构,对应的真实结构如果是跳转结构---》典型就是 链表:
优点:删除元素,插入元素效率高
缺点:查询元素效率低
集合
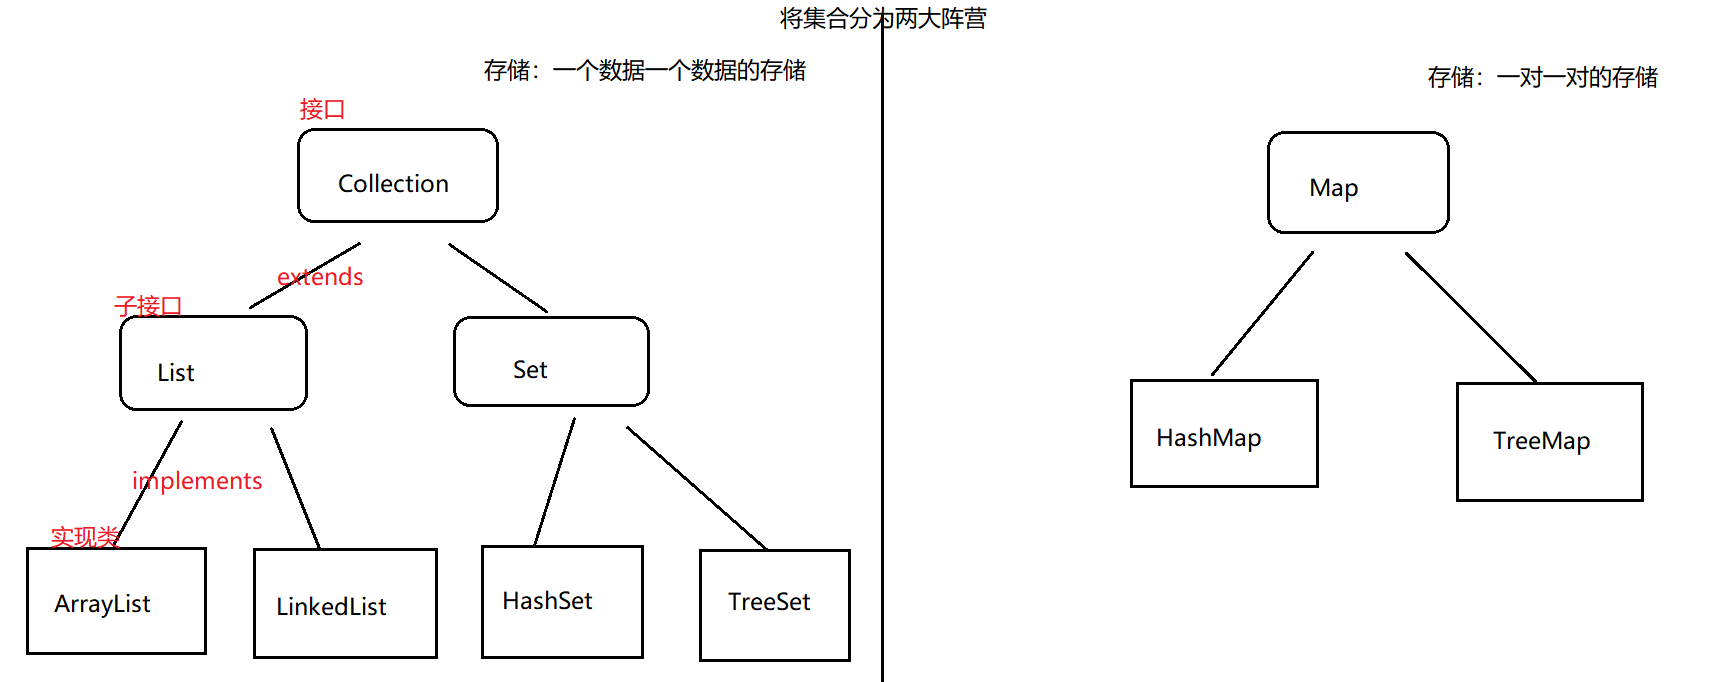
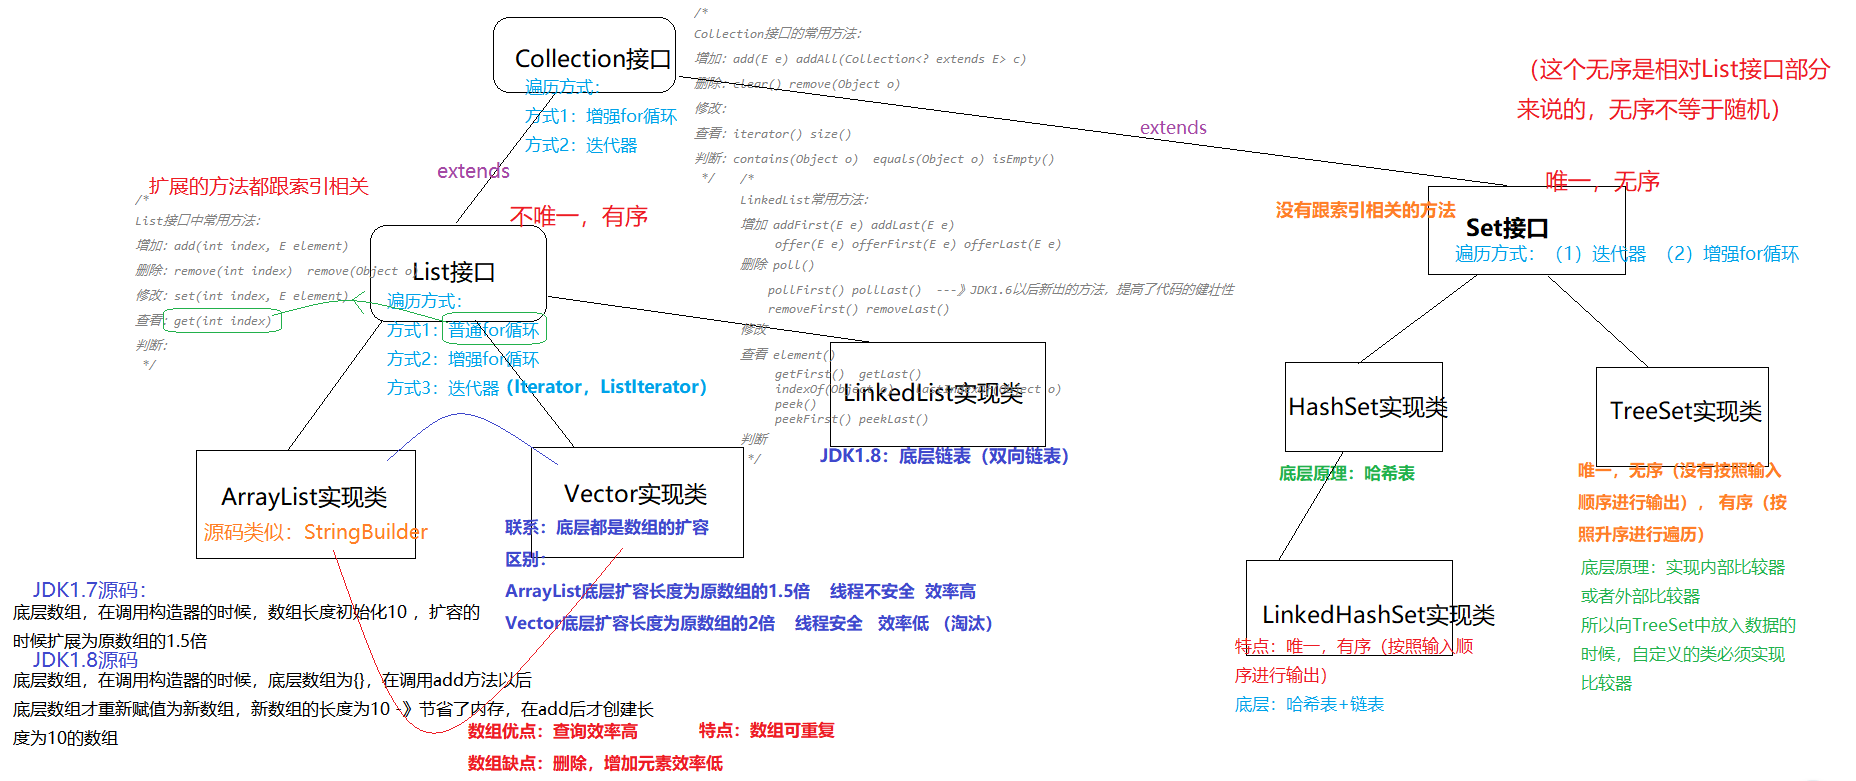
Colletion接口:
1.Colletion接口常用方法
public class Test01 {
//这是main方法,程序的入口
public static void main(String[] args) {
/*
Collection接口的常用方法:
增加:add(E e) addAll(Collection<? extends E> c)
删除:clear() remove(Object o)
修改:
查看:iterator() size()
判断:contains(Object o) equals(Object o) isEmpty()
*/
//创建对象:接口不能创建对象,利用实现类创建对象:
Collection col = new ArrayList();
//调用方法:
//集合有一个特点:只能存放引用数据类型的数据,不能是基本数据类型
//基本数据类型自动装箱,对应包装类。int--->Integer
col.add(18);
col.add(12);
col.add(11);
col.add(17);
System.out.println(col/*.toString()*/);
List list = Arrays.asList(new Integer[]{11, 15, 3, 7, 1});
col.addAll(list);//将另一个集合添加入col中
System.out.println(col);
//col.clear();清空集合
System.out.println(col);
System.out.println("集合中元素的数量为:"+col.size());
System.out.println("集合是否为空:"+col.isEmpty());
boolean isRemove = col.remove(15);
System.out.println(col);
System.out.println("集合中数据是否被删除:"+isRemove);
Collection col2 = new ArrayList();
col2.add(18);
col2.add(12);
col2.add(11);
col2.add(17);
Collection col3 = new ArrayList();
col3.add(18);
col3.add(12);
col3.add(11);
col3.add(17);
System.out.println(col2.equals(col3));
System.out.println(col2==col3);//地址一定不相等 false
System.out.println("是否包含元素:"+col3.contains(117));
}
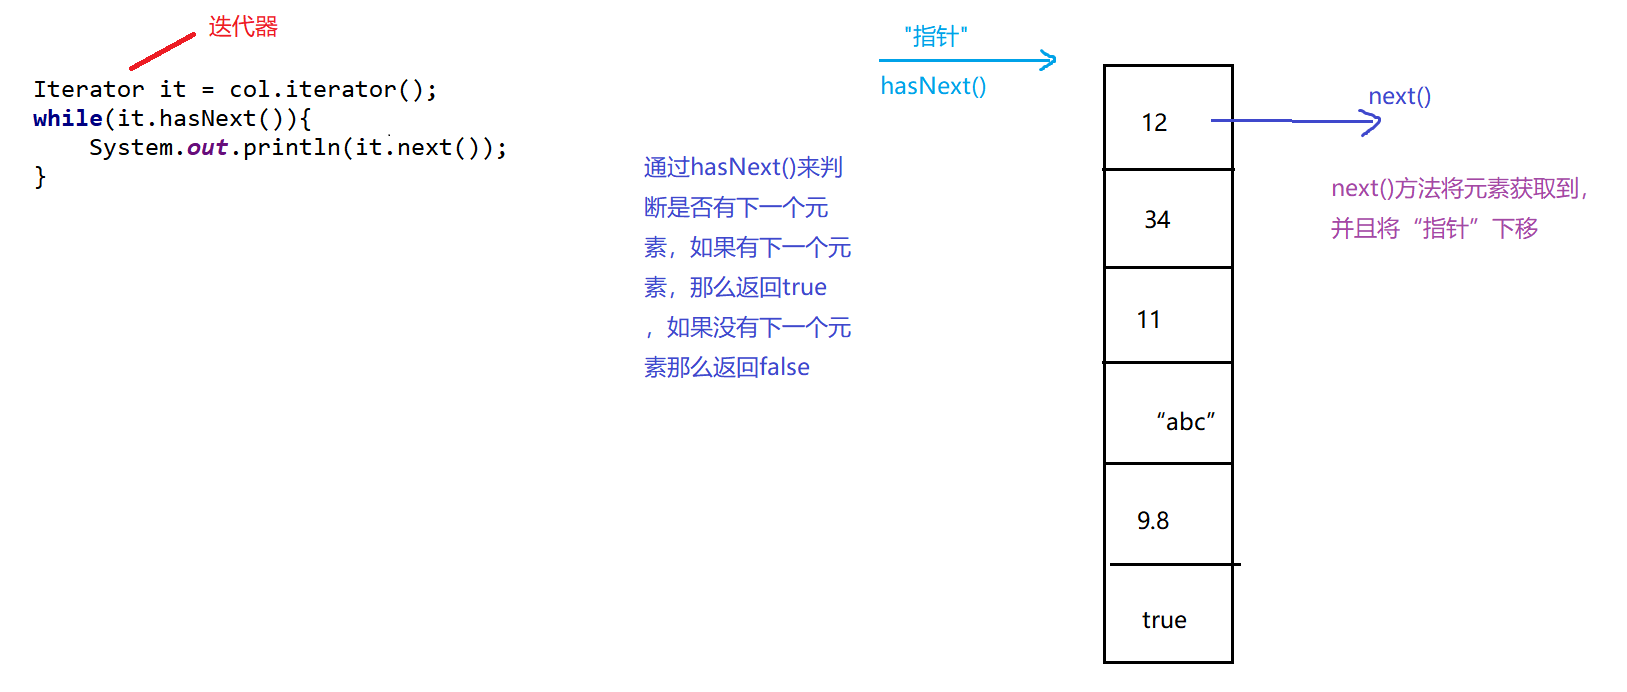
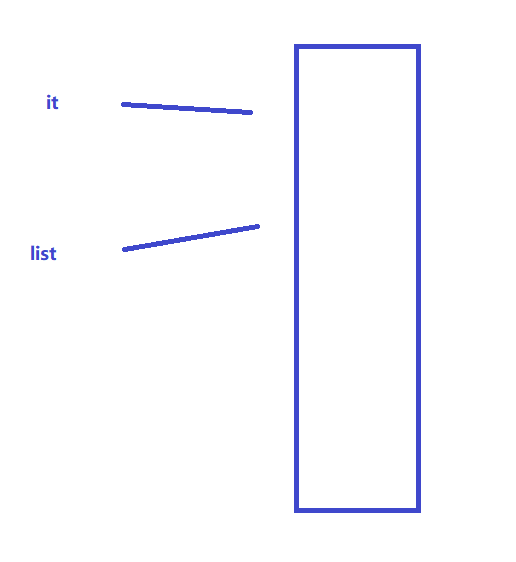
}2.Collection集合的遍历
迭代器简要原理图:
public class Test02 {
//这是main方法,程序的入口
public static void main(String[] args) {
Collection col = new ArrayList();
col.add(18);
col.add(12);
col.add(11);
col.add(17);
col.add("abc");
col.add(9.8);
//对集合遍历(对集合中元素进行查看)
//方式1:普通for循环
/*for(int i= 0;i<col.size();i++){
col.
}*/
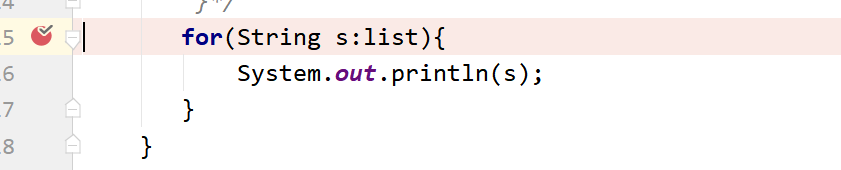
//方式2:增强for循环
for(Object o:col){
System.out.println(o);
}
System.out.println("------------------------");
//方式3:iterator()
Iterator it = col.iterator();
while(it.hasNext()){
System.out.println(it.next());
}
}
}
3.List接口
List接口的常用方法和遍历方式
public class Test03 {
    //这是main方法,程序的入口
    public static void main(String[] args) {
        /*
        List接口中常用方法:
        增加:add(int index, E element)
        删除:remove(int index)  remove(Object o)
        修改:set(int index, E element)
        查看:get(int index)
        判断:
         */
        List list = new ArrayList();
        list.add(13);
        list.add(17);
        list.add(6);
        list.add(-1);
        list.add(2);
        list.add("abc");
        System.out.println(list);
        list.add(3,66);
        System.out.println(list);
        list.set(3,77);
        System.out.println(list);
        list.remove(2);//在集合中存入的是Integer类型数据的时候,调用remove方法调用的是:remove(int index)
        System.out.println(list);
        list.remove("abc");
        System.out.println(list);
        Object o = list.get(0);
        System.out.println(o);
        //List集合 遍历:
        //方式1:普通for循环:
        System.out.println("---------------------");
        for(int i = 0;i<list.size();i++){
            System.out.println(list.get(i));
        }
        //方式2:增强for循环:
        System.out.println("---------------------");
        for(Object obj:list){
            System.out.println(obj);
        }
        //方式3:迭代器:
        System.out.println("---------------------");
        Iterator it = list.iterator();
        while(it.hasNext()){
            System.out.println(it.next());
        }
    }
}
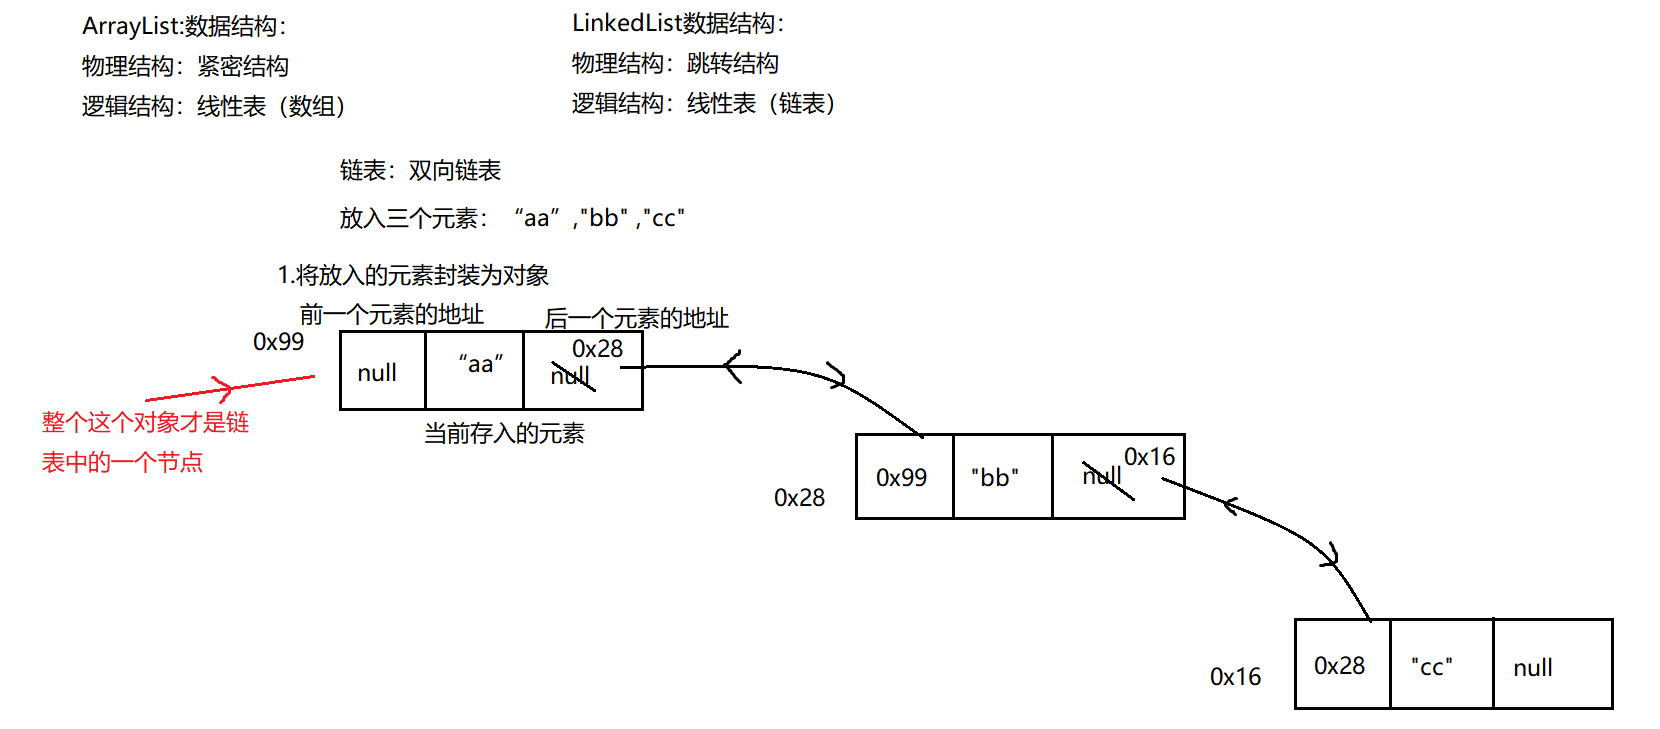
LinkedList实现类的使用
模拟LinkedList源码
public class MyLinkedList {
    //链中一定有一个首节点:
    Node first;
    //链中一定有一个尾节点:
    Node last;
    //计数器:
    int count = 0;
    //提供一个构造器:
    public MyLinkedList(){
    }
    //添加元素方法:
    public void add(Object o){
        if(first == null){//证明你添加的元素是第一个节点:
            //将添加的元素封装为一个Node对象:
            Node n = new Node();
            n.setPre(null);
            n.setObj(o);
            n.setNext(null);
            //当前链中第一个节点变为n
            first = n;
            //当前链中最后一个节点变为n
            last = n;
        }else{//证明已经不是链中第一个节点了
            //将添加的元素封装为一个Node对象:
            Node n = new Node();
            n.setPre(last);//n的上一个节点一定是当前链中的最后一个节点last
            n.setObj(o);
            n.setNext(null);
            //当前链中的最后一个节点的下一个元素 要指向n
            last.setNext(n);
            //将最后一个节点变为n
            last = n;
        }
        //链中元素数量加1
        count++;
    }
    //得到集合中元素的数量:
    public int getSize(){
        return count;
    }
    //通过下标得到元素:
    public Object get(int index){
        //获取链表的头元素:
        Node n = first;
        //一路next得到想要的元素
        for(int i=0;i<index;i++){
            n = n.getNext();
        }
        return n.getObj();
    }
}
class Test{
    //这是main方法,程序的入口
    public static void main(String[] args) {
        //创建一个MyLinkedList集合对象:
        MyLinkedList ml = new MyLinkedList();
        ml.add("aa");
        ml.add("bb");
        ml.add("cc");
        System.out.println(ml.getSize());
        System.out.println(ml.get(0));
    }
}
LinkedList源码解析
public class LinkedList<E>{//E是一个泛型,具体的类型要在实例化的时候才会最终确定
        transient int size = 0;//集合中元素的数量
        //Node的内部类
        private static class Node<E> {
        E item;//当前元素
        Node<E> next;//指向下一个元素地址
        Node<E> prev;//上一个元素地址
        Node(Node<E> prev, E element, Node<E> next) {
            this.item = element;
            this.next = next;
            this.prev = prev;
        }
    }
        transient Node<E> first;//链表的首节点
        transient Node<E> last;//链表的尾节点
        //空构造器:
        public LinkedList() {
    }
        //添加元素操作:
        public boolean add(E e) {
        linkLast(e);
        return true;
    }
        void linkLast(E e) {//添加的元素e
        final Node<E> l = last;//将链表中的last节点给l 如果是第一个元素的话 l为null
                //将元素封装为一个Node具体的对象:
        final Node<E> newNode = new Node<>(l, e, null);
                //将链表的last节点指向新的创建的对象:
        last = newNode;

        if (l == null)//如果添加的是第一个节点
            first = newNode;//将链表的first节点指向为新节点
        else//如果添加的不是第一个节点
            l.next = newNode;//将l的下一个指向为新的节点
        size++;//集合中元素数量加1操作
        modCount++;
    }
        //获取集合中元素数量
        public int size() {
        return size;
    }
        //通过索引得到元素:
        public E get(int index) {
        checkElementIndex(index);//健壮性考虑
        return node(index).item;
    }

    Node<E> node(int index) {
        //如果index在链表的前半段,那么从前往后找
        if (index < (size >> 1)) {
            Node<E> x = first;
            for (int i = 0; i < index; i++)
                x = x.next;
            return x;
        } else {//如果index在链表的后半段,那么从后往前找
            Node<E> x = last;
            for (int i = size - 1; i > index; i--)
                x = x.prev;
            return x;
        }
    }
}
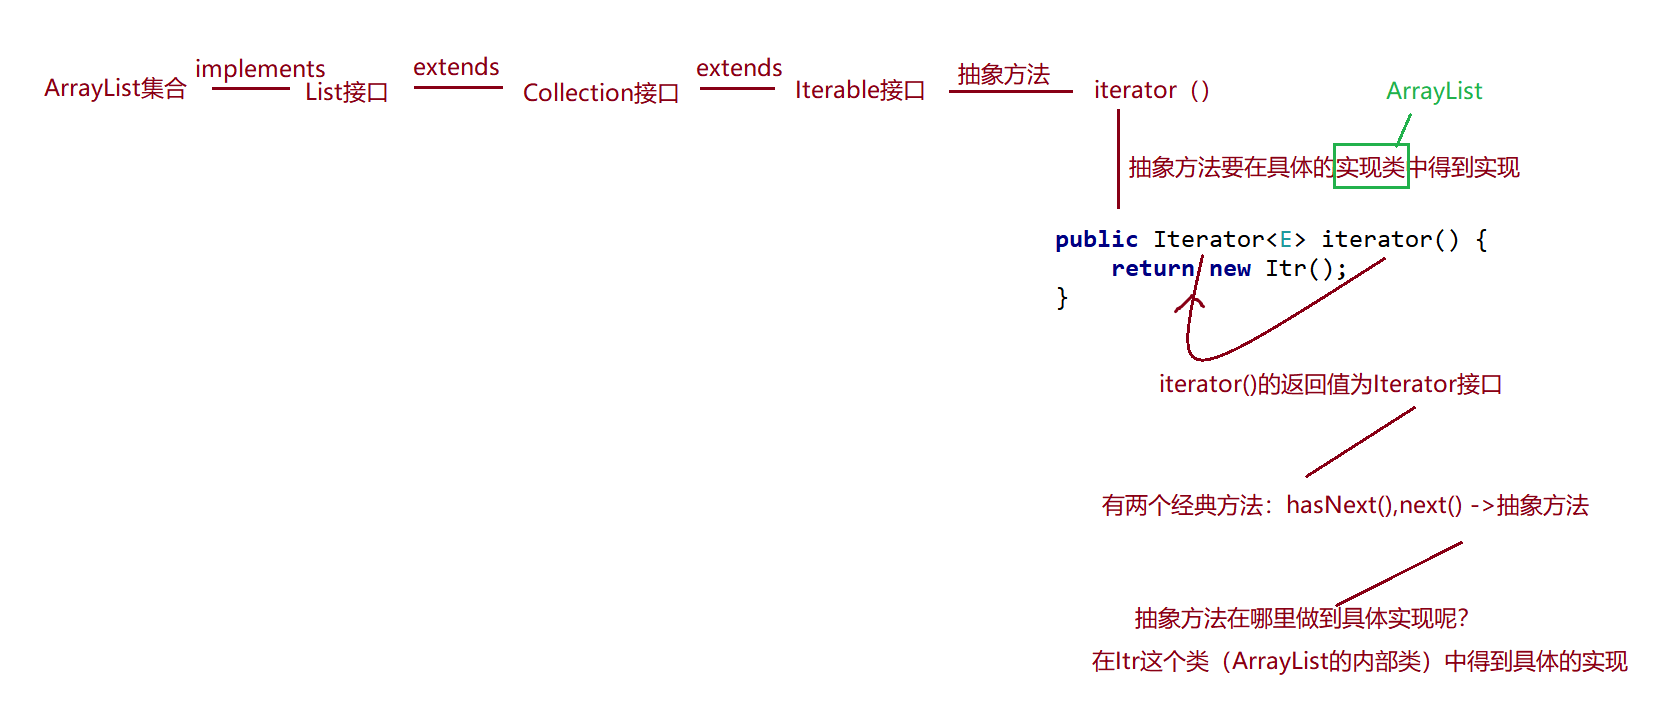
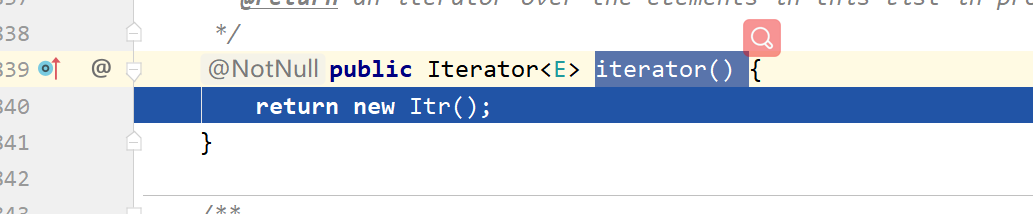
面试题:iterator(),Iterator,Iterable关系
【1】面试题:对应的关系:
【2】hasNext(),next()的具体实现:

【3】增强for循环 底层也是通过迭代器实现的:
ListIterator迭代器
public class Test2 {
    //这是main方法,程序的入口
    public static void main(String[] args) {
        ArrayList<String> list = new ArrayList<>();
        list.add("aa");
        list.add("bb");
        list.add("cc");
        list.add("dd");
        list.add("ee");
        //在"cc"之后添加一个字符串"kk"
        Iterator<String> it = list.iterator();
        while(it.hasNext()){
            if("cc".equals(it.next())){
                list.add("kk");
            }
        }
    }
}
发现报错:

出错原因:就是迭代器和list同时对集合进行操作:
解决办法:事情让一个“人”做 --》引入新的迭代器:ListIterator
迭代和添加操作都是靠ListIterator来完成的:
public class Test2 {
    //这是main方法,程序的入口
    public static void main(String[] args) {
        ArrayList<String> list = new ArrayList<>();
        list.add("aa");
        list.add("bb");
        list.add("cc");
        list.add("dd");
        list.add("ee");
        //在"cc"之后添加一个字符串"kk"
        ListIterator<String> it = list.listIterator();
        while(it.hasNext()){
            if("cc".equals(it.next())){
                it.add("kk");
            }
        }
        System.out.println(it.hasNext());
        System.out.println(it.hasPrevious());
        //逆向遍历:
        while(it.hasPrevious()){
            System.out.println(it.previous());
        }
        System.out.println(it.hasNext());
        System.out.println(it.hasPrevious());
        System.out.println(list);
    }
}
4.Set接口
HashSet实现类的使用
【1】放入Integer类型数据:
public class TestInteger {
    //这是main方法,程序的入口
    public static void main(String[] args) {
        //创建一个HashSet集合:
        HashSet<Integer> hs = new HashSet<>();
        System.out.println(hs.add(19));//true
        hs.add(5);
        hs.add(20);
        System.out.println(hs.add(19));//false 这个19没有放入到集合中
        hs.add(41);
        hs.add(0);
        System.out.println(hs.size());//唯一,无序
        System.out.println(hs);
    }
}
【2】放入String类型数据:
public class TestString {
//这是main方法,程序的入口
public static void main(String[] args) {
//创建一个HashSet集合:
HashSet<String> hs = new HashSet<>();
hs.add("hello");
hs.add("apple");
hs.add("banana");
hs.add("html");
hs.add("apple");
hs.add("css");
System.out.println(hs.size());
System.out.println(hs);
}
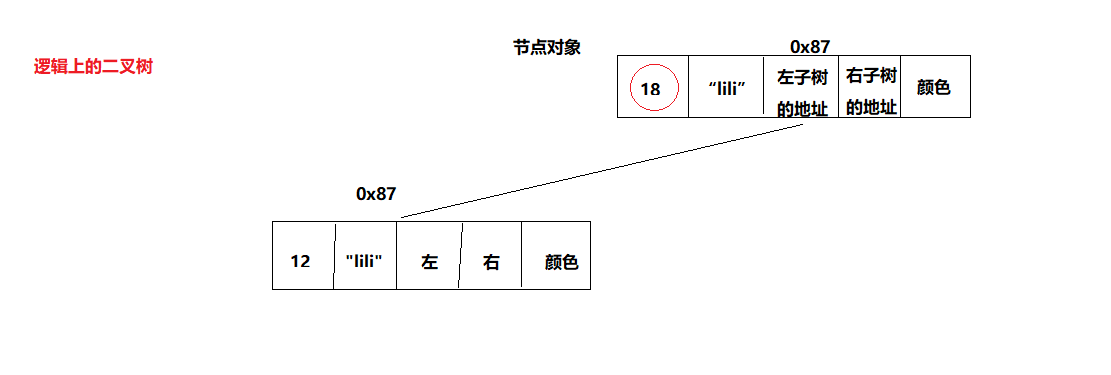
}【3】放入自定义的引用数据类型的数据:
public class TestStudent {
    //这是main方法,程序的入口
    public static void main(String[] args) {
        //创建一个HashSet集合:
        HashSet<Student> hs = new HashSet<>();
        hs.add(new Student(19,"lili"));
        hs.add(new Student(20,"lulu"));
        hs.add(new Student(18,"feifei"));
        hs.add(new Student(19,"lili"));
        hs.add(new Student(10,"nana"));
        System.out.println(hs.size());
        System.out.println(hs);
    }
}
上面自定义的类型不满足 唯一,无序的特点。为什么呢?
【4】HashSet原理图:(简要原理图)
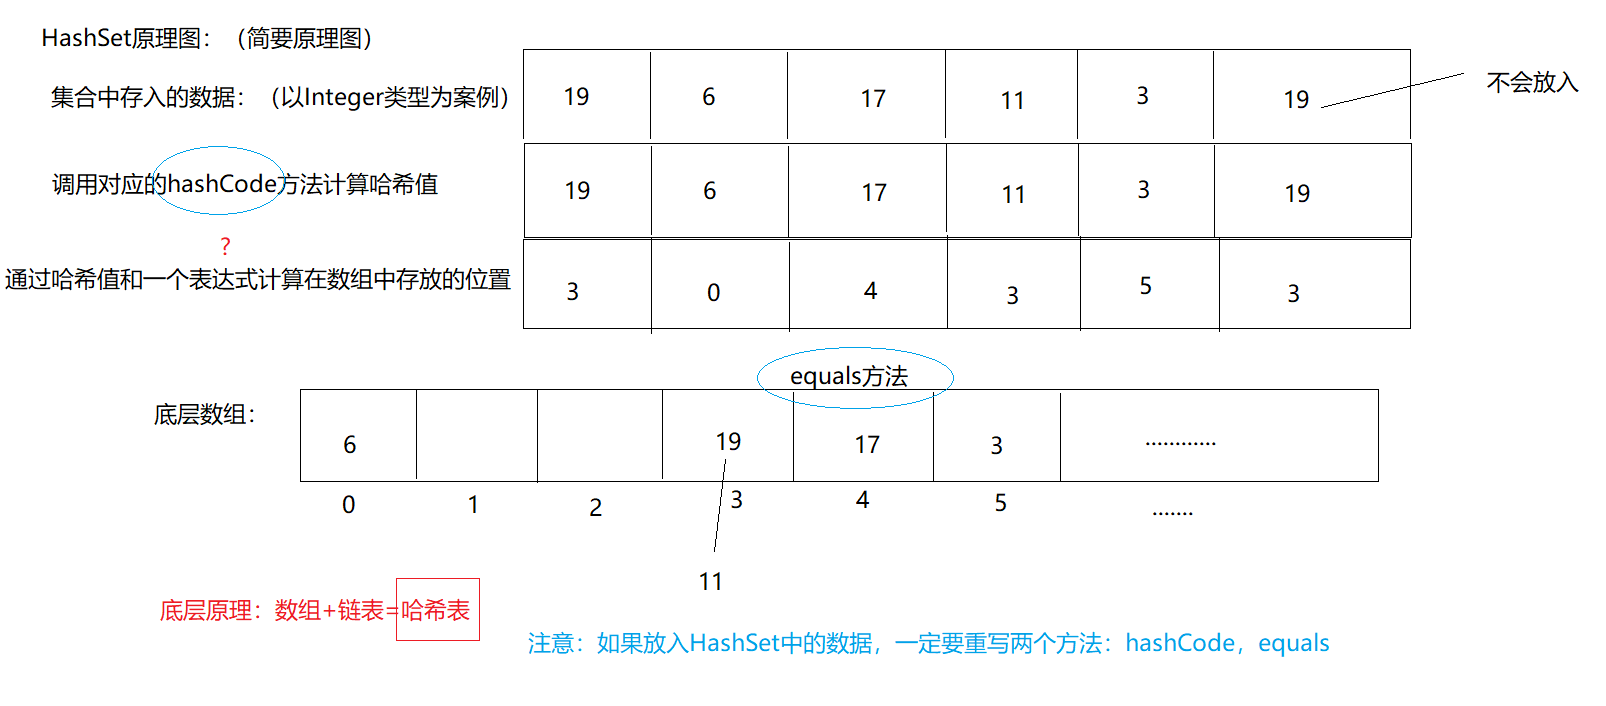
【5】疑问:
1.数组的长度是多少。
2.数组的类型是什么?
3.hashCode,equals方法真的调用了吗?验证
4.底层表达式是什么?
5.同一个位置的数据 向前放 还是 向后放?
6.放入数组中的数据,是直接放的吗?是否封装为对象了?
LinkedHashSet使用
其实就是在HashSet的基础上,多了一个总的链表,这个总链表将放入的元素串在一起,方便有序的遍历:
(可以看到LinkedHashMap.Entry 继承自HashMap.Node 除了Node 本身有的几个属性外,额外增加了before after 用于指向前一个Entry 后一个Entry。也就是说,元素之间维持着一条总的链表数据结构。)

代码:
public class TestInteger {
    //这是main方法,程序的入口
    public static void main(String[] args) {
        //创建一个HashSet集合:
        LinkedHashSet<Integer> hs = new LinkedHashSet<>();
        System.out.println(hs.add(19));//true
        hs.add(5);
        hs.add(20);
        System.out.println(hs.add(19));//false 这个19没有放入到集合中
        hs.add(41);
        hs.add(0);
        System.out.println(hs.size());//唯一,无序
        System.out.println(hs);
    }
}
比较器的使用
【1】以int类型为案例:
比较的思路:将比较的数据做差,然后返回一个int类型的数据,将这个int类型的数值 按照 =0 >0 <0
     int a = 10;
        int b = 20;
        System.out.println(a-b); // =0  >0  <0
【2】比较String类型数据:
String类实现了Comparable接口,这个接口中有一个抽象方法compareTo,String类中重写这个方法即可
     String a = "A";
        String b = "B";
        System.out.println(a.compareTo(b));
【3】比较double类型数据:
     double a = 9.6;
        double b = 9.3;
       /* System.out.println((int)(a-b));*/
        System.out.println(((Double) a).compareTo((Double) b));
【4】比较自定义的数据类型:
(1)内部比较器:
public class Student implements Comparable<Student>{
    private int age;
    private double height;
    private String name;
    public int getAge() {
        return age;
    }
    public void setAge(int age) {
        this.age = age;
    }
    public double getHeight() {
        return height;
    }
    public void setHeight(double height) {
        this.height = height;
    }
    public String getName() {
        return name;
    }
    public void setName(String name) {
        this.name = name;
    }
    public Student(int age, double height, String name) {
        this.age = age;
        this.height = height;
        this.name = name;
    }
    @Override
    public String toString() {
        return "Student{" +
                "age=" + age +
                ", height=" + height +
                ", name='" + name + '\'' +
                '}';
    }
    @Override
    public int compareTo(Student o) {
        //按照年龄进行比较:
        /*return this.getAge() - o.getAge();*/
        //按照身高比较
        /*return ((Double)(this.getHeight())).compareTo((Double)(o.getHeight()));*/
        //按照名字比较:
        return this.getName().compareTo(o.getName());
    }
}
public class Test02 {
    //这是main方法,程序的入口
    public static void main(String[] args) {
        //比较两个学生:
        Student s1 = new Student(14,160.5,"alili");
        Student s2 = new Student(14,170.5,"bnana");
        System.out.println(s1.compareTo(s2));
    }
}
(2)外部比较器:
public class Student{
    private int age;
    private double height;
    private String name;
    public int getAge() {
        return age;
    }
    public void setAge(int age) {
        this.age = age;
    }
    public double getHeight() {
        return height;
    }
    public void setHeight(double height) {
        this.height = height;
    }
    public String getName() {
        return name;
    }
    public void setName(String name) {
        this.name = name;
    }
    public Student(int age, double height, String name) {
        this.age = age;
        this.height = height;
        this.name = name;
    }
    @Override
    public String toString() {
        return "Student{" +
                "age=" + age +
                ", height=" + height +
                ", name='" + name + '\'' +
                '}';
    }
}
class BiJiao01 implements Comparator<Student> {
    @Override
    public int compare(Student o1, Student o2) {
        //比较年龄:
        return o1.getAge()-o2.getAge();
    }
}
class BiJiao02 implements Comparator<Student> {
    @Override
    public int compare(Student o1, Student o2) {
        //比较姓名:
        return o1.getName().compareTo(o2.getName());
    }
}
class BiJiao03 implements Comparator<Student> {
@Override
public int compare(Student o1, Student o2) {
//在年龄相同的情况下 比较身高 年龄不同比较年龄
if((o1.getAge()-o2.getAge())==0){
return ((Double)(o1.getHeight())).compareTo((Double)(o2.getHeight()));
}else{//年龄不一样
return o1.getAge()-o2.getAge();
}
}
}
public class Test02 {
    //这是main方法,程序的入口
    public static void main(String[] args) {
        //比较两个学生:
        Student s1 = new Student(9,160.5,"alili");
        Student s2 = new Student(14,170.5,"bnana");
        //获取外部比较器:
        Comparator bj1 = new BiJiao03();
        System.out.println(bj1.compare(s1, s2));
    }
}
【5】外部比较器和内部比较器 谁好呀?
答案:外部比较器,多态,扩展性好
TreeSet实现类的使用
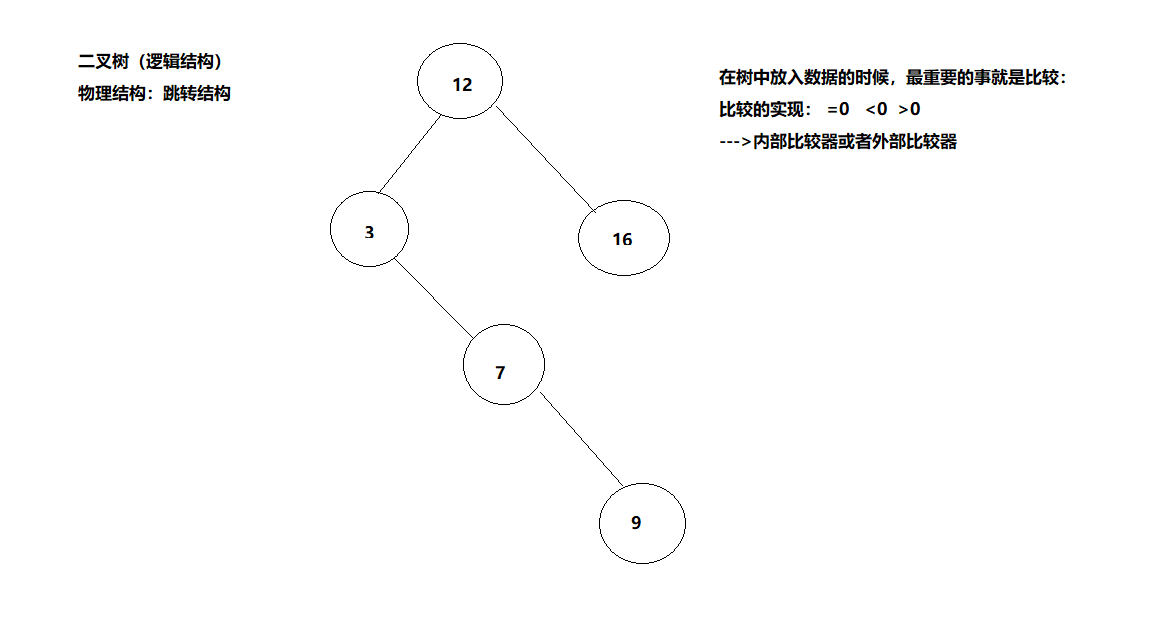
【1】存入Integer类型数据:(底层利用的是内部比较器)
public class Test01 {
    //这是main方法,程序的入口
    public static void main(String[] args) {
        //创建一个TreeSet:
        TreeSet<Integer> ts = new TreeSet<>();
        ts.add(12);
        ts.add(3);
        ts.add(7);
        ts.add(9);
        ts.add(3);
        ts.add(16);
        System.out.println(ts.size());
        System.out.println(ts);
    }
}
特点:唯一,无序(没有按照输入顺序进行输出), 有序(按照升序进行遍历)
【2】原理:底层:二叉树(数据结构中的一个逻辑结构)
【3】放入String类型数据:(底层实现类内部比较器)
public class Test02 {
    //这是main方法,程序的入口
    public static void main(String[] args) {
        //创建一个TreeSet:
        TreeSet<String> ts = new TreeSet<>();
        ts.add("elili");
        ts.add("blili");
        ts.add("alili");
        ts.add("elili");
        ts.add("clili");
        ts.add("flili");
        ts.add("glili");
        System.out.println(ts.size());
        System.out.println(ts);
    }
}
【4】想放入自定义的Student类型的数据:
(1)利用内部比较器:
public class Student implements Comparable<Student> {
    private int age;
    private String name;
    public int getAge() {
        return age;
    }
    public void setAge(int age) {
        this.age = age;
    }
    public String getName() {
        return name;
    }
    public void setName(String name) {
        this.name = name;
    }
    public Student(int age, String name) {
        this.age = age;
        this.name = name;
    }
    @Override
    public String toString() {
        return "Student{" +
                "age=" + age +
                ", name='" + name + '\'' +
                '}';
    }
    @Override
    public int compareTo(Student o) {
        return this.getAge()-o.getAge();
    }
}
public class Test03 {
    //这是main方法,程序的入口
    public static void main(String[] args) {
        //创建一个TreeSet:
        TreeSet<Student> ts = new TreeSet<>();
        ts.add(new Student(10,"elili"));
        ts.add(new Student(8,"blili"));
        ts.add(new Student(4,"alili"));
        ts.add(new Student(9,"elili"));
        ts.add(new Student(10,"flili"));
        ts.add(new Student(1,"dlili"));
        System.out.println(ts.size());
        System.out.println(ts);
    }
}
(2)通过外部比较器:
public class Student  {
    private int age;
    private String name;
    public int getAge() {
        return age;
    }
    public void setAge(int age) {
        this.age = age;
    }
    public String getName() {
        return name;
    }
    public void setName(String name) {
        this.name = name;
    }
    public Student(int age, String name) {
        this.age = age;
        this.name = name;
    }
    @Override
    public String toString() {
        return "Student{" +
                "age=" + age +
                ", name='" + name + '\'' +
                '}';
    }
}
class BiJiao implements Comparator<Student>{
    @Override
    public int compare(Student o1, Student o2) {
        return o1.getName().compareTo(o2.getName());
    }
}
public class Test03 {
    //这是main方法,程序的入口
    public static void main(String[] args) {
        //创建一个TreeSet:
        //利用外部比较器,必须自己制定:
        Comparator<Student> com = new BiJiao();
        TreeSet<Student> ts = new TreeSet<>(com);//一旦指定外部比较器,那么就会按照外部比较器来比较
        ts.add(new Student(10,"elili"));
        ts.add(new Student(8,"blili"));
        ts.add(new Student(4,"alili"));
        ts.add(new Student(9,"elili"));
        ts.add(new Student(10,"flili"));
        ts.add(new Student(1,"dlili"));
        System.out.println(ts.size());
        System.out.println(ts);
    }
}
实际开发中利用外部比较器多,因为扩展性好(多态)
换一种写法:
public class Test03 {
    //这是main方法,程序的入口
    public static void main(String[] args) {
        //创建一个TreeSet:
        //利用外部比较器,必须自己制定:
        /*Comparator<Student> com = new Comparator<Student>() {
            @Override
            public int compare(Student o1, Student o2) {
                return o1.getName().compareTo(o2.getName());
            }
        };*/
        TreeSet<Student> ts = new TreeSet<>(new Comparator<Student>() {
            @Override
            public int compare(Student o1, Student o2) {
                return o1.getName().compareTo(o2.getName());
            }
        });//一旦指定外部比较器,那么就会按照外部比较器来比较
        ts.add(new Student(10,"elili"));
        ts.add(new Student(8,"blili"));
        ts.add(new Student(4,"alili"));
        ts.add(new Student(9,"elili"));
        ts.add(new Student(10,"flili"));
        ts.add(new Student(1,"dlili"));
        System.out.println(ts.size());
        System.out.println(ts);
    }
}
【5】TreeSet底层的二叉树的遍历是按照升序的结果出现的,这个升序是靠中序遍历得到的:

Collection部分整体结构图
Map接口:
常用方法
public class Test01 {
    //这是main方法,程序的入口
    public static void main(String[] args) {
        /*
        增加:put(K key, V value)
        删除:clear() remove(Object key)
        修改:
        查看:entrySet() get(Object key) keySet() size() values()
        判断:containsKey(Object key) containsValue(Object value)
            equals(Object o) isEmpty()
         */
        //创建一个Map集合:无序,唯一
        Map<String,Integer> map = new HashMap<>();
        System.out.println(map.put("lili", 10101010));
        map.put("nana",12345234);
        map.put("feifei",34563465);
        System.out.println(map.put("lili", 34565677));
        map.put("mingming",12323);
        /*map.clear();清空*/
        /*map.remove("feifei");移除*/
        System.out.println(map.size());
        System.out.println(map);
        System.out.println(map.containsKey("lili"));
        System.out.println(map.containsValue(12323));
        Map<String,Integer> map2 = new HashMap<>();
        System.out.println(map2.put("lili", 10101010));
        map2.put("nana",12345234);
        map2.put("feifei",34563465);
        System.out.println(map2.put("lili", 34565677));
        map2.put("mingming2",12323);
        System.out.println(map==map2);
        System.out.println(map.equals(map2));//equals进行了重写,比较的是集合中的值是否一致
        System.out.println("判断是否为空:"+map.isEmpty());
        System.out.println(map.get("nana"));
        System.out.println("-----------------------------------");
        //keySet()对集合中的key进行遍历查看:
        Set<String> set = map.keySet();
        for(String s:set){
            System.out.println(s);
        }
        System.out.println("-----------------------------------");
        //values()对集合中的value进行遍历查看:
        Collection<Integer> values = map.values();
        for(Integer i:values){
            System.out.println(i);
        }
        System.out.println("-----------------------------------");
        //get(Object key) keySet()
        Set<String> set2 = map.keySet();
        for(String s:set2){
            System.out.println(map.get(s));
        }
        System.out.println("-----------------------------------");
        //entrySet()
        Set<Map.Entry<String, Integer>> entries = map.entrySet();
        for(Map.Entry<String, Integer> e:entries){
            System.out.println(e.getKey()+"----"+e.getValue());
        }
    }
}
【1】key的类型为String类型:
public class Test02 {
    //这是main方法,程序的入口
    public static void main(String[] args) {
        Map<String,Integer> map = new TreeMap<>();
        map.put("blili",1234);
        map.put("alili",2345);
        map.put("blili",5467);
        map.put("clili",5678);
        map.put("dlili",2345);
        System.out.println(map.size());
        System.out.println(map);
    }
}
【2】key的类型是一个自定义的引用数据类型:
(1)内部比较器:
public class Test03 {
    //这是main方法,程序的入口
    public static void main(String[] args) {
        Map<Student,Integer> map = new TreeMap<>();
        map.put(new Student(19,"blili",170.5),1001);
        map.put(new Student(18,"blili",150.5),1003);
        map.put(new Student(19,"alili",180.5),1023);
        map.put(new Student(17,"clili",140.5),1671);
        map.put(new Student(10,"dlili",160.5),1891);
        System.out.println(map);
        System.out.println(map.size());
    }
}
public class Student implements Comparable<Student>{
private int age;
private String name;
private double height;
public int getAge() {
return age;
}
public void setAge(int age) {
this.age = age;
}
public String getName() {
return name;
}
public void setName(String name) {
this.name = name;
}
public double getHeight() {
return height;
}
public void setHeight(double height) {
this.height = height;
}
public Student(int age, String name, double height) {
this.age = age;
this.name = name;
this.height = height;
}
@Override
public String toString() {
return "Student{" +
"age=" + age +
", name='" + name + '\'' +
", height=" + height +
'}';
}
@Override
public int compareTo(Student o) {
/* return this.getAge()-o.getAge();*/
return this.getName().compareTo(o.getName());
}
}
public class Test03 {
    //这是main方法,程序的入口
    public static void main(String[] args) {
        Map<Student,Integer> map = new TreeMap<>(new Comparator<Student>() {
            @Override
            public int compare(Student o1, Student o2) {
                return ((Double)(o1.getHeight())).compareTo((Double)(o2.getHeight()));
            }
        });
        map.put(new Student(19,"blili",170.5),1001);
        map.put(new Student(18,"blili",150.5),1003);
        map.put(new Student(19,"alili",180.5),1023);
        map.put(new Student(17,"clili",140.5),1671);
        map.put(new Student(10,"dlili",160.5),1891);
        System.out.println(map);
        System.out.println(map.size());
    }
}
Map部分整体结构图
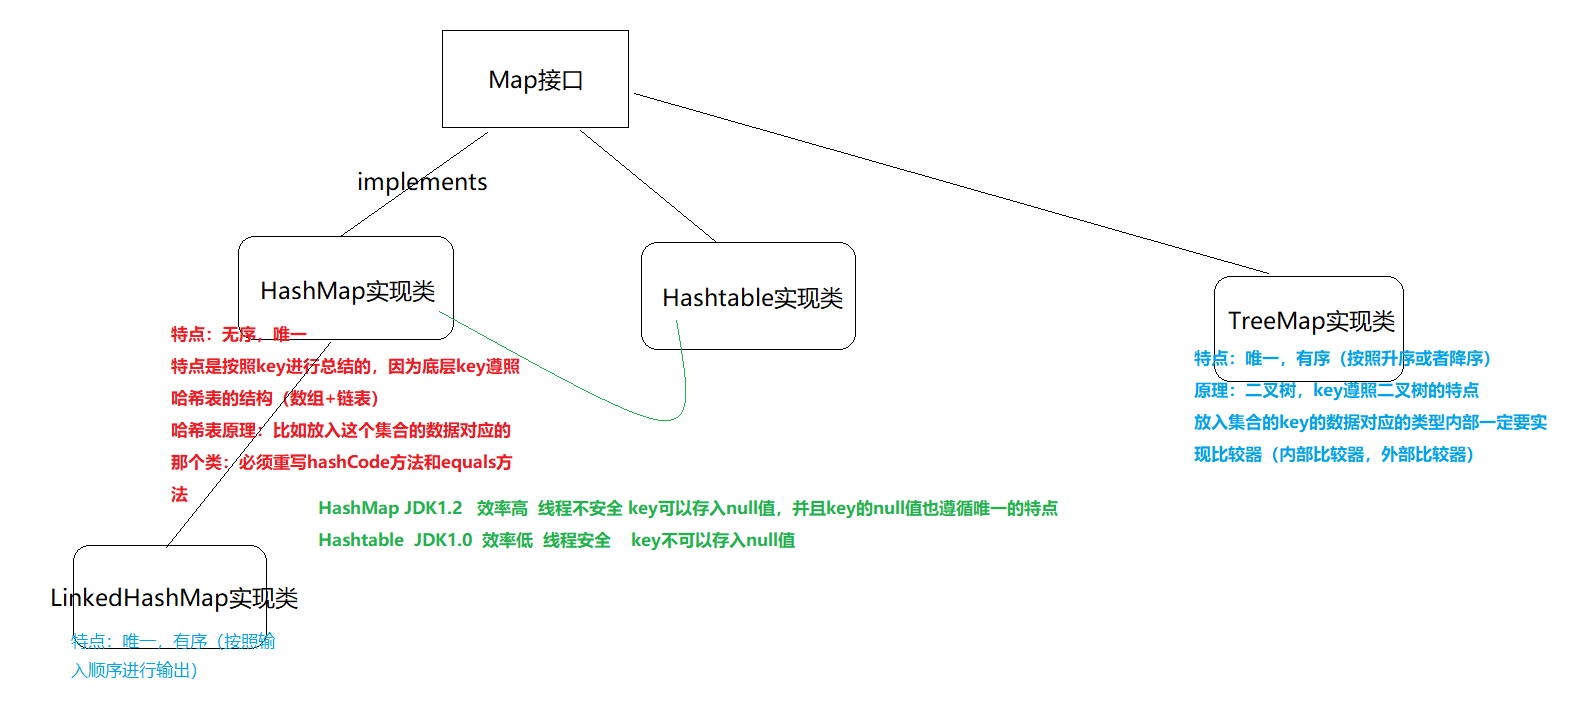
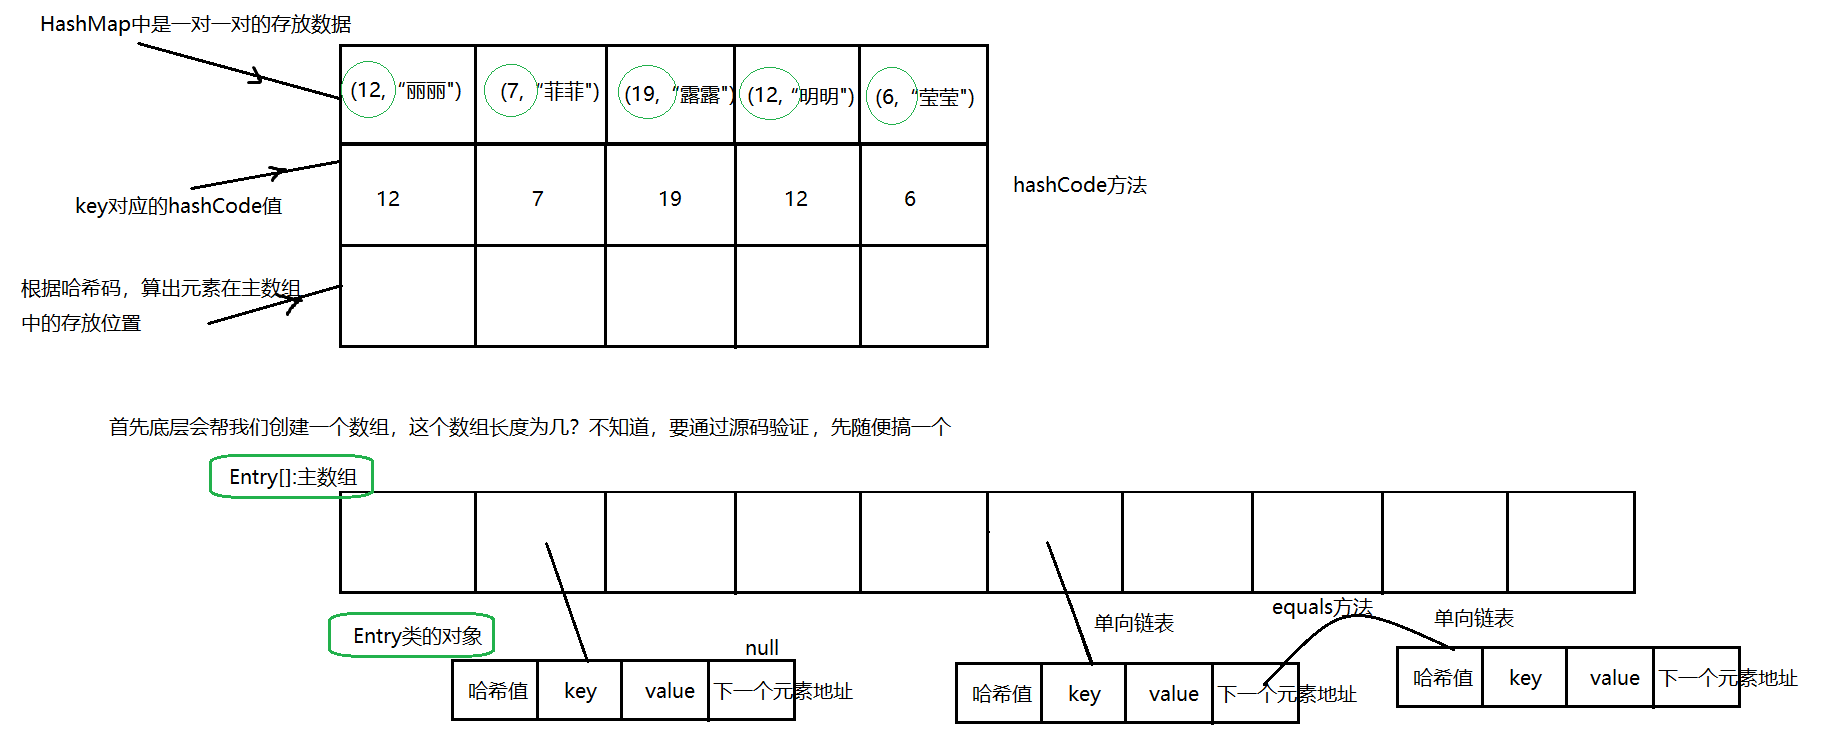
HashMap
原理
先演示原理图,再看源码,直接看的话,有的人接不上就蒙了:
相当于先看原理,然后从源码中验证这个原理是否正确:把图搞懂了,就是事倍功半的效果
原理如下:(JDK1.7)
public class HashMap<K,V>
    extends AbstractMap<K,V> //【1】继承的AbstractMap中,已经实现了Map接口
        //【2】又实现了这个接口,多余,但是设计者觉得没有必要删除,就这么地了
    implements Map<K,V>, Cloneable, Serializable{


        //【3】后续会用到的重要属性:先粘贴过来:
    static final int DEFAULT_INITIAL_CAPACITY = 16;//哈希表主数组的默认长度
        //定义了一个float类型的变量,以后作为:默认的装填因子,加载因子是表示Hsah表中元素的填满的程度
        //太大容易引起哈西冲突,太小容易浪费  0.75是经过大量运算后得到的最好值
        //这个值其实可以自己改,但是不建议改,因为这个0.75是大量运算得到的
        static final float DEFAULT_LOAD_FACTOR = 0.75f;
        transient Entry<K,V>[] table;//主数组,每个元素为Entry类型
        transient int size;
        int threshold;//数组扩容的界限值,门槛值   16*0.75=12
        final float loadFactor;//用来接收装填因子的变量

        //【4】查看构造器:内部相当于:this(16,0.75f);调用了当前类中的带参构造器
        public HashMap() {
        this(DEFAULT_INITIAL_CAPACITY, DEFAULT_LOAD_FACTOR);
    }
        //【5】本类中带参数构造器:--》作用给一些数值进行初始化的!
        public HashMap(int initialCapacity, float loadFactor) {
        //【6】给capacity赋值,capacity的值一定是 大于你传进来的initialCapacity 的 最小的 2的倍数
        int capacity = 1;
        while (capacity < initialCapacity)
            capacity <<= 1;
                //【7】给loadFactor赋值,将装填因子0.75赋值给loadFactor
        this.loadFactor = loadFactor;
                //【8】数组扩容的界限值,门槛值
        threshold = (int)Math.min(capacity * loadFactor, MAXIMUM_CAPACITY + 1);

                //【9】给table数组赋值,初始化数组长度为16
        table = new Entry[capacity];

    }
        //【10】调用put方法:
        public V put(K key, V value) {
                //【11】对空值的判断
        if (key == null)
            return putForNullKey(value);
                //【12】调用hash方法,获取哈希码
        int hash = hash(key);
                //【14】得到key对应在数组中的位置
        int i = indexFor(hash, table.length);
                //【16】如果你放入的元素,在主数组那个位置上没有值,e==null  那么下面这个循环不走
                //当在同一个位置上放入元素的时候
        for (Entry<K,V> e = table[i]; e != null; e = e.next) {
            Object k;
                        //哈希值一样  并且  equals相比一样
                        //(k = e.key) == key  如果是一个对象就不用比较equals了
            if (e.hash == hash && ((k = e.key) == key || key.equals(k))) {
                V oldValue = e.value;
                e.value = value;
                e.recordAccess(this);
                return oldValue;
            }
        }
        modCount++;
                //【17】走addEntry添加这个节点的方法:
        addEntry(hash, key, value, i);
        return null;
    }

        //【13】hash方法返回这个key对应的哈希值,内部进行二次散列,为了尽量保证不同的key得到不同的哈希码!
        final int hash(Object k) {
        int h = 0;
        if (useAltHashing) {
            if (k instanceof String) {
                return sun.misc.Hashing.stringHash32((String) k);
            }
            h = hashSeed;
        }
                //k.hashCode()函数调用的是key键值类型自带的哈希函数,
                //由于不同的对象其hashCode()有可能相同,所以需对hashCode()再次哈希,以降低相同率。
        h ^= k.hashCode();
        // This function ensures that hashCodes that differ only by
        // constant multiples at each bit position have a bounded
        // number of collisions (approximately 8 at default load factor).
                /*
                接下来的一串与运算和异或运算,称之为“扰动函数”,
                扰动的核心思想在于使计算出来的值在保留原有相关特性的基础上,
                增加其值的不确定性,从而降低冲突的概率。
                不同的版本实现的方式不一样,但其根本思想是一致的。
                往右移动的目的,就是为了将h的高位利用起来,减少哈西冲突
                */
        h ^= (h >>> 20) ^ (h >>> 12);
        return h ^ (h >>> 7) ^ (h >>> 4);
    }
        //【15】返回int类型数组的坐标
        static int indexFor(int h, int length) {
                //其实这个算法就是取模运算:h%length,取模效率不如位运算
        return h & (length-1);
    }
        //【18】调用addEntry
        void addEntry(int hash, K key, V value, int bucketIndex) {
                //【25】size的大小  大于 16*0.75=12的时候,比如你放入的是第13个,这第13个你打算放在没有元素的位置上的时候
        if ((size >= threshold) && (null != table[bucketIndex])) {
                        //【26】主数组扩容为2倍
            resize(2 * table.length);
                        //【30】重新调整当前元素的hash码
            hash = (null != key) ? hash(key) : 0;
                        //【31】重新计算元素位置
            bucketIndex = indexFor(hash, table.length);
        }
                //【19】将hash,key,value,bucketIndex位置  封装为一个Entry对象:
        createEntry(hash, key, value, bucketIndex);
    }
        //【20】
        void createEntry(int hash, K key, V value, int bucketIndex) {
                //【21】获取bucketIndex位置上的元素给e
        Entry<K,V> e = table[bucketIndex];
                //【22】然后将hash, key, value封装为一个对象,然后将下一个元素的指向为e (链表的头插法)
                //【23】将新的Entry放在table[bucketIndex]的位置上
        table[bucketIndex] = new Entry<>(hash, key, value, e);
                //【24】集合中加入一个元素 size+1
        size++;
    }
    //【27】
        void resize(int newCapacity) {
        Entry[] oldTable = table;
        int oldCapacity = oldTable.length;
        if (oldCapacity == MAXIMUM_CAPACITY) {
            threshold = Integer.MAX_VALUE;
            return;
        }
                //【28】创建长度为newCapacity的数组
        Entry[] newTable = new Entry[newCapacity];
        boolean oldAltHashing = useAltHashing;
        useAltHashing |= sun.misc.VM.isBooted() &&
                (newCapacity >= Holder.ALTERNATIVE_HASHING_THRESHOLD);
        boolean rehash = oldAltHashing ^ useAltHashing;
                //【28.5】转让方法:将老数组中的东西都重新放入新数组中
        transfer(newTable, rehash);
                //【29】老数组替换为新数组
        table = newTable;
                //【29.5】重新计算
        threshold = (int)Math.min(newCapacity * loadFactor, MAXIMUM_CAPACITY + 1);
    }
        //【28.6】
        void transfer(Entry[] newTable, boolean rehash) {
        int newCapacity = newTable.length;
        for (Entry<K,V> e : table) {
            while(null != e) {
                Entry<K,V> next = e.next;
                if (rehash) {
                    e.hash = null == e.key ? 0 : hash(e.key);
                }
                                //【28.7】将哈希值,和新的数组容量传进去,重新计算key在新数组中的位置
                int i = indexFor(e.hash, newCapacity);
                                //【28.8】头插法
                e.next = newTable[i];//获取链表上元素给e.next
                newTable[i] = e;//然后将e放在i位置
                e = next;//e再指向下一个节点继续遍历
            }
        }
    }
}
TreeMap
【1】原理大致介绍:
【2】源码:
public class TreeMap<K,V>{
        //重要属性:
        //外部比较器:
        private final Comparator<? super K> comparator;
        //树的根节点:
        private transient Entry<K,V> root = null;
        //集合中元素的数量:
        private transient int size = 0;
        //空构造器:
        public TreeMap() {
        comparator = null;//如果使用空构造器,那么底层就不使用外部比较器
    }
        //有参构造器:
        public TreeMap(Comparator<? super K> comparator) {
        this.comparator = comparator;//如果使用有参构造器,那么就相当于指定了外部比较器
    }

        public V put(K key, V value) {//k,V的类型在创建对象的时候确定了
        //如果放入的是第一对元素,那么t的值为null
        Entry<K,V> t = root;//在放入第二个节点的时候,root已经是根节点了
                //如果放入的是第一个元素的话,走入这个if中:
        if (t == null) {
                        //自己跟自己比
            compare(key, key); // type (and possibly null) check
                        //根节点确定为root
            root = new Entry<>(key, value, null);
                        //size值变为1
            size = 1;
            modCount++;
            return null;
        }

        int cmp;
        Entry<K,V> parent;
        // split comparator and comparable paths
                //将外部比较器赋给cpr:
        Comparator<? super K> cpr = comparator;
                //cpr不等于null,意味着你刚才创建对象的时候调用了有参构造器,指定了外部比较器
        if (cpr != null) {
            do {
                parent = t;
                cmp = cpr.compare(key, t.key);//将元素的key值做比较
                                //cmp返回的值就是int类型的数据:
                                //要是这个值《0 =0  》0
                if (cmp < 0)
                    t = t.left;
                else if (cmp > 0)
                    t = t.right;
                else//cpm==0
                                //如果key的值一样,那么新的value替换老的value  但是key不变 因为key是唯一的
                    return t.setValue(value);
            } while (t != null);
        }
                //cpr等于null,意味着你刚才创建对象的时候调用了空构造器,没有指定外部比较器,使用内部比较器
        else {
            if (key == null)
                throw new NullPointerException();
            Comparable<? super K> k = (Comparable<? super K>) key;
            do {
                parent = t;
                cmp = k.compareTo(t.key);//将元素的key值做比较
                if (cmp < 0)
                    t = t.left;
                else if (cmp > 0)
                    t = t.right;
                else
                    return t.setValue(value);
            } while (t != null);
        }
        Entry<K,V> e = new Entry<>(key, value, parent);
        if (cmp < 0)
            parent.left = e;
        else
            parent.right = e;
        fixAfterInsertion(e);
        size++;//size加1 操作
        modCount++;
        return null;
    }


}
 static final class Entry<K,V> implements Map.Entry<K,V> {
        K key;
        V value;
        Entry<K,V> left = null;
        Entry<K,V> right = null;
        Entry<K,V> parent;
        boolean color = BLACK;
 }
泛型
【1】什么是泛型(Generic):
泛型就相当于标签
形式:<>
集合容器类在设计阶段/声明阶段不能确定这个容器到底实际存的是什么类型的对象,所以在JDK1.5之前只能把元素类型设计为Object,
JDK1.5之 后使用泛型来解决。因为这个时候除了元素的类型不确定,其他的部分是确定的,例如关于这个元素如何保存,如何管理等是确定的,因此此时把元素的类型设计成一个参数,这个类型参数叫做泛型。
Collection<E>, List<E>, ArrayList<E> 这个<E>就是类型参数,即泛型。
【2】没有泛型的时候使用集合:
public class Test01 {
    //这是main方法,程序的入口
    public static void main(String[] args) {
        //创建一个ArrayList集合,向这个集合中存入学生的成绩:
        ArrayList al = new ArrayList();
        al.add(98);
        al.add(18);
        al.add(39);
        al.add(60);
        al.add(83);
        al.add("丽丽");
        //对集合遍历查看:
        for(Object obj:al){
            System.out.println(obj);
        }
    }
}
如果不使用泛型的话,有缺点:
一般我们在使用的时候基本上往集合中存入的都是相同类型的数据--》便于管理,所以现在什么引用数据类型都可以存入集合,不方便!
【3】JDK1.5以后开始使用泛型,集合中使用泛型:
public class Test01 {
    //这是main方法,程序的入口
    public static void main(String[] args) {
        //创建一个ArrayList集合,向这个集合中存入学生的成绩:
        //加入泛型的优点:在编译时期就会对类型进行检查,不是泛型对应的类型就不可以添加入这个集合。
        ArrayList<Integer> al = new ArrayList<Integer>();
        al.add(98);
        al.add(18);
        al.add(39);
        al.add(60);
        al.add(83);
        /*al.add("丽丽");
        al.add(9.8);*/
        //对集合遍历查看:
        /*for(Object obj:al){
            System.out.println(obj);
        }*/
        for(Integer i:al){
            System.out.println(i);
        }
    }
}
【4】泛型总结:
(1)JDK1.5以后
(2)泛型实际就是 一个<>引起来的 参数类型,这个参数类型 具体在使用的时候才会确定具体的类型。
(3)使用了泛型以后,可以确定集合中存放数据的类型,在编译时期就可以检查出来。
(4)使用泛型你可能觉得麻烦,实际使用了泛型才会简单,后续的遍历等操作简单。
(5)泛型的类型:都是引用数据类型,不能是基本数据类型。
(6)ArrayList<Integer> al = new ArrayList<Integer>();在JDK1.7以后可以写为:
ArrayList<Integer> al = new ArrayList<>(); --<> ---钻石运算符
(1)泛型类,泛型接口
【1】泛型类的定义和实例化:
/**
 * GenericTes就是一个普通的类
 * GenericTest<E> 就是一个泛型类
 * <>里面就是一个参数类型,但是这个类型是什么呢?这个类型现在是不确定的,相当于一个占位
 * 但是现在确定的是这个类型一定是一个引用数据类型,而不是基本数据类型
 */
public class GenericTest<E> {
    int age;
    String name;
    E sex;
    public void a(E n){
    }
    public void b(E[] m){
    }
}
class Test{
    //这是main方法,程序的入口
    public static void main(String[] args) {
        //GenericTest进行实例化:
        //(1)实例化的时候不指定泛型:如果实例化的时候不明确的指定类的泛型,那么认为此泛型为Object类型
        GenericTest gt1 = new GenericTest();
        gt1.a("abc");
        gt1.a(17);
        gt1.a(9.8);
        gt1.b(new String[]{"a","b","c"});
        //(2)实例化的时候指定泛型:---》推荐方式
        GenericTest<String> gt2 = new GenericTest<>();
        gt2.sex = "男";
        gt2.a("abc");
        gt2.b(new String[]{"a","b","c"});

    }
}
【2】继承情况:
(1)父类指定泛型:
class SubGenericTest extends GenericTest<Integer>{
}
class Demo{
    //这是main方法,程序的入口
    public static void main(String[] args) {
        //指定父类泛型,那么子类就不需要再指定泛型了,可以直接使用
        SubGenericTest sgt = new SubGenericTest();
        sgt.a(19);
    }
}
(2)父类不指定泛型:
如果父类不指定泛型,那么子类也会变成一个泛型类,那这个E的类型可以在创建子类对象的时候确定:
class SubGenericTest2<E> extends GenericTest<E>{
}

class Demo2{
    //这是main方法,程序的入口
    public static void main(String[] args) {
        SubGenericTest2<String> s = new  SubGenericTest2<>();
        s.a("abc");
        s.sex = "女";
    }
}
(2)泛型方法
 * 1.什么是泛型方法:
 * 不是带泛型的方法就是泛型方法
 * 泛型方法有要求:这个方法的泛型的参数类型要和当前的类的泛型无关
 * 换个角度:
 * 泛型方法对应的那个泛型参数类型 和  当前所在的这个类 是否是泛型类,泛型是啥  无关
 * 2.泛型方法定义的时候,前面要加上<T>
 *     原因:如果不加的话,会把T当做一种数据类型,然而代码中没有T类型那么就会报错
 * 3.T的类型是在调用方法的时候确定的
 * 4.泛型方法可否是静态方法?可以是静态方法
 */
public class TestGeneric<E> {
    //不是泛型方法 (不能是静态方法)
    public static void a(E e){
    }
    //是泛型方法
    public static <T>  void b(T t){
    }
}
class Demo{
    //这是main方法,程序的入口
    public static void main(String[] args) {
        TestGeneric<String> tg = new TestGeneric<>();
        tg.a("abc");
        tg.b("abc");
        tg.b(19);
        tg.b(true);
    }
}
(3)泛型参数存在继承关系的情况
(4)通配符
【1】在没有通配符的时候:
下面的a方法,相当于方法的重复定义,报错
public class Test {
    /*public void a(List<Object> list){
    }
    public void a(List<String> list){
    }
    public void a(List<Integer> list){
    }*/
}
【2】引入通配符:
public class Demo {
//这是main方法,程序的入口
public static void main(String[] args) {
List<Object> list1 = new ArrayList<>();
List<String> list2 = new ArrayList<>();
List<Integer> list3 = new ArrayList<>();
List<?> list = null;
list = list1;
list = list2;
list = list3;
}
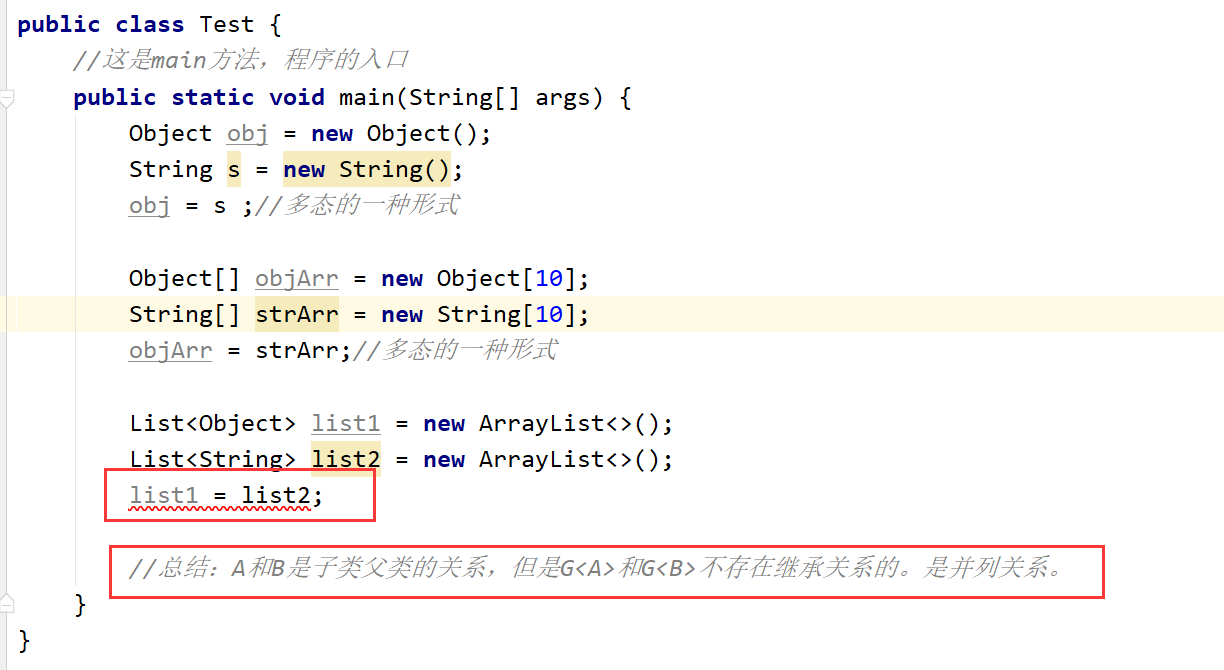
}发现: A 和 B是子类父类的关系,G<A>和G<B>不存在子类父类关系,是并列的
加入通配符?后,G<?>就变成了 G<A>和G<B>的父类
【3】使用通配符:
package com.msb.test06;
import java.util.ArrayList;
import java.util.List;
public class Test {
/*public void a(List<Object> list){
}
public void a(List<String> list){
}
public void a(List<Integer> list){
}*/
public void a(List<?> list){
//内部遍历的时候用Object即可,不用?
for(Object a:list){
System.out.println(a);
}
}
}
class T{
//这是main方法,程序的入口
public static void main(String[] args) {
Test t = new Test();
t.a(new ArrayList<Integer>());
t.a(new ArrayList<String>());
t.a(new ArrayList<Object>());
}
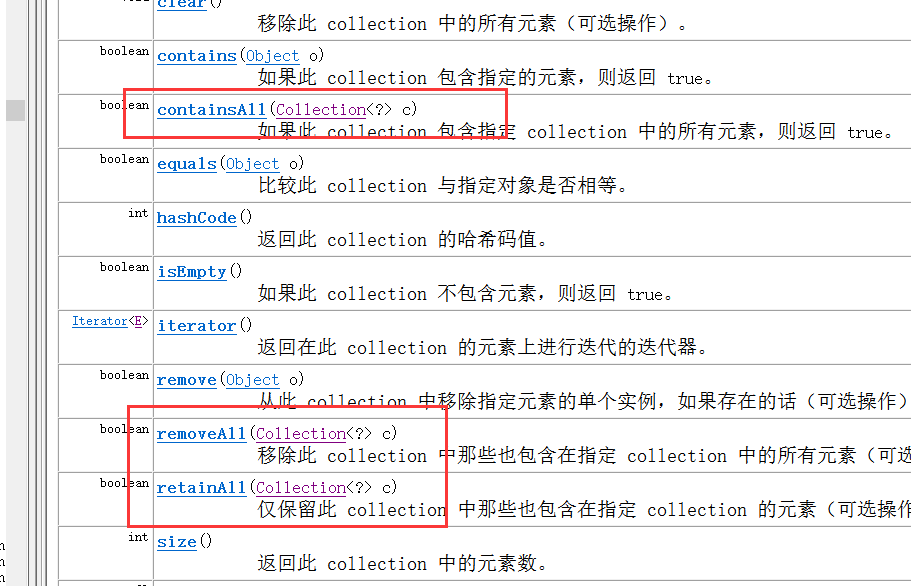
}【4】查看API中应用位置:
(5)使用通配符后的细节
public class Test {
    public void a(List<?> list){
        //1.遍历:
        for(Object a:list){
            System.out.println(a);
        }
        //2.数据的写入操作 :
        //list.add("abc");-->出错,不能随意的添加数据
        list.add(null);
        //3.数据的读取操作:
        Object s = list.get(0);
    }
}
class T{
    //这是main方法,程序的入口
    public static void main(String[] args) {
        Test t = new Test();
        t.a(new ArrayList<Integer>());
        t.a(new ArrayList<String>());
        t.a(new ArrayList<Object>());
    }
}
(6)泛型受限
public class Test {
    //这是main方法,程序的入口
    public static void main(String[] args) {
        //a,b,c三个集合是并列的关系:
        List<Object> a = new ArrayList<>();
        List<Person> b = new ArrayList<>();
        List<Student> c = new ArrayList<>();
        /*开始使用泛型受限:泛型的上限
        List<? extends Person>:
        就相当于:
        List<? extends Person>是List<Person>的父类,是List<Person的子类>的父类
         */
        List<? extends Person> list1 = null;
        /*list1 = a;
        list1 = b;
        list1 = c;*/
        /*开始使用泛型受限:泛型的下限
        List<? super Person>
        就相当于:
        List<? super Person>是List<Person>的父类,是List<Person的父类>的父类
         */
        List<? super Person> list2 = null;
        list2 = a;
        list2 = b;
        list3 = c;
    }
}
数据结构
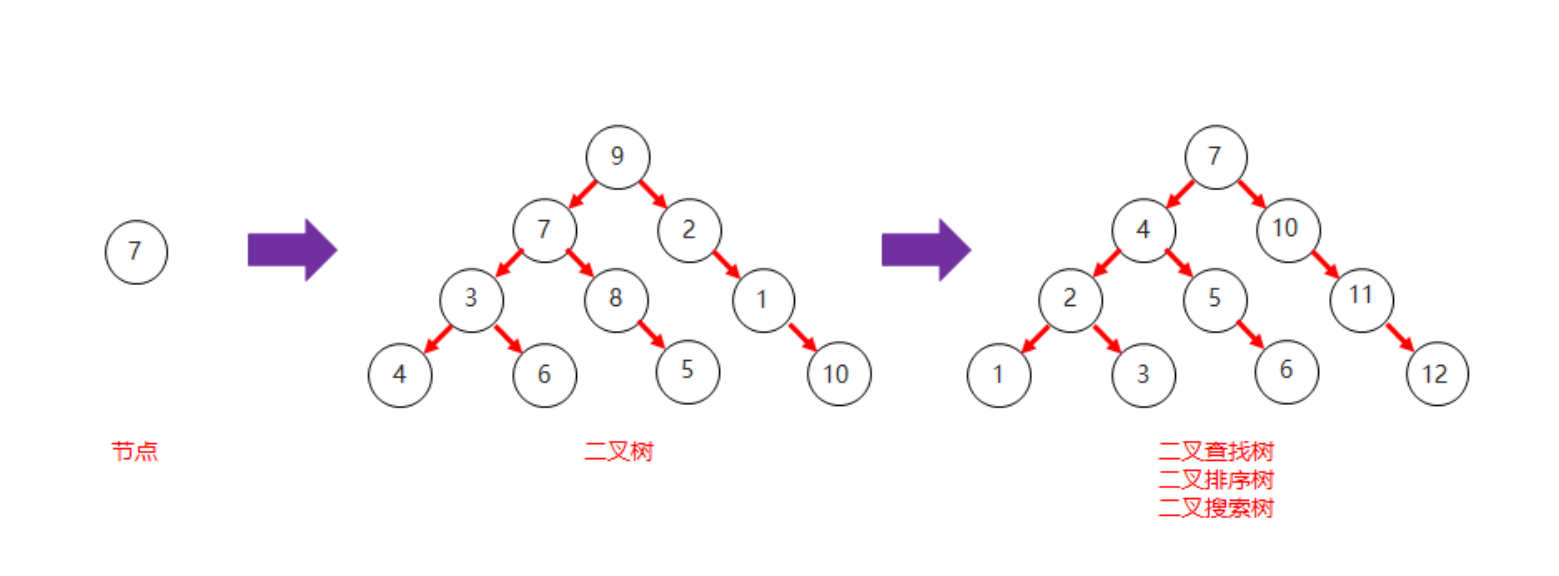
1二叉树【理解】
+ 二叉树的特点
+ 二叉树中,任意一个节点的度要小于等于2
+ 节点: 在树结构中,每一个元素称之为节点
+ 度: 每一个节点的子节点数量称之为度
+ 二叉树结构图
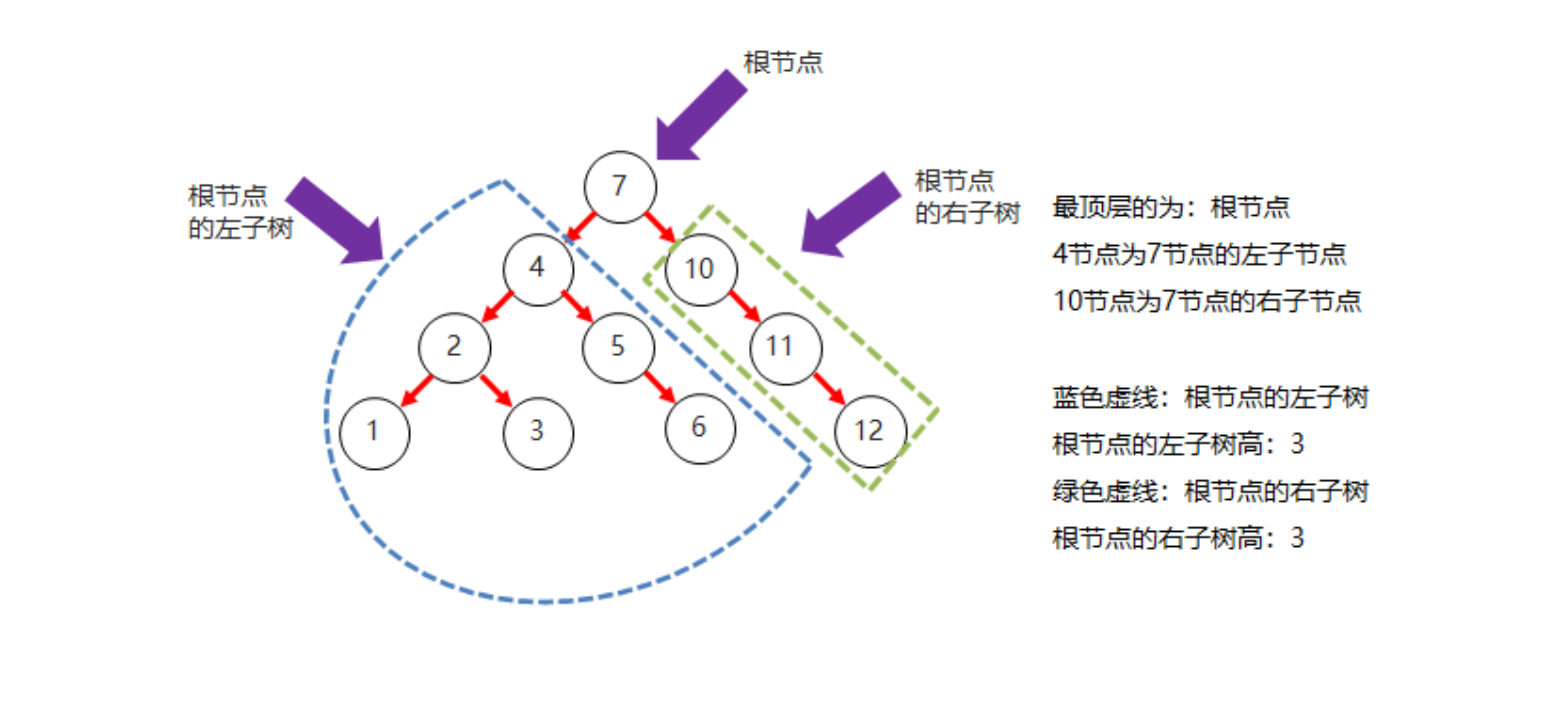
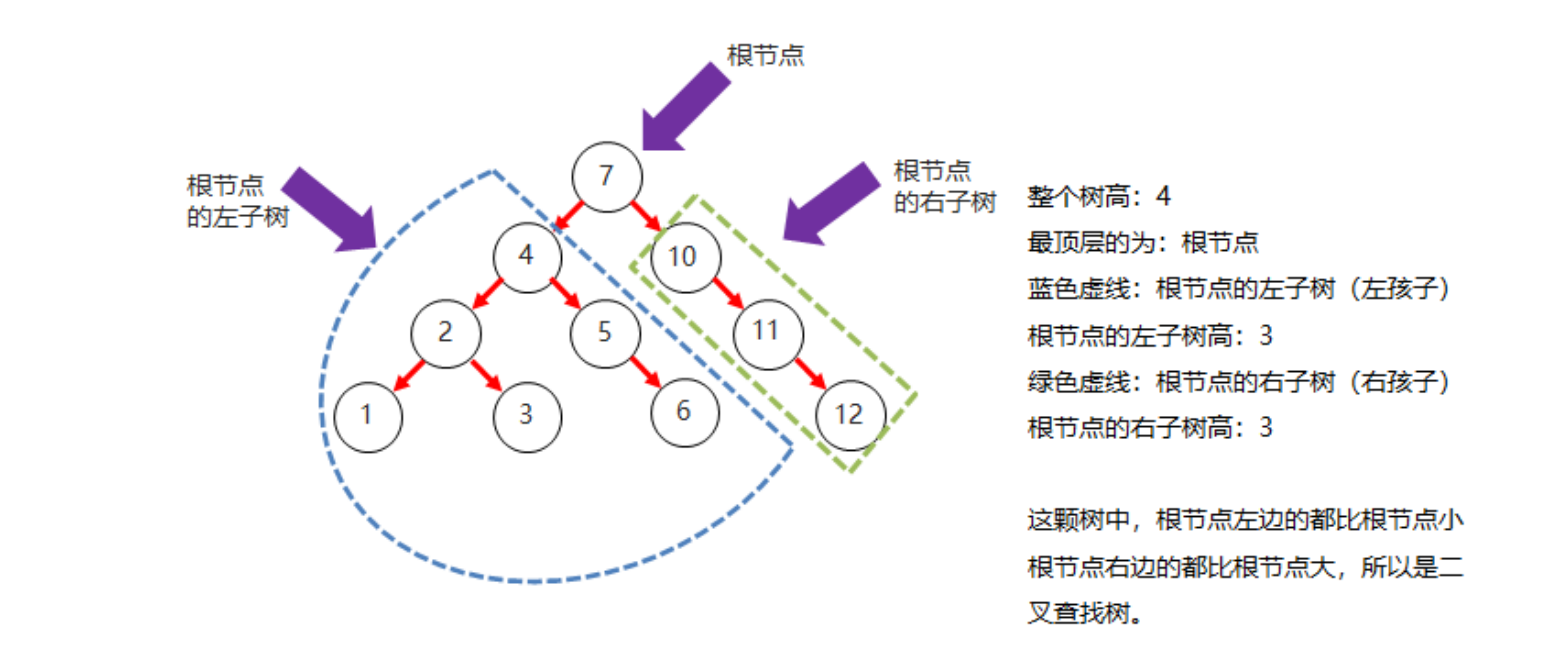
8.2二叉查找树【理解】
+ 二叉查找树的特点
+ 二叉查找树,又称二叉排序树或者二叉搜索树
+ 每一个节点上最多有两个子节点
+ 左子树上所有节点的值都小于根节点的值
+ 右子树上所有节点的值都大于根节点的值
+ 二叉查找树结构图
+ 二叉查找树和二叉树对比结构图
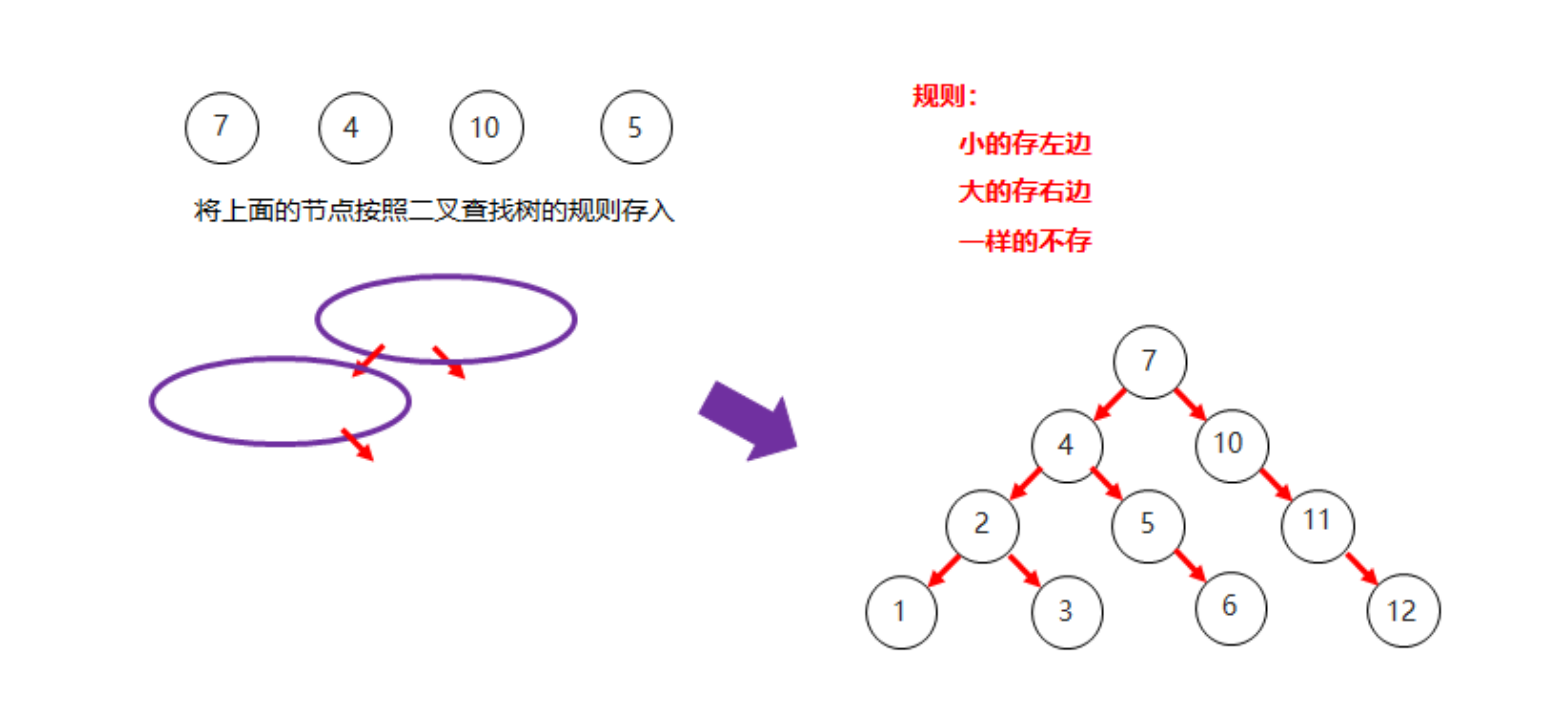
+ 二叉查找树添加节点规则
+ 小的存左边
+ 大的存右边
+ 一样的不存
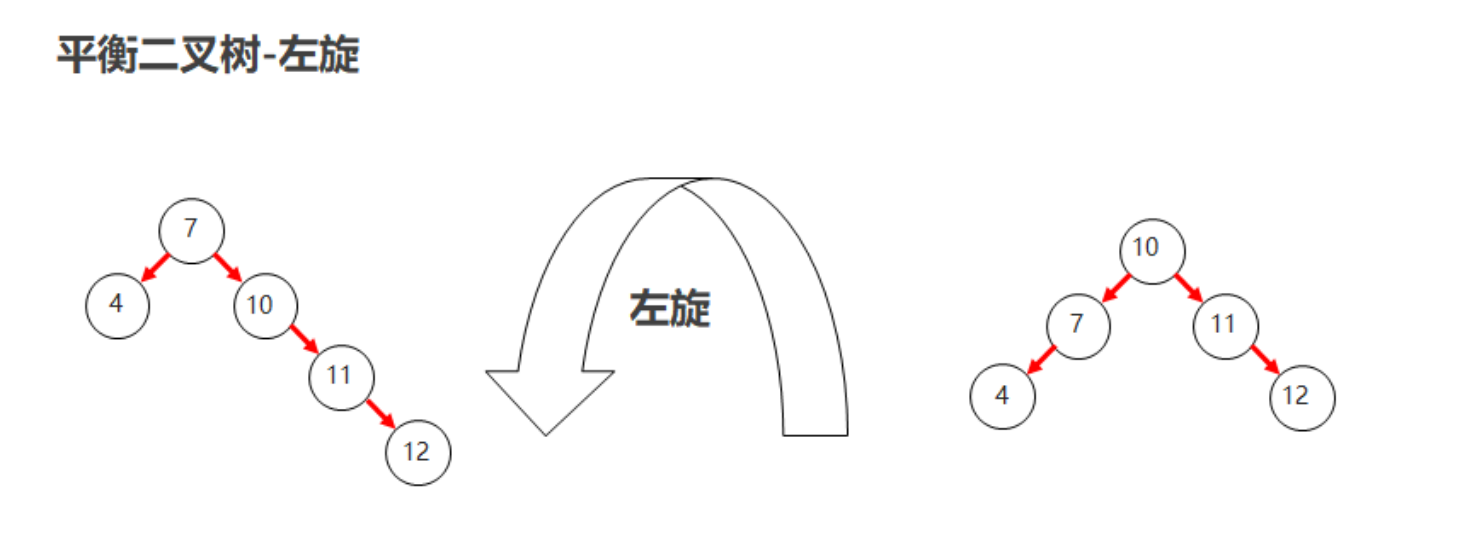
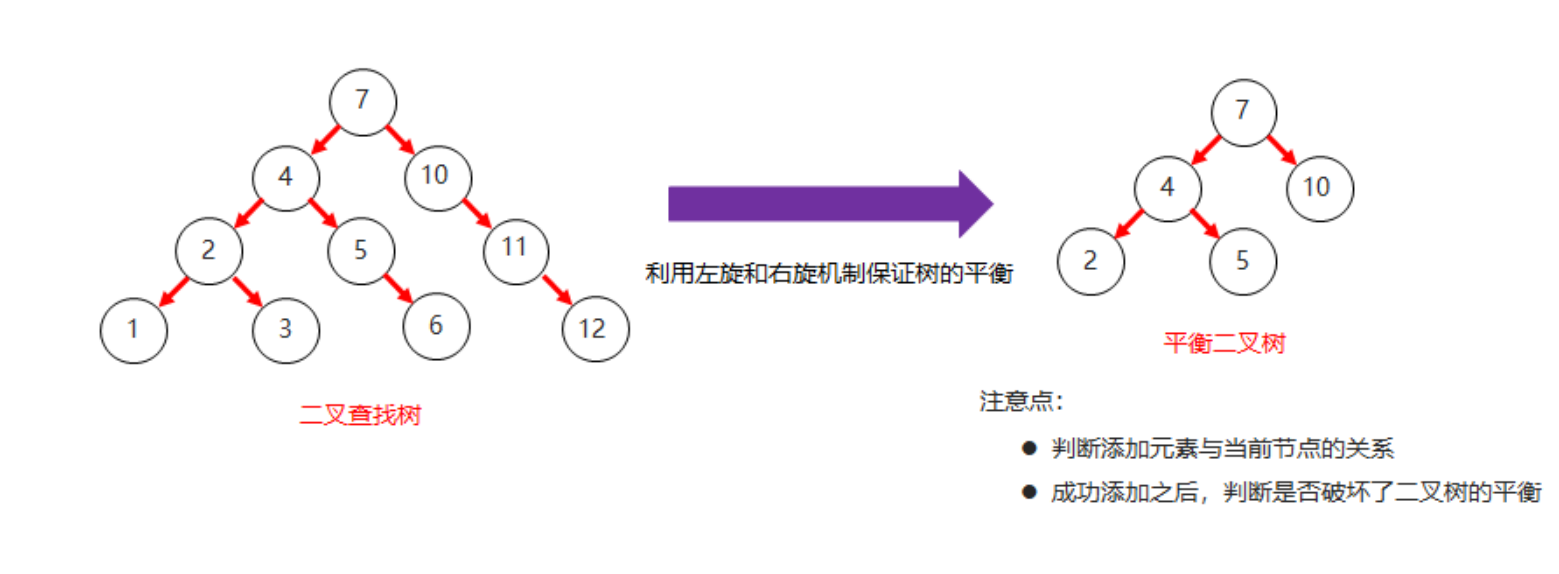
3平衡二叉树【理解】
+ 平衡二叉树的特点
+ 二叉树左右两个子树的高度差不超过1
+ 任意节点的左右两个子树都是一颗平衡二叉树
+ 平衡二叉树旋转
+ 旋转触发时机
+ 当添加一个节点之后,该树不再是一颗平衡二叉树
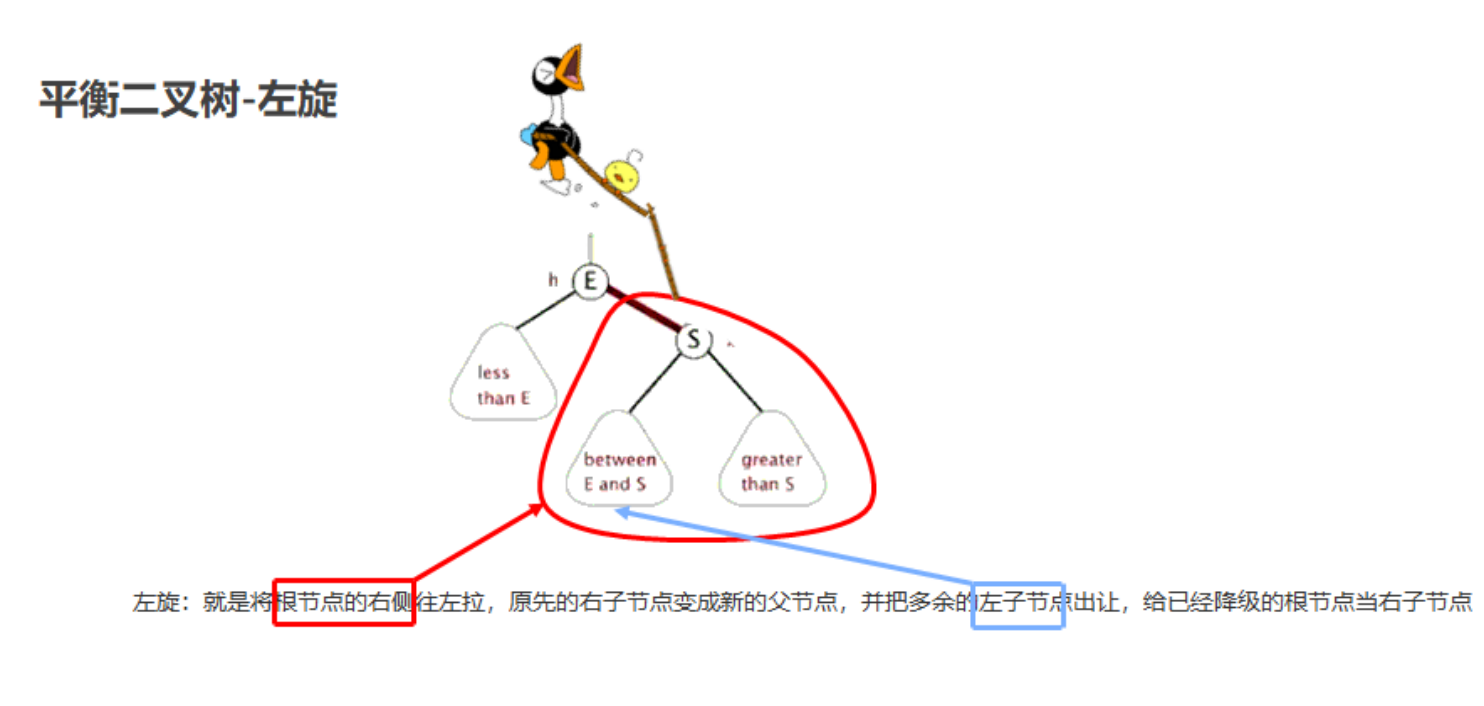
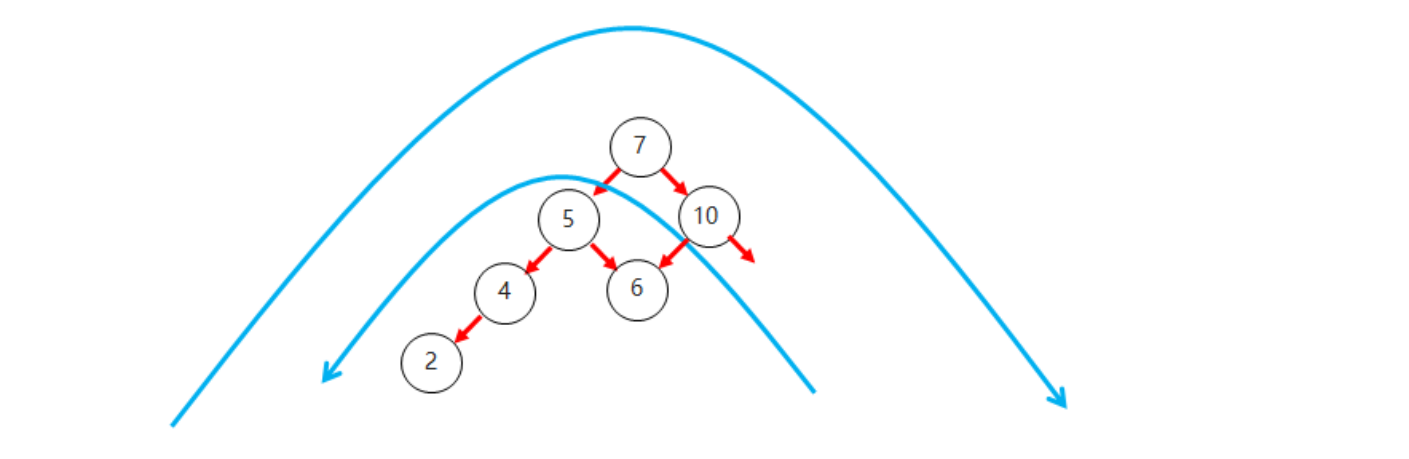
+ 左旋
+ 就是将根节点的右侧往左拉,原先的右子节点变成新的父节点,并把多余的左子节点出让,给已经降级的根节点当右子节点
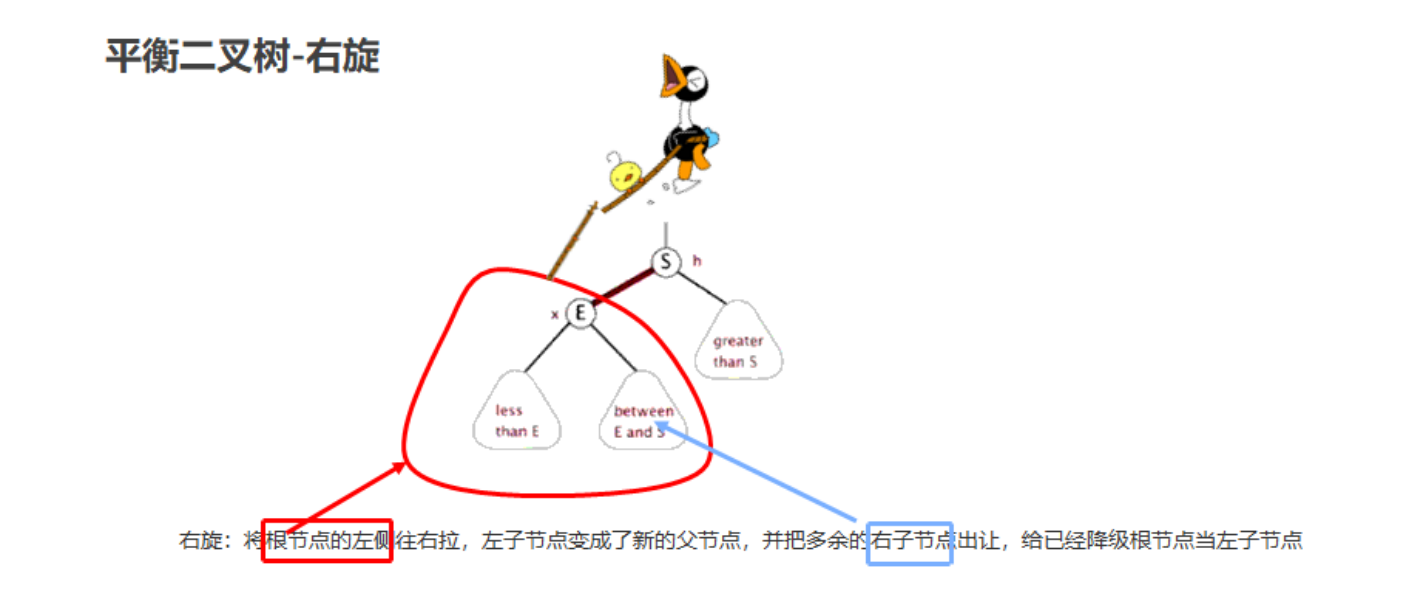
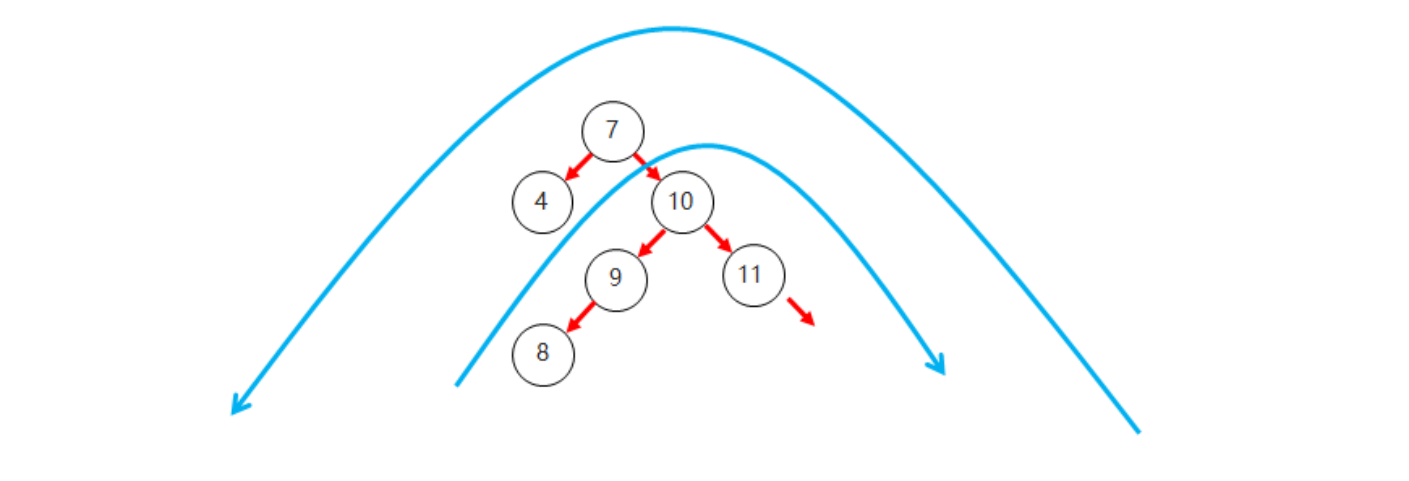
+ 右旋
+ 就是将根节点的左侧往右拉,左子节点变成了新的父节点,并把多余的右子节点出让,给已经降级根节点当左子节点

+ 平衡二叉树和二叉查找树对比结构图
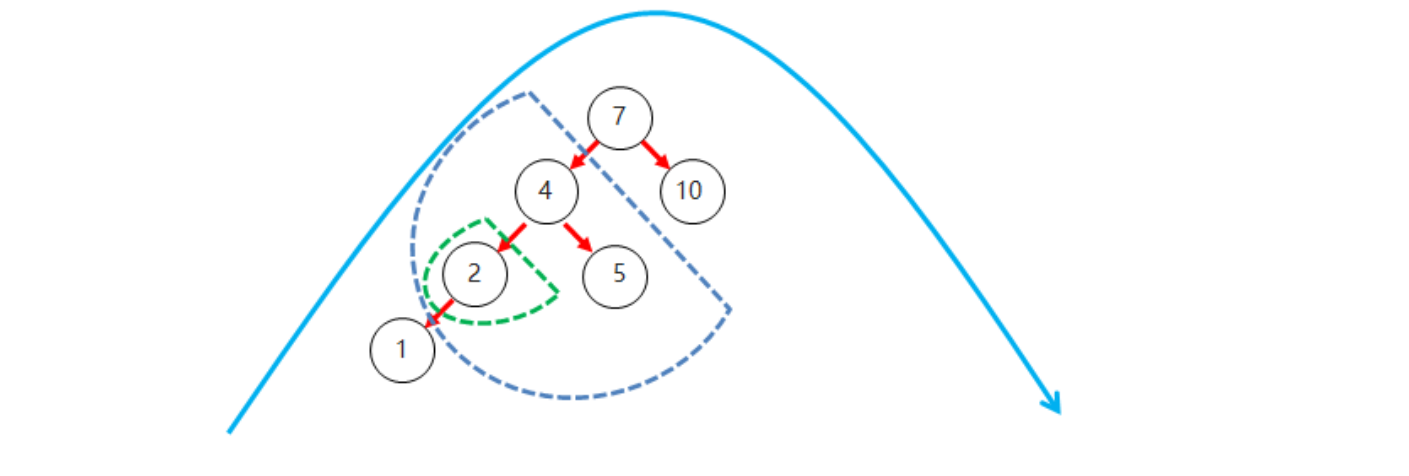
+ 平衡二叉树旋转的四种情况
+ 左左
+ 左左: 当根节点左子树的左子树有节点插入,导致二叉树不平衡
+ 如何旋转: 直接对整体进行右旋即可
+ 左右
+ 左右: 当根节点左子树的右子树有节点插入,导致二叉树不平衡
+ 如何旋转: 先在左子树对应的节点位置进行左旋,在对整体进行右旋
+ 右右
+ 右右: 当根节点右子树的右子树有节点插入,导致二叉树不平衡
+ 如何旋转: 直接对整体进行左旋即可
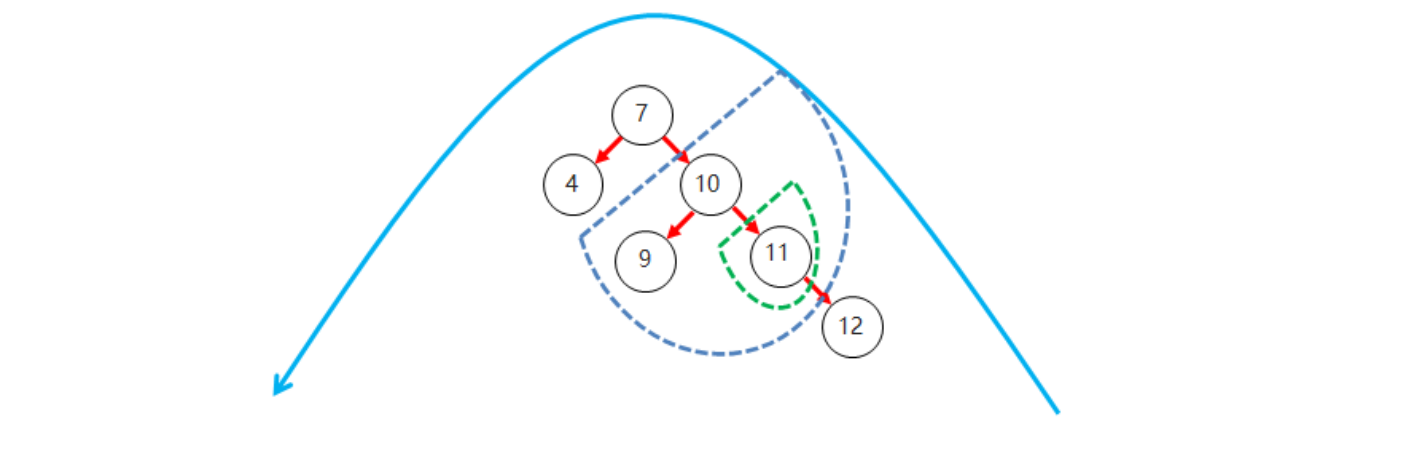
+ 右左
+ 右左:当根节点右子树的左子树有节点插入,导致二叉树不平衡
+ 如何旋转: 先在右子树对应的节点位置进行右旋,在对整体进行左旋
4红黑树【理解】
+ 红黑树的特点
+ 平衡二叉B树
+ 每一个节点可以是红或者黑
+ 红黑树不是高度平衡的,它的平衡是通过"自己的红黑规则"进行实现的
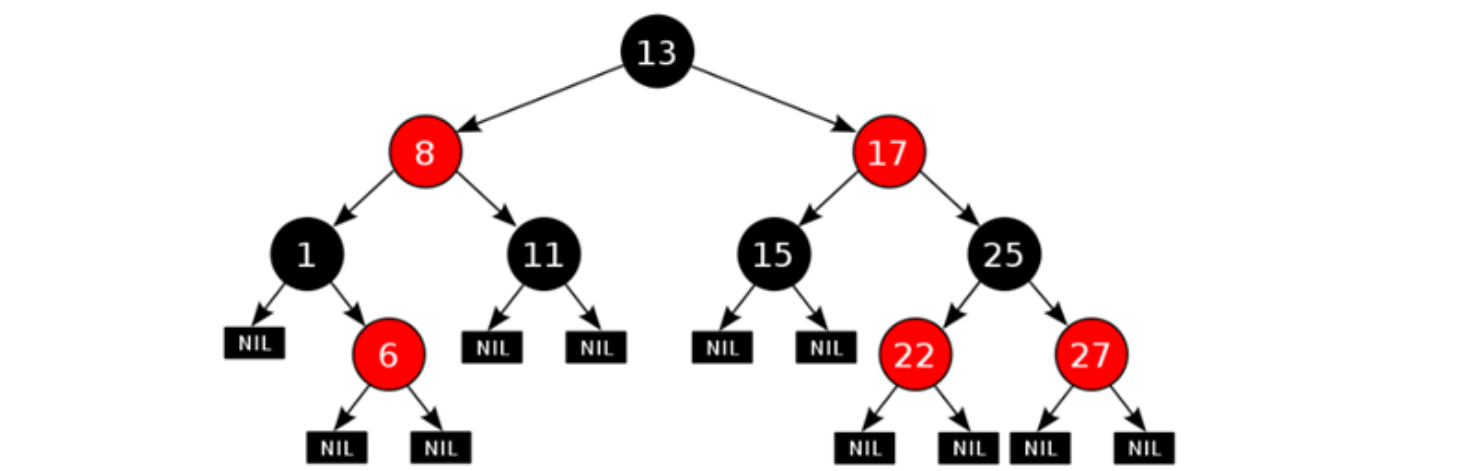
+ 红黑树的红黑规则有哪些
1. 每一个节点或是红色的,或者是黑色的
2. 根节点必须是黑色
3. 如果一个节点没有子节点或者父节点,则该节点相应的指针属性值为Nil,这些Nil视为叶节点,每个叶节点(Nil)是黑色的
4. 如果某一个节点是红色,那么它的子节点必须是黑色(不能出现两个红色节点相连 的情况)
5. 对每一个节点,从该节点到其所有后代叶节点的简单路径上,均包含相同数目的黑色节点
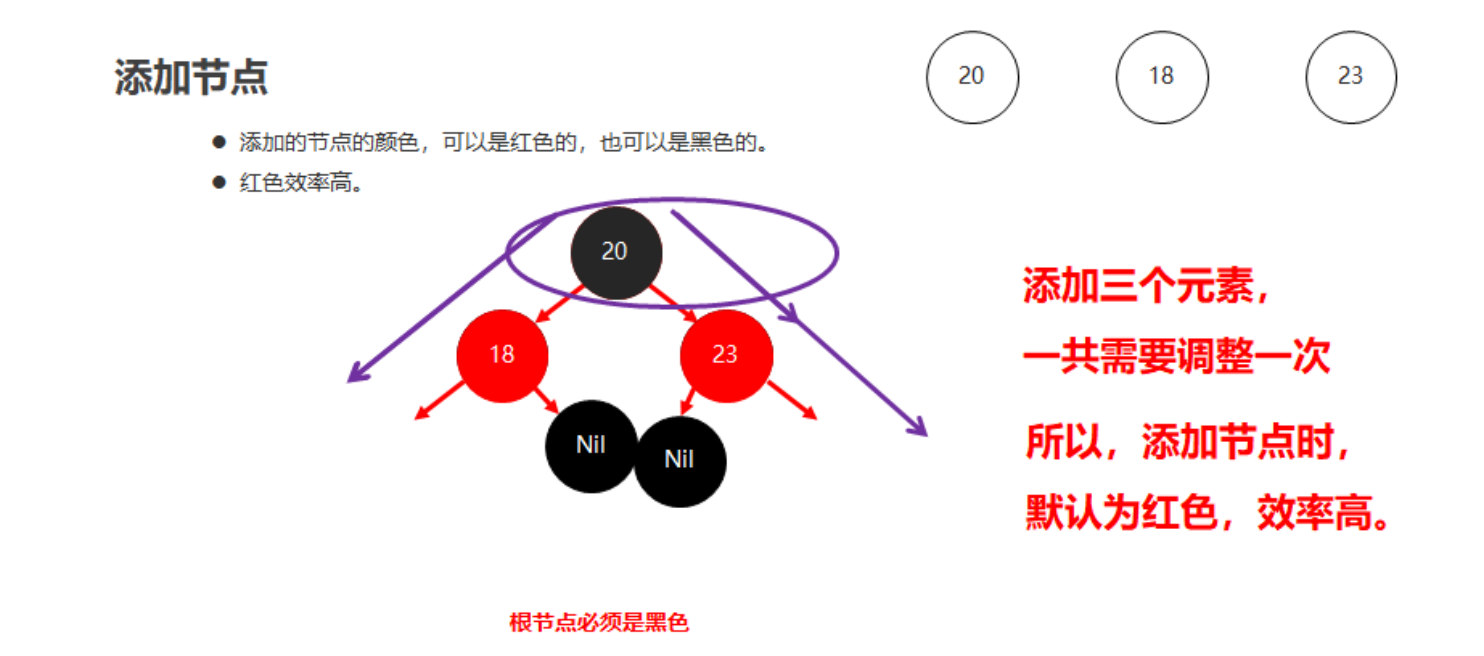
+ 红黑树添加节点的默认颜色
+ 添加节点时,默认为红色,效率高
+ 红黑树添加节点后如何保持红黑规则
+ 根节点位置
+ 直接变为黑色
+ 非根节点位置
+ 父节点为黑色
+ 不需要任何操作,默认红色即可
+ 父节点为红色
+ 叔叔节点为红色
1. 将"父节点"设为黑色,将"叔叔节点"设为黑色
2. 将"祖父节点"设为红色
3. 如果"祖父节点"为根节点,则将根节点再次变成黑色
+ 叔叔节点为黑色
1. 将"父节点"设为黑色
2. 将"祖父节点"设为红色
3. 以"祖父节点"为支点进行旋转

 浙公网安备 33010602011771号