SVN Serve 安装
1、部署环境说明
centos 7.9 (腾讯云)
subversion-1.14.1
2、查询下列软件是否已安装
rpm -qa | grep gcc
rpm -qa | grep openssl
rpm -qa | grep openssl-devel
rpm -qa | grep expat
rpm -qa | grep apr-devel
rpm -qa | grep apr-util-devel
rpm -qa | grep unzip
rpm -qa | grep zlib
rpm -qa | grep zlib-devel
3、安装SVN Serve
3.1、上传安装包
上传
subversion-1.14.1.tar.gz和sqlite-amalgamation-3081101.zip到centos系统/home目录下
3.2、跳转到/home
命令:
cd /home
3.3、解压文件
解压subversion:
tar -zxvf subversion-1.14.1.tar.gz
解压sqlite:unzip sqlite-amalgamation-3081101.zip
移动sqlite:mv sqlite-amalgamation-3081101 subversion-1.14.1/sqlite-amalgamation
3.4、配置svn参数
新建subversion安装目录:
mkdir subversion
跳转到:cd subversion-1.14.1
配置软件信息:./configure --prefix=/home/subversion
报错信息:
You probably need to do something similar with the Apache
Portable Runtime Utility (APRUTIL) library and then configure
Subversion with both the --with-apr and --with-apr-util options.
configure: error: no suitable APR found
3.5、处理上一步(3.4)安装错误问题
安装apr:
yum install -y apr-devel apr-util-devel
配置软件信息:./configure --prefix=/home/subversion
报错信息:
configure: error: Subversion requires LZ4 >= r129, or use --with-lz4=internal
3.6、处理上一步(3.5)安装错误问题
配置信息:
./configure --prefix=/home/subversion --with-lz4=internal
报错信息:
configure: error: Subversion requires UTF8PROC; install it or re-run configure with "--with-utf8proc=internal"
3.7、处理上一步(3.6)安装错误问题
配置信息:
./configure --prefix=/home/subversion --with-lz4=internal --with-utf8proc=internal
3.8、编译和安装
命令:
make && make install
4、配置环境变量
命令:
vim /etc/profile
文件最后添加一行内容:export PATH=/home/subversion/bin:$PATH
配置及时生效:source /etc/profile
5、创建一个仓库
5.1、创建文件夹
命令:
mkdir /home/repository
5.2、创建svn仓库
命令:
svnadmin create /home/repository/
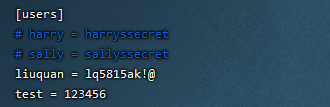
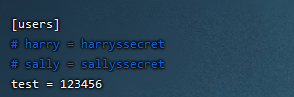
5.3、配置用户和密码
命令:
vim /home/repository/conf/passwd
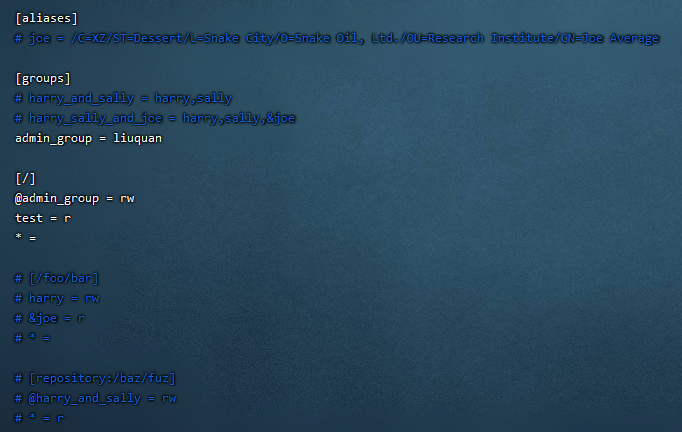
5.4、配置用户对应权限
命令:
vim /home/repository/conf/authz
5.5、配置svnseve.conf
命令:
vim /home/repository/conf/svnserve.conf
开启下列配置
anon-access = none #匿名用户不可读写
auth-access = write #授权用户可写
password-db = passwd #使用哪个文件作为账号密码文件
authz-db = authz #使用哪个文件作为权限文件
realm = myFirstSvn #认证空间名
5.6、启动svn服务
(第一种)命令:
svnserve -d -r /home/repository,访问地址:svn://127.0.0.1/
(第二种)命令:svnserve -d -r /home,authz文件[/] 或 [repository:/],访问地址:svn://127.0.0.1/repository
6、设置开机自动启动
1、查看
rc.local是否有执行权限,如果没有执行命令chmod +x /etc/rc.d/rc.local
2、在rc.local文件末尾追加内容,内容是/home/subversion/bin/svnserve -d -r /home/repository
7、查询svn是否启动
查询命令:
ps -ef | grep svn
如果启动时报端口号被占用,可以指定端口号启动svnserve --listen-port 3691 -d -r /home/repository
8、参考案例(网上实例)
部署(来源):https://blog.csdn.net/weixin_44316575/article/details/89189663
开启启动(来源):https://www.cnblogs.com/etiao/p/5404554.html
9、扩展知识
配置多个库,本实例只是演示了创建两个库
9.1、创建两个库
命令:
svnadmin create /home/svn/one
命令:svnadmin create /home/svn/two
9.2、设置authz,passwd
命令:
cp /home/svn/one/conf/passwd /home/svn/
命令:cp /home/svn/one/conf/authz /home/svn/
命令:vim /home/svn/passwd
命令:vim /home/svn/authz
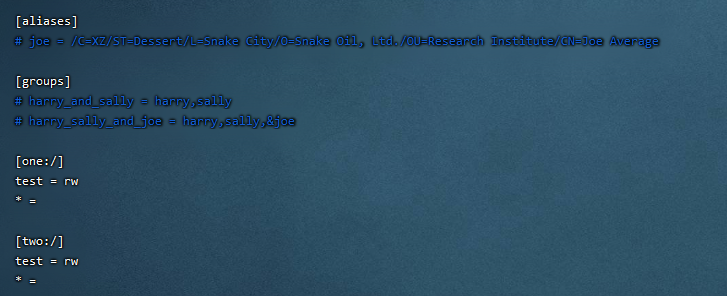
9.3、设置svnserve.conf
命令:
vim one/conf/svnserve.conf和vim two/conf/svnserve.conf文件内容如下:
anon-access = none #匿名用户不可读写
auth-access = write #授权用户可写
password-db = /home/svn/passwd #使用哪个文件作为账号密码文件
authz-db = /home/svn/authz #使用哪个文件作为权限文件
realm = myMoreSvn #认证空间名【相同,切换库不用重新登录;不同,切换库需要重新登录】
9.4、访问库,查看是否成功
访问地址:
http://ip/one
访问地址:http://ip/two


 浙公网安备 33010602011771号