


【事件绑定】
基本使用
新建项目,使用模板可以选择:JS基础版本
# 1 方式一
<view bind:tab="js中写方法"></view>
# 2 方式二
<view bindtab="js中写方法"></view>

# 3 js中写方法
  showLog(){
    console.log("我被点了")
  }
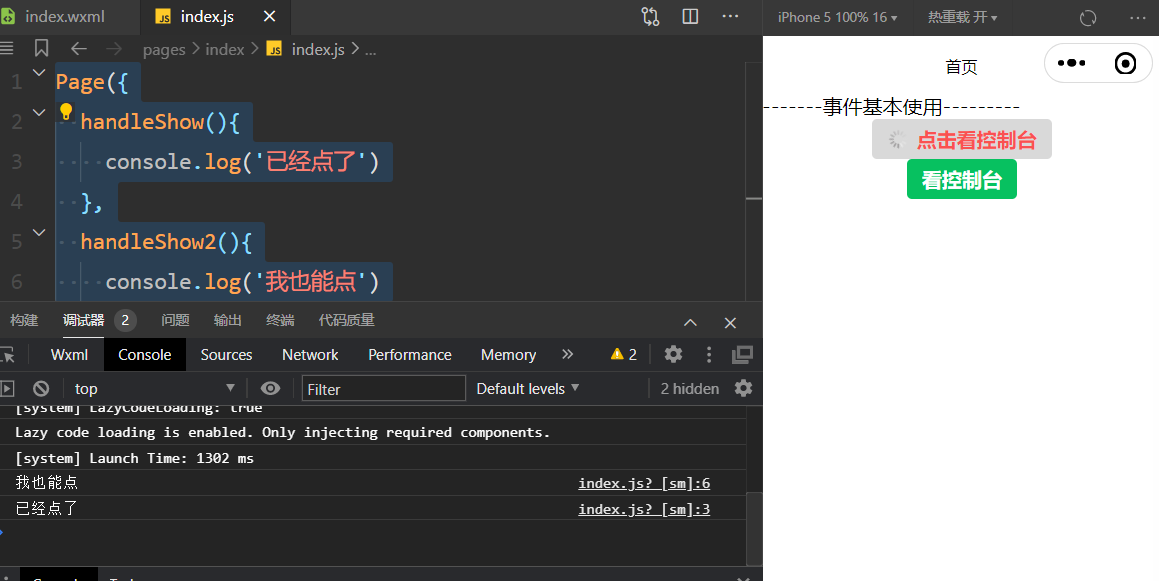
 1 vxml
 2
 3
 4 <!--index.wxml-->
 5 <view>-------事件基本使用---------</view>
 6
 7 <button size="mini" type="warn" loading bind:tap="handleShow">点击看控制台</button>
 8
 9 <button size="mini" type="primary" bindtap="handleShow2">看控制台</button>
10
11
12 *****************************
13 index.js
14
15 Page({
16   handleShow(){
17     console.log('已经点了')
18   },
19   handleShow2(){
20     console.log('我也能点')
21   },
22 })
阻止事件冒泡
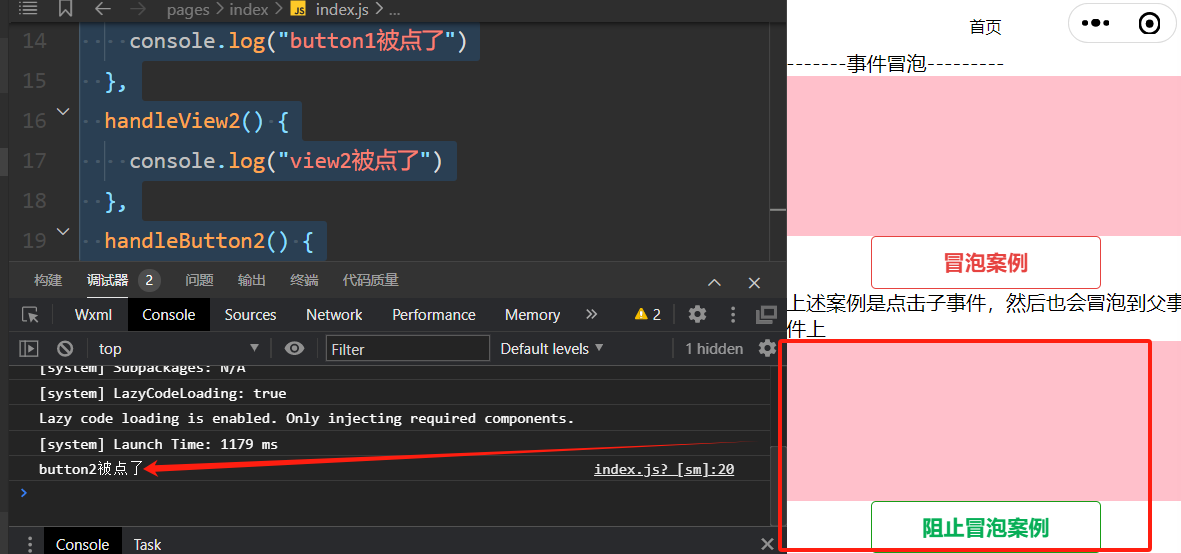
 1 <!--index.wxml-->
 2
 3 <view>-------事件冒泡---------</view>
 4 <view class="view1" bind:tap="handleView1"></view>
 5 <button type="warn" plain bind:tap="handleButton1">冒泡案例</button>
 6 <view>上述案例是点击子事件,然后也会冒泡到父事件上</view>
 7 <view class="view1" bind:tap="handleView2"></view>
 8 <button type="primary" plain catch:tap="handleButton2">阻止冒泡案例</button>
 9
10
11
12 <view style="height:300rpx;display: flex;justify-content: center;align-items: center; background-color: pink;" bind:tap="handleView1">
13 <button type="warn" plain bind:tap="handleButton1">冒泡案例</button>
14
15 </view>
16 //catch
17 <view style="height:300rpx;display: flex;justify-content: center;align-items: center; background-color: orange;" bind:tap="handleView2">
18 <button type="primary" plain catch:tap="handleButton2">阻止事件冒泡</button>
19 </view>
20
21 ********************************
22 样式
23
24 .view1{
25   height: 300rpx;
26   display: flex;
27   justify-content: center;
28   align-items: center;
29   background-color: pink;
30 }
31
32
33 ******************
34 js
35
36 Page({
37
38   handleView1() {
39     console.log("view1被点了")
40
41   },
42   handleButton1() {
43     console.log("button1被点了")
44   },
45   handleView2() {
46     console.log("view2被点了")
47   },
48   handleButton2() {
49     console.log("button2被点了")
50   },
51 })
事件对象和事件传参
data-*方案
mark:自定义属性
target :事件触发者 :dataset data定义的属性
currentTarget:事件绑定者 :dataset data定义的属性
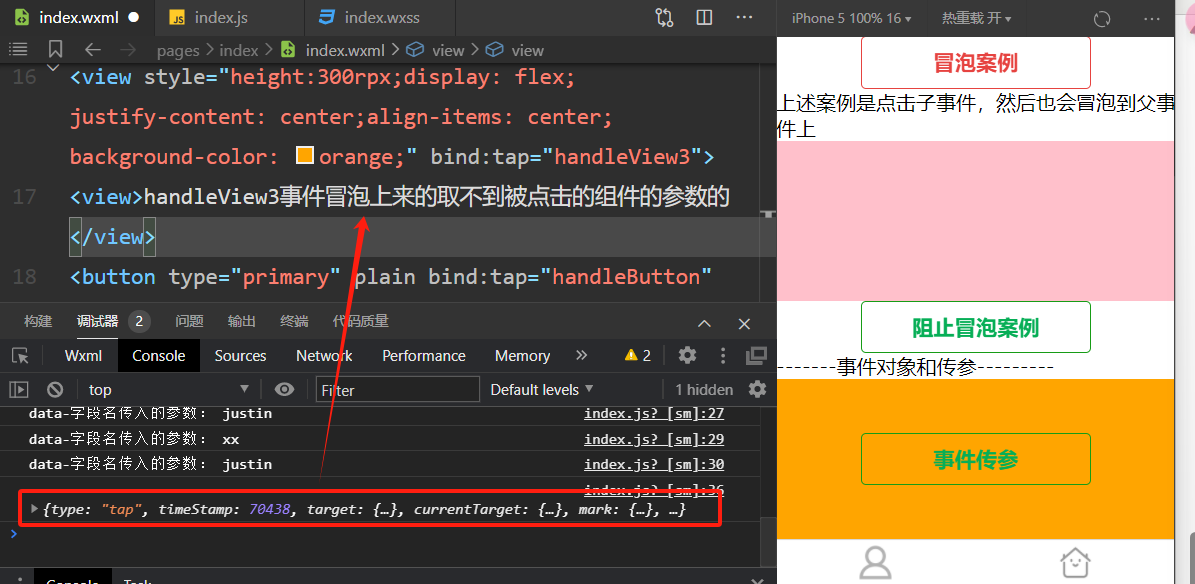
 1 <view style="height:300rpx;display: flex;justify-content: center;align-items: center; background-color: orange;" bind:tap="handleView3">
 2 <view>handleView3事件冒泡上来的取不到被点击的组件的参数的</view>
 3 <button type="primary" plain bind:tap="handleButton" data-name="justin" data-xx="xx" mark:name="lqz">事件传参</button>
 4 </view>
 5
 6
 7 ***************************************
 8 js
 9
10 handleButton(event){
11     console.log(event)
12     console.log('mark传入的参数:',event.mark.name)
13     console.log('data-字段名传入的参数:',event.currentTarget.dataset.xx)
14     console.log('data-字段名传入的参数:',event.currentTarget.dataset.name)
15
16     console.log('data-字段名传入的参数:',event.target.dataset.xx)
17     console.log('data-字段名传入的参数:',event.target.dataset.name)
18     // mark
19     // target:dataset
20     // currentTarget:dataset
21   },
22   handleView3(event){
23     console.log(event)
24   }
页面跳转
wxml-组件跳转--声明式导航
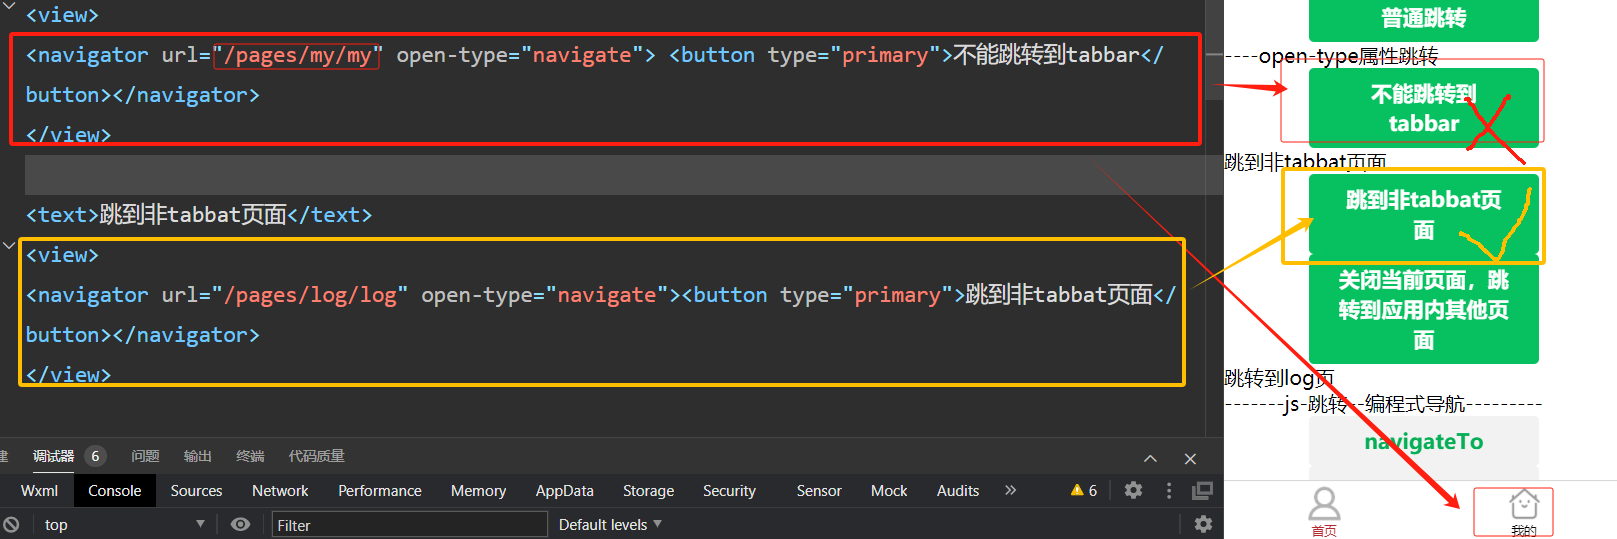
# 1 使用 navigator 组件实现跳转
    -url :当前小程序内的跳转链接
    -open-type :跳转方式
        navigate:保留当前页面,跳转到应用内的某个页面。但是不能跳到 tabbar 页面
        redirect: 关闭当前页面,跳转到应用内的某个页面。但不能跳转到 tabbar 页面
        switchTab:跳转到 tabBar 页面,并关闭其他所有非 tabBar 页面
        reLaunch:关闭所有页面,打开到应用内的某个页面
        navigateBack:关闭当前页面,返回上一页面或多级页面
<text>----普通跳转</text>
<view><navigator url="/pages/log/log"><button type="primary">普通跳转</button></navigator></view>
<text>----open-type属性跳转</text>
<view>
<navigator url="/pages/my/my" open-type="navigate"> <button type="primary">不能跳转到tabbar</button></navigator>
</view>
<text>跳到非tabbat页面</text>
<view>
<navigator url="/pages/log/log" open-type="navigate"><button type="primary">跳到非tabbat页面</button></navigator>
</view>
<text>关闭当前页面</text>
<view>
<navigator url="/pages/log/log" open-type="redirect"><button type="primary">关闭当前页面,跳转到应用内其他页面,只能回到首页</button></navigator>
</view>
<text>只能跳到tabbat</text>
<view>
<navigator url="/pages/my/my" open-type="switchTab"><button type="primary">只能跳到tabbat,无返回</button></navigator>
</view>
<text>关闭所有页面,打开到应用内的某个页面</text>
<view>
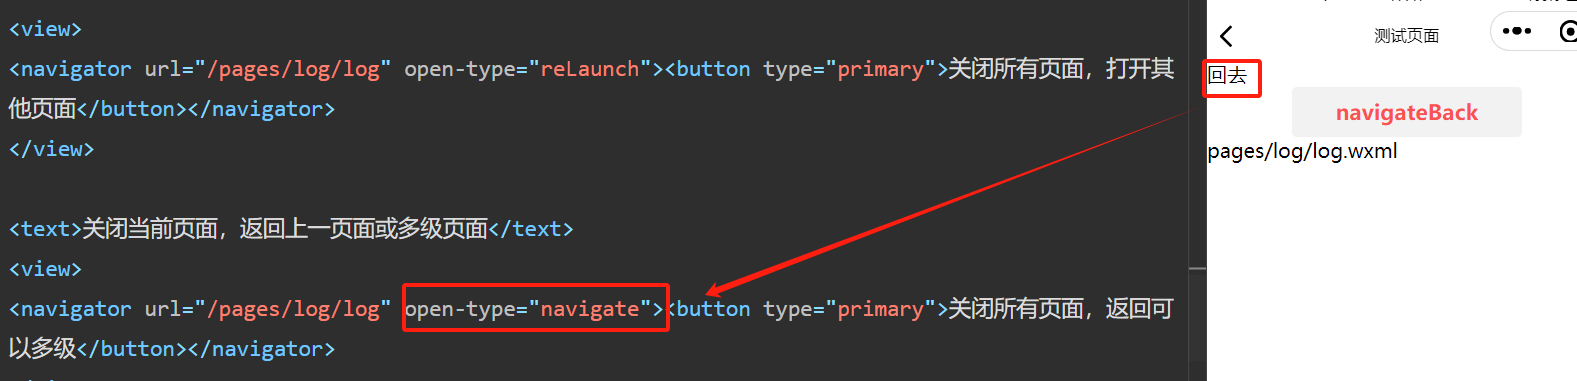
<navigator url="/pages/log/log" open-type="reLaunch"><button type="primary">关闭所有页面,打开其他页面</button></navigator>
</view>
<text>关闭当前页面,返回上一页面或多级页面</text>
<view>
<navigator url="/pages/log/log" open-type="navigate"><button type="primary">关闭所有页面,返回可以多级</button></navigator>
</view>
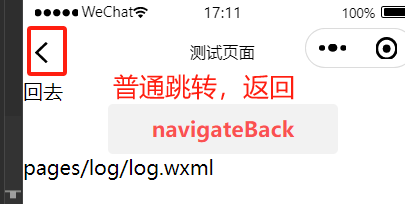
----------------log页面的返回方式
<!-- delta控制返回层级 -->
<navigator open-type="navigateBack" delta="1">回去</navigator>
-----------------------------------
# 携带参数
跳转
<view>
<navigator url="/pages/login/login?name=justin&age=19" open-type="navigate">跳转到login页</navigator>
</view>
#4.2 在 onLoad的options中获取参数
onLoad(options) {
console.log(options)
},
## 4.3 注意跳转tabbar不能携带参数


js-跳转--编程式导航
# 1 5 个方法
wx.navigateTo({
    url: 'url',
})

wx.redirectTo({
    url: 'url',
})

wx.switchTab({
    url: 'url',
})

wx.reLaunch({
    url: 'url',
})

wx.navigateBack()

# 2  index页面
<button type="default"  bind:tap="handlenavigateTo">navigateTo</button>
<button type="warn" bind:tap="handleredirectTo">redirectTo</button>
<button type="primary" bind:tap="handleswitchTab">switchTab</button>
<button type="default" bind:tap="handlereLaunch">reLaunch</button>

-------log页面
<button type="warn" bind:tap="handlenavigateBack">navigateBack</button>


# 3 index.js
  handlenavigateTo(){
    wx.navigateTo({
      url: '/pages/log/log',
    })
  },
  handleredirectTo(){
    wx.redirectTo({
      url: '/pages/log/log',
    })
  },
  handleswitchTab(){
    wx.switchTab({
      url: '/pages/my/my',
    })
  },
  handlereLaunch(){
    wx.reLaunch({
      url: '/pages/log/log',
    })

  },

------------log.js
  handlenavigateBack(){
    // 关闭当前页面,返回上一页或上某一页,传入数字
    wx.navigateBack()

     wx.navigateBack({
      delta:1
    })
  },

。
。
。
wxml语法
模版语法
#  1 在页面 xx.js 的 Page() 方法的 data 对象中进行声明定义
#  2 在xx.wxml 中使用 {{}} 包裹,显示数据
#  3 可以显示如下,不能编写js语句或js方法
    -变量
    -算数运算
    -三元运算
    -逻辑判断

# 4 只是单纯通过赋值,js中变量会变化,但是wxml中的页面不会变化,没有联动效果,需要使用setData()方法修改
    - 更新数据
    - 页面更新
 -----------------------------------
wxml页面渲染
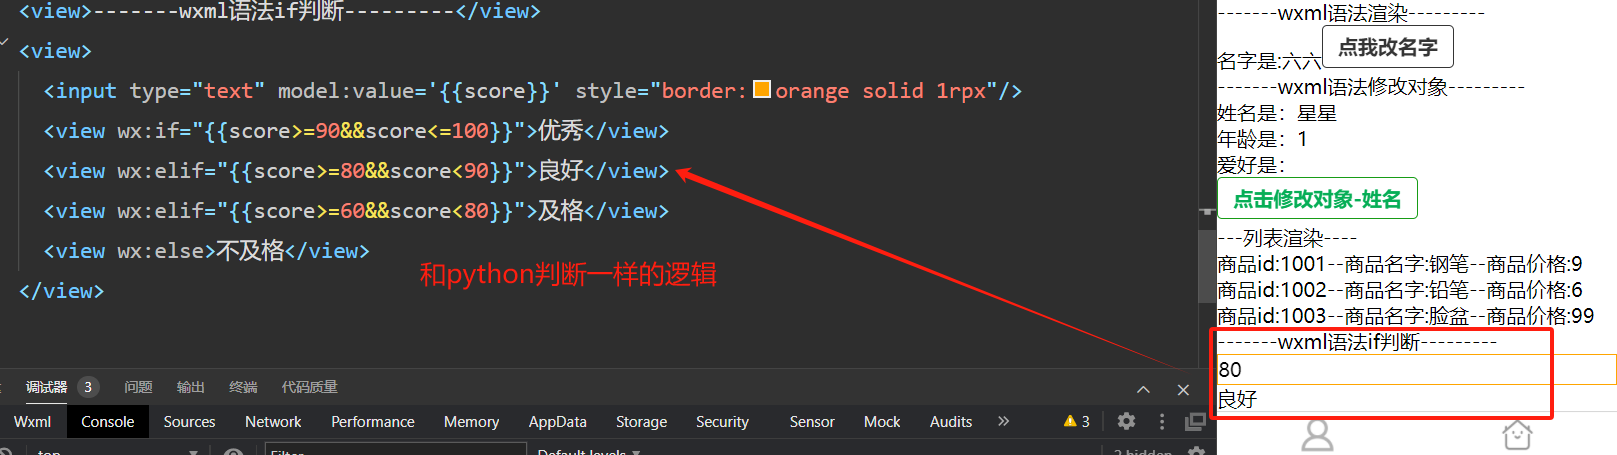
 1 wxml
 2
 3 <text>名字是:{{name}}</text>
 4 <button size="mini" type="default" plain bind:tap="handlChangeName">点我改名字</button>
 5
 6
 7 ---------------
 8 js
 9
10 Page({
11   data:{
12     name:'六六',
13   },
14
15   handlChangeName(){
16     this.name='奶茶'
17     console.log(this.data.name)
18
19     //setData案例 修改数字,让页面也改变
20     this.setData({
21       'name':'奶茶'
22     })
23     console.log(this.data.name)
24   },
25 })

。
。
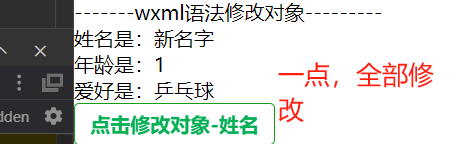
wxml语法修改对象
  1 wxml
  2
  3 <view>
  4 <view>姓名是:{{userinfo.name}}</view>
  5 <view>年龄是:{{userinfo.age}}</view>
  6 <view>爱好是:{{userinfo.hobby}}</view>
  7 <button bind:tap="handleChangeName1" plain="true" type="primary" size="mini">点击修改对象-姓名</button>
  8 </view>
  9
 10 ---------------------
 11 js
 12
 13   data:{
 14     userinfo:{
 15       name:'星星',
 16       age:1
 17
 18   },
 19
 20
 21 handleChangeName1(){
 22     this.setData({
 23       //改名字
 24       'userinfo.name':'小星星',
 25       //增加对象
 26       'userinfo.hobby':'吃猫条',
 27     },
 28 -----------------------------------------------------------------
 29
 30       // 修改多个数据1--》简便方案--》展开运算符
 31     const userinfo = {
 32       ...this.data.userinfo,
 33       name: '新名字',
 34       hobby: '乒乓球'
 35 }
 36
 37     this.setData({
 38       userinfo:userinfo
 39       userinfo //简写形式
 40
 41     })
 42   },
 43
 44
 45 ==============================
 46 其他修改对象方式
 47
 48     // 1.修改多个数据--》简便方案-->assign
 49     const userinfo = Object.assign(this.data.userinfo, {
 50       name: 'xxzz',
 51       hobby: '烫头'
 52     })
 53     this.setData({
 54       // userinfo:userinfo
 55       userinfo //简写形式
 56     })
 57
 58
 59  //2.删除数据-->单个
 60     delete this.data.userinfo.name // 页面删除不了,需要用setData更新
 61     this.setData({
 62       userinfo:this.data.userinfo
 63     })
 64
 65     //3.删除数据-->多个--解构赋值
 66     const {name,age,...res}=this.data.userinfo
 67     this.setData({
 68       userinfo:res
 69     })
 70
 71   },
 72
 73 # 4.setData 修改数组
 74 ## 7.1 js
 75 data: {
 76     names:['刘亦菲','迪丽热巴','古力娜扎','马尔扎哈']
 77   },
 78
 79    handleChangeList(){
 80     //1 增加数组
 81     // 1.1 增加再设置值
 82     this.data.names.push('亚瑟王')
 83     this.setData({
 84       names:this.data.names
 85     })
 86
 87     // 1.2 通过数组拼接
 88     // const newList=this.data.names.concat("甄姬")
 89     // this.setData({
 90     //   names:newList
 91     // })
 92
 93     // 1.3 通过解构赋值
 94     const newList=[...this.data.names,"李白"]
 95     this.setData({
 96       names:newList
 97     })
 98
 99     // 2 修改数组
100     this.setData({
101       'names[1]':'justin'
102     })
103
104     // 3 删除数组
105     this.data.names.slice(1)
106     this.setData({
107       names:this.data.names.slice(1)
108     })
109
110
111   },
112 ## 7.2 wxml
113 <view wx:for="{{names}}" wx:key="index">
114 {{item}}
115
116 </view>
117 <button bind:tap="handleChangeList" plain="true" type="primary" size="mini">修改数组</button>
118
119
120 # 5 双向数据绑定:model
121 <view>
122   <!-- 不支持数组和对象 -->
123   <input type="text" model:value='{{name}}' style="border:orange solid 1rpx"/>
124   <checkbox model:checked="{{isCheck}}"/>
125   <text>{{isCheck}}</text>
126 </view>
条件渲染
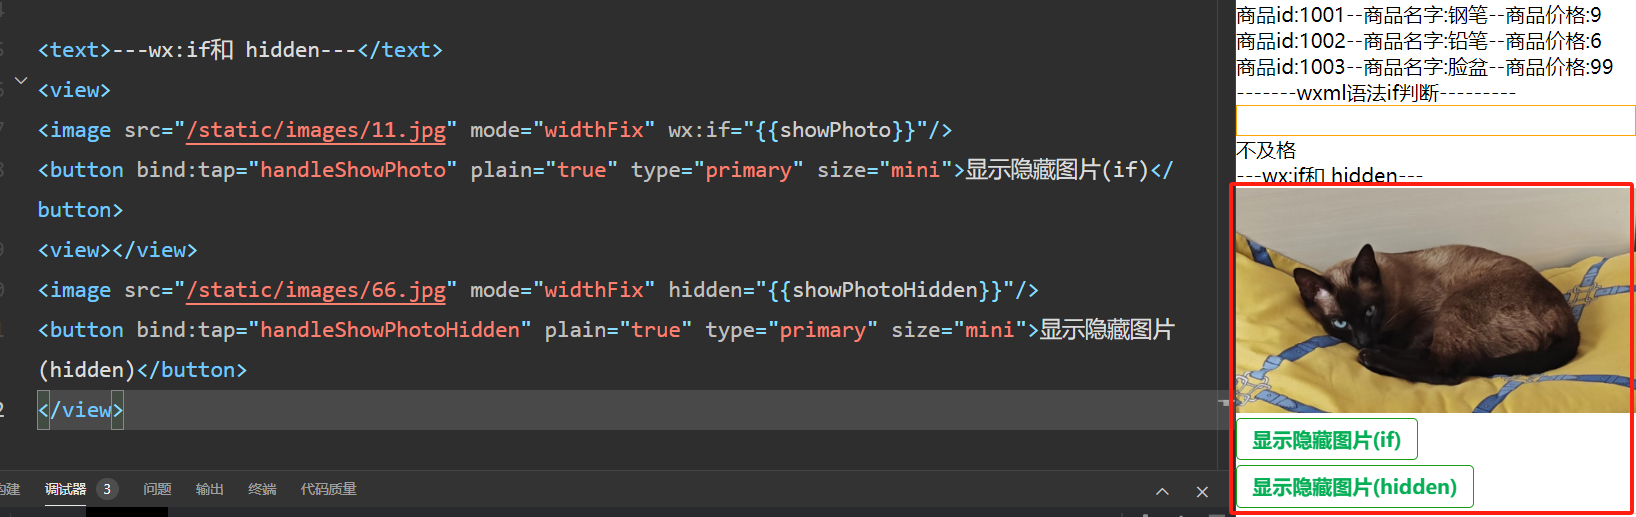
 1 # 1 wx:if   wx:elif   wx:else
 2 <view>
 3   <input type="text" model:value='{{score}}' style="border:orange solid 1rpx"/>
 4   <view wx:if="{{score>=90&&score<=100}}">优秀</view>
 5   <view wx:elif="{{score>=80&&score<90}}">良好</view>
 6   <view wx:elif="{{score>=60&&score<80}}">及格</view>
 7   <view wx:else>不及格</view>
 8 </view>
 9 'score':' ',
10
11 ----------------------------------------------------------------------
12
13 # 2 wx:if  和 hidden
14 ## 2.1 js
15 showPhoto:true,
16 showPhotoHidden:true
17     handleShowPhoto(){
18         this.setData({
19             showPhoto:!this.data.showPhoto
20         })
21         console.log(this.data.showPhoto)
22     },
23     handleShowPhotoHidden(){
24         this.setData({
25             showPhotoHidden:!this.data.showPhotoHidden
26         })
27     },
28
29 ## 2.2 wxml
30 <view>
31 <image src="/images/b.jpg" mode="widthFix" wx:if="{{showPhoto}}"/>
32 <button bind:tap="handleShowPhoto" plain="true" type="primary" size="mini">显示隐藏图片(if)</button>
33 <view></view>
34 <image src="/images/b.jpg" mode="widthFix" hidden="{{showPhotoHidden}}"/>
35 <button bind:tap="handleShowPhotoHidden" plain="true" type="primary" size="mini">显示隐藏图片(hidden)</button>
36 </view>
列表渲染
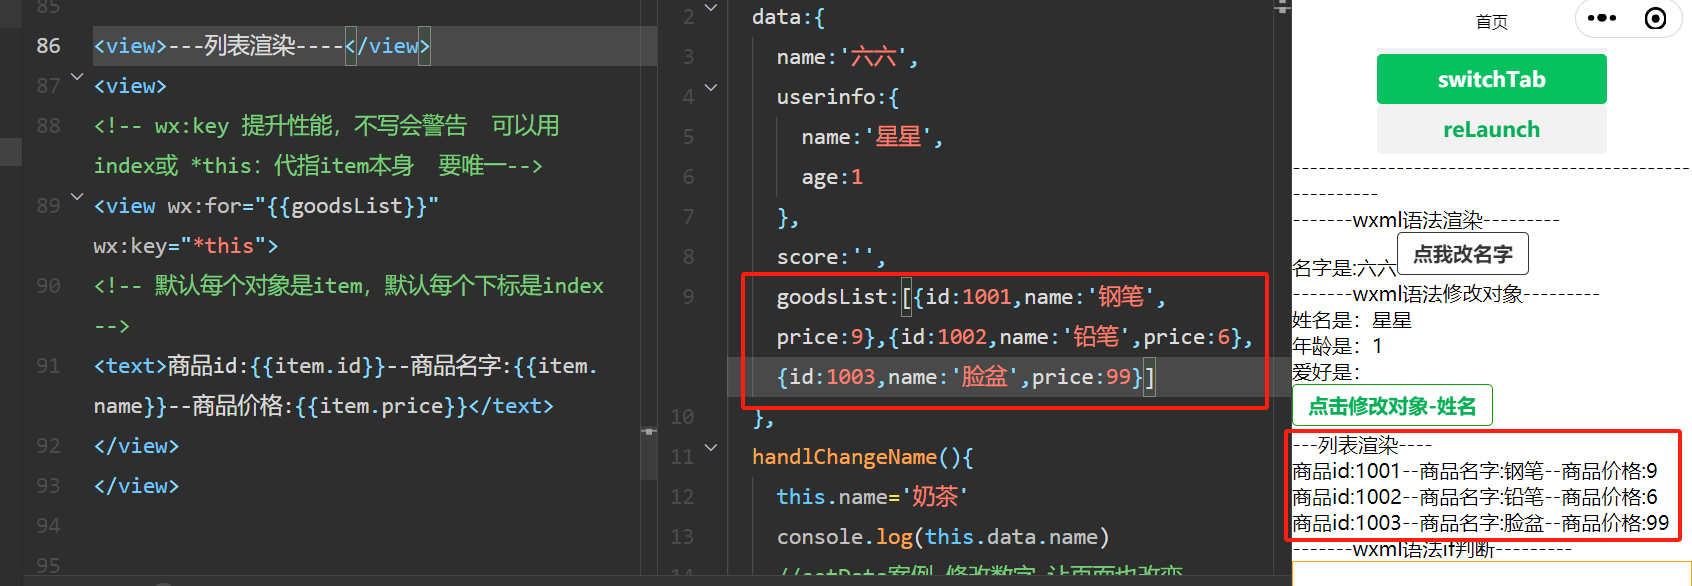
 1 # 1 基本使用
 2 ## 1.1 js
 3   data: {
 4     goodsList:[{id:1001,name:'钢笔',price:9},{id:1002,name:'铅笔',price:6},{id:1003,name:'脸盆',price:99}]
 5   },
 6 ##1.2 wxml
 7
 8 <view>
 9 <!-- wx:key 提升性能,不写会警告  可以用 index或 *this:代指item本身  要唯一-->
10 <view wx:for="{{goodsList}}" wx:key="*this">
11 <!-- 默认每个对象是item,默认每个下标是index -->
12 <!-- <text>商品id:{{item.id}}--商品名字:{{item.name}}--商品价格:{{item.price}}</text> -->
13 </view>
14 </view>
15 ------------------------------------------
16
17 # 2 修改wx:for-index  wx:for-item
18 <view>
19   <view wx:for="{{goodsList}}" wx:key="*this" wx:for-item="info">
20 <!-- 修改默认index和item--wx:for-index  wx:for-item    -->
21 <text>商品id:{{info.id}}--商品名字:{{info.name}}--商品价格:{{info.price}}</text>
22 </view>
23 </view>
24
25 # 3 block
26 <block>商品id:{{info.id}}--商品名字:{{info.name}}--商品价格:{{info.price}}</block>
。
。
发送网络请求(和后端交互,路飞项目中的轮播图)
wx.request()
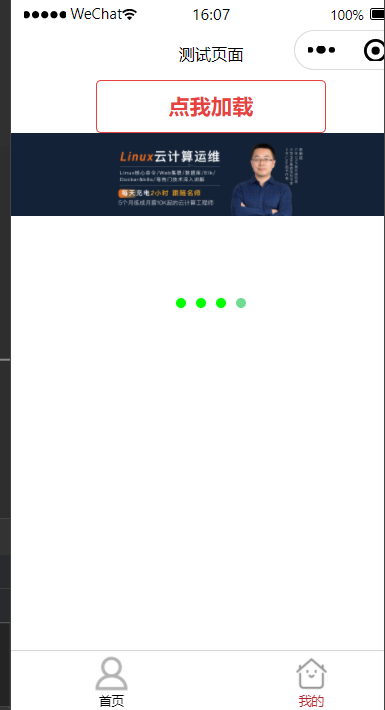
 1 <!--pages/my/my.wxml-->
 2 <button type="warn" plain bind:tap="handleLoad">点我加载</button>
 3
 4 <swiper
 5 autoplay
 6 interval="2000"
 7 indicator-dots
 8 indicator-color="#00FF00"
 9 indicator-active-color="#70DB93"
10 circular
11 >
12   <swiper-item wx:for="{{bannerList}}" wx:key="*this">
13     <image src="{{item.image}}" mode="widthFix"/>
14   </swiper-item>
15
16 </swiper>
17
18 -------------------------------------------------------------------------
19
20 // pages/my/my.js
21 Page({
22   data:{
23     bannerList:[]
24   },
25   handleLoad(){
26     wx.showLoading({
27       title: '加载中,稍后',
28       mask:true  // 显示透明蒙层
29     })
30     wx.request({
31       url: 'http://127.0.0.1:8000/api/v1/home/banner/',
32       method:'GET',
33       success:(res)=>{
34         console.log(res.data)
35         this.setData({
36           bannerList:res.data.results
37         })
38       },
39       fail:(err)=>{
40         console.log(err)
41       },
42       complete:()=>{
43         console.log('无论成功失败,都执行')
44         // 关闭
45         wx.hideLoading()
46       }
47
48     })
49   },
50
51 })
。
。
对话框
模态对话框
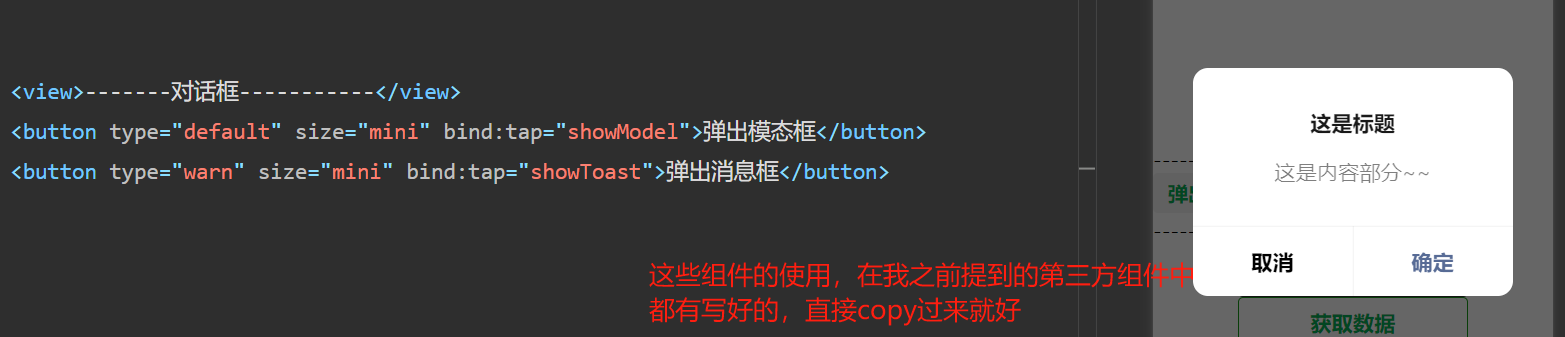
 1 ##### wxml
 2 <button type="default" size="mini" bind:tap="showModel">弹出模态框</button>
 3 ### js ###
 4 showModel(){
 5     wx.showModal({
 6         title: '这是标题',
 7         content: '这是内容部分~~',
 8         complete: (res) => {
 9             if (res.cancel) {
10                 console.log('用户取消了')
11             }
12
13             if (res.confirm) {
14                 console.log('用户确认了')
15             }
16         }
17     })
18 }
消息对话框
 1 #### wxml
 2 <button type="default" size="mini" bind:tap="showToast">弹出消息框</button>
 3 ### js
 4 showToast(){
 5     wx.showToast({
 6         title: '恭喜您,秒杀成功',
 7         icon:"success",
 8         duration:2000
 9     })
10 }
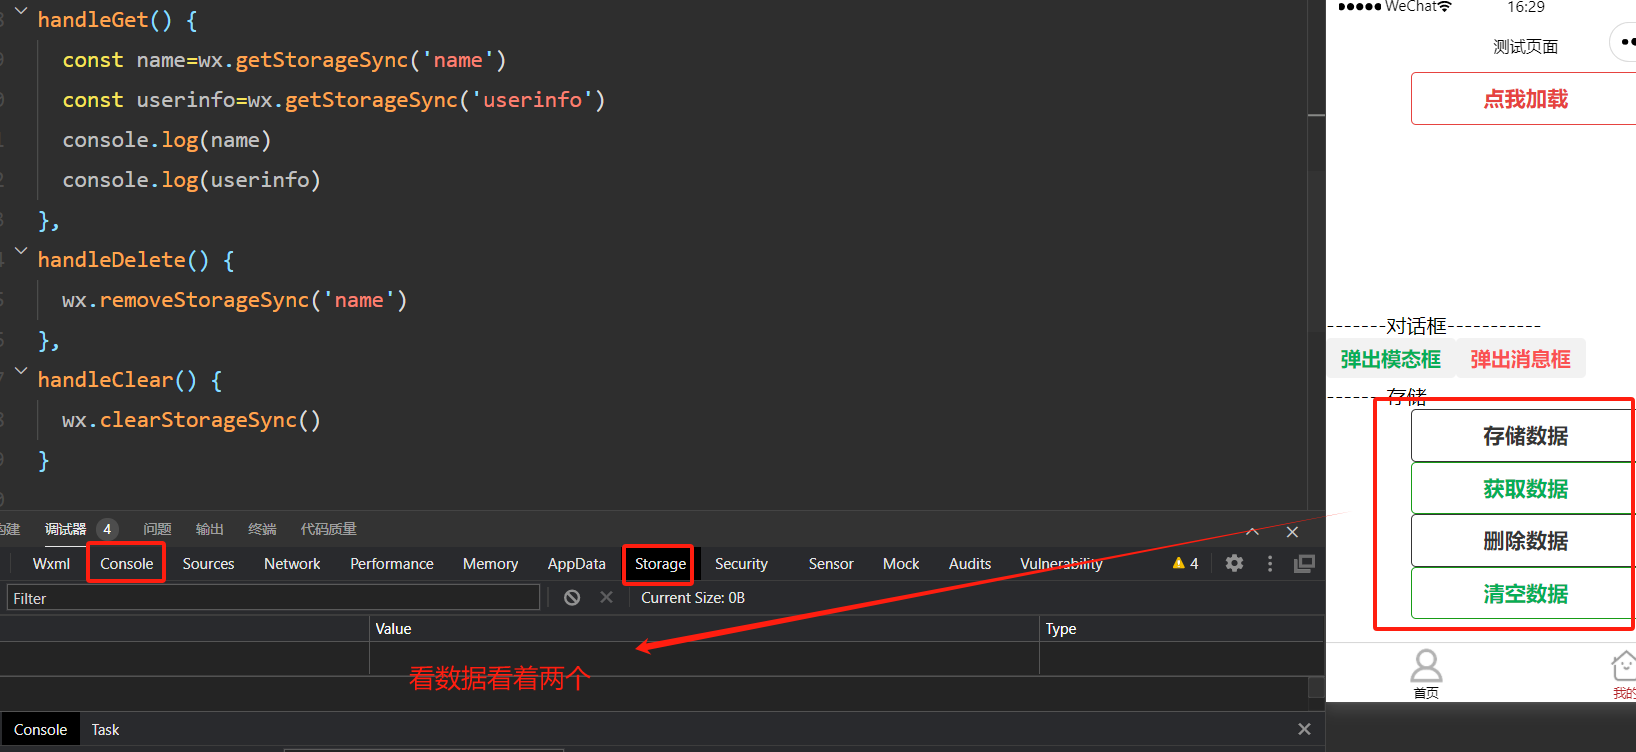
本地存储
 1 #####  在调试窗口中可以通过appdata看到当前页面中的变量,及变量变化
 2
 3 #### wxml####
 4 <button type="default" plain bind:tap="handleSave">存储数据</button>
 5 <button type="primary" plain bind:tap="handleGet">获取数据</button>
 6 <button type="default" plain bind:tap="handleDelete">删除数据</button>
 7 <button type="primary" plain bind:tap="handleClear">清空数据</button>
 8
 9 -----------------------------------------------------------
10
11 ###js### 同步####
12 handleSave() {
13     wx.setStorageSync('name', "justin")
14     wx.setStorageSync('userinfo', {name:'lqz',age:19})
15 },
16 handleGet() {
17     const name=wx.getStorageSync('name')
18     const userinfo=wx.getStorageSync('userinfo')
19     console.log(name)
20     console.log(userinfo)
21 },
22 handleDelete() {
23     wx.removeStorageSync('name')
24 },
25 handleClear() {
26     wx.clearStorageSync()
27 }
28
29
30 ###js### 异步:async,获取的是对象,值在data里面 ####
31 handleSave() {
32     wx.setStorage({
33         key:'name',
34         data:"justin"
35     })
36     wx.setStorage({
37         key:'userinfo',
38         data:{name:'lqz',age:19}
39     })
40 },
41
42 async handleGet() {
43     const name= await wx.getStorage({key:'name'})
44     const userinfo= await wx.getStorage({key:'userinfo'})
45     console.log(name)
46     console.log(userinfo)
47 },
48 handleDelete() {
49     wx.removeStorage({key:'name'})
50 },
51 handleClear() {
52     wx.clearStorage()
53 }
本地的存储的增删改查都从storage里获取

 浙公网安备 33010602011771号