


云服务器购买
(领了3个月免费的)
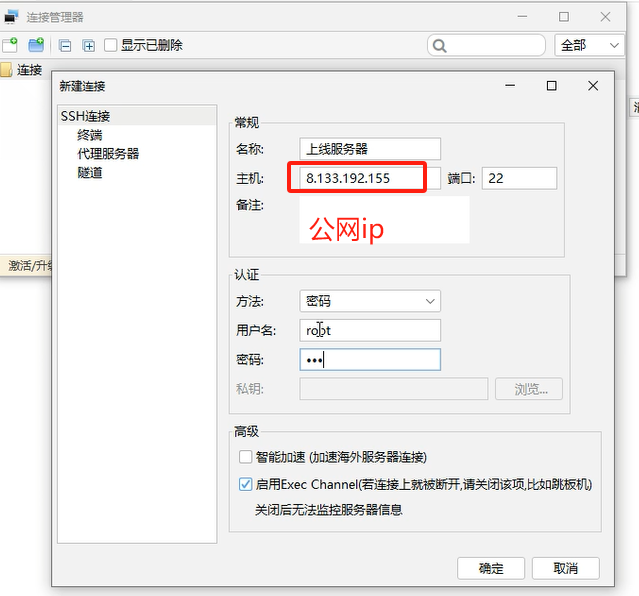
 1 # 1 咱们项目要上线
 2     - 1 有台服务器:安装软件:mysql;运行django。。。
 3     - 2 公网ip:互联网用户都可以访问
 4     - 3 域名:备案,互联网用户都可以访问,输入地址,而不是ip
 5
 6
 7 # 2 购买云服务器
 8     -这台服务器--》不在咱们这---》在他们的机房中--》他们帮咱们运行着
 9     - 腾讯,阿里,华为
10     - 咱们:阿里云
11
12 # 3 购买流程
13     1 打开网站:https://ecs.console.aliyun.com/home
14     2 选择购买
15
16 # 4 远程链接
17     -finalshell:下载后一路下一步安装
18     -powershell,git bash
19
20     -远程链接:
21         -可以用户名密码链接:咱们用的
22         -免密链接:生成ssh的公钥和私钥--》咱们生成了--》git
23             -把公钥配置在服务器上,以后链接就不需要密码了
。
我的公网ip121.41.36.137
。
。
服务器安装git
1 # 方式一:
2  yum install git -y
3 # 方式二:装git 和一些其它软件(开发会用到的)
4 yum -y groupinstall "Development tools"
5
6
7 # 装一些 依赖:# 执行下面这条(后续咱么需要装其他软件,需要有些依赖,装依赖)
8 yum install openssl-devel bzip2-devel expat-devel gdbm-devel readline-devel sqlite-devel psmisc libffi-devel -y
。
。
安装mysql
安装5.7
 1 # mysql 5.7
 2 #1 前往用户根目录
 3
 4 # pwd  查看我在哪个目录下
 5 # cd 切换到某个路径下
 6  cd ~  # 回到家路径
 7
 8 #2 下载mysql57
 9 wget http://dev.mysql.com/get/mysql57-community-release-el7-10.noarch.rpm
10 # ls  查看当前目录下的文件和文件夹
11
12 #3 安装mysql57
13  yum -y install mysql57-community-release-el7-10.noarch.rpm
14  yum install mysql-community-server --nogpgcheck -y
15
16 #4 启动mysql57并查看启动状态
17 systemctl start mysqld  # 启动mysql服务
18 systemctl status mysqld  # 查看mysql状态
19
20 #5 查看默认密码并登录(第一次安装,root密码是随机的)
21 # 去/var/log/mysqld.log 中过滤出包含 password 的多行
22 grep "password" /var/log/mysqld.log   # 7n5hchTomp++
23 mysql -uroot -p
24
25 #6 修改root密码
26  ALTER USER 'root'@'localhost' IDENTIFIED BY 'Lqz12345?';
27  grant all privileges on *.* to 'root'@'%' identified by 'Lqz12345?';
28  如果还连不上,就是mysql 3306的安全组没开---》防火墙端口没开
29
30
31 # 7 远程连接:win---》navicate--》
32     连接成功
安装8.0
 1 ### 1 官方yum源
 2 https://dev.mysql.com/downloads/repo/yum/
 3
 4 ### 2 下载对应版本mysql源到本地,如果系统是centos7,这里选择el7版本
 5 # no architecture的缩写,说明这个包可以在各个不同的cpu上使用
 6 我们选择  mysql80-community-release-el7-7.noarch.rpm
 7
 8 ### 3 或者直接来到:https://repo.mysql.com/
 9 找到相应版本下载,我们下载
10 mysql80-community-release-el7-7.noarch.rpm
11 ### 4 下载rpm包
12 wget https://repo.mysql.com/mysql80-community-release-el7-7.noarch.rpm
13
14 ### 5 安装rpm包
15 yum install mysql80-community-release-el7-7.noarch.rpm -y
16
17 ### 6 开始安装
18
19 yum install mysql-community-server --nogpgcheck -y  # 会自动把客户端装上
20 ### 7 启动,查看状态
21 systemctl start mysqld
22 systemctl status mysqld
23
24 ### 8 查看默认密码并登录
25 grep "password" /var/log/mysqld.log  # %TKR(Kj;l3zoc
26
27 ### 9 修改密码
28 mysql -uroot -p
29 ALTER USER 'root'@'localhost' IDENTIFIED BY 'Lqz12345?';
30 ### 10 查看mysql版本
31 mysql -V
32
33
34 ######## 后面上线项目时应该做的## 现在直接做了
35
36 #1 创建luffy库
37 create database luffy default charset=utf8;
38 #2 查看用户
39 SELECT User, Host FROM mysql.user;
40 #3 创建用户
41 CREATE USER 'luffy'@'localhost' IDENTIFIED BY 'Luffy123?';
42 CREATE USER 'luffy'@'%' IDENTIFIED BY 'Luffy123?';
43 GRANT ALL PRIVILEGES ON luffy.* TO 'luffy'@'localhost' WITH GRANT OPTION;
44 GRANT ALL PRIVILEGES ON luffy.* TO 'luffy'@'%' WITH GRANT OPTION;
45
46 #### 使用navicat 使用luffy用户链接###
47 如果链接不上,就是安全组没开
。
。
安装redis
# 1 官方提供的:https://redis.io/downloads/
redis-7.2.4.tar.gz # 源码包--》c代码--》不能运行--》编译---》可执行文件--》才能运行
redis-stack-server-7.2.0-v8.rhel7.x86_64.tar.gz # 编译过后的可执行文件,解压即用
直接安装包(redis-stack-server)
 1 # 1 下载源码包,在当前平台,编译---》就能在当前平台运行了
 2     wget https://packages.redis.io/redis-stack/redis-stack-server-7.2.0-v8.rhel7.x86_64.tar.gz
 3 # 2 解压
 4 tar -xzvf redis-stack-server-7.2.0-v8.rhel7.x86_64.tar.gz
 5 # 3 进入到 redis  bin 目录--》redis-server
 6 # 4 运行redis
 7 redis-server 配置文件
 8 # 5 把软件包赋值到 /usr/local  加入环境变量
 9 cp -r redis-stack-server-7.2.0-v8 /usr/local/redis7.2
10 # /usr/local/redis7.2/bin 有 redis-server 和 redis-cli
11
12 # 6 制作软链接---》在任意路径下敲redis-server都能把服务运行
13 # 因为/usr/bin/ 在环境变量
14 ln -s /usr/local/redis7.2/bin/redis-server /usr/bin/redis-server
15 ln -s /usr/local/redis7.2/bin/redis-cli /usr/bin/redis-cli
16
17 # 7 在任意路径启动
18 redis-server 可以启动了
19 redis-cli 可以链接了
20 # 8 查看redis 是否启动
21 #查看是否创建软连接成功
22 ll /usr/bin |grep redis
23
24 # 9 查看redis 是否启动
25 ps aux |grep redis
26
27 # 10 启动redis服务,后台运行
28 redis-server &
源码编译安装(redis-7.2.4.tar.gz)
 1 #1  下载7.2.4.tar.gz
 2 wget https://github.com/redis/redis/archive/refs/tags/7.2.4.tar.gz
 3
 4 #2 解压安装包
 5 tar -xf 7.2.4.tar.gz
 6
 7 #3  进入目标文件
 8 mv redis-7.2.4 redis7
 9 cd redis7
10
11
12 #4  编译环境 gcc   在src路径下把源码编译出  redis-cli  reidis-server
13 make  #编译,项目目录下执行
14 #5 在 src目录下就会多出 可执行文件
15 redis-server
16 redis-cli
17
18 #6  复制环境到指定路径完成安装
19 cp -r ~/redis7 /usr/local/redis
20
21 #7 配置redis可以后台启动:修改下方内容
22 mv /usr/local/redis/redis.conf /usr/local/redis/redis.conf.bak
23 vim /usr/local/redis/redis.conf
24 daemonize yes
25
26 # 完成配置修改
27 >:    esc
28 >:    :wq
29
30
31
32 #8  建立软连接
33 # /usr/local/redis/src/不在环境变量,在任意路径下敲 redis-server找不到的
34 # 如果建立软连接----》/usr/bin/新建了一个redis-server指向了/usr/local/redis/src/
35 # 而/usr/bin/ 是在环境变量的,所有以后任意路径敲redis-server都能找到
36 ln -s /usr/local/redis/src/redis-server /usr/bin/redis-server7
37 ln -s /usr/local/redis/src/redis-cli /usr/bin/redis-cli7
38 ## 查看软连接情况
39 ll /usr/bin/ |grep redis
40
41
42 #8 后台运行redis
43 cd /usr/local/redis
44 redis-server7 ./redis.conf  # 在后台运行
45
46 # redis-server7 /usr/local/redis/redis.conf
47
48
49 # 等同于
50 redis-server7 ./redis.conf &
51
52 #9  测试redis环境
53 redis-cli7
54
55 #10 关闭redis服务
56 redis-cli  shutdown

。
。
安装python
# 1 所有linux和mac--》都会自带python2
-他们系统上有很多系统服务 使用python2写的---》必须要有解释器环境
# 2 cento 7.9 默认
-python pip ---》python2.7
-python3 pip3 ---》python3.6.8
# 3 自己装3.10---》python3.10--->pip3.10
安装openssl(依赖)
 1 # 安装依赖包 openssl
 2
 3 #1 yum install zlib-devel bzip2-devel openssl-devel ncurses-devel sqlite-devel readline-devel tk-devel gcc make libffi-devel perl-Test-Simple -y
 4
 5 #2 cd
 6
 7 #3 下载
 8 wget https://github.com/openssl/openssl/releases/download/OpenSSL_1_1_1w/openssl-1.1.1w.tar.gz
 9
10 # 4 解压
11 tar -zxvf openssl-1.1.1w.tar.gz
12 # 5 进入
13 cd openssl-1.1.1w/
14 # 6 配置
15 ./config shared --prefix=/usr/local/openssl --openssldir=/usr/local/openssl
16 # 7 安装
17 make && make install
18
19 #8 查看之前老的
20 # openssl version
21 OpenSSL 1.0.2k-fips  26 Jan 2017
22
23 # 9 备份系统自带的openssl
24 mv /usr/bin/openssl /usr/bin/openssl.bak
25 # 10 软连接,放到环境变量
26 ln -s /usr/local/openssl/bin/openssl /usr/bin/openssl
27 ln -s /usr/local/openssl/lib/libssl.so.1.1 /usr/lib/libssl.so.1.1
28 ln -s /usr/local/openssl/lib/libcrypto.so.1.1 /usr/lib/libcrypto.so.1.1
29
30 #11 配置
31 sudo echo "/usr/local/lib64/" >> /etc/ld.so.conf
32 sudo ldconfig
33
34 # 12  openssl version
35 OpenSSL 1.1.1w  11 Sep 2023
安装python3.10
 1 # 1 下载python3
 2 ## 官方
 3 wget https://www.python.org/ftp/python/3.10.13/Python-3.10.13.tgz
 4 # 镜像站
 5 # https://registry.npmmirror.com/binary.html?path=python/
 6 wget https://registry.npmmirror.com/-/binary/python/3.10.14/Python-3.10.14.tgz
 7
 8
 9 # 2 解压并进入
10 tar xf Python-3.10.14.tgz
11 cd Python-3.10.14
12 #3  编译安装python配置ssl
13 ./configure prefix=/usr/local/python310 -C --with-openssl=/usr/local/openssl --with-openssl-rpath=auto
14
15 make && make install
16
17 # 4 建立软链接
18 ln -s /usr/local/python310/bin/python3 /usr/bin/python3.10
19 ln -s /usr/local/python310/bin/pip3 /usr/bin/pip3.10
20
21
22 # 5 以后,机器有三个python解释器环境
23     -python    pip       ---》python2.7
24     -python3   pip3      ---》python3.6.8
25     -python3.10 pip3.10  ---》3.10.14
。
。
虚拟环境
 1 ### 虚拟环境:pip3.10 去安装---》python3.10上
 2 #1 安装依赖
 3 pip3.10 install virtualenv
 4 pip3.10 install virtualenvwrapper
 5
 6 # 2 建立虚拟环境软连接
 7 ln -s /usr/local/python310/bin/virtualenv /usr/bin/virtualenv
 8
 9 #3  配置虚拟环境:填入下方内容
10 # ~/ 表示用户家路径:root用户,就是在/root/.bash_profile
11 >: vi ~/.bash_profile
12 # 按 a
13 # 光标上下控制,粘贴上下面内容
14
15 VIRTUALENVWRAPPER_PYTHON=/usr/bin/python3.10
16 source /usr/local/python310/bin/virtualenvwrapper.sh
17 # 按 esc
18 # 输入  :wq   敲回车
19
20
21 #4  更新配置文件内容
22 source ~/.bash_profile
23
24 # 虚拟环境默认根目录:
25 /root/.virtualenvs
26
27
28 #5 创建虚拟环境
29 mkvirtualenv -p python3.10 luffy
30
31
32 #
33 wget https://www.openssl.org/source/openssl-1.1.1n.tar.gz --no-check-certificate
34
35 tar -zxvf openssl-1.1.1n.tar.gz
36 cd openssl-1.1.1n
37 ./config --prefix=/usr/local/openssl
38 make && make install
39 ln -s /usr/local/openssl/bin/openssl /usr/bin/openssl
。
。
nginx部署前端
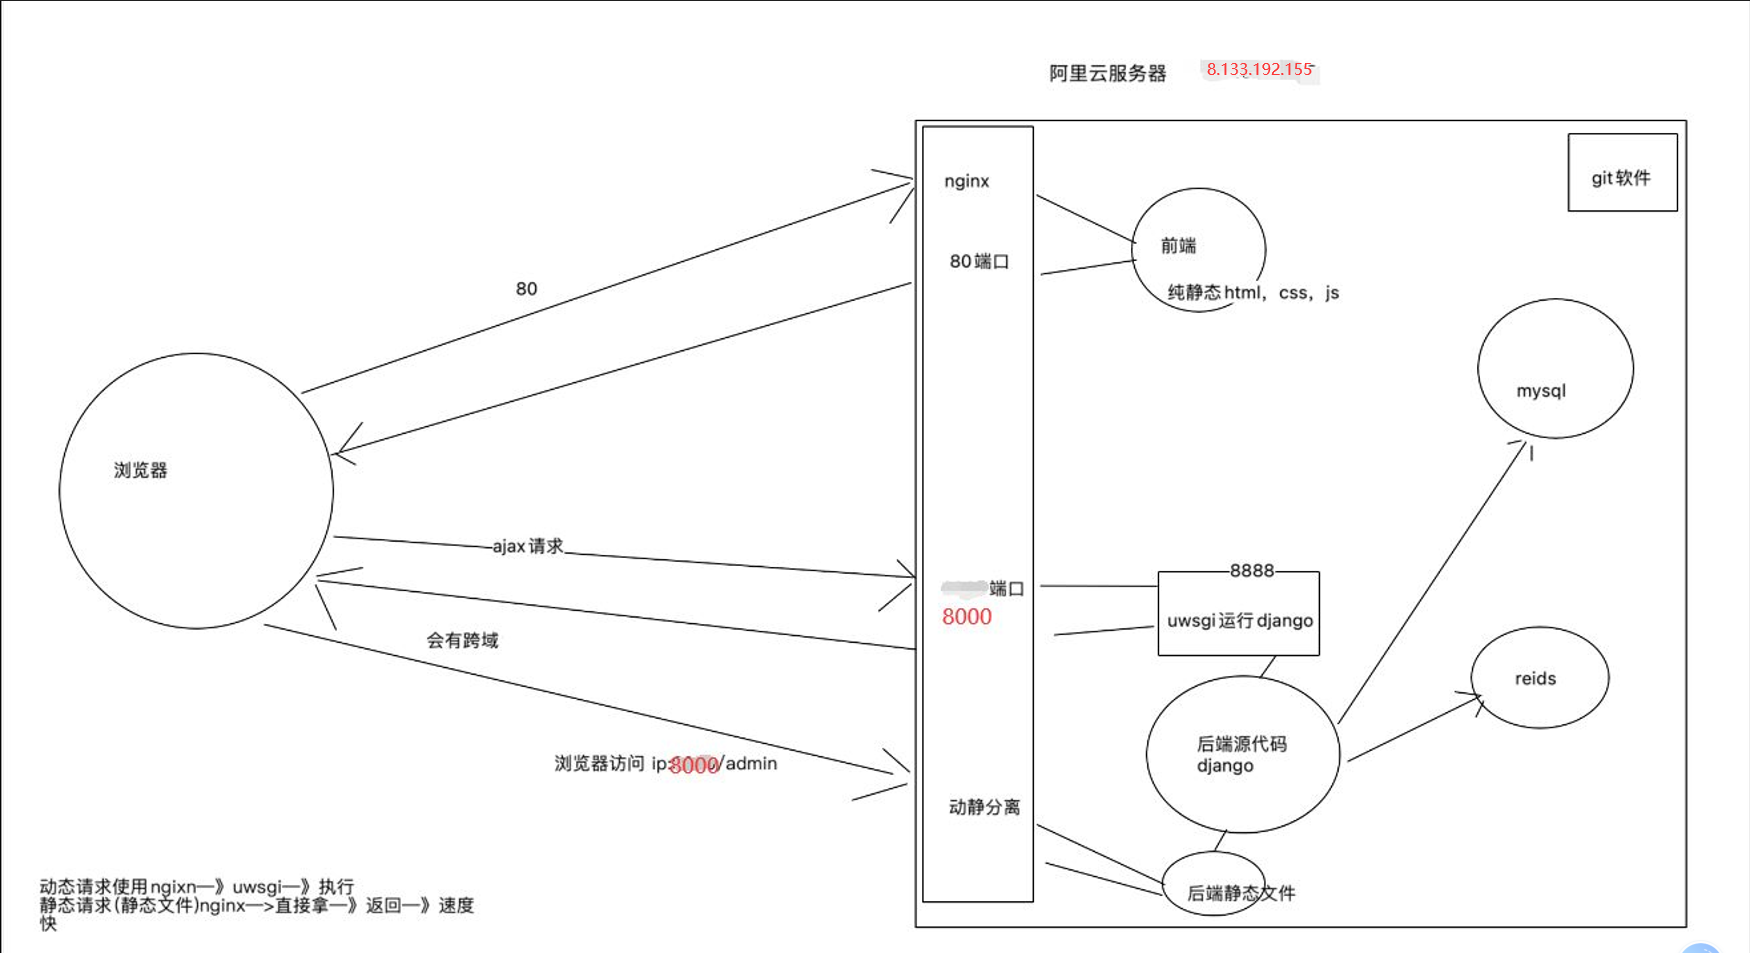
# 1 nginx 软件
    -web反向代理服务器--》运行在服务器上--》监听端口【默认80】---》nginx启动了,访问服务器的80端口---》http请求--》就被nginx接到了---》后续干啥,需要改ngixn的配置文件【配置文件很重要】
    -能够干
        1 请求转发
        2 负载均衡
        3 静态文件代理


# 2 部署前端【就是一堆静态文件】,需要使用nginx
安装nginx
 1 #1 前往用户根目录
 2 cd ~
 3 #2 下载nginx1.13.7
 4 # 官网http://nginx.org
 5 wget http://nginx.org/download/nginx-1.26.0.tar.gz
 6
 7 #3 解压安装包
 8 tar -xf nginx-1.26.0.tar.gz
 9
10 # 4 进入目标文件
11 cd nginx-1.26.0
12
13 #5 配置安装路径:/usr/local/nginx
14 ./configure --prefix=/usr/local/nginx
15
16 #6 编译并安装
17 make &&  make install
18
19 #7 建立软连接:终端命令 nginx
20 ln -s /usr/local/nginx/sbin/nginx /usr/bin/nginx
21
22
23 #8  测试Nginx环境,服务器运行nginx,本地访问服务器ip
24 # 启动nginx服务
25 nginx
26 # 启动nginx服务,监听80端口----》公网ip 80 端口就能看到页面了
27
28
29 #9 静态文件放的路径
30 /usr/local/nginx/html
31
32 # 10 查看进程
33 ps aux | grep nginx
34
35
36 #11 关闭和启动
37 关闭:nginx -s stop
38 重新加载配置:nginx -s reload
39 启动:nginx
。
。
部署前端
# 1 前端是用vue写的---》最终要编译成---》html,css,js静态资源
# 2 把编译后的放到服务器上某个位置
# 3 使用ngixn代理即可
    -修改nginx配置文件  (后面修改)


# 4 前端ajax请求的地址改一下(没有域名就用地址)  在src/js/settings中的配置
// const BASE_URL = 'http://121.41.36.137:8000/api/v1/'
// const BASE_URL = 'http://www.liuqingzheng.top:8000/api/v1/'
const BASE_URL ='http://121.41.36.137:8000/api/v1/'

# 5 编译vue---》项目根路径下生成一个dist文件夹--》编译过后的
@haodeMacBook-Air luffy_city % cnpm run build


# 6 上线只用 dist文件夹下的资源,压缩,放在桌

# 7 把dist.zip 传到服务器上去

# 8 服务器安装
yum install lrzsz -y  # 上传下载文件的
yum install unzip -y  # 解压zip的

# 9 上传
rz

# 10 解压
unzip dist.zip

# 11 移动并重命名
mv ./dist /html

# 12 修改nginx配置--》配置nginx 静态代理--->nginx 默认会去/usr/local/nginx/html拿静态文件
cd  /usr/local/nginx/conf   # nginx.conf   配置文件
mv nginx.conf nginx.conf.bak
vi nginx.conf
# 按 a  粘贴下面代码
events {
    worker_connections  1024;
}
http {
    include       mime.types;
    default_type  application/octet-stream;
    sendfile        on;
    server {
        listen 80;
                    # 121.41.36.137
        server_name 127.0.0.1;
        charset utf-8;
        location / {
            root /html;
            index index.html;
            try_files $uri $uri/ /index.html;
        }
    }
}

# 按 esc  :wq  回车

#13  重启nginx
nginx -s reload
安装uwsgi
 1 # 1 我们部署django
 2     -不用  python manage.py runserver  运行---》使用wsgiref,性能低
 3     -使用 uwsgi  web服务器部署---》只能部署python的web项目:flask,django
 4
 5
 6 # 2 安装步骤
 7 1)在真实环境下安装(退出虚拟环境)
 8 pip3.10 install uwsgi  # 会有个uwsgi的可执行文件,但是不在环境变量,所以需要加软连接
 9 #安装到了python38的安装路径的bin路径下了
10 2)建立软连接
11 ln -s /usr/local/python310/bin/uwsgi /usr/bin/uwsgi
部署后端
# 1 修改配置文件 pro.py   前端和后端的基地址,都是云服务器地址(将dev中的配置文件cv到pro中然后进行修改)

DEBUG = False
ALLOWED_HOSTS = ['*']

# BACKEND_URL='http://www.liuqingzheng.top:8000/'
BACKEND_URL = 'http://121.41.36.137:8000'
LUFFY_URL = 'http://121.41.36.137'
# LUFFY_URL = 'http://www.liuqingzheng.top'

# 2 修改项目中wsgi.py,asgi.py  用uwsgi运行wsgi.py
os.environ.setdefault('DJANGO_SETTINGS_MODULE', 'luffytest.settings.pro')
application = get_wsgi_application()


# 3 导出项目依赖
pip3 freeze > requirements.txt

#4 推到远端
# 这里需要注意,你要在本地已经连到gitee地址,然后后续可以在远程ip上通过git将代码拉到那里去
git push origin master


# 5 服务器上拉取下来: 服务器创建目录---/home/project/(克隆在finalshell)
git clone https://gitee.com/towards-the-cloud/luffytest.git
    # 会出现需要登录用户名密码验证的情况,使用git账户和密码即可/如果确认密码账号准确还是报错,可以去gitee上先修改密码然后在重新git clone

# 6 在虚拟环境中安装依赖
    workon luffy
    pip install -r requirements.txt # 报错
    # 把requirements.txt 的mysql-client先注释掉,把别的先装上ll
    # 单独装mysql-client
    # 查看虚拟环境中模块
    pip list


# 7 单独装mysqlclient
yum install python3-devel -y
yum install mysql-devel --nogpgcheck -y
pip install mysqlclient


# 8 在虚拟环境中,也要装uwsgi
pip install uwsgi


# 9 创建luffy库,用户,授权--》做过了

# 10 迁移文件,把表迁移到数据库中 ---》manage的配置文件必须是线上配置文件
python manage.py makemigrations
python manage.py migrate

# 11 使用uwsgi运行django,uwsgi配置文件 :项目根路径下新建:luffy_api.xml
<uwsgi>
    <socket>127.0.0.1:8888</socket>
    <chdir>/home/project/luffytest/</chdir>
    <module>luffytest.wsgi</module>
    <processes>4</processes>
    <daemonize>uwsgi.log</daemonize>
</uwsgi>


# 12 使用uwsgi运行(使用uwsgi运行django--》等同于之前的python manage.py runserver )
uwsgi -x luffy_api.xml
# 查看uwsgi进程
ps aux |grep uwsgi
# 关闭uwsgi
pkill -9 uwsgi


# 13 配置nginx 转发--新增一个server
server {
    listen 8000;
    server_name  121.41.36.137;
    charset utf-8;
    location / {
        include uwsgi_params;
        uwsgi_pass 127.0.0.1:8888;
        uwsgi_param UWSGI_SCRIPT luffytest.wsgi;
        uwsgi_param UWSGI_CHDIR /home/project/luffytest/;
    }
}

# 14 重启nginx
nginx -s reload

# 5 访问:测试--->数据能回来,表示通了   # 表中没数据   样式没有
    http://121.41.36.137:8000/api/v1/home/banner/

# 6 表中数据--》admin中录入---》直接把sql导入
    把原来测试的数据库导出,然后放到上线库
    -到出原来测试的sql
    -导入到线上库


# 7 访问  127.0.0.1正常操作即可
    -如果有问题:按日志排查
        1 nginx 日志:/usr/local/nginx/logs
        2 uwsgi 日志:/home/project/luffytest/uwsg.log
        3 项目日志 :/home/project/luffytest/logs/luffy.log
后台管理样式
# 1 如果使用uwsgi部署项目,它只能代理动态请求
    -动态请求:有路由的路径
    -静态文件:static下的,都不会返回,静态交给ngix--》nginx处理静态资源性能最高
    -因为uwsgi为了提高性能,不处理静态资源
    -下面地址就是:
    http://127.0.0.1:8000/static/admin/simpleui-x/elementui/theme-chalk/index.css


# 2 把项目中所有静态资源统一收集到一个文件夹下
    -simpleui
    -drf


# 3 在配置文件中加入:
# pro.py中加入   把静态资源收集到这个文件夹下
    STATIC_URL = '/static/'
    STATIC_ROOT = os.path.join(BASE_DIR, 'static')
# 4 创建文件夹
mkdir /home/project/luffy_api/luffy_api/static/

# 5 执行收集命令(manage 的配置文件一定是pro)
python manage.py collectstatic


# 6  修改nginx配置
location /static {
    alias /home/project/luffy_api/luffy_api/static;
}

# 7 整个nginx配置
events {
    worker_connections  1024;
}
http {
    include       mime.types;
    default_type  application/octet-stream;
    sendfile        on;
    server {
        listen 80;
        server_name  127.0.0.1;
        charset utf-8;
        location / {
            root /html;
            index index.html;
            try_files $uri $uri/ /index.html;
        }
    }
    server {
        listen 8000;
        server_name  127.0.0.1;
        charset utf-8;
        location /static {
           alias /home/project/luffytest/luffytest/static;
        }
        location / {
            include uwsgi_params;
            uwsgi_pass 127.0.0.1:8888;
            uwsgi_param UWSGI_SCRIPT luffytest.wsgi;
            uwsgi_param UWSGI_CHDIR /home/project/luffytest/;
        }

        }
}


#8 重启nginx
#9 django  必须要运行

# 访问
http://127.0.0.1:8000/admin/login/?next=/admin/
安全组
# 1 开启的端口
-80
-8000
-3306

 浙公网安备 33010602011771号