


redis介绍安装
# 0 数据库
    -存数据的软件
# 1 关系型数据库
    -PostgreSQL(后面安装了解看看),mysql,sqlserver,oracle。。。
    -sql语句,通用
# 2 非关系型数据库
    -redis,mongod,clickhouse,infludb,elasticsearch。。。
# 3 非关系型数据库:no sql
  -c语言写的 服务(监听端口),
  -用来存储数据的,数据是存储在内存中,取值,放值速度非常快, 10w qps
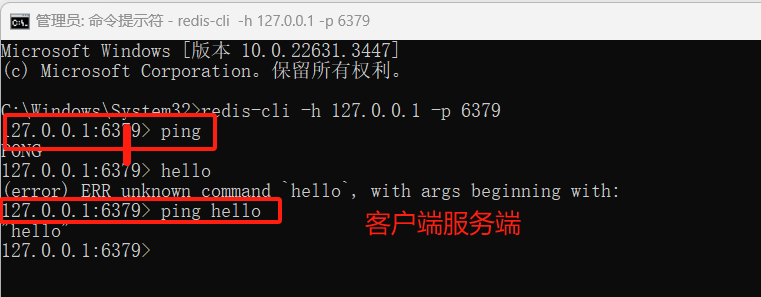
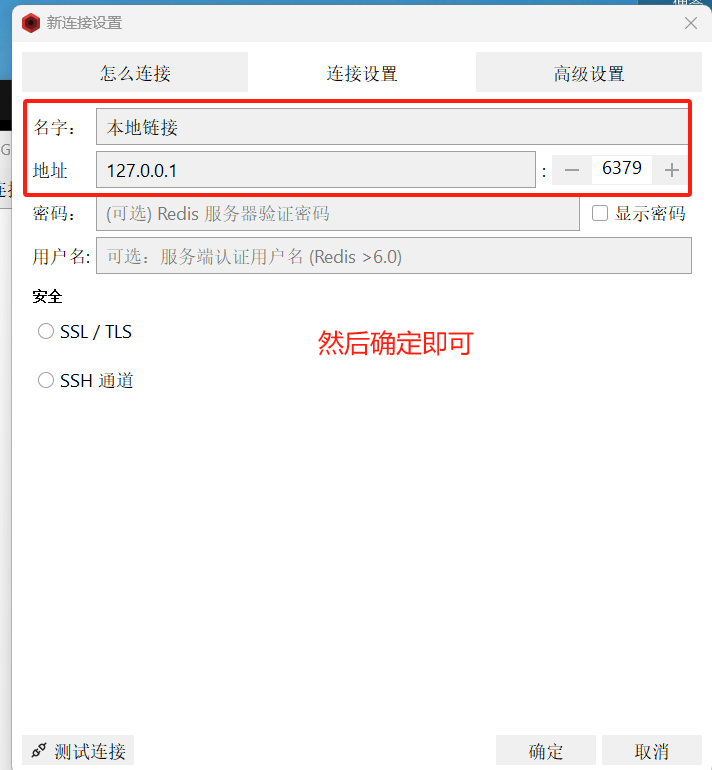
# 4 redis:
    1 开源使用c编写的cs架构软件
        -c:客户端:命令创建,桌面软件resp,Navicat,Python代码,Go,Java,Node
        -s:服务端:一台服务器,一直运行,监听 6379端口
    2 key-value形式存储
    3 vaule有5种数据类型
        -字符串
        -列表
        -hash
        -集合
        -有序集合
    4 纯内存存储:速度非常快--》适合用于高并发场景
    5 可以持久化:永久保存
    6 数据操作-》单进程,单线程架构--》没有锁
    7 使用了IO多路复用的模型:并发量高


# 5 redis版本 最新:7.x  win上 5.x
    -https://redis.io/downloads/
    -Redis Stack downloads:编译过后的软件,不提供win版本
    -redis:源码,需要编译
    -不支持:微软,基于源码修改--》能在win上编译
# 6 win安装redis win版本下载地址
    # 最新5.x版本 https://github.com/tporadowski/redis/releases/
    # 最新3.x版本 https://github.com/microsoftarchive/redis/releases
    下载完一路下一步即可,具体可参照:
    https://www.cnblogs.com/liuqingzheng/p/9831331.html


# 7 一路下一步,安装成功
    1 C:\Program Files\Redis 有两个可执行文件
        redis-cli---》mysql  客户端
        redis-server--》mysqld 服务端

    2 自动在服务中,做一个redis服务,以后通过服务启动和停止


# 8 redis客户端
    -1 cmd命令中的reids-cli
        -redis-cli  # 默认链本地的6379
        -redis-cli -h 地址 -p 端口

    -2 软件:rdm,resp:老版本免费,新版本收费
        -输入地址和端口,连接即可


    -3 软件:navicat:收费
        -输入地址和端口,连接即可


# 9 redis服务启动和停止

    -1 使用服务--》点击启动,停止即可
        -net start redis
        -net stop redis

    -2 使用命令:(启动server)
        -redis-server 配置文件启动
        -redis-server ./redis.windows-service.conf
        -ctrl c

    -3 关闭:在客户端
        shutdown :友好关闭
8.cmd操作

。
resp操作
。
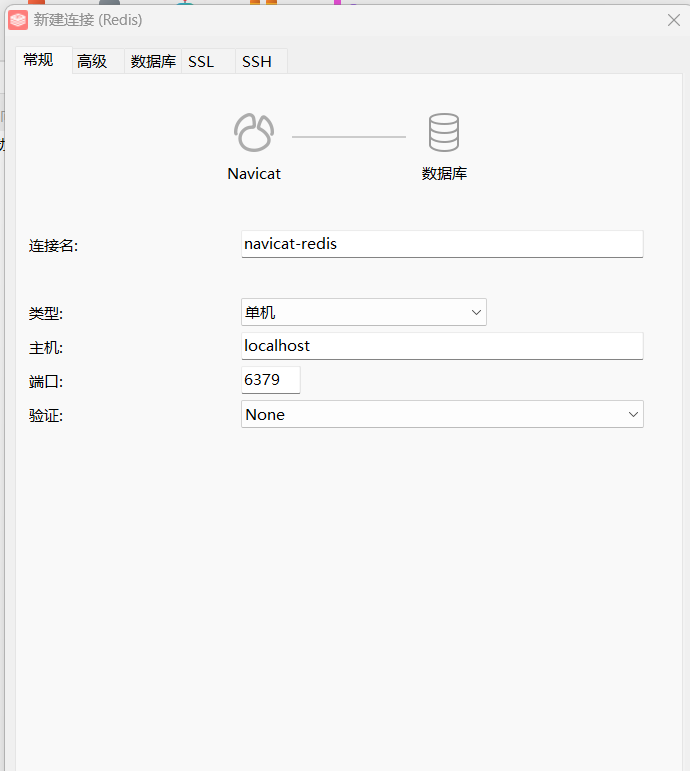
navicat操作
。
。
。
python操作redis
普通链接
 1 1 模块,redis
 2 # pip install redis
 3
 4 # 2 使用 redis链接redis
 5 import redis
 6
 7 conn = redis.Redis(
 8     host="localhost",
 9     port=6379,
10     db=0,
11     password=None)
12 print(conn)
13 conn.set('name', 'jh')
14 conn.close()
连接池链接
连接池是什么,作用是什么
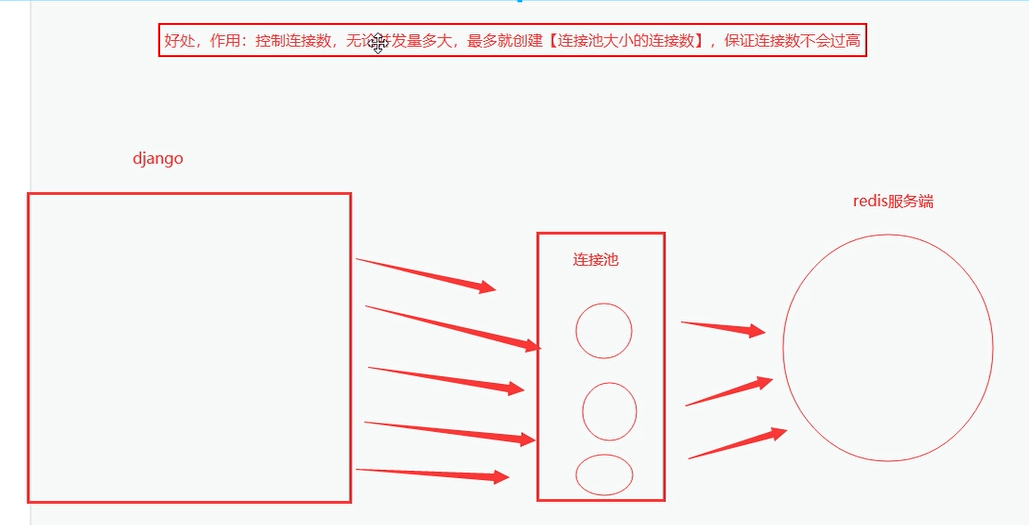
python链接redis使用连接池
 1 import redis
 2
 3 # 1 做一个连接池,POOL 对象,应该是单例的,全局只有这一个对象
 4 POOL = redis.ConnectionPool(max_connections=10, host='127.0.0.1', port=6379, decode_responses=True)
 5
 6 ### 使用####
 7 # from pool import POOL  # python 的模块导入,是天然单例
 8
 9 # 2 从池中拿链接
10 conn = redis.Redis(connection_pool=POOL)
11 # 3 使用链接操作redis
12 res = conn.get('name')
13 print(res)
14 # 4 关闭,把连接放回池中
15 conn.close()
# 补充:
	-django--》连接数据库---》有没有连接池?
    -django--》连接mysql--》如何使用连接池?

# python如何实现单例
	-6种
    	-以模块导入
redis字符串操作
 1 import redis
 2
 3 conn = redis.Redis()
 4 # 1 set(name, value, ex=None, px=None, nx=False, xx=False)
 5 # 1.1 基本使用
 6 conn.set('age', 18)
 7 # 1.2 ex使用:10s后过期,被清理掉
 8 conn.set('hobby', '篮球', ex=10)
 9 # 1.3 nx,如果设置为True,则只有name不存在时,当前set操作才执行,值存在,就修改不了,执行没效果
10 conn.set('name', '666', nx=True)  # name存在,不会修改了
11 # 1.4 xx,如果设置为True,则只有name存在时,当前set操作才执行,值存在才能修改,值不存在,不会设置新值
12 conn.set('name', '666', xx=True)  # name存在,会修改了,name不存在,不会新建
13 conn.set('hobby', '篮球', xx=True)  # name存在,会修改了,name不存在,不会新建
14
15 # redis实现分布式锁底层使用nx xx实现
16 # 2 setnx(name, value)  等同于 conn.set('name','666',nx=True)
17 # 设置值,只有name不存在时,执行设置操作(添加),如果存在,不会修改
18
19 # 3 setex(name, value, time) 设置过期时间过期时间秒
20 conn.setex('hobby', 4, '足球')
21
22 # 4 psetex(name, time_ms, value)  过期时间毫秒
23 conn.psetex('hobby', 5000, 'sss')
24
25 # 5 mset(*args, **kwargs)  批量设置
26 conn.mset({'name': 'xxx', 'age': 19, 'height': 183, 'weight': 140})
27
28 # 6 get(name)  获取之
29 print(conn.get('weight'))
30
31 # 7 mget(keys, *args) 值放列表里面
32 res = conn.mget('name', 'age')
33 # res=conn.mget(['name','hobby','height'])
34 print(res)
35
36 # 8 getset(name, value)  获取值然后设置新值
37 res = conn.getset('name', 'sdsaf')
38 print(res)
39
40 # 9 getrange(key, start, end)  # 获取起始和结束位置的字符串 前闭后闭  取字节
41 res = conn.getrange('name', 0, 1)
42 print(res)
43
44 # 10 setrange(name, offset, value)
45 conn.setrange('name', 4, 'xxss')
46
47 # 操作比特位--后面讲
48 # 11 setbit(name, offset, value)
49 # 12 getbit(name, offset)
50 # 13 bitcount(key, start=None, end=None)
51 # 14 bitop(operation, dest, *keys)
52
53
54 # 15 strlen(name)  统计字节长度
55 print(conn.strlen('name'))
56
57 # 15 incr(self, name, amount=1)  # 自增,做计数器,性能高,单线程,没有并发安全问题,不会错错乱
58 conn.incr('age')
59 conn.incrby('age', 2)
60
61 # 16 incrbyfloat(self, name, amount=1.0)
62 # 17 decr(self, name, amount=1)
63 conn.decrby('age', 3)
64 # 18 append(key, value)
65 conn.append('name', 'ddd')
66 conn.close()
。
redis hash操作
 1 import redis
 2
 3 conn = redis.Redis(decode_responses=True)
 4 # 1 hset(name, key, value)
 5 # user-info-01 存用户id为1的用户信息
 6 conn.hset('user-info-01', 'name', '吉吉国王')
 7 conn.hset('user-info-01', 'age', 8)
 8 conn.hset('user-info-01', 'hobby', '篮球')
 9
10 # 2 hmset(name, mapping)  -->变成了hset,批量设置
11 conn.hset('user-info-02', mapping={'name': '猪猪侠', 'age': 18})
12
13 # 3 hget(name,key) 获取用户信息值
14 print(conn.hget('user-info-01', 'name'))
15
16 # 4 hmget(name, keys, *args) 批量获取值
17 print(conn.hmget('user-info-01', 'name', 'age', 'hobby'))
18 print(conn.hmget('user-info-01', ['name', 'age', 'hobby']))
19
20 # 5 hgetall(name) 拿到所有值
21 print(conn.hgetall('user-info-02'))
22
23 # 6 hlen(name) 统计字典的大小
24 print(conn.hlen('user-info-01'))
25
26 # 7 hkeys(name) 获取所有的key
27 print(conn.hkeys('user-info-01'))
28
29 # 8 hvals(name) 获取所有的value
30 print(conn.hvals('user-info-01'))
31
32 # 9 hexists(name, key) 判断key是否存在
33 print(conn.hexists('user-info-02', 'hobby'))
34
35 # 10 hdel(name,*keys) 删除key
36 conn.hdel('user-info-01', 'hobby', 'age')
37
38 # 11 hincrby(name, key, amount=1)
39 conn.hincrby('user-info-01', 'age')  # 有会自增,没有会创建并自增
40
41 # 12 hincrbyfloat(name, key, amount=1.0)
42 # 如果hash寸的数据量很大,不能使用hgetall一次性全取回来---》分批取值
43 # hash 类型无序,不会按key排序--》python 的字典有序
44
45 # 13 hscan(name, cursor=0, match=None, count=None)
46 for i in range(1000):
47     conn.hset('map_demo', i, '鸡蛋_%s' % i)
48
49 # 一次性取出来
50 res = conn.hgetall("map_demo")
51 print(res)
52
53 # 分批取 hscan 不单独用  ,count 是取的条数,但是有时候上下会差一点点
54 res = conn.hscan('map_demo', count=11)
55 print(res)
56 print(len(res[1]))
57 print(res[1])
58 res = conn.hscan('map_demo', cursor=64, count=10)
59 print(res)
60
61 # 14 hscan_iter(name, match=None, count=None)--取出所有值,但是分批取
62 for item in conn.hscan_iter('map_demo', count=10):
63     print(item)
64
65 conn.close()
。
。
redis list操作
 1 # 作用
 2 # 1 跨进程间通信  ---》消息队列
 3 # 2 实现分布式
 4 # 3 队列和栈
 5
 6 import redis
 7
 8 conn = redis.Redis(decode_responses=True)
 9 # 1 lpush(name, values) 表示从左向右操作
10 conn.lpush('girls', '刘亦菲')
11 conn.lpush('girls', '迪丽热巴')
12 conn.lpush('girls', '小红')
13
14 # 2 rpush(name, values) 表示从右向左操作
15 conn.rpush('girls', '小紫')
16
17 # 3 lpushx(name, value)  在name对应的list中添加元素,只有name已经存在时,值添加到列表的最左边
18 conn.lpushx('girls', '古力娜扎')
19
20 # 4 rpushx(name, value) 存在则表示从右向左操作
21
22 # 5 llen(name)  统计长度
23 print(conn.llen('girls'))
24
25 # 6 linsert(name, where, refvalue, value)) 从哪插值
26 conn.linsert('girls', 'before', '刘亦菲', '上海刘亦菲')
27 conn.linsert('girls', 'after', '刘亦菲', '北京刘亦菲')
28
29 # 7 r.lset(name, index, value) 索引设置
30 conn.lset('girls', '0', 'xx')
31
32 # 8 r.lrem(name, value, num)  删除
33 conn.lrem('girls', 1, '刘亦菲')  # 从左侧删除一个符合条件
34 conn.lrem('girls', -1, '刘亦菲')  # 从右侧删除一个符合条件
35 conn.lrem('girls', 0, '刘亦菲')  # 删除所有符合条件
36
37 # 9 lpop(name)  表示从左向右操作 ,弹出
38 # 10 rpop(name) 表示从右向左操作
39 print(conn.lpop('girls'))
40
41 # 11 lindex(name, index)  查看索引为1的信息
42 print(conn.lindex('girls', 1))
43
44 # 12 lrange(name, start, end) 取从第几个到第几个的值
45 print(conn.lrange('girls', 0, 1))
46
47 # 13 ltrim(name, start, end) 修剪,只保留从哪到哪中间的树
48 conn.ltrim('girls', 1, 3)
49
50 # 14 rpoplpush(src, dst) 表示从右向左操作,从src中弹出一个值,放到dst中
51
52 # 15 blpop(keys, timeout)  block--》阻塞
53 res = conn.blpop('boys')
54 print(res)
55 # 16 r.brpop(keys, timeout),从右向左获取数据
56 # 17 brpoplpush(src, dst, timeout=0)
57 conn.close()
。
。
redis其他操作
 1 import redis
 2
 3 conn = redis.Redis()
 4 # 1. 删值delete(*names)
 5 conn.delete('name', 'user-info-01')
 6 # 2. 看是否有值exists(name)
 7 print(conn.exists('age1'))
 8
 9 # 3.取出所有keys(pattern='*')
10 # print(conn.keys('user*'))
11
12 # 4.设置过期时间 expire(name ,time)
13 conn.expire('age', 5)
14
15 # 5.改名 rename(src, dst)
16 conn.rename('girls', 'hobby01')
17
18 # 6.移动 move(name, db))
19 conn.move('hobby01', 3)
20
21 # 7.随机弹出key randomkey()
22 print(conn.randomkey())
23
24 conn.close()
。
。
django中使用redis
方式一:通用方式
######## 写个pool.py
import redis
POOL = redis.ConnectionPool(max_connections=10, decode_responses=True)
###### 在哪里用,导入用即可
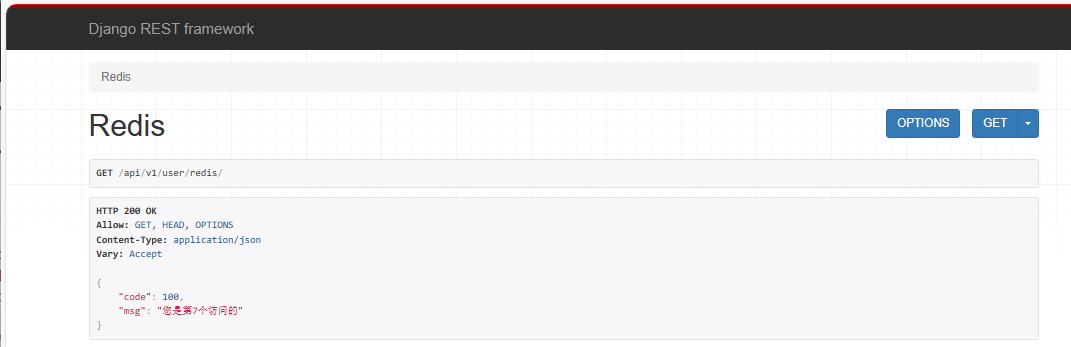
# redis测试使用  user.view
from utils.redis_pool import POOL
import redis
class RedisView(APIView):
    def get(self, request, *args, **kargs):
        conn = redis.Redis(connection_pool=POOL)
        conn.incrby('count')
        res = conn.get('count')
        return APIResponse(msg='您是第%s个访问的' % res)
方式二:django-redis(第三方)
#1  安装
pip install django-redis

# 2 配置文件配置
CACHES = {
    "default": {
        "BACKEND": "django_redis.cache.RedisCache",
        "LOCATION": "redis://127.0.0.1:6379",
        "OPTIONS": {
            "CLIENT_CLASS": "django_redis.client.DefaultClient",
            "CONNECTION_POOL_KWARGS": {"max_connections": 100}
            # "PASSWORD": "123",
        }
    }
}

# 3 在使用的位置
from django_redis import get_redis_connection
class RedisView(ViewSet):
    def list(self, request):
        conn = get_redis_connection() # 从池中获取一个链接
        res= conn.get('count')
        return APIResponse(msg='您是第%s个访问的' % res)
方式三:django的缓存
# django内置的,可以直接操作缓存---》缓存的位置--》内存--》只要项目一重启,数据就没了
# 后期,我们要把缓存数据,放到 redis中 ,redis可以持久化,项目停止,但redis还运行,数据就不会丢

# 只要在配置文件中,如下配置,以后只要使用 cache.set  和 cache.get 通过都是去redis设置和取
CACHES = {
    "default": {
        "BACKEND": "django_redis.cache.RedisCache",
        "LOCATION": "redis://127.0.0.1:6379",
        "OPTIONS": {
            "CLIENT_CLASS": "django_redis.client.DefaultClient",
            "CONNECTION_POOL_KWARGS": {"max_connections": 100}
            # "PASSWORD": "123",
        }
    }
}

# cache.set()  设置缓存
# cache.get()  获取缓存


## 以后再django中,可以直接使用
cache.set 和cache.get  操作redis,用它错缓存 ---》非常简单

## 重点:
    -优势:redis 分数据类型, 只能设置5种数据类型
       -django的缓存来讲 ,不限制类型,可以放python的任意类型

    -django的缓存来讲,cache.set('redis的key','不区分类型:放python的任意类型')  # person
    -cache.get('userinfo')
    -django cache 底层是基于: 把你存储的类型---》使用pickle序列化--》bytes格式---》当redis的字符串形式存到redis中


    -以后咱们做redis的操作,可以直接使用django的缓存, 不需要考虑类型
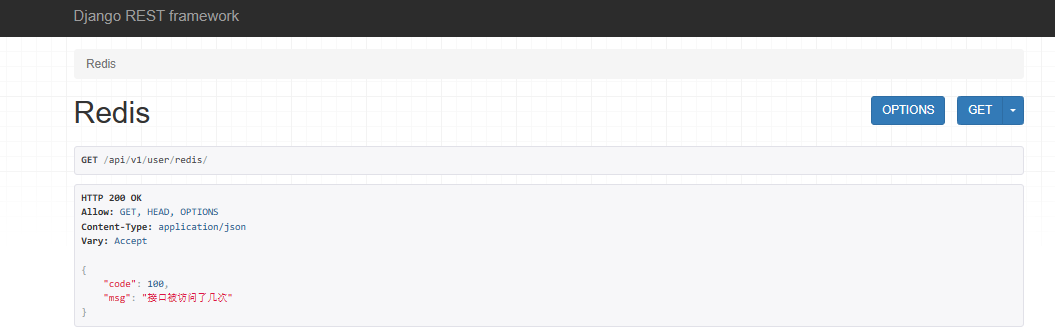
from django.core.cache import cache

class RedisView(APIView):
def get(self, request, *args, **kwargs):
    cache.set('name','jh')
    return APIResponse(msg=f'接口被访问了几次')


 浙公网安备 33010602011771号