


【介绍】
# vue3 的变化
    1.性能的提升
        -打包大小减少41%
        -初次渲染快55%, 更新渲染快133%
        -内存减少54%
    2.源码的升级
        使用Proxy代替defineProperty实现响应式
        重写虚拟DOM的实现和Tree-Shaking
    3.拥抱TypeScript
        Vue3可以更好的支持TypeScript
    4.新的特性
        Composition API(组合API)
        setup配置
        ref与reactive
        watch与watchEffect
        provide与inject
        新的内置组件
        Fragment
        Teleport
        Suspense
        其他改变

        新的生命周期钩子
        data 选项应始终被声明为一个函数
        移除keyCode支持作为 v-on 的修饰符

--------------------------------
 # 组合式API和配置项API
    vue2 :配置项API
         new Vue({
             el:'#app',
             data:{}
         })

    vue3: 组合式API
        let name='lqz'
        let add=()=>{
        }
。
。
【vue3项目创建】
# 1 跟之前创建vue2一样
# 2 步骤: 1 vue create vue3_demo001 2 注意选择vue3,其他都一样
# 3 webstorm打开--》配置启动
# 4 配置npm 镜像站 npm config set registry https://registry.npmmirror.com
检测:npm config get registry
【vite创建(推荐)】
#1 什么是vite?—— 新一代前端构建工具。
优势如下:
开发环境中,无需打包操作,可快速的冷启动。
轻量快速的热重载(HMR)。
真正的按需编译,不再等待整个应用编译完成。
传统构建 与 vite构建对比图


# 2 兼容性注意
Vite 需要 Node.js 版本 18+,20+。然而,有些模板需要依赖更高的 Node 版本才能正常运行,当你的包管理器发出警告时,请注意升级你的 Node 版本
官网:https://cn.vitejs.dev/

# 3 创建工程
# 不指定名字创建:npm create vite@latest
# 配置npm镜像站:npm config set registry https://registry.npmmirror.com
# 查看镜像站:npm config get registry
# 指定名字创建
    # 创建项目方式一
    npm create vite@latest
    # 创建项目方式二:指定名字
    npm create vite@latest vue3_demo002
    # 创建项目方式三
    cnpm create vite@latest vue3_demo002
    # 创建项目方式四
    cnpm create vite vue3_demo002
# 3 使用编辑器打开vue3项目
# 4 安装依赖
    npm install
# 5 运行项目
    npm run dev
。
。
。
【常用API】
1.setup函数
# 1 如果使用配置项API---》写起来跟vue2一样
# 2 如果写组合式API---》所有代码都要写在setup函数中
-后期除了setup函数,其他都不带了
# 3 setup函数必须返回变量或函数--》在template中才能使用
# 4 默认不带响应式,需要使用ref或reactive包裹
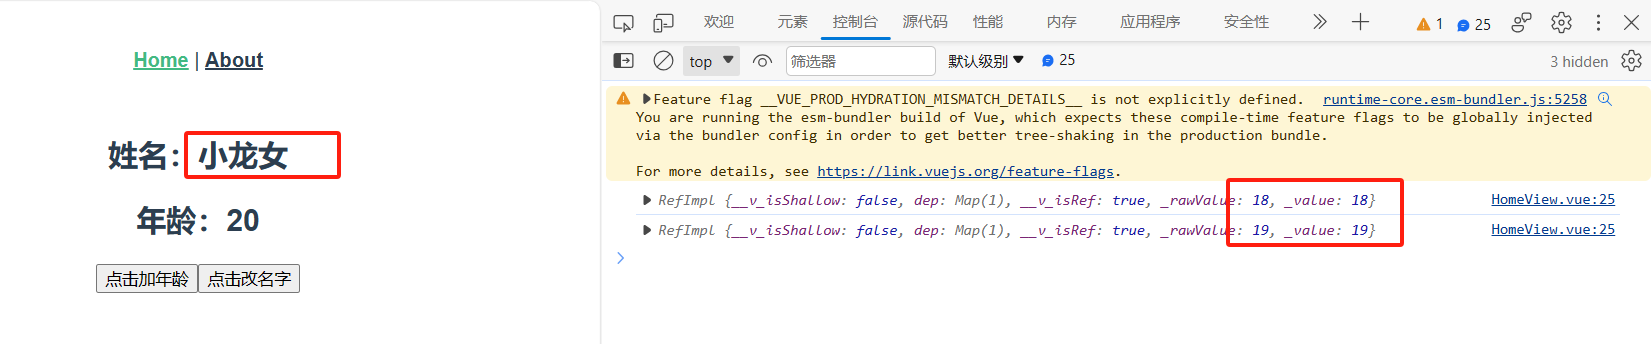
 1 <template>
 2   <div class="home">
 3     <h2>姓名:{{ name }}</h2>
 4     <h2>年龄:{{ age }}</h2>
 5     <button @click="handleAdd">点击加年龄</button>
 6     <button @click="handleChange">点击改名字</button>
 7   </div>
 8 </template>
 9
10 <script>
11
12
13 import {ref} from "vue";
14
15 export default {
16   name: 'HomeView',
17   setup() {
18 //1.插值语法
19 //   let name='张三'
20     let name = ref('张三')
21     // let age=18  默认没有响应式
22     let age = ref(18)  //做成响应式,需要导入模块
23     //2.方法--点击年龄+1
24     function handleAdd() {
25       console.log(age)  //age的类型是RefImpl,
26       age.value += 1  //age的值+1需要通过value来操作
27
28     }
29
30     //3.方法--改名字
31     function handleChange() {
32       name.value = '小龙女'
33     }
34
35     //.必须return,然后才能在template中使用
36     return {name, age, handleAdd, handleChange}
37   }
38 }
39 </script>
2.ref和reactive
# 1 ref 包裹值类型[数字,字符串,布尔],做成响应式
# 2 reactive包裹引用类型[对象,数组],做成响应式
# 3 使用reactive包裹的对象,直接通过 . [] 取值赋值就是响应式的
ref包裹的对象,需要使用 对象.value 修改值
# 4 使用ref包裹的,在template中,不用使用 变量.value
##### js###
const hobby = ref('篮球')
const wife = reactive({name: '刘亦菲', age: 38, height: 168})
const handleAddHeight = () => {
    wife.height += 1
}

#### template####
<h1>ref和reacitve</h1>
<p>爱好是:{{ hobby }}</p>
<p>wife名字是:{{ wife.name }}-->wife年龄是:{{ wife.age }}---》wife身高是:{{ wife.height }}</p>
<button @click="handleAddHeight">点击wife身高+1</button>
3.计算属性computed
##### js###
 // 3 计算属性
    const person = reactive({
      firstName: '',
      lastName: ''
    })

    // 只有 计算属性,不修改值的情况
    // person.fullName = computed(() => {
    //   return person.firstName+person.lastName
    // })

    // 支持修改
    person.fullName = computed({
      get() {
        return person.firstName + person.lastName
      },
      set(value) {
        person.firstName = value.slice(0, 1)
        person.lastName = value.slice(1)
      },
    })

#### template###
<h1>计算属性</h1>
<p>姓:<input type="text" v-model="person.firstName"></p>
<p>名:<input type="text" v-model="person.lastName"></p>
<p>全名:{{ person.fullName }}</p>
<p>全名修改:<input type="text" v-model="person.fullName"></p>

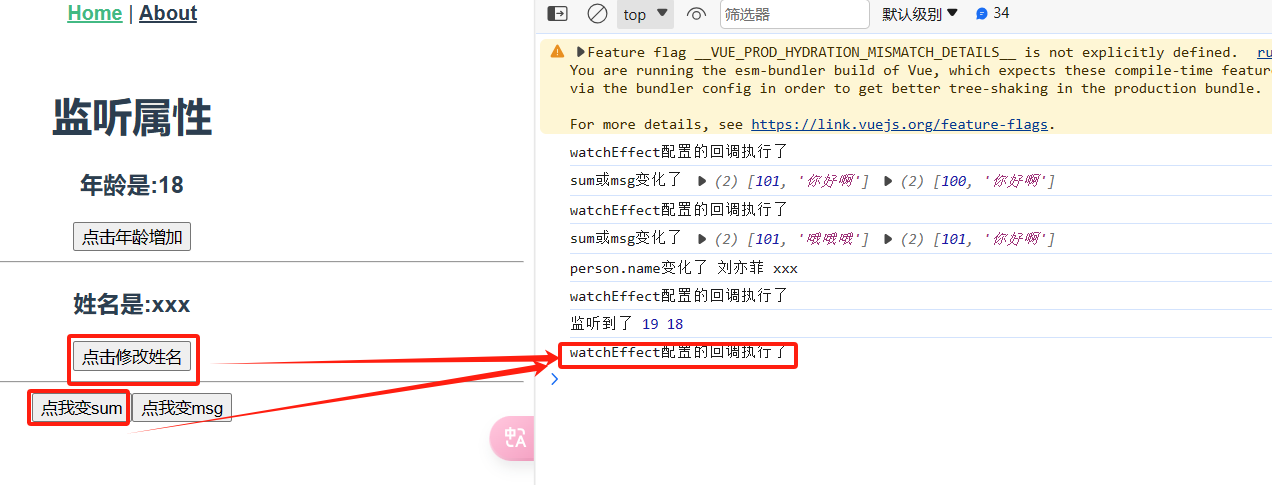
4.监听属性
4.1监听值类型,监听对象类型,监听多个变量,watchEffect函数
 1 <template>
 2   <div class="home">
 3     <h1>监听属性</h1>
 4     <h3>年龄是:{{ age }}</h3>
 5     <button @click="ageAdd">点击年龄增加</button>
 6     <hr>
 7     <h3>姓名是:{{ person.name }}</h3>
 8     <button @click="changeName">点击修改姓名</button>
 9     <hr>
10     <button @click="changeSum">点我变sum</button>
11     <button @click="changeMsg">点我变msg</button>
12   </div>
13 </template>
14
15 <script>
16 import {ref, watch, reactive, watchEffect} from "vue";
17
18 export default {
19   name: 'HomeView',
20   setup() {
21     const age = ref(18)
22
23     const person = reactive({name: 'xxx'})
24
25     const sum = ref(100)
26     const msg = ref('你好啊')
27
28     function ageAdd() {
29       age.value++
30     }
31
32     function changeName() {
33       person.name = '刘亦菲'
34     }
35
36     function changeSum() {
37       sum.value++
38     }
39
40     function changeMsg() {
41       msg.value = '哦哦哦'
42     }
43
44     //1.监听属性  普通监听
45     watch(age, (newValue, oldValue) => {
46       console.log('监听到了', newValue, oldValue)
47     })
48
49     //2.监听对象
50     watch(() => person.name, (newValue, oldValue) => {
51       console.log('person.name变化了', newValue, oldValue)
52     })
53
54     //3.监听多个
55     watch([sum, msg], (newValue, oldValue) => {
56       console.log('sum或msg变化了', newValue, oldValue)
57     })
58
59     //watchEffect函数,使用:不用指定监听谁,只要watchEffect内部用了某个变量,某个变量发送变化,就会触发
60     watchEffect(() => {
61       const x1 = sum.value
62       const x2 = person.name
63       console.log('watchEffect配置的回调执行了')
64     })
65     return {age, ageAdd, watch, changeName, person, sum, msg, changeSum, changeMsg}
66   }
67 }
68 </script>
5.生命周期
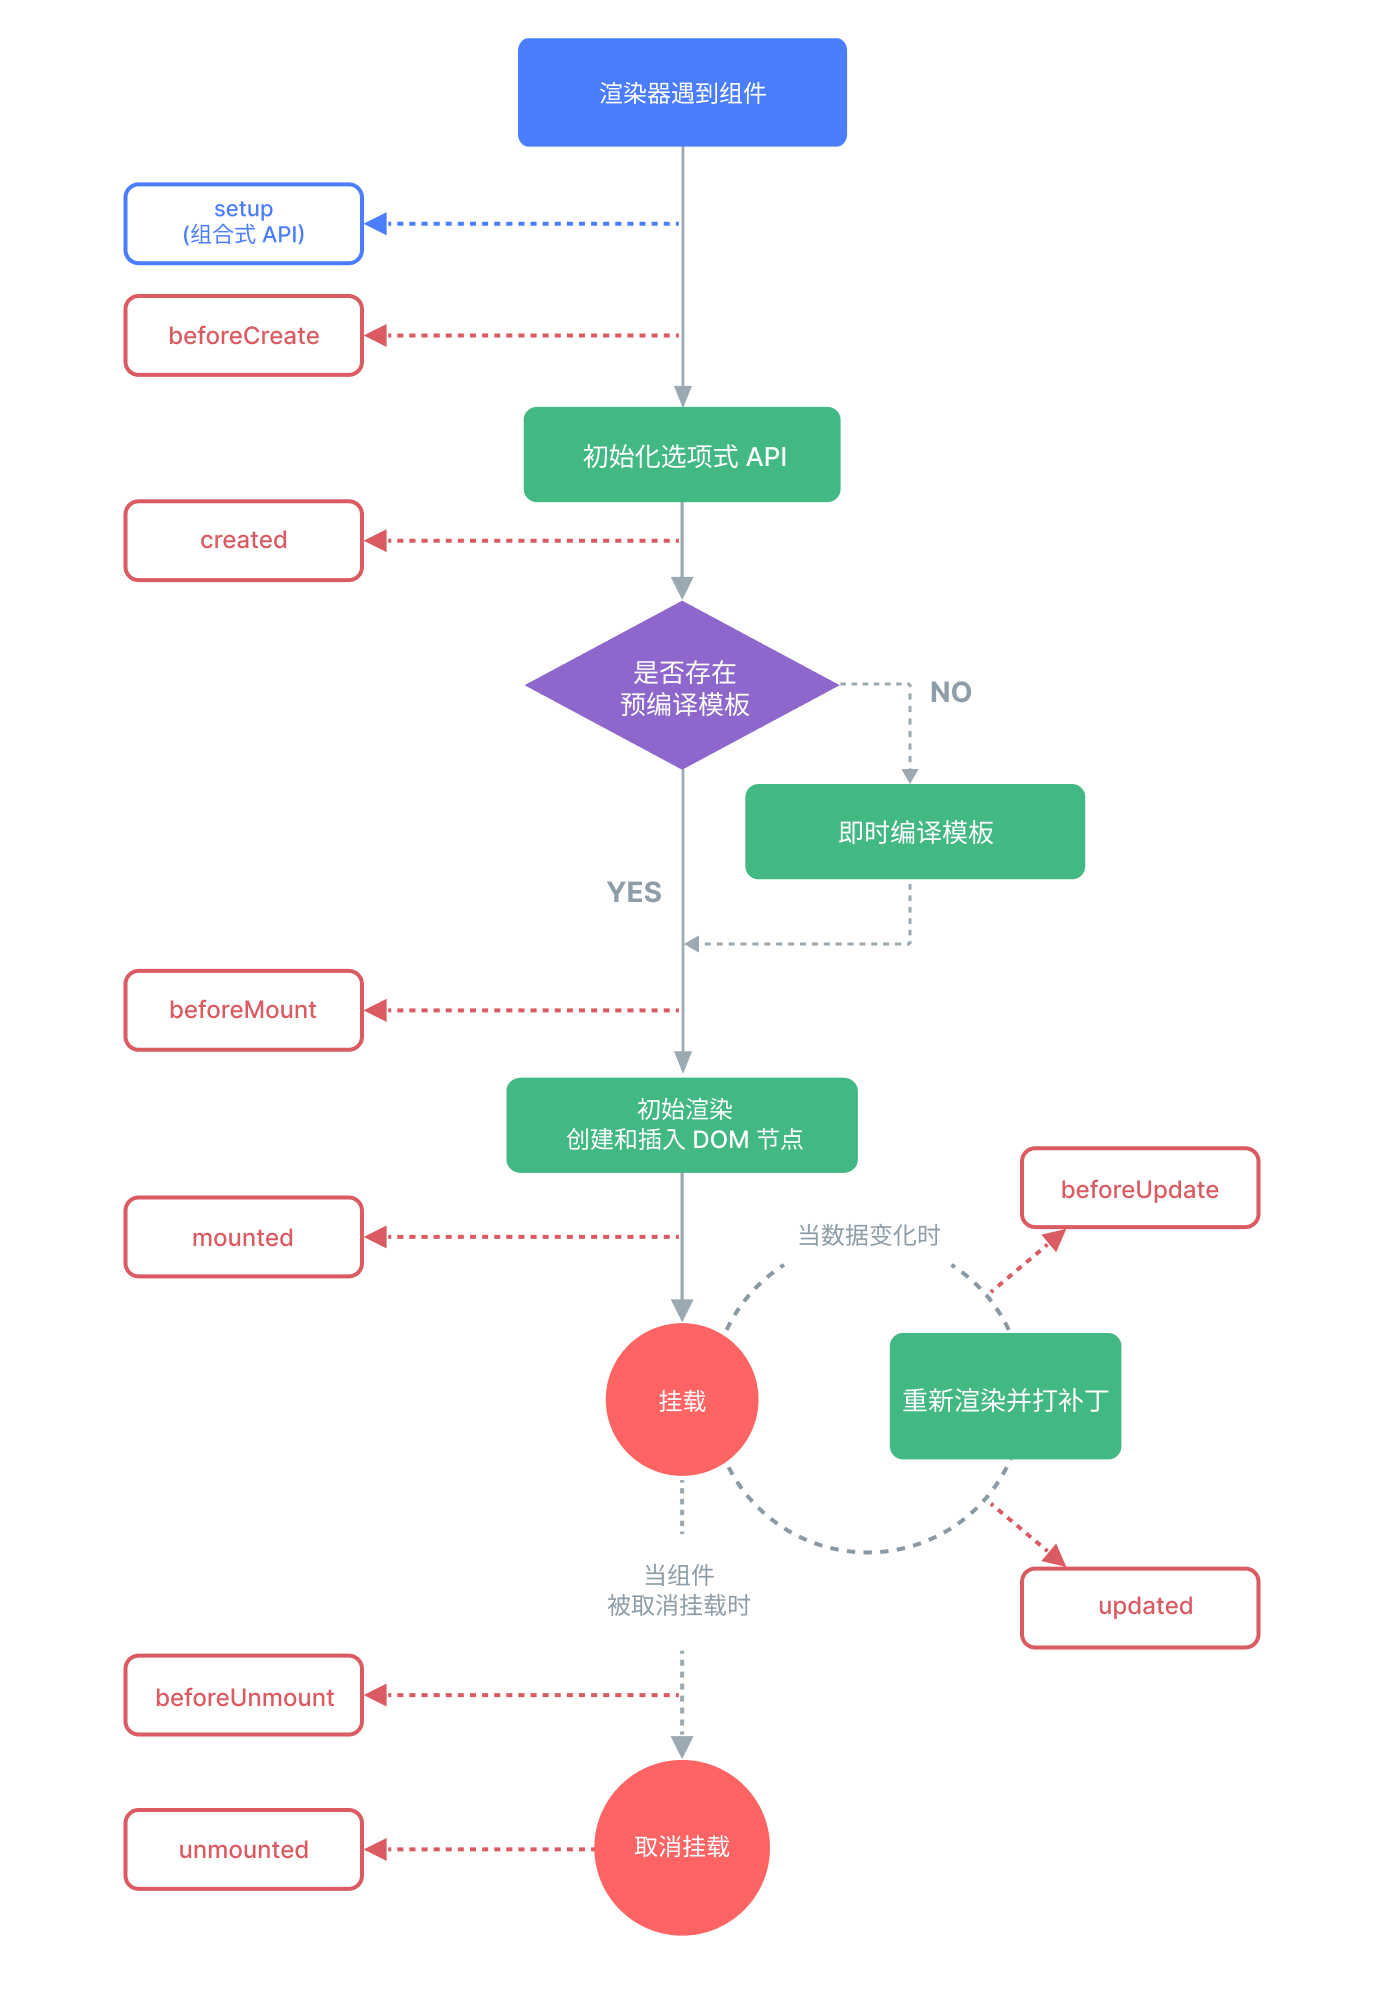
5.1配置项API生命周期
beforeCreate
created
beforeMount
mounted
beforeUpdate
updated
beforeUnmount
unmounted
5.2组合式API生命周期
beforeCreate===>setup()
created=======>setup()
beforeMount ===>onBeforeMount
mounted=======>onMounted
beforeUpdate===>onBeforeUpdate
updated =======>onUpdated
beforeUnmount ==>onBeforeUnmount
unmounted =====>onUnmounted
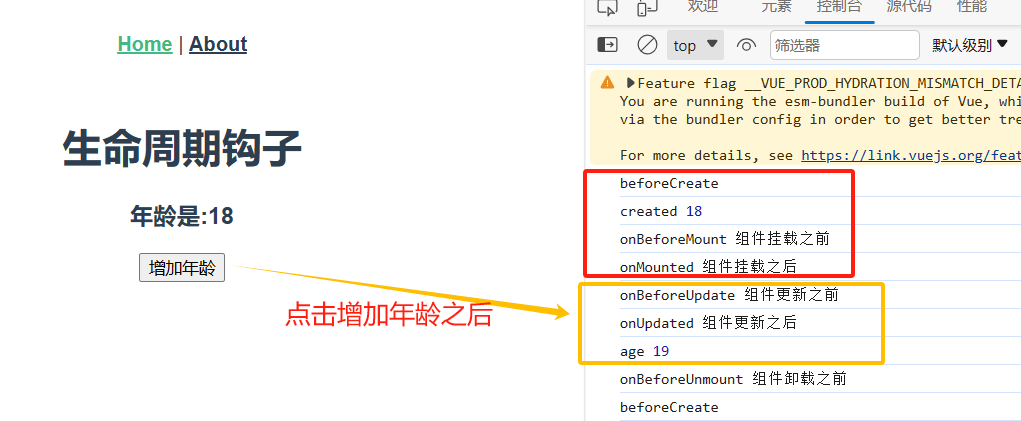
<template>
  <div class="home">
    <h1>生命周期钩子</h1>
    <h3>年龄是:{{ age }}</h3>
    <button @click="ageAdd">增加年龄</button>
  </div>
</template>

<script>
import {ref, onBeforeMount, onMounted, onBeforeUpdate, onUpdated, onBeforeUnmount, onUnmounted} from "vue";

export default {
  name: 'HomeView',
  setup() {
    //1.写在这里就是beforeCreate
    console.log('beforeCreate')

    const age = ref(18)

    function ageAdd() {
      age.value++
    }

    //2.created
    console.log('created', age.value)

    //3.onBeforeMount
    onBeforeMount(() => {
      console.log('onBeforeMount', '组件挂载之前')
    })

    //4.,onMounted
    onMounted(() => {
      console.log('onMounted', '组件挂载之后')
    })

    //5.onBeforeUpdate
    onBeforeUpdate(() => {
      console.log('onBeforeUpdate', '组件更新之前')
    })

    //6.onUpdated
    onUpdated(() => {
      console.log('onUpdated', '组件更新之后')
      console.log('age', age.value)
    })

    //7.onBeforeUnmount
    onBeforeUnmount(() => {
      console.log('onBeforeUnmount', '组件卸载之前')
    })

    //8.onUnmounted
    onUnmounted(() => {
      console.log('onUnmounted', '组件卸载之后')
    })

    return {age, ageAdd}
  },


}
</script>
6.toRefs
将响应式对象转换为普通对象,但其属性被转换为 ref
 1 <template>
 2   <div class="home">
 3     <h1>toRefs</h1>
 4     <h3>{{ name }}----------{{ age }}</h3>
 5     <button @click="age++">年龄+1</button>
 6     <hr>
 7     <button @click="handleShow">看控制台</button>
 8     <button @click="ageAdd">年龄增加</button>
 9
10   </div>
11 </template>
12
13 <script>
14 import {ref, reactive, toRefs} from "vue";
15
16 export default {
17   name: 'HomeView',
18   setup() {
19     let person = reactive({name: '张三', age: 48})
20
21     function ageAdd() {
22       person.age++
23       console.log(person)
24     }
25
26     function handleShow() {
27       console.log(person)
28     }
29
30     return {...toRefs(person), ageAdd, handleShow}// toRefs: 将响应式对象转换为普通对象,但其属性被转换为 ref。
31     //相当于return {name:ref(person.name),age:ref(person.age}
32     //这样做的好处是,你可以在模板中直接使用 name 和 age(而不是 person.name 和 person.age),而它们仍然是响应式的。
33   },
34
35
36 }
37 </script>
【用vit+vue3创建项目】
App.vue
1 <script setup>
// 以后,只要再 这样写[ <script setup> ] ,script就是setup函数中的
// 定义的变量和函数,不需要return,以后,就不再写配置项了

// 1 组件,只需要导入,就会自动注册
import HelloWorld from './components/HelloWorld.vue'
2 import HelloWorld from './components/HelloWorld.vue' 3 import Child from "./components/Child.vue"; 4 import Child2 from "./components/Child2.vue"; 5 import utils from "../public/utils/index.js"; 6 import Child3 from "./components/Child3.vue"; 7 8 //1.setup写法 9 import {ref, reactive, computed, toRefs, toRef} from 'vue' 10 11 const name = ref('张三') 12 13 function changeName() { 14 name.value = '李四' 15 } 16 17 //2.生命周期钩子---created 18 console.log('created') 19 20 //3.计算属性 21 const newName = computed(() => { 22 return name.value + '123' 23 }) 24 25 //4.自定义属性---父传子 26 const msg1 = ref('猪猪侠') 27 28 //5.自定义事件---子传父 29 const child_name = ref('') 30 31 function handleEvent(name) { 32 child_name.value = name 33 } 34 35 //6.插槽 36 //7.没有全局mixin,只有局部自己建的 37 let b = utils.name = '我是熊大' 38 let a = utils.add(1, 2) 39 console.log(a, b) 40 41 //8.toRefs 42 const person = reactive({ 43 name2: '光头强', 44 age2: 8 45 }) 46 let {name2, age2} = toRefs(person) 47 console.log(typeof (name2), age2) 48 name2.value = '吉吉国王' 49 50 //9.toRef---只把对象中某一个做成响应式 51 let name3 = toRef(person, 'name2') 52 console.log(name3.value) 53 54 //10.ref属性 55 const child3 = ref() // 代指 this.$refs.child3 ,这个地方必须叫child3,放在组件上的ref是child3 56 // created--->还没挂载---》组件还没有 57 function showLog() { 58 console.log(child3.value.age) 59 child3.value.changeAge() 60 console.log(child3.value.age) 61 } 62 63 </script> 64 65 <template> 66 <h1>setup写法</h1> 67 <h2>{{ name }}</h2> 68 <button @click="changeName">点我改名字</button> 69 <h2>计算属性:{{ newName }}</h2> 70 <hr> 71 <h1>自定义属性---父传子</h1> 72 <HelloWorld :msg="msg1"></HelloWorld> 73 <h2>自定义事件--子传父</h2> 74 <h3>子组件传过来的---{{ child_name }}</h3> 75 <Child @myevent="handleEvent"></Child> 76 <hr> 77 <h2>插槽</h2> 78 <Child2> 79 <template v-slot:a> 80 <div>我是a</div> 81 </template> 82 > 83 <template v-slot:b> 84 <div>我是b</div> 85 </template> 86 > 87 </Child2> 88 <hr> 89 <h1>ref属性-放在组件上</h1> 90 <Child3 ref="child3"></Child3> 91 <button @click="showLog">点我看控制台</button> 92 93 </template> 94 95 <style scoped> 96 .logo { 97 height: 6em; 98 padding: 1.5em; 99 will-change: filter; 100 transition: filter 300ms; 101 } 102 103 .logo:hover { 104 filter: drop-shadow(0 0 2em #646cffaa); 105 } 106 107 .logo.vue:hover { 108 filter: drop-shadow(0 0 2em #42b883aa); 109 } 110 </style>
HelloWorld.vue-->父传子
<script setup>
import {ref} from 'vue'

// 父传子,接收父传过来的变量:数组形式
// defineProps(['msg'])

//2.对象形式
defineProps({
  msg: String
})

const count = ref(0)
</script>

<template>
  <h1>{{ msg }}</h1>

</template>
Child.vue-->父子通信子传父
<script setup>
import {ref} from "vue";

let $emit = defineEmits(['myevent'])
const name = ref('')

function handleSend() {
  $emit('myevent', (name.value))
}
</script>

<template>
  <input type="text" v-model="name">--->{{ name }}--->
  <button @click="handleSend">点我传到父</button>
</template>

<style scoped>

</style>
Child2.vue--》插槽
<script setup>

</script>

<template>
<h2>child2</h2>
  <slot name="a"></slot>
  <hr>
  <slot name="b"></slot>
</template>

<style scoped>

</style>
Child3.vue-->ref属性
<script setup>
import {ref} from 'vue'

const age = ref(0)

function changeAge() {
  age.value += 4
}

defineExpose({age, changeAge})
</script>

<template>
  <h1>ref属性</h1>

</template>

<style scoped>

</style>
mixin.index.js
export default {
    name:'熊大',
    add:function (a,b){
        return a+b
    }
}
。
。
。
2.axios使用
2.1 基本使用
import axios from "axios";
// 相当于写在了created中--》页面加载完,就发送请求
axios.get('自己地址').then(res => {
  console.log(res)
})
2.1.1 小电影案例


<script setup>
import HelloWorld from './components/HelloWorld.vue'
import axios from "axios";
import {reactive} from "vue";

const filmsList = reactive({result: []})
axios.get('http://127.0.0.1:8000/app01/films/').then(res => {
  console.log(res.data)
  if (res.data.code == 100) {
    //加载成功.把数据放到变量中
    filmsList.result = res.data.result
    console.log('----', filmsList)
  } else {
    alert(res.data.msg)
  }
})
</script>

<template>
  <h1>加载电影案例</h1>
  <div v-for="item in filmsList.result">
    <h3>{{ item.name }}</h3>
    <img :src="item.poster" alt="" height="200px" width="150px">
  </div>

</template>

<style scoped>
.logo {
  height: 6em;
  padding: 1.5em;
  will-change: filter;
  transition: filter 300ms;
}

.logo:hover {
  filter: drop-shadow(0 0 2em #646cffaa);
}

.logo.vue:hover {
  filter: drop-shadow(0 0 2em #42b883aa);
}
</style>
 1 <script setup>
 2 import HelloWorld from './components/HelloWorld.vue'
 3 import axios from "axios";
 4 import {reactive} from "vue";
 5
 6 const filmsList = reactive({result: []})
 7 //2.升级
 8 // axios.get('http://127.0.0.1:8000/app01/films/').then(res => {
 9 //   console.log(res.data)
10   // if (res.data.code == 100) {
11     // 2.1 直接把res.data.result 复制到filmList.result
12     // Object.assign(filmsList.result, res.data.result)
13
14     // 2.2 解构赋值
15     // let {data} = res  // res={data:{code:100,msg:成功}}
16     // Object.assign(filmsList.result, data.result)
17
18     // 2.3 解构赋值
19     // let {data: {result}} = res
20     // Object.assign(filmsList.result, result)
21
22     // 2.4 解构赋值
23     // let {data} = res  // {code:100,msg:成功,result:[]}
24     // Object.assign(filmsList, data)
25     //
26     // } else {
27     //   alert(res.data.msg)
28     // }
29 // })
30
31     // 3 async  await
32     async function load() {
33      let{data}=await axios.get('http://127.0.0.1:8000/app01/films/')
34           Object.assign(filmsList, data)
35       }
36  load()
37
38 </script>
后端

。
。
。
【promise】
1.0 普通函数和回调函数
//普通函数: 正常调用的函数,一般函数执行完毕后才会继续执行下一行代码

<script>
    let fun1 = () =>{
        console.log("fun1 执行了")
    }
    // 调用函数
    fun1()
    // 函数执行完毕,继续执行后续代码
    console.log("其他代码继续执行")
</script>

//回调函数: 一些特殊的函数,表示未来才会执行的一些功能,后续代码不会等待该函数执行完毕就开始执行了

<script>
    // 设置一个2000毫秒后会执行一次的定时任务,基于事件自动调用,console.log先执行
    setTimeout(function (){
        console.log("延迟演示执行了")
    },2000)
    console.log("其他代码执行")
</script>
2.0promise基本使用(用来处理回调函数)
# Promise对象代表一个异步操作,有三种状态:`Pending`(进行中)、`Resolved`(已完成,又称 Fulfilled)和`Rejected`(已失败)
# 现实生活中对应 你跟你女朋友说,5年后等我赚够500w就结婚--》定义函数
-1 进行中(努力赚钱,其他代码继续执行)
-2 成功(赚够500w---》结婚)
-3 失败(没赚够---》分手)
 1 <script setup>
 2 import HelloWorld from './components/HelloWorld.vue'
 3 import axios from "axios";
 4 import {reactive} from "vue";
 5
 6 let promise = new Promise(function (resolve, reject) {
 7   // resolve,reject 是两个函数
 8   console.log("promise 开始执行")
 9   // resolve("promise 执行成功")
10   reject("promise 执行失败")
11   // 主动抛异常,也是执行失败
12   // throw new Error("error message")
13 })
14 console.log('11111')
15 // promise.then(
16 //     function (value) {console.log(`promise中执行了resolve:${value}`)},
17 //     function (error) {console.log(`promise中执行了reject:${error}`)})
18
19 //2.
20 promise.then(res => {
21   console.log(res)
22 }).catch(err => {
23   console.log(err)
24 })
25 console.log('222222')
26 </script>
3.0async和await的使用
promise对象 支持async和await 写法
 1 <script setup>
 2 import HelloWorld from './components/HelloWorld.vue'
 3
 4 // async 和await 写法
 5 // 1  async标识函数后,async函数的返回值会变成一个promise对象
 6 async function demo01() {
 7   let promise = new Promise(function (resolve, reject) {
 8     // resolve,reject 是两个函数
 9     console.log("promise 开始执行")
10     // resolve("promise 执行成功")
11     // reject("promise 执行失败")
12     // 主动抛异常,也是执行失败
13     throw new Error("error message")
14   })
15   return promise
16 }
17
18 console.log('11111')
19
20 // await 关键字,必须写在async修饰的函数中
21 async function demo02() {
22   try {
23     let res = await demo01()  // 正常调用,返回promise 对象,加await 调用--》返回正常then的数据
24     console.log(res)
25   } catch (err) {
26     console.log('出错了')
27   }
28
29 }
30
31 demo02()  // 它会等正常执行完成才会调用
32 console.log('222222')
33 </script>
axios其它配置项
//axios.get()
//axios.post()
axios({
    url:'地址',
    method:'post',
    headers: {'token': 'adsfa.adsfa.adsf',contentType:'application/json'},
    params: {name: lqz,age:19},
    data: {firstName: 'Fred'},
    timeout: 1000,
})
// 更多参数
{
  //1 `url` 是用于请求的服务器 URL
  url: '/user',
  //2 `method` 是创建请求时使用的方法
  method: 'get', // 默认值
  //3 `baseURL` 将自动加在 `url` 前面,除非 `url` 是一个绝对 URL。
  // 它可以通过设置一个 `baseURL` 便于为 axios 实例的方法传递相对 URL
  baseURL: 'https://some-domain.com/api/',
  //4 `transformRequest` 允许在向服务器发送前,修改请求数据
  // 它只能用于 'PUT', 'POST' 和 'PATCH' 这几个请求方法
  // 数组中最后一个函数必须返回一个字符串, 一个Buffer实例,ArrayBuffer,FormData,或 Stream
  // 你可以修改请求头。
  transformRequest: [function (data, headers) {
    // 对发送的 data 进行任意转换处理
    return data;
  }],
  // `transformResponse` 在传递给 then/catch 前,允许修改响应数据
  transformResponse: [function (data) {
    // 对接收的 data 进行任意转换处理
    return data;
  }],
  //5  自定义请求头
  headers: {'X-Requested-With': 'XMLHttpRequest'},
  //6 params` 是与请求一起发送的 URL 参数
  // 必须是一个简单对象或 URLSearchParams 对象
  params: {
    ID: 12345
  },
  // 7 aramsSerializer`是可选方法,主要用于序列化`params`
  // (e.g. https://www.npmjs.com/package/qs, http://api.jquery.com/jquery.param/)
  paramsSerializer: function (params) {
    return Qs.stringify(params, {arrayFormat: 'brackets'})
  },
  //8 data` 是作为请求体被发送的数据
  // 仅适用 'PUT', 'POST', 'DELETE 和 'PATCH' 请求方法
  // 在没有设置 `transformRequest` 时,则必须是以下类型之一:
  // - string, plain object, ArrayBuffer, ArrayBufferView, URLSearchParams
  // - 浏览器专属: FormData, File, Blob
  // - Node 专属: Stream, Buffer
  data: {
    firstName: 'Fred'
  },
  // 发送请求体数据的可选语法
  // 请求方式 post
  // 只有 value 会被发送,key 则不会
  data: 'Country=Brasil&City=Belo Horizonte',
  // 0imeout` 指定请求超时的毫秒数。
  // 如果请求时间超过 `timeout` 的值,则请求会被中断
  timeout: 1000, // 默认值是 `0` (永不超时)
  // 11 thCredentials` 表示跨域请求时是否需要使用凭证
  withCredentials: false, // default
  //12 dapter` 允许自定义处理请求,这使测试更加容易。
  // 返回一个 promise 并提供一个有效的响应 (参见 lib/adapters/README.md)。
  adapter: function (config) {
    /* ... */
  },
  //13 auth` HTTP Basic Auth
  auth: {
    username: 'lqz'
    password: '123‘
  },
  //14 `responseType` 表示浏览器将要响应的数据类型
  // 选项包括: 'arraybuffer', 'document', 'json', 'text', 'stream'
  // 浏览器专属:'blob'
  responseType: 'json', // 默认值
  //15 `responseEncoding` 表示用于解码响应的编码 (Node.js 专属)
  // 注意:忽略 `responseType` 的值为 'stream',或者是客户端请求
  // Note: Ignored for `responseType` of 'stream' or client-side requests
  responseEncoding: 'utf8', // 默认值
  //16  `xsrfCookieName` 是 xsrf token 的值,被用作 cookie 的名称
  xsrfCookieName: 'XSRF-TOKEN', // 默认值
  //17  `xsrfHeaderName` 是带有 xsrf token 值的http 请求头名称
  xsrfHeaderName: 'X-XSRF-TOKEN', // 默认值
  //18  `onUploadProgress` 允许为上传处理进度事件
  // 浏览器专属
  onUploadProgress: function (progressEvent) {
    // 处理原生进度事件
  },
  //19  `onDownloadProgress` 允许为下载处理进度事件
  // 浏览器专属
  onDownloadProgress: function (progressEvent) {
    // 处理原生进度事件
  },
  // 20 `maxContentLength` 定义了node.js中允许的HTTP响应内容的最大字节数
  maxContentLength: 2000,
  //21  `maxBodyLength`(仅Node)定义允许的http请求内容的最大字节数
  maxBodyLength: 2000,
  // 22 `validateStatus` 定义了对于给定的 HTTP状态码是 resolve 还是 reject promise。
  // 如果 `validateStatus` 返回 `true` (或者设置为 `null` 或 `undefined`),
  // 则promise 将会 resolved,否则是 rejected。
  validateStatus: function (status) {
    return status >= 200 && status < 300; // 默认值
  },
  // 23 `maxRedirects` 定义了在node.js中要遵循的最大重定向数。
  // 如果设置为0,则不会进行重定向
  maxRedirects: 5, // 默认值
  //24  `socketPath` 定义了在node.js中使用的UNIX套接字。
  // e.g. '/var/run/docker.sock' 发送请求到 docker 守护进程。
  // 只能指定 `socketPath` 或 `proxy` 。
  // 若都指定,这使用 `socketPath` 。
  socketPath: null, // default
  //25  `httpAgent` and `httpsAgent` define a custom agent to be used when performing http
  // and https requests, respectively, in node.js. This allows options to be added like
  // `keepAlive` that are not enabled by default.
  httpAgent: new http.Agent({ keepAlive: true }),
  httpsAgent: new https.Agent({ keepAlive: true }),
  //26  `proxy` 定义了代理服务器的主机名,端口和协议。
  // 您可以使用常规的`http_proxy` 和 `https_proxy` 环境变量。
  // 使用 `false` 可以禁用代理功能,同时环境变量也会被忽略。
  // `auth`表示应使用HTTP Basic auth连接到代理,并且提供凭据。
  // 这将设置一个 `Proxy-Authorization` 请求头,它会覆盖 `headers` 中已存在的自定义 `Proxy-Authorization` 请求头。
  // 如果代理服务器使用 HTTPS,则必须设置 protocol 为`https`
  proxy: {
    protocol: 'https',
    host: '127.0.0.1',
    port: 9000,
    auth: {
      username: 'lqz',
      password: '123'
    }
  },
  // 27 see https://axios-http.com/zh/docs/cancellation
  cancelToken: new CancelToken(function (cancel) {
  }),
  // 28 `decompress` indicates whether or not the response body should be decompressed
  // automatically. If set to `true` will also remove the 'content-encoding' header
  // from the responses objects of all decompressed responses
  // - Node only (XHR cannot turn off decompression)
  decompress: true // 默认值
}
。
。
。
【vue-router插件】
安装:npm install vue-router@4
main.js
import { createApp } from 'vue'
import './style.css'
import App from './App.vue'
import router from "./router/index.js";

createApp(App).use(router).mount('#app')
App.vue
<script setup>
import HelloWorld from './components/HelloWorld.vue'
</script>

<template>
  <router-view></router-view>
</template>
HomeView.vue-AboutView.vue--LoginView.vue
 1 <script setup>
 2 import {useRouter} from 'vue-router'
 3 let router = useRouter()
 4 function handleTo(){
 5 // router.push('/about')
 6 //   router.push({'name':'about',query:{name:'吉吉',age:8}})
 7   router.push({name:'about',params:{id:1}})
 8   }
 9 </script>
10
11 <template>
12   <h1>首页</h1>
13   <h2>页面跳转</h2>
14   <router-link to="/about"><button>跳转到about-html跳</button></router-link>
15   <button @click="handleTo">js跳到about</button>
16 </template>
17
18 <style scoped>
19
20 </style>
21
22
23 ========================================
24 <script setup>
25 //取出home页面传入的数据
26 import {useRoute} from 'vue-router'
27
28 let route = useRoute()
29 // console.log(route.query.name)
30 // let name=route.query.name
31
32 //路径中带数据取值
33 let id = route.params.id
34 </script>
35
36 <template>
37   <h1>about页面</h1>
38   <!--  <h1>{{name}}</h1>-->
39   <h1>{{ id }}</h1>
40 </template>
41
42 <style scoped>
43
44 </style>
45
46 ==========================================
47 <script setup></script>
48
49 <template>
50 <h1>登录</h1>
51 </template>
router/index.js
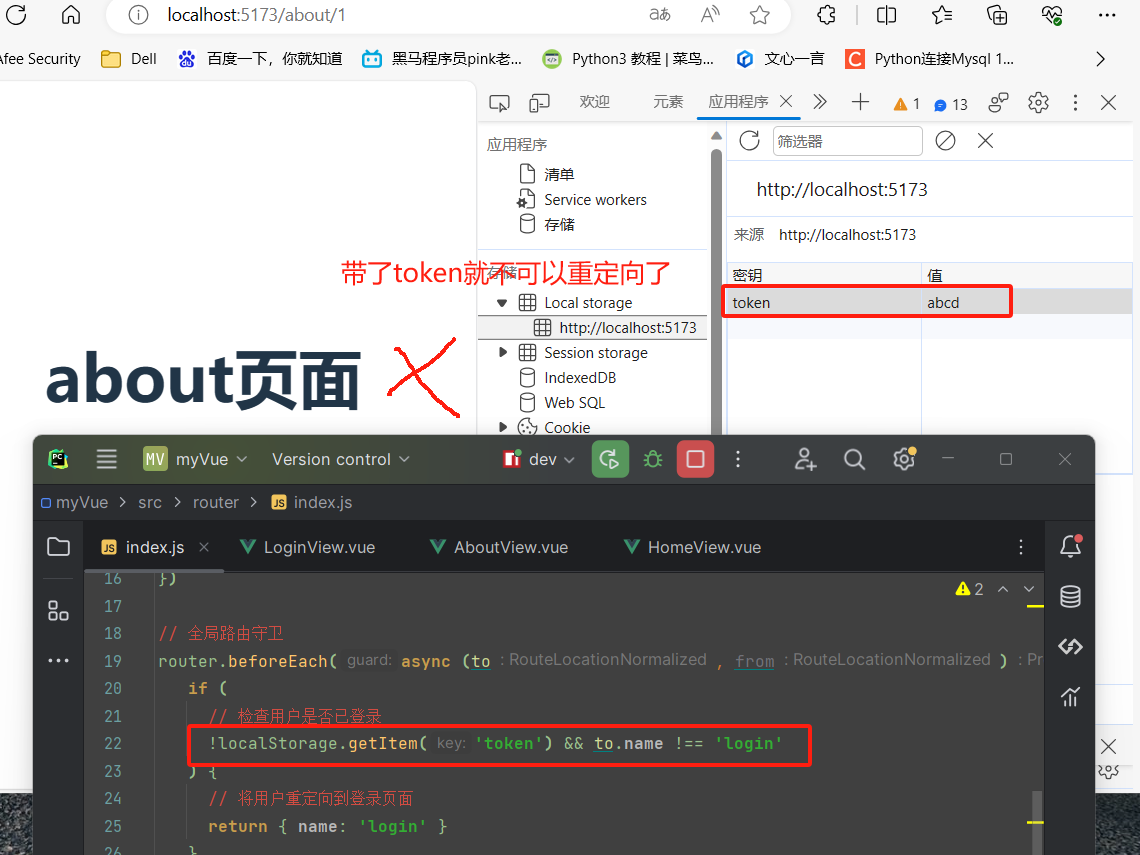
 1 import {createRouter, createWebHashHistory, createWebHistory} from "vue-router";
 2 import HomeView from "../view/HomeView.vue";
 3 import AboutView from "../view/AboutView.vue";
 4 import LoginView from "../view/LoginView.vue";
 5
 6 const routes = [
 7     {path: '/', name: 'home', component: HomeView},
 8     {path: '/about/:id', name: 'about', component: AboutView},
 9      {path: '/login', name: 'login', component: LoginView},
10 ]
11
12 const router = createRouter({
13
14     history: createWebHistory(),
15     routes,
16 })
17
18 // 全局路由守卫
19 router.beforeEach(async (to, from) => {
20    if (
21      // 检查用户是否已登录
22      !localStorage.getItem('token') && to.name !== 'login'
23    ) {
24      // 将用户重定向到登录页面
25      return { name: 'login' }
26    }
27  })
28 export default router
。
。
【pinia】
状态管理器,统一状态管理,组件间通信
state、getter 和 action,我们可以假设这些概念相当于组件中的 data、 computed 和 methods
使用步骤: 1 安装 npm install pinia
2 在store/xx.js,写入代码,可以定义多个
3 main.js中使用插件
4 在组件中使用pinia的数据
store/counter.js
 1 import {defineStore} from 'pinia'
 2
 3 export const useCounterStore = defineStore('counter', {
 4     //1 定义变量
 5     state: () => {
 6         return {
 7             count: 0,
 8             hobby: '篮球'
 9         }
10     },
11     //2 这里面写方法,与后端交互或逻辑判断,再操作数据
12     actions: {
13         increment(id) {
14             // 跟后端交互--》把good_id--》真正加购物车
15             this.count++
16         },
17         changeHobby(hobby) {
18             this.hobby = hobby
19         }
20     },
21     //3 getter-->获取数据
22     getters: {
23         getCount() {
24             return this.count
25         },
26     },
27 })
main.js
import {createPinia} from 'pinia'

const pinia = createPinia()
createApp(App).use(router).use(pinia).mount('#app')
goodsList组件
 1 <script setup>
 2 import {reactive} from "vue";
 3 import ShoppingCard from "./ShoppingCard.vue";
 4 //1.引入pinia的store/counter.js
 5 import {useCounterStore} from "../store/counter";
 6
 7 let counter = useCounterStore()
 8
 9 //2.页面渲染数据,都通过counter对象来操作State、getter、action
10 const goodsList = reactive([
11   {id: 1, name: '钢笔', price: 100},
12   {id: 2, name: '毛笔', price: 20},
13   {id: 3, name: '铅笔', price: 10},
14   {id: 4, name: '圆珠笔', price: 15},
15 ])
16
17 //点击按钮修改
18 function handleAdd(id) {
19   console.log('加入购物车', id)
20   // counter.count++
21   counter.increment()
22   // counter.getCount()
23 }
24
25 //测试pinia中的changeHobby
26 function changeHobby() {
27   counter.hobby = '打羽毛球'
28 }
29 </script>
30
31 <template>
32   <h2>商品</h2>
33   <ShoppingCard/>
34   <hr>
35   <div>
36     <div v-for="item in goodsList">
37       <span>商品名:{{ item.name }}</span>
38       <span>价格:{{ item.price }}</span>
39       <button @click="handleAdd(item.id)">加入购物车</button>
40     </div>
41     <button @click="changeHobby">点我变pinia中的hobby</button>
42   </div>
43 </template>
44
45 <style scoped>
46
47 </style>
shoppingCar组件
 1 <script setup>
 2 //1.引入pinia的store/counter.js
 3 import {useCounterStore} from "../store/counter";
 4
 5 let counter = useCounterStore()
 6 </script>
 7
 8 <template>
 9   <h2>购物车</h2>
10   <p>数量:{{ counter.getCount }}</p>
11   <p>爱好修改:{{ counter.hobby }}</p>
12 </template>
。
。
【elementui-plus】
# 0 ant-design :https://www.antdv.com/components/message-cn

# 1 官网:https://element-plus.org/zh-CN/#/zh-CN
# 2 安装
cnpm install element-plus --save

# 3 main.js中注册
import ElementPlus from 'element-plus'
import 'element-plus/dist/index.css'

createApp(App).use(router).use(pinia).use(ElementPlus).mount('#app')

# 4 组件中使用
<script setup>
import { ElMessage } from 'element-plus'
const open2 = () => {
  ElMessage({
    message: '恭喜您成功了',
    type: 'success',
  })
}
</script>

<template>
  <div class="mb-4">
    <el-button>Default</el-button>
    <el-button type="primary">Primary</el-button>
    <el-button type="success">Success</el-button>
    <el-button type="info">Info</el-button>
    <el-button type="warning">Warning</el-button>
    <el-button type="danger">Danger</el-button>
  </div>
  <div>
    <el-card style="max-width: 480px">
      <template #header>Yummy hamburger</template>
      <img
          src="https://shadow.elemecdn.com/app/element/hamburger.9cf7b091-55e9-11e9-a976-7f4d0b07eef6.png"
          style="width: 100%"
      />
    </el-card>
  </div>
  <div>
    <el-button :plain="true" @click="open2">Message</el-button>
  </div>
</template>

<style scoped>

</style>

 浙公网安备 33010602011771号