


【router基本使用(路由跳转,携带数据)】
####### 跳转 #######
    -js跳转
        this.$router.push(路径)
        this.$router.push(对象)
            -this.$router.push({name:'路由别名'})
            -this.$router.push({path:'路径'})

    -组件跳转
        <router-link to="/about">
        <router-link :to="{name:'路由别名'}">
        <router-link :to="{path:'路径'}">


##### 路由跳转,携带数据############
    -请求地址中以  ? 形式携带 ---》 /about?name=数据
        #####router-link######
        -router-link 组件携带
            - to="/about?name=xxx"
              - :to="{name:'about',query:{name:'xxx',age:18}}"
        -在另一个页面组件中取:
            this.$route.query
        #####js跳转######
        -js跳转 携带数据
            -this.$router.push('/about?name=xxx&age=18')
            -this.$router.push({name: 'about', query: {name: 'xxx', age: 28}})
        -在另一个页面组件中取:
            this.$route.query
 1 <template>
 2   <div class="home">
 3     <h1>Home</h1>
 4     <!--    <<h></h>outer-link to="/about?name=xxx"><button>跳转到about</button></router-link>-->
 5     <!--    请求地址中以 ?形式携带-->
 6     <!--<router-link :to="{name:'about',query:{name:'xxx',age:18}}"><button>跳转到about</button></router-link>-->
 7     <hr>
 8     <button @click="handleTo">js跳转到about</button>
 9   </div>
10
11 </template>
12
13 <script>
14
15 export default {
16   name: 'HomeView',
17   methods: {
18     handleTo() {
19       //1.js携带数据
20       // this.$router.push('/about?name=xxx&age=18')
21
22       //2.js携带数据
23       this.$router.push({name: 'about', query: {name: 'xxx', age: 28}})
24     }
25   }
26 }
27 </script>
aboutView
<template>
  <div class="about">
    <h1>about页面</h1>

  </div>
</template>

<script>
export default {
  name: 'AboutView',
  data() {
    return {
      name: '',
    }
  },
  created() {
    console.log('$route', this.$route) //$route是当前路由信息对象
    //取值
    this.name = this.$route.query.name
  }
}
</script>
----------------------------------------------------------------------------
    -请求地址中携带 --》/about/数据/
        -必须在路由中写
              {
                path: '/about/:id/detail',
                name: 'about',
                component: AboutView
              },
           -标签跳转
            -to="/about/88"
            -:to="{name:'about',params:{id:66}}"
        -js跳转
            this.$router.push('/about/tt')
              this.$router.push({name: 'about', params: {id: 'xxx'}})
        -另一组件中取
            this.$route.params
。
。
。
【相关api】
1 指的是:this.$router--->方法
2 常用的 this.$router.push(path): 相当于点击路由链接(可以返回到当前路由界面)
this.$router.replace(path): 用新路由替换当前路由(不可以返回到当前路由界面)
this.$router.back(): 请求(返回)上一个记录路由
this.$router.go(-1): 请求(返回)上一个记录路由
this.$router.go(1): 请求下一个记录路由
【多级路由】

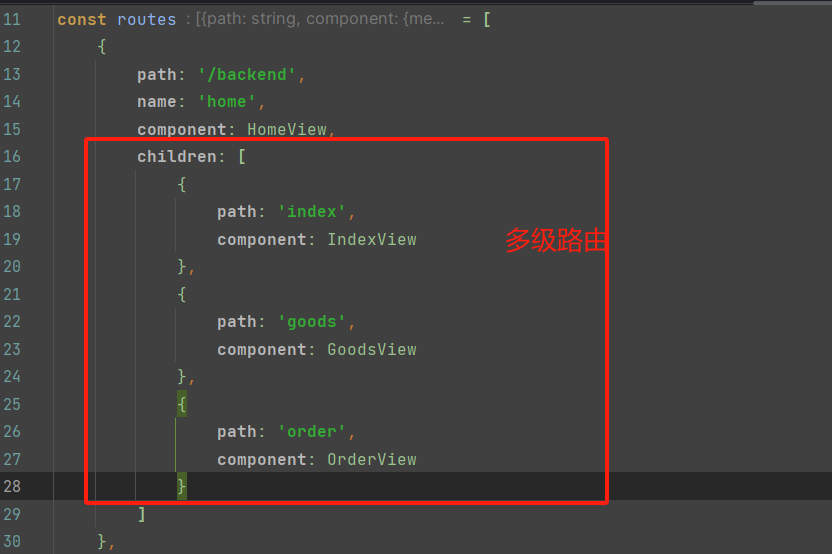
 1 <template>
 2   <div class="home">
 3
 4   <div class="left">
 5     <router-link to="/backend/index"><p>首页</p></router-link>
 6     <router-link to="/backend/order"><p>订单页面</p></router-link>
 7     <router-link to="/backend/goods"><p>商品页面</p></router-link>
 8
 9   </div>
10   <div class="right">
11     <router-view></router-view>
12   </div>
13   </div>
14
15 </template>
16
17 <script>
18
19 export default {
20   name: 'HomeView',
21   methods: {
22
23   },
24
25 }
26 </script>
27
28 <style scoped>
29 .home{
30   display: flex;
31 }
32 .left{
33   height: 300px;
34   width: 20%;
35   background-color: #42b983;
36 }
37 .right{
38   height: 300px;
39   width: 80%;
40   background-color: aqua;
41 }
42 </style>

。
。
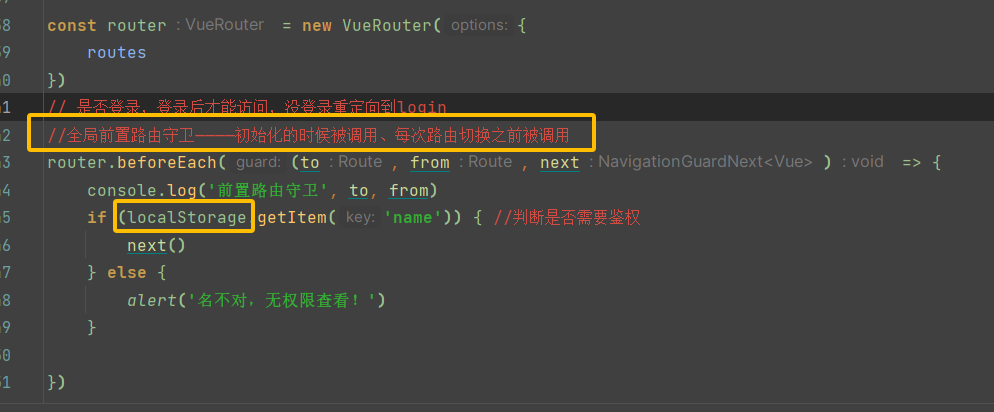
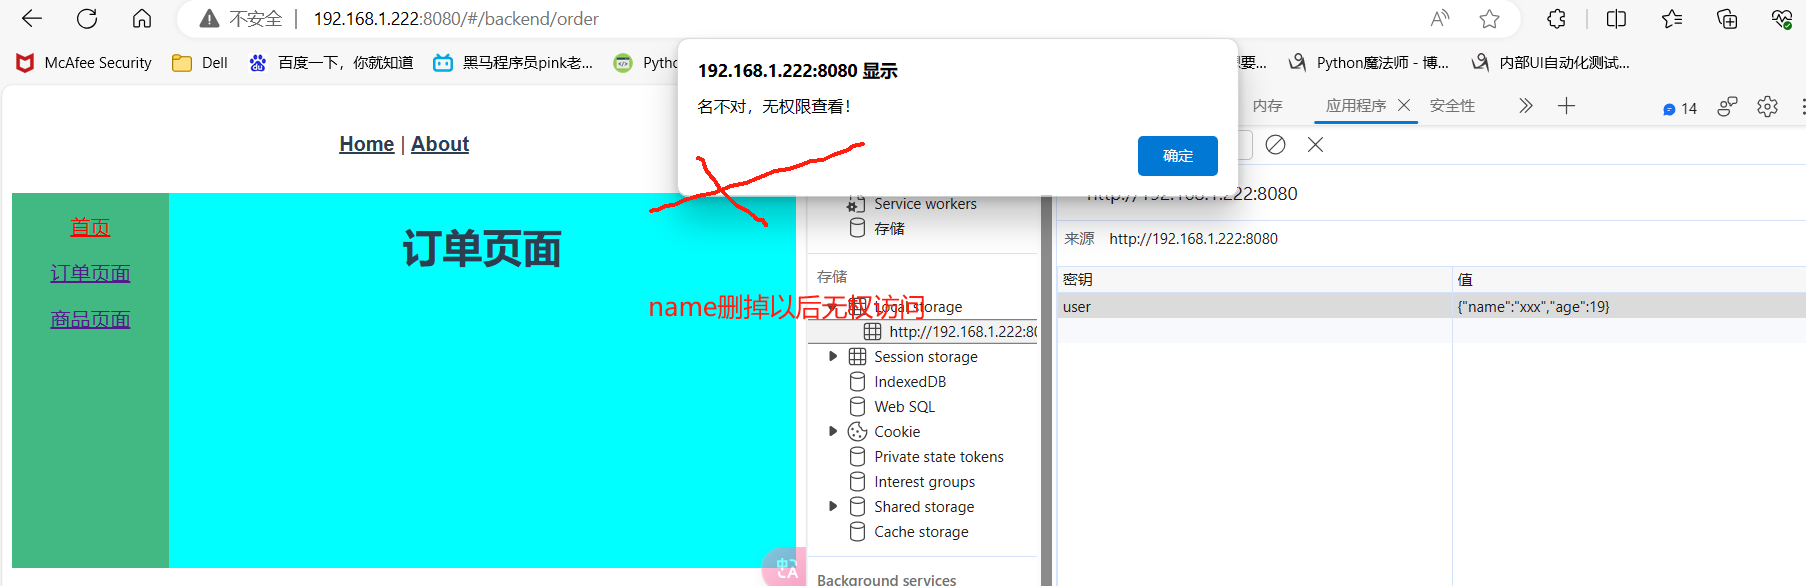
【路由守卫】

。
。

 浙公网安备 33010602011771号