


DELL iDRAC (Integrated Dell™ Remote Access Controller )是 Dell PowerEdge 系列服务器上的远程管理方案, 11代 12代服务器已经集成此管理卡,用户无须购置其它任何设备即可实现服务器底层管理,如系统崩溃恢复,电源控制 ,BIOS 设置。如果再搭配其DRAC Enterprise 控制卡,可实现图形界面下登录到控制台。
特点:
1. 独立于操作系统和BIOS,服务器无须安装任何程序,只须作相应配置即可。
2. 主控端无须安装任何额外设备,使用 Telnet/SSH/浏览器方式即可控制 。
3. 可以实现对BIOS甚至操作系统的完全控制。

功能:
1. 在操作系统崩溃,死机或 BIOS自检出错情况下,远程重启/开机/关机。
2. 通过串口重定向,实现远程对服务器BIOS 启动过程的完全控制。
3. 远程实时查看Linux启动时控制台的输出。
4. 通过串口远程登录到Linux, 典型的应用场景:以单用户模式通过串口登录到Linux, 执行系统紧急救援  。
5.  远程通过PXE 自动给 服务器安装操作系统 (windows/Linux均可 ) 。
Dell C6100 BIOS/BMC Configuration
原文 http://vnetwise.wordpress.com/2013/07/03/dell-c6100-biosbmc-configuration
iDRAC6配置
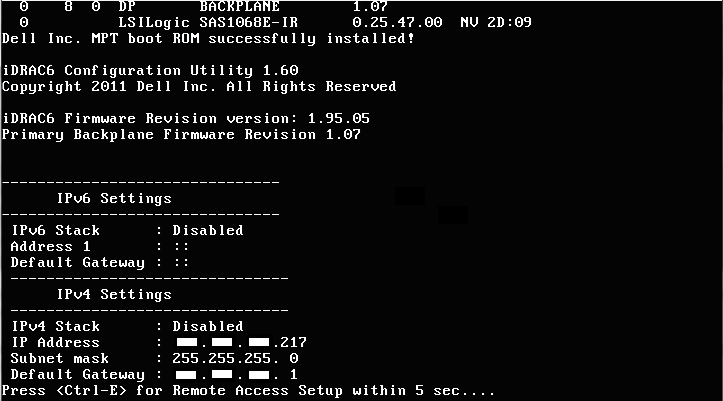
1.登录iDRAC配置界面
服务器开机自检时, 出现以下画面时, 按Ctrl + E进入.
2.开启IPMI功能
iDRAC6 LAN切换至On, IPMI Over LAN切换至On
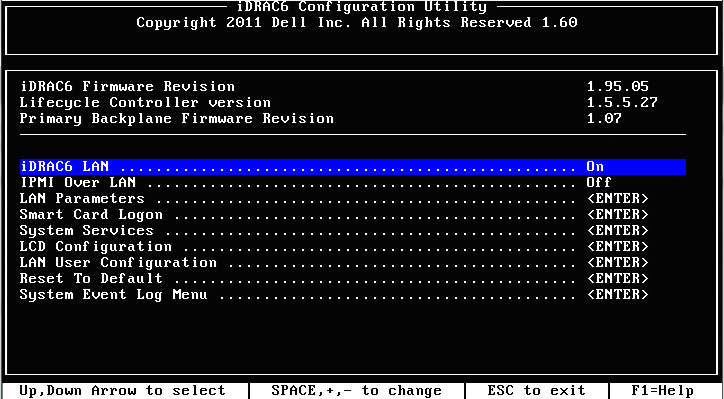
3.配置网络参数
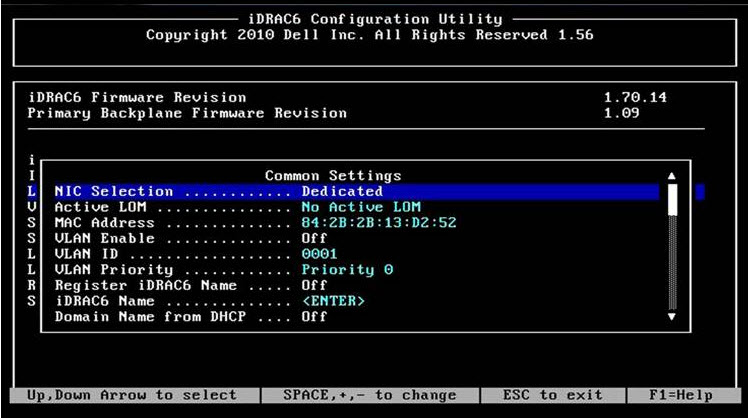
选择LAN Parameters进入. NIC Selection 有几个参数可供选择. 我们一般选择Shared方式
'Dedicated'(专用)— 选择此选项可以使远程访问设备能够使用 iDRAC Enterprise 上的专用网络接口。此接口不与主机操作系统共享并会将管理通信路由到单独的物理网络,从而能够与应用程序通信分开。此选项只有在系统中装有 iDRAC6 Enterprise 时才可用。安装 iDRAC6 Enterprise 卡后,确保更改"NIC Selection"(NIC 选择)为"Dedicated"(专用)。这可以通过 iDRAC6 配置公用程序、iDRAC6 Web 界面或通过 RACADM 完成。

'Shared'(共享)— 选择此选项可以与主机操作系统共享网络接口。当主机操作系统针对 NIC 组配置后,远程访问设备网络接口将具有全部功能。远程访问设备通过 NIC 1 和 NIC 2 接收数据,但是只通过 NIC 1 发送数据。如果 NIC 1 出现故障,远程访问设备将不可访问。

'Shared with Failover LOM2'(与故障转移 LOM2 共享)— 选择此选项可以与主机操作系统共享网络接口。当主机操作系统针对 NIC 组配置后,远程访问设备网络接口将具有全部功能。远程访问设备通过 NIC 1 和 NIC 2 接收数据,但是只通过 NIC 1 发送数据。如果 NIC 1 出现故障,远程访问设备会故障转移到 NIC 2 进行所有数据发送。远程访问设备会继续使用 NIC 2 进行数据发送。如果 NIC 2 出现故障,远程访问设备会故障转移回 NIC 1 来进行所有数据发送,但前提是 NIC 1 中的故障已经得以纠正。

'Shared with Failover All LOMs'(与故障转移所有 LOM 共享)— 选择此选项可以与主机操作系统共享网络接口。当主机操作系统针对 NIC 组配置后,远程访问设备网络接口将具有全部功能。远程访问设备通过 NIC 1、NIC 2、NIC 3 和 NIC 4 接收数据,但是只通过 NIC 1 发送数据。如果 NIC 1 出现故障,远程访问设备会故障转移回 NIC 2 来进行所有数据发送。如果 NIC 2 出现故障,远程访问设备会故障转移回 NIC 3 来进行所有数据发送。如果 NIC 3 出现故障,远程访问设备会故障转移回 NIC 4 来进行所有数据发送。如果 NIC 4 出现故障,远程访问设备会故障转移回 NIC 1 来进行所有数据发送,但前提是原来的 NIC 1 故障已经得以纠正。此选项可能在 iDRAC6 Enterprise 上不可用。
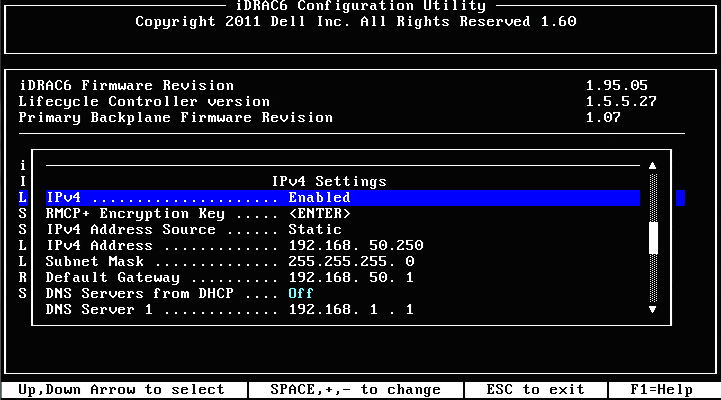
光标向下移动, 可以配置IPV4地址
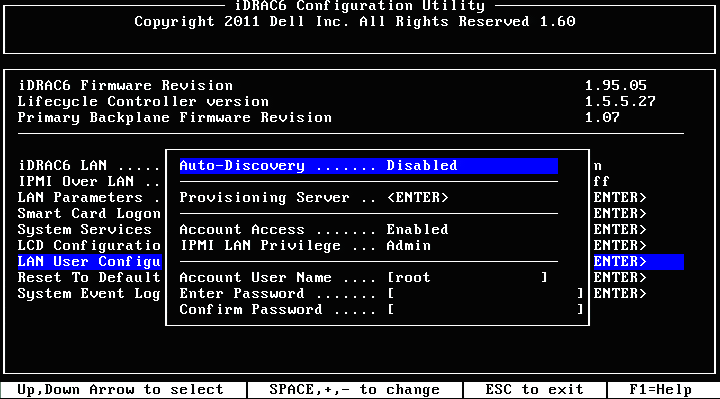
4.用户管理
移动光标到LAN User Configuration, 进入. 默认用户名root 密码calvin, 改成我们所需要的用户名及密码
iDRAC7配置
参考 http://serverfault.com/questions/512752/what-are-the-idrac-7-default-settings
加电自检过程中, 按F2进入系统设置
#System Summary

    No settings, but will show you which NIC the DRAC is using, as well as its network settings. If you just need someone to tell you what the network info is, send them here.
#Network
    Network Settings
        Enable NIC: Enabled
        NIC Selection: Dedicated (Express is set to LOM1)
        Failover Network: None (Express has this option enabled: None)
        MAC Address: [varies, obviously]
        Auto Negotiation: On (Express has this option disabled: On)
        Auto Dedicated NIC: Disabled
        Network Speed: [varies]
        Active NIC Interface: Dedicated (Express has: None)
        Duplex Mode: [varies]
    Common Settings
        Register DRAC on DNS: Disabled
        DNS DRAC Name: idrac-XXXXXXX (I believe the second part of the name is generated individually by each DRAC, but I do not know the algorithm used.)
        Auto Config Domain Name: Disabled
        Static DNS Domain Name: (empty)
    IPv4 Settings
        Enable IPv4: Enabled
        Enable DHCP: Disabled
        Static IP Address: 192.168.0.120
        Static Gateway: 192.168.0.1
        Static Subnet Mask: 255.255.255.0
        Use DHCP to obtain DNS server addresses: Disabled
        Static Preferred DNS Server: 0.0.0.0
        Static Alternate DNS Server: 0.0.0.0
    IPv6 Settings
        Enable IPv6: Disabled
        Enable Auto-configuration: Enabled
        Static IP Address 1: ::
        Static Prefex Length: 64
        Static Gateway: ::
        Link Local Address: ::
        Use DHCP to obtain DNS Server address: Disabled
        Static Preferred DNS Server: ::
        Static Alternate DNS Server: ::
    IPMI Settings
        Enable IPMI Over LAN: Enabled
        Channel Privilege Level Limit: Administrator
        Encryption Key: 00000000000000000000000000000000
    VLAN Settings
        Enable VLAN ID: Disabled
        VLAN ID: 1
        Priority: 0
#OS to iDRAC Pass Through
    OS to iDRAC Pass Through: Disabled
    Network Settings
        OS IP Address: 0.0.0.0
#Alerts
    Platform Events
        Enable Platform Event Filter Alerts: Disabled
    Trap Settings
        IP Destination List
        Enable Alert Destination 1: Disabled
        Alert Destination 1: 0.0.0.0
        (This repeats for Alert Destinations 2 through 8)
        Community String
        Community String: public
#System Event Log
    Total Number of Records: [varies]
    Clear Records: No
#Virtual Media (Entire section is Enterprise-only)
    Virtual Media Status: Auto attach
#vFlash Media (Entire section is Enterprise-only)
    Enable vFlash: Enabled
#Power Configuration
    Power Cap Policy (This subsection is Enterprise-only)
        iDRAC Power Limit Policy: Disabled
        Recommended Limits
        Minimum Power Limit: 225 Watts or 767 BTU/hr
        Maximum Power Limit: 294 Watts or 1003 BTU/hr
        User Defined Limits
        Maximum Power Limit (Watts): 277
        Maximum Power Limit (BTU/hr): 945
        Maximum % of Recommended System Limit: 75
    Power Supply Options
        Power Supply Redundant Policy: Power Supply Redundancy
    Hot Spare
        Enable Hot Spare: Enabled
        Primary Power Supply Unit: PSU1
    Power Factor Correction (PFC)
        Enable Power Factor Correction: Disabled
#Thermal
    Thermal Base Algorithm: Auto
    User option: Default
    Maximum Air Exhaust Temperature (in C): None
    Fan Speed Offset: Low Fan Speed Offset
#System Location [I do not know how much of this a tower system will have.]
    Data Center Name: (empty)
    Aisle Name: (empty)
    Rack Name: (empty)
    Rack Slot: 1
    Size of Managed System in U: [varies]
#Front Panel Security
    Disable Power Button: No
    Front Panel Access: Full Capabilities
    Set LCD message: Service Tag
    User-Defined String: (empty)
    System Power Units: Watt
    Ambient Temp Units: Celsius
    Error Display: Simple
    Enable Virtual Console Indication: Disabled
#User Configuration
    User ID: 2
    Enable User: Enabled
    User Name: root
    LAN User Privilege: Administrator
    Serial Port User Privilege: Administrator
    Change Password: [The default password is "calvin"]
#Smart Card (Entire section is Enterprise-only)
    Configure Smart Card Logon: Disabled

#Lifecycle Controller
    Lifecycle Controller: Enabled
    Collect System Inventory on Restart: Enabled
    Cancel Lifecycle Controller Actions: No
#Remote Enablement
    Enable Auto-Discovery: Disabled
    Provisioning Server: (empty)
dell服务器配置sol
dell早期服务器
| Serial Communication | DEFAULT: | CHANGE TO: |
|---|---|---|
| Serial Communication | On without Console Redirection | On with Console Redirection via COM2 |
| External Serial Connector | COM1 | COM1 |
| Failsafe Baud Rate | 115200 | 115200 |
| Remote Terminal Type | VT100/VT220 | VT100/VT220 |
| Redirection After Boot | Enabled | Disabled |
dell新服务器
| Serial Communication | DEFAULT: | CHANGE TO: |
|---|---|---|
| Serial Communication | On without Console Redirection | On with Console Redirection via COM2 |
| External Port Address | Serial Device1=COM1,Serial Device2=COM2 | Serial Device1=COM1,Serial Device2=COM2 |
| External Serial Connector | Serial Device1 | Serial Device1 |
| Failsafe Baud Rate | 115200 | 115200 |
| Remote Terminal Type | VT100/VT220 | VT100/VT220 |
| Redirection After Boot | Enabled | Disabled |
ipmitool
安装
yum -y install ipmitool OpenIPMI
chkconfig ipmi on && /etc/init.d/ipmi start
配置
ipmi 功能开启
ipmitool lan set 1 access on
配置IP地址 掩码 网关
ipmitool lan set 1 ipaddr 172.16.100.11
ipmitool lan set 1 netmask 255.255.255.0
ipmitool lan set 1 defgw ipaddr 172.16.100.1
显示网络配置信息
ipmitool lan print 1
配置用户权限
ipmitool user set password 2 tvmining
显示用户信息
ipmitool user list 1
远程控制
显示远程主机 10.1.100.244 网络配置
ipmitool -I lanplus -H 10.1.100.244 -U root -P tvmining lan print 1
设置远程主机 10.1.100.244 的 bios 引导方式为 pxe
ipmitool -I lanplus -H 10.1.100.244 -U root -P tvmining chassis bootdev pxe
Set Boot Device to pxe
远程关闭主机 10.1.100.244
ipmitool -I lan -H 10.1.100.244 -U root -P tvmining chassis power off
Chassis Power is off
远程重启主机 10.1.100.244
ipmitool -I lan -H 10.1.100.244 -U root -P tvmining chassis power reset
Chassis Power is reset
远程开启主机 10.1.100.244
ipmitool -I lan -H 10.1.100.244 -U root -P tvmining chassis power on
Chassis Power is on
显示远程主机 10.1.100.244 电源状态
ipmitool -I lan -H 10.1.100.244 -U root -P tvmining chassis power status
Chassis Power is on
显示远程终端
ipmitool -I lan -H 10.1.100.244 -U root -P tvmining sol activate
ipmitool -I lan -H 10.1.100.244 -U root -P tvmining sol deactivate

 浙公网安备 33010602011771号