基于注解的Spring多数据源配置和使用
前一段时间研究了一下spring多数据源的配置和使用,为了后期从多个数据源拉取数据定时进行数据分析和报表统计做准备。由于之前做过的项目都是单数据源的,没有遇到这种场景,所以也一直没有去了解过如何配置多数据源。
后来发现其实基于spring来配置和使用多数据源还是比较简单的,因为spring框架已经预留了这样的接口可以方便数据源的切换。
先看一下spring获取数据源的源码:
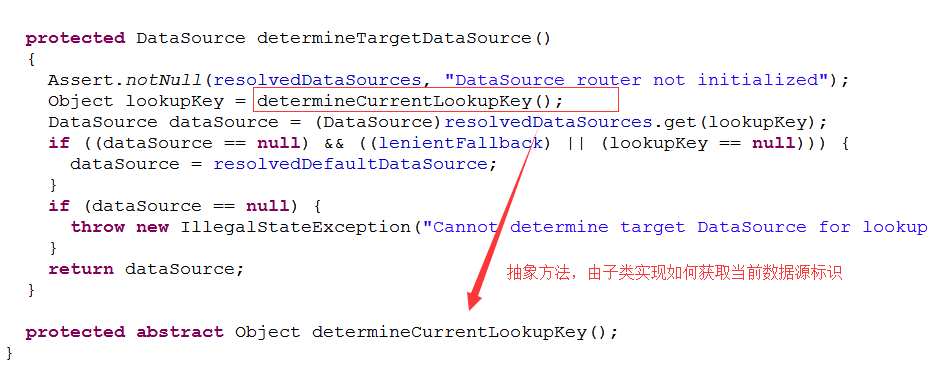
可以看到AbstractRoutingDataSource获取数据源之前会先调用determineCurrentLookupKey方法查找当前的lookupKey,这个lookupKey就是数据源标识。
因此通过重写这个查找数据源标识的方法就可以让spring切换到指定的数据源了。
第一步:创建一个DynamicDataSource的类,继承AbstractRoutingDataSource并重写determineCurrentLookupKey方法,代码如下:
1 public class DynamicDataSource extends AbstractRoutingDataSource {
2
3     @Override
4     protected Object determineCurrentLookupKey() {
5         // 从自定义的位置获取数据源标识
6         return DynamicDataSourceHolder.getDataSource();
7     }
8
9 }
第二步:创建DynamicDataSourceHolder用于持有当前线程中使用的数据源标识,代码如下:
 1 public class DynamicDataSourceHolder {
 2     /**
 3      * 注意:数据源标识保存在线程变量中,避免多线程操作数据源时互相干扰
 4      */
 5     private static final ThreadLocal<String> THREAD_DATA_SOURCE = new ThreadLocal<String>();
 6
 7     public static String getDataSource() {
 8         return THREAD_DATA_SOURCE.get();
 9     }
10
11     public static void setDataSource(String dataSource) {
12         THREAD_DATA_SOURCE.set(dataSource);
13     }
14
15     public static void clearDataSource() {
16         THREAD_DATA_SOURCE.remove();
17     }
18
19 }
第三步:配置多个数据源和第一步里创建的DynamicDataSource的bean,简化的配置如下:
 1 <!--创建数据源1,连接数据库db1 -->
 2 <bean id="dataSource1" class="org.apache.commons.dbcp.BasicDataSource" destroy-method="close">
 3     <property name="driverClassName" value="${db1.driver}" />
 4     <property name="url" value="${db1.url}" />
 5     <property name="username" value="${db1.username}" />
 6     <property name="password" value="${db1.password}" />
 7 </bean>
 8 <!--创建数据源2,连接数据库db2 -->
 9 <bean id="dataSource2" class="org.apache.commons.dbcp.BasicDataSource" destroy-method="close">
10     <property name="driverClassName" value="${db2.driver}" />
11     <property name="url" value="${db2.url}" />
12     <property name="username" value="${db2.username}" />
13     <property name="password" value="${db2.password}" />
14 </bean>
15 <!--创建数据源3,连接数据库db3 -->
16 <bean id="dataSource3" class="org.apache.commons.dbcp.BasicDataSource" destroy-method="close">
17     <property name="driverClassName" value="${db3.driver}" />
18     <property name="url" value="${db3.url}" />
19     <property name="username" value="${db3.username}" />
20     <property name="password" value="${db3.password}" />
21 </bean>
22
23 <bean id="dynamicDataSource" class="com.test.context.datasource.DynamicDataSource">
24     <property name="targetDataSources">
25         <map key-type="java.lang.String">
26             <!-- 指定lookupKey和与之对应的数据源 -->
27             <entry key="dataSource1" value-ref="dataSource1"></entry>
28             <entry key="dataSource2" value-ref="dataSource2"></entry>
29             <entry key="dataSource3 " value-ref="dataSource3"></entry>
30         </map>
31     </property>
32     <!-- 这里可以指定默认的数据源 -->
33     <property name="defaultTargetDataSource" ref="dataSource1" />
34 </bean>
到这里已经可以使用多数据源了,在操作数据库之前只要DynamicDataSourceHolder.setDataSource("dataSource2")即可切换到数据源2并对数据库db2进行操作了。
示例代码如下:
 1 @Service
 2 public class DataServiceImpl implements DataService {
 3     @Autowired
 4     private DataMapper dataMapper;
 5
 6     @Override
 7     public List<Map<String, Object>> getList1() {
 8         // 没有指定,则默认使用数据源1
 9         return dataMapper.getList1();
10     }
11
12     @Override
13     public List<Map<String, Object>> getList2() {
14         // 指定切换到数据源2
15         DynamicDataSourceHolder.setDataSource("dataSource2");
16         return dataMapper.getList2();
17     }
18
19     @Override
20     public List<Map<String, Object>> getList3() {
21         // 指定切换到数据源3
22         DynamicDataSourceHolder.setDataSource("dataSource3");
23         return dataMapper.getList3();
24     }
25 }
--------------------------------------------------------------------------------------华丽的分割线--------------------------------------------------------------------------------------------------
但是问题来了,如果每次切换数据源时都调用DynamicDataSourceHolder.setDataSource("xxx")就显得十分繁琐了,而且代码量大了很容易会遗漏,后期维护起来也比较麻烦。能不能直接通过注解的方式指定需要访问的数据源呢,比如在dao层使用@DataSource("xxx")就指定访问数据源xxx?当然可以!前提是,再加一点额外的配置^_^。
首先,我们得定义一个名为DataSource的注解,代码如下:
1 @Target({ TYPE, METHOD })
2 @Retention(RUNTIME)
3 public @interface DataSource {
4     String value();
5 }
然后,定义AOP切面以便拦截所有带有注解@DataSource的方法,取出注解的值作为数据源标识放到DynamicDataSourceHolder的线程变量中:
 1 public class DataSourceAspect {
 2
 3     /**
 4      * 拦截目标方法,获取由@DataSource指定的数据源标识,设置到线程存储中以便切换数据源
 5      *
 6      * @param point
 7      * @throws Exception
 8      */
 9     public void intercept(JoinPoint point) throws Exception {
10         Class<?> target = point.getTarget().getClass();
11         MethodSignature signature = (MethodSignature) point.getSignature();
12         // 默认使用目标类型的注解,如果没有则使用其实现接口的注解
13         for (Class<?> clazz : target.getInterfaces()) {
14             resolveDataSource(clazz, signature.getMethod());
15         }
16         resolveDataSource(target, signature.getMethod());
17     }
18
19     /**
20      * 提取目标对象方法注解和类型注解中的数据源标识
21      *
22      * @param clazz
23      * @param method
24      */
25     private void resolveDataSource(Class<?> clazz, Method method) {
26         try {
27             Class<?>[] types = method.getParameterTypes();
28             // 默认使用类型注解
29             if (clazz.isAnnotationPresent(DataSource.class)) {
30                 DataSource source = clazz.getAnnotation(DataSource.class);
31                 DynamicDataSourceHolder.setDataSource(source.value());
32             }
33             // 方法注解可以覆盖类型注解
34             Method m = clazz.getMethod(method.getName(), types);
35             if (m != null && m.isAnnotationPresent(DataSource.class)) {
36                 DataSource source = m.getAnnotation(DataSource.class);
37                 DynamicDataSourceHolder.setDataSource(source.value());
38             }
39         } catch (Exception e) {
40             System.out.println(clazz + ":" + e.getMessage());
41         }
42     }
43
44 }
最后在spring配置文件中配置拦截规则就可以了,比如拦截service层或者dao层的所有方法:
1 <bean id="dataSourceAspect" class="com.test.context.datasource.DataSourceAspect" />
2     <aop:config>
3         <aop:aspect ref="dataSourceAspect">
4             <!-- 拦截所有service方法 -->
5             <aop:pointcut id="dataSourcePointcut" expression="execution(* com.test.*.dao.*.*(..))"/>
6             <aop:before pointcut-ref="dataSourcePointcut" method="intercept" />
7         </aop:aspect>
8     </aop:config>
9 </bean>
OK,这样就可以直接在类或者方法上使用注解@DataSource来指定数据源,不需要每次都手动设置了。
示例代码如下:
 1 @Service
 2 // 默认DataServiceImpl下的所有方法均访问数据源1
 3 @DataSource("dataSource1")
 4 public class DataServiceImpl implements DataService {
 5     @Autowired
 6     private DataMapper dataMapper;
 7
 8     @Override
 9     public List<Map<String, Object>> getList1() {
10         // 不指定,则默认使用数据源1
11         return dataMapper.getList1();
12     }
13
14     @Override
15     // 覆盖类上指定的,使用数据源2
16     @DataSource("dataSource2")
17     public List<Map<String, Object>> getList2() {
18         return dataMapper.getList2();
19     }
20
21     @Override
22     // 覆盖类上指定的,使用数据源3
23     @DataSource("dataSource3")
24     public List<Map<String, Object>> getList3() {
25         return dataMapper.getList3();
26     }
27 }
提示:注解@DataSource既可以加在方法上,也可以加在接口或者接口的实现类上,优先级别:方法>实现类>接口。也就是说如果接口、接口实现类以及方法上分别加了@DataSource注解来指定数据源,则优先以方法上指定的为准。

 浙公网安备 33010602011771号