IdentityServer4之Jwt身份验证方案分析
一,准备内容
在之前讲过的asp.net core 实现OAuth2.0四种模式系列中的IdentityApi客户端用到了以下配置代码
  public void ConfigureServices(IServiceCollection services)
        {
            services.AddMvc().SetCompatibilityVersion(CompatibilityVersion.Version_2_2);
            services.AddAuthentication("Bearer").AddJwtBearer(r => {
                //认证地址
                r.Authority = "http://localhost:5000";
                //权限标识
                r.Audience = "secretapi";
                //是否必需HTTPS
                r.RequireHttpsMetadata = false;
            });
        }
app.UseAuthentication();
AddJwtBearer到底起到什么作用呢。首先熟习两个概念
1,中间件(Middleware)
中间件是组装到Asp.net core应用程序管道中以处理请求和响应的软件。可以这样理解:一根管道从水源(用户)连接到家庭(资源)。水源的水是不能直接饮用的,需要重重过滤,这些过滤手段就是中间件,在处理过程中决定是否往下继续传送,可能丢弃,也可能转到其它地方。请参考我之前写的《Asp.net core之中间件》
2,身份认证执行方案(AuthenticationSchemes)
在一个启用身份认证的Asp.net core应用中可以有几个执行方案,分工不同,功能也不同。可以指定由那个方案进行身份认证,如以下代码
      [HttpGet]
        [Route("api/identity")]
        [Microsoft.AspNetCore.Authorization.Authorize(Roles ="admin",AuthenticationSchemes ="Bearer")]
        public object GetUserClaims()
指定了方案名为“Bearer”的方案来做这个Api接口的认证。这个"Bearer"是怎么来的呢,看一下services.AddAuthentication方法有几个重载,我们上面用的重载是传递一个字符串指定默认方案为“Bearer”,那么程序是如果根据"Bearer"这个方案名找到对应的执行方案的呢?
二,AddJwtBearer添加Jwt证书验证执行方案
AddJwtBearer是Microsoft.AspNetCore.Authentication.JwtBearer对AuthenticationBuilder的一个扩写方法,看一下源码
  public static class JwtBearerExtensions
    {
        public static AuthenticationBuilder AddJwtBearer(this AuthenticationBuilder builder)
            => builder.AddJwtBearer(JwtBearerDefaults.AuthenticationScheme, _ => { });

        public static AuthenticationBuilder AddJwtBearer(this AuthenticationBuilder builder, Action<JwtBearerOptions> configureOptions)
            => builder.AddJwtBearer(JwtBearerDefaults.AuthenticationScheme, configureOptions);

        public static AuthenticationBuilder AddJwtBearer(this AuthenticationBuilder builder, string authenticationScheme, Action<JwtBearerOptions> configureOptions)
            => builder.AddJwtBearer(authenticationScheme, displayName: null, configureOptions: configureOptions);

        public static AuthenticationBuilder AddJwtBearer(this AuthenticationBuilder builder, string authenticationScheme, string displayName, Action<JwtBearerOptions> configureOptions)
        {
            builder.Services.TryAddEnumerable(ServiceDescriptor.Singleton<IPostConfigureOptions<JwtBearerOptions>, JwtBearerPostConfigureOptions>());
            return builder.AddScheme<JwtBearerOptions, JwtBearerHandler>(authenticationScheme, displayName, configureOptions);
        }
    }
有四个方法重载,但最后运行的是最后一个重载,最后一个重载用了builder.AddScheme方法添加方案,所以,AddJwtBearer本质上就是添加验证方案。前二个方法重载没有传“authenticationScheme"参数,使用的是JwtBearerDefaults.AuthenticationScheme这个值,我们上边用的代码是第二个重载,传了configOptions,没传authenticationScheme,JwtBearerDefaults.AuthenticationScheme这个值预设为Bearer(见以下源码),所以根据Bearer这个方案名找到的方案就是我们运行AddJwtBearer所添加的方案。
 public static class JwtBearerDefaults
    {
        /// <summary>
        /// Default value for AuthenticationScheme property in the JwtBearerAuthenticationOptions
        /// </summary>
        public const string AuthenticationScheme = "Bearer";
    }
三,JwtBearer执行方案具体做了什么工作
上面说过AddJwtBearer本质上就是添加一个执行方案。先看下添加执行方案的关键源码
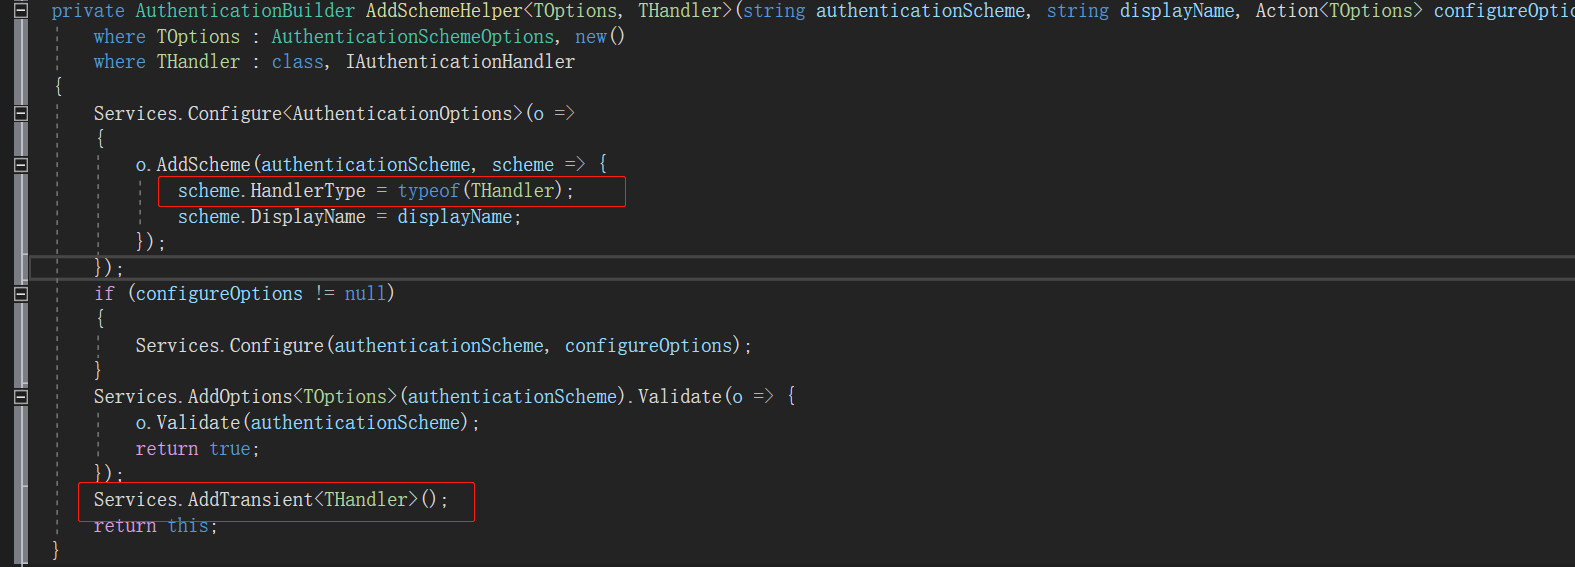
把方案的HandlerType指定为方法的第二个泛型,方便从根据方案实例化Hndler,并将这个泛型添加进了服务依赖。从AddJwtBearer源码可看到出这个泛型为:JwtBearerHandler
  public static AuthenticationBuilder AddJwtBearer(this AuthenticationBuilder builder, string authenticationScheme, string displayName, Action<JwtBearerOptions> configureOptions)
        {
            builder.Services.TryAddEnumerable(ServiceDescriptor.Singleton<IPostConfigureOptions<JwtBearerOptions>, JwtBearerPostConfigureOptions>());
            return builder.AddScheme<JwtBearerOptions, JwtBearerHandler>(authenticationScheme, displayName, configureOptions);
        }
分析JwtBearerHandler源码,JwtBearerHandler主要是能干三件事
1,HandleAuthenticateAsync:获取HTTP请求头里的Authorization头。先验证是不是Bearer格式,再用JwtSecurityTokenHandler这个工具类验证Jwt数据,包括长度,格式,是否过期,签发地址等。
触发事件:1),MessageReceived:接收到请时触发。
2),TokenValidated:验证Jwt数据成功时触发。
3),AuthenticationFailed:验证Jwt数据失败时触发。
附源码
  protected override async Task<AuthenticateResult> HandleAuthenticateAsync()
        {
            string token = null;
            try
            {
                // Give application opportunity to find from a different location, adjust, or reject token
                var messageReceivedContext = new MessageReceivedContext(Context, Scheme, Options);

                // event can set the token
                await Events.MessageReceived(messageReceivedContext);
                if (messageReceivedContext.Result != null)
                {
                    return messageReceivedContext.Result;
                }

                // If application retrieved token from somewhere else, use that.
                token = messageReceivedContext.Token;

                if (string.IsNullOrEmpty(token))
                {
                    string authorization = Request.Headers[HeaderNames.Authorization];

                    // If no authorization header found, nothing to process further
                    if (string.IsNullOrEmpty(authorization))
                    {
                        return AuthenticateResult.NoResult();
                    }

                    if (authorization.StartsWith("Bearer ", StringComparison.OrdinalIgnoreCase))
                    {
                        token = authorization.Substring("Bearer ".Length).Trim();
                    }

                    // If no token found, no further work possible
                    if (string.IsNullOrEmpty(token))
                    {
                        return AuthenticateResult.NoResult();
                    }
                }

                if (_configuration == null && Options.ConfigurationManager != null)
                {
                    _configuration = await Options.ConfigurationManager.GetConfigurationAsync(Context.RequestAborted);
                }

                var validationParameters = Options.TokenValidationParameters.Clone();
                if (_configuration != null)
                {
                    var issuers = new[] { _configuration.Issuer };
                    validationParameters.ValidIssuers = validationParameters.ValidIssuers?.Concat(issuers) ?? issuers;

                    validationParameters.IssuerSigningKeys = validationParameters.IssuerSigningKeys?.Concat(_configuration.SigningKeys)
                        ?? _configuration.SigningKeys;
                }

                List<Exception> validationFailures = null;
                SecurityToken validatedToken;
                foreach (var validator in Options.SecurityTokenValidators)
                {
                    if (validator.CanReadToken(token))
                    {
                        ClaimsPrincipal principal;
                        try
                        {
                            principal = validator.ValidateToken(token, validationParameters, out validatedToken);
                        }
                        catch (Exception ex)
                        {
                            Logger.TokenValidationFailed(ex);

                            // Refresh the configuration for exceptions that may be caused by key rollovers. The user can also request a refresh in the event.
                            if (Options.RefreshOnIssuerKeyNotFound && Options.ConfigurationManager != null
                                && ex is SecurityTokenSignatureKeyNotFoundException)
                            {
                                Options.ConfigurationManager.RequestRefresh();
                            }

                            if (validationFailures == null)
                            {
                                validationFailures = new List<Exception>(1);
                            }
                            validationFailures.Add(ex);
                            continue;
                        }

                        Logger.TokenValidationSucceeded();

                        var tokenValidatedContext = new TokenValidatedContext(Context, Scheme, Options)
                        {
                            Principal = principal,
                            SecurityToken = validatedToken
                        };

                        await Events.TokenValidated(tokenValidatedContext);
                        if (tokenValidatedContext.Result != null)
                        {
                            return tokenValidatedContext.Result;
                        }

                        if (Options.SaveToken)
                        {
                            tokenValidatedContext.Properties.StoreTokens(new[]
                            {
                                new AuthenticationToken { Name = "access_token", Value = token }
                            });
                        }

                        tokenValidatedContext.Success();
                        return tokenValidatedContext.Result;
                    }
                }

                if (validationFailures != null)
                {
                    var authenticationFailedContext = new AuthenticationFailedContext(Context, Scheme, Options)
                    {
                        Exception = (validationFailures.Count == 1) ? validationFailures[0] : new AggregateException(validationFailures)
                    };

                    await Events.AuthenticationFailed(authenticationFailedContext);
                    if (authenticationFailedContext.Result != null)
                    {
                        return authenticationFailedContext.Result;
                    }

                    return AuthenticateResult.Fail(authenticationFailedContext.Exception);
                }

                return AuthenticateResult.Fail("No SecurityTokenValidator available for token: " + token ?? "[null]");
            }
            catch (Exception ex)
            {
                Logger.ErrorProcessingMessage(ex);

                var authenticationFailedContext = new AuthenticationFailedContext(Context, Scheme, Options)
                {
                    Exception = ex
                };

                await Events.AuthenticationFailed(authenticationFailedContext);
                if (authenticationFailedContext.Result != null)
                {
                    return authenticationFailedContext.Result;
                }

                throw;
            }
        }
2,HandleChallengeAsync:验证失败时挑战验证结果,有点像网球比赛的挑战鹰眼功能。但Jwt的挑战验证极其简单,就是重新调用了一次HandleAuthenticateAsync,然后就是挑战失败后设置请求上下文的状态码为:401,也就是我们在前端访问的Response状态码,再往Http回应的Http Header上加上一个名为WWWAuthenticate的头。触发Challenge事件表示挑战失败。
附源码
 protected override async Task HandleChallengeAsync(AuthenticationProperties properties)
        {
            var authResult = await HandleAuthenticateOnceSafeAsync();
            var eventContext = new JwtBearerChallengeContext(Context, Scheme, Options, properties)
            {
                AuthenticateFailure = authResult?.Failure
            };

            // Avoid returning error=invalid_token if the error is not caused by an authentication failure (e.g missing token).
            if (Options.IncludeErrorDetails && eventContext.AuthenticateFailure != null)
            {
                eventContext.Error = "invalid_token";
                eventContext.ErrorDescription = CreateErrorDescription(eventContext.AuthenticateFailure);
            }

            await Events.Challenge(eventContext);
            if (eventContext.Handled)
            {
                return;
            }

            Response.StatusCode = 401;

            if (string.IsNullOrEmpty(eventContext.Error) &&
                string.IsNullOrEmpty(eventContext.ErrorDescription) &&
                string.IsNullOrEmpty(eventContext.ErrorUri))
            {
                Response.Headers.Append(HeaderNames.WWWAuthenticate, Options.Challenge);
            }
            else
            {
                // https://tools.ietf.org/html/rfc6750#section-3.1
                // WWW-Authenticate: Bearer realm="example", error="invalid_token", error_description="The access token expired"
                var builder = new StringBuilder(Options.Challenge);
                if (Options.Challenge.IndexOf(' ') > 0)
                {
                    // Only add a comma after the first param, if any
                    builder.Append(',');
                }
                if (!string.IsNullOrEmpty(eventContext.Error))
                {
                    builder.Append(" error=\"");
                    builder.Append(eventContext.Error);
                    builder.Append("\"");
                }
                if (!string.IsNullOrEmpty(eventContext.ErrorDescription))
                {
                    if (!string.IsNullOrEmpty(eventContext.Error))
                    {
                        builder.Append(",");
                    }

                    builder.Append(" error_description=\"");
                    builder.Append(eventContext.ErrorDescription);
                    builder.Append('\"');
                }
                if (!string.IsNullOrEmpty(eventContext.ErrorUri))
                {
                    if (!string.IsNullOrEmpty(eventContext.Error) ||
                        !string.IsNullOrEmpty(eventContext.ErrorDescription))
                    {
                        builder.Append(",");
                    }

                    builder.Append(" error_uri=\"");
                    builder.Append(eventContext.ErrorUri);
                    builder.Append('\"');
                }

                Response.Headers.Append(HeaderNames.WWWAuthenticate, builder.ToString());
            }
        }
3,HandleForbiddenAsync,验证Jwt数据成功,但授权失败时会调用这个方法,设置Response状态码为403,直接返回不再继续往下。触发Forbidden事件。
附源码
 protected override Task HandleForbiddenAsync(AuthenticationProperties properties)
        {
            var forbiddenContext = new ForbiddenContext(Context, Scheme, Options);
            Response.StatusCode = 403;
            return Events.Forbidden(forbiddenContext);
        }
三,JwtBearer执行方案工作流程
上边说了JwtBearerHandler的三个功能,这一小节来讲讲这三个功能在什么时候开始工作的。
上面我们使用AddAuthentication,AddJwtBearer只是把这个身份验证这个功能加入到服务,好比你买了台冰箱放在家里,还没有上电使用,占了个地方而已,怎么使用呢,这里就要用到中间件,中间件就像一个即插即用的插头。启用身份验证的中间件用UseAuthentication方法。看一下这个方法的源码,看它又做了什么事。
// Copyright (c) .NET Foundation. All rights reserved.
// Licensed under the Apache License, Version 2.0. See License.txt in the project root for license information.

using System;
using System.Threading.Tasks;
using Microsoft.AspNetCore.Http;
using Microsoft.Extensions.DependencyInjection;

namespace Microsoft.AspNetCore.Authentication
{
    public class AuthenticationMiddleware
    {
        private readonly RequestDelegate _next;

        public AuthenticationMiddleware(RequestDelegate next, IAuthenticationSchemeProvider schemes)
        {
            if (next == null)
            {
                throw new ArgumentNullException(nameof(next));
            }
            if (schemes == null)
            {
                throw new ArgumentNullException(nameof(schemes));
            }

            _next = next;
            Schemes = schemes;
        }

        public IAuthenticationSchemeProvider Schemes { get; set; }

        public async Task Invoke(HttpContext context)
        {
            context.Features.Set<IAuthenticationFeature>(new AuthenticationFeature
            {
                OriginalPath = context.Request.Path,
                OriginalPathBase = context.Request.PathBase
            });

            // Give any IAuthenticationRequestHandler schemes a chance to handle the request
            var handlers = context.RequestServices.GetRequiredService<IAuthenticationHandlerProvider>();
            foreach (var scheme in await Schemes.GetRequestHandlerSchemesAsync())
            {
                var handler = await handlers.GetHandlerAsync(context, scheme.Name) as IAuthenticationRequestHandler;
                if (handler != null && await handler.HandleRequestAsync())
                {
                    return;
                }
            }

            var defaultAuthenticate = await Schemes.GetDefaultAuthenticateSchemeAsync();
            if (defaultAuthenticate != null)
            {
                var result = await context.AuthenticateAsync(defaultAuthenticate.Name);
                if (result?.Principal != null)
                {
                    context.User = result.Principal;
                }
            }

            await _next(context);
        }
    }
}
重点是Invoke方法,看来就做了二件事
1,从当前方案集合里(可添加多个方案,目前我们只用了一个Bearer)筛选出IAuthenticationRequestHandler的实现类,执行他的HandleRequestAsync方法。
2,找到默认执行方案,执行他的AuthenticateAsync方法。
第1件事,当前我添加的Bearer方案所用的JwtBearerHandler并没有继承自IAuthenticationRequestHandler,所以这一步在当前验证方案就没起作用,我们在以后讲AddOpenIdConnect时会讲到这一步,使用OpenidConnect做身份验证时,OpenidConnect所用的OpenIdConnectHandler是RemoteAuthenticationHandler的实现,而RemoteAuthenticationHandler继承了IAuthenticationRequestHandler
public class JwtBearerHandler : AuthenticationHandler<JwtBearerOptions>
public abstract class RemoteAuthenticationHandler<TOptions> : AuthenticationHandler<TOptions>, IAuthenticationRequestHandler
第2件事,执行AuthenticateAsync方法,在JwtBearerHandler中没有这个方法,但他的父类 AuthenticationHandler<JwtBearerOptions>中是有的。在父类中执行AuthenticateAsync时如果没有设置ForwardAuthenticate(验证方案跳转),会执行HandleAuthenticateOnceAsync方法,这个方法要注意:他是一个类似于单例的调用方式,在生命周期内只会触发一次子类的HandleAuthenticateAsync方法。也就是JwtBearerHandler的HandleAuthenticateAsync方法。理解这个对后续的工作流很重要。
附源码
public async Task<AuthenticateResult> AuthenticateAsync()
        {
            var target = ResolveTarget(Options.ForwardAuthenticate);
            if (target != null)
            {
                return await Context.AuthenticateAsync(target);
            }

            // Calling Authenticate more than once should always return the original value.
            var result = await HandleAuthenticateOnceAsync();
            if (result?.Failure == null)
            {
                var ticket = result?.Ticket;
                if (ticket?.Principal != null)
                {
                    Logger.AuthenticationSchemeAuthenticated(Scheme.Name);
                }
                else
                {
                    Logger.AuthenticationSchemeNotAuthenticated(Scheme.Name);
                }
            }
            else
            {
                Logger.AuthenticationSchemeNotAuthenticatedWithFailure(Scheme.Name, result.Failure.Message);
            }
            return result;
        }

        /// <summary>
        /// Used to ensure HandleAuthenticateAsync is only invoked once. The subsequent calls
        /// will return the same authenticate result.
        /// </summary>
        protected Task<AuthenticateResult> HandleAuthenticateOnceAsync()
        {
            if (_authenticateTask == null)
            {
                _authenticateTask = HandleAuthenticateAsync();
            }

            return _authenticateTask;
        }
好了,JwtBearerHandler的三个功能,我们已经搞清一个了,他的验证功能在请求伊始就会能过身份验证中间件触发。那另二个呢,另外二个功能的触发点需要用到另一个中间件,身份授权中间件(UseAuthorization)。这个中间件不用手动Use,AddMvc和UseMvc已经把这部份工作做了。这个中间件干了什么,看下他的中间件实现源码
// Copyright (c) .NET Foundation. All rights reserved.
// Licensed under the Apache License, Version 2.0. See License.txt in the project root for license information.

using System;
using System.Linq;
using System.Threading.Tasks;
using Microsoft.AspNetCore.Authentication;
using Microsoft.AspNetCore.Authorization.Policy;
using Microsoft.AspNetCore.Http;
using Microsoft.Extensions.DependencyInjection;

namespace Microsoft.AspNetCore.Authorization
{
    public class AuthorizationMiddleware
    {
        // Property key is used by other systems, e.g. MVC, to check if authorization middleware has run
        private const string AuthorizationMiddlewareInvokedKey = "__AuthorizationMiddlewareInvoked";
        private static readonly object AuthorizationMiddlewareInvokedValue = new object();

        private readonly RequestDelegate _next;
        private readonly IAuthorizationPolicyProvider _policyProvider;

        public AuthorizationMiddleware(RequestDelegate next, IAuthorizationPolicyProvider policyProvider)
        {
            _next = next ?? throw new ArgumentNullException(nameof(next));
            _policyProvider = policyProvider ?? throw new ArgumentNullException(nameof(policyProvider));
        }

        public async Task Invoke(HttpContext context)
        {
            if (context == null)
            {
                throw new ArgumentNullException(nameof(context));
            }

            var endpoint = context.GetEndpoint();

            // Flag to indicate to other systems, e.g. MVC, that authorization middleware was run for this request
            context.Items[AuthorizationMiddlewareInvokedKey] = AuthorizationMiddlewareInvokedValue;

            // IMPORTANT: Changes to authorization logic should be mirrored in MVC's AuthorizeFilter
            var authorizeData = endpoint?.Metadata.GetOrderedMetadata<IAuthorizeData>() ?? Array.Empty<IAuthorizeData>();
            var policy = await AuthorizationPolicy.CombineAsync(_policyProvider, authorizeData);
            if (policy == null)
            {
                await _next(context);
                return;
            }

            // Policy evaluator has transient lifetime so it fetched from request services instead of injecting in constructor
            var policyEvaluator = context.RequestServices.GetRequiredService<IPolicyEvaluator>();

            var authenticateResult = await policyEvaluator.AuthenticateAsync(policy, context);

            // Allow Anonymous skips all authorization
            if (endpoint?.Metadata.GetMetadata<IAllowAnonymous>() != null)
            {
                await _next(context);
                return;
            }

            // Note that the resource will be null if there is no matched endpoint
            var authorizeResult = await policyEvaluator.AuthorizeAsync(policy, authenticateResult, context, resource: endpoint);

            if (authorizeResult.Challenged)
            {
                if (policy.AuthenticationSchemes.Any())
                {
                    foreach (var scheme in policy.AuthenticationSchemes)
                    {
                        await context.ChallengeAsync(scheme);
                    }
                }
                else
                {
                    await context.ChallengeAsync();
                }

                return;
            }
            else if (authorizeResult.Forbidden)
            {
                if (policy.AuthenticationSchemes.Any())
                {
                    foreach (var scheme in policy.AuthenticationSchemes)
                    {
                        await context.ForbidAsync(scheme);
                    }
                }
                else
                {
                    await context.ForbidAsync();
                }

                return;
            }

            await _next(context);
        }
    }
}
1,先进行策略验证,是不是该请求不需要授权,是的话就往下传递请求,不再执行后边的代码
2,该请求需要授权访问,请调用policyEvaluator.AuthorizeAsync进行身份及授权验证
附源码
 public virtual async Task<PolicyAuthorizationResult> AuthorizeAsync(AuthorizationPolicy policy, AuthenticateResult authenticationResult, HttpContext context, object resource)
        {
            if (policy == null)
            {
                throw new ArgumentNullException(nameof(policy));
            }

            var result = await _authorization.AuthorizeAsync(context.User, resource, policy);
            if (result.Succeeded)
            {
                return PolicyAuthorizationResult.Success();
            }

            // If authentication was successful, return forbidden, otherwise challenge
            return (authenticationResult.Succeeded)
                ? PolicyAuthorizationResult.Forbid()
                : PolicyAuthorizationResult.Challenge();
        }
如果身份和授权都验证成功,则成功,如果身份验证能过,授权没通过则禁止访问,直接回应,如果身份验证没通过就去挑战验证结果,挑战成功继续来一次来,挑战失败就直接回应了。源码中的PolicyAuthorizationResult.Forbid() 和PolicyAuthorizationResult.Challenge()具体执行的是什么方法呢?看以下源码
   public virtual Task<AuthenticationScheme> GetDefaultChallengeSchemeAsync()
            => _options.DefaultChallengeScheme != null
            ? GetSchemeAsync(_options.DefaultChallengeScheme)
            : GetDefaultSchemeAsync();
        public virtual Task<AuthenticationScheme> GetDefaultForbidSchemeAsync()
            => _options.DefaultForbidScheme != null
            ? GetSchemeAsync(_options.DefaultForbidScheme)
            : GetDefaultChallengeSchemeAsync();
然来如果没有指定特定的方案,就返回默认的方案。指定特定的Challenge方案和Forbid方案我们讲OpenIdConnect时再详细说。目前我们所用的只有一个默认方案:Bearer,所以会执行JwtBearerHandler的Challenge和Forbid方法。
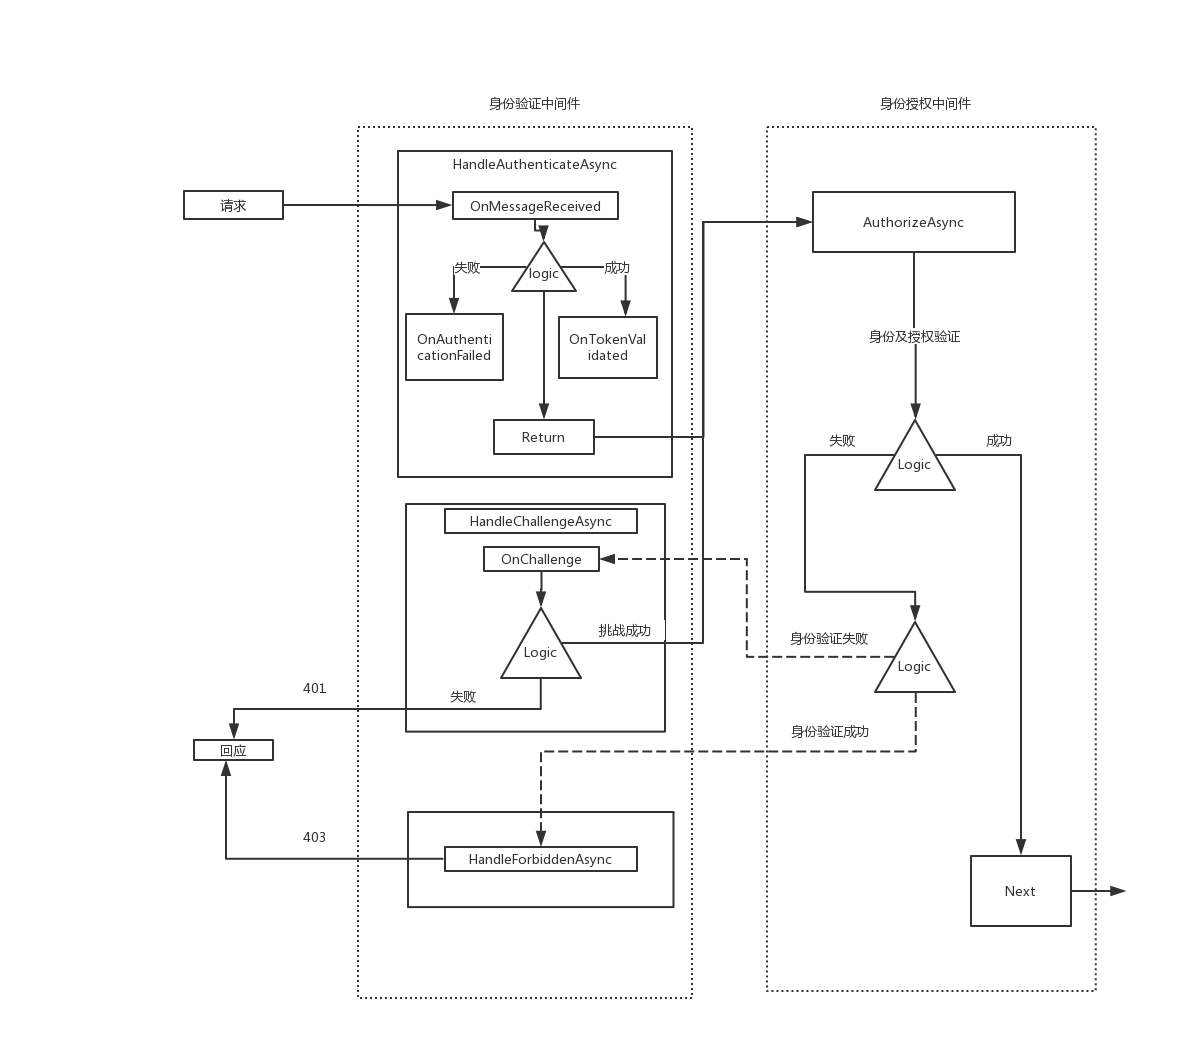
如此一来,JwtBearerHandler的三种功能触发时机,作用都已经搞清楚了,我画了个图方便大家理理解

 浙公网安备 33010602011771号