运维之利器--Ansible
一、简介
Ansible是新出现的自动化运维工具,基于Python开发,集合了众多运维工具(puppet、cfengine、chef、func、fabric)的优点,实现了批量系统配置、批量程序部署、批量运行命令等功能。
二、安装
yum -y install ansible
三、配置ssh-key(可选)
ssh-keygen  //生成秘钥
# 将秘钥拷贝到被管理服务器上
ssh-copy-id  -i ~/.ssh/id_rsa.pub -p 22 root@192.168.182.129
四、ansible基础
4.1、ansibel主配置文件(/etc/ansible/ansible.cfg)
4.2、主要的默认配置


[defaults]

# some basic default values...

#inventory      = /etc/ansible/hosts
#library        = /usr/share/my_modules/
#module_utils   = /usr/share/my_module_utils/
#remote_tmp     = ~/.ansible/tmp
#local_tmp      = ~/.ansible/tmp
#plugin_filters_cfg = /etc/ansible/plugin_filters.yml
#forks          = 5
#poll_interval  = 15
#sudo_user      = root
#ask_sudo_pass = True
#ask_pass      = True
#transport      = smart
#remote_port    = 22
#module_lang    = C
#module_set_locale = False
4.3、开启记录日志
# 去掉前面的'#'号
#log_path = /var/log/ansible.log ==> log_path = /var/log/ansible.log
4.4、去掉第一次连接ssh ask确认(两种方法)
# 第一种(推荐)
vi /etc/ansible/ansible.cfg
# 其实就是把#去掉
# host_key_checking = False  ==> host_key_checking = False

# 第二种
vi /etc/ssh/ssh_config
StrictHostKeyChecking ask  ==> StrictHostKeyChecking no
4.5、以配置文件中配置的:#sudo_user = root,去执行命令
# -u:当前执行的用户,-k(小k):与-u用户对应的密码口令,-b 与配置文件的sudo_user对应,sudo提权到这个用户去执行,-K(大k):sudo_user用户的密码口令
# 前提是要在被控制端主机上配置'liuguoping'这个用户的sudo权限(但是如果输入sudo用户的密码,这个可以不用配置了sudo),可以把用户加到【%wheel  ALL=(ALL)       ALL】组里,即
[root@centos7-3 ~]# usermod -aG wheel liuguoping
[root@centos7-3 ~]# id liuguoping
uid=1000(liuguoping) gid=1000(liuguoping) groups=1000(liuguoping),10(wheel)
ansible web -m command -a 'ls /root' -u liuguoping -k -b -K
4.6、列出某个分组下的清单
ansible web --list-host
ansible web --list-hosts
ansible web --list
4.7、常用执行操作
# 1、通配符
ansible 192.168.182.* -m ping

# 2、逻辑或(:)
ansible web:mysql -m ping

# 3、逻辑与(用':&'号),并且关系,注意需要加单引号,双引号可能有问题,因为'&'符号在命令行是后台执行。
ansible 'web:&mysql' -m ping

# 4、逻辑非,注意需要加单引号
ansible 'nfs:!mysql' -m ping

# 5、综合逻辑
ansible 'nfs:!mysql:&web' -m ping

# 6、正则表达式,必须使用'~'开头
ansible "~(web|my).*sql" -m ping
4.8、指定主机清单文件(-i)
ansible -i ~/hosts 192.168.182.129 -m ping
4.9、命令执行过程
步骤一、加载自己的配置文件,默认/etc/ansible/ansible.cfg

步骤二、加载自己对应的模块文件(默认为command)

步骤三、通过ansible将模块或命令生成临时py文件,将该文件传输至远程服务器的对应执行用户$HOME/.ansible/tmp/ansible-tmp-数字/xxx.py文件

步骤四、给文件+x执行权限

步骤五、执行并返回结果

步骤六、删除临时文件xxx.py文件,sleep 0退出
4.10、执行状态
绿色:执行成功并且不需要做改变的操作

黄色:执行成功并且对目标主机做变更

红色:执行失败
5、Inventory-主机清单
5.1、含义
主机清单配置(默认配置文件:/etc/ansible/hosts)
5.2、增加主机组
# 定义webservers组
[webservers]
192.168.182.130
192.168.182.128
192.168.182.129
5.3、增加用户名密码
[webservers]
192.168.182.130 ansible_ssh_user=root ansible_ssh_pass=1331301116
5.4、增加端口
[webservers]
192.168.182.130 ansible_ssh_user=root ansible_ssh_pass=1331301116 ansible_ssh_port=22
5.5、变量

5.6、子分组
[web]
192.168.182.130 ansible_ssh_user=root ansible_ssh_pass=1331301116 ansible_ssh_port=22
192.168.182.128
[mysql]
192.168.182.129
# 子分组
[nfs:children]
web
mysql
# 对分组统一定义变量
[nfs:vars]
ansible_ssh_user=root
ansible_ssh_pass=1331301116
ansible_ssh_port=22
5.7、自定义主机列表
# vim hostlist
[web]
192.168.182.130
192.168.182.128
[mysql]
192.168.182.129
# 子分组
[nfs:children]
web
mysql
# 对分组统一定义变量
[nfs:vars]
ansible_ssh_user=root
ansible_ssh_pass=1331301116
ansible_ssh_port=22
# ansible -i hostlist nfs -m ping -o
6、Ad-Hoc-点对点模式
6.1、简介
ad-hoc 命令是一种可以快速输入的命令,而且不需要保存起来的命令。就相当于bash中的一句话shell。这也是一个好的地方,在学习ansible playbooks时可以先了解另外一种ansible基本的快速用法,不一定非要写一个palybook文件;ad-hoc简而言之,就是"临时命令"
6.2、常用模块
6.2.1、shell模块
# 帮助
ansible-doc shell
ansible-doc shell -s(推荐)

# 简介
shell模块 [执行远程主机的shell/python等脚本]

# 查看主机名(-o:一行显示)
ansible web -m shell -a 'hostname' -o

# -f:并行任务数。FORKS被指定为一个整数,默认是5
ansible web -m shell -a 'hostname' -o -f 2

# 示例
# 安装httpd
ansible web -m shell -a 'yum -y install httpd' -o

# 查看时间
ansible web -m shell -a 'uptime' -o
6.2.2、script模块
# 帮助
ansible-doc script -s(推荐)

# 简介
script模块 [在远程主机执行主控端的shell/python等脚本 ]

# 参数简介
free_form参数 :必须参数,指定需要执行的脚本,脚本位于 ansible 管理主机本地,并没有具体的一个参数名叫 free_form,具体解释请参考 command 模块。

chdir参数 : 此参数的作用就是指定一个远程主机中的目录,在执行对应的脚本之前,会先进入到 chdir 参数指定的目录中。

creates参数 :使用此参数指定一个远程主机中的文件,当指定的文件存在时,就不执行对应脚本,可参考 command 模块中的解释。

removes参数 :使用此参数指定一个远程主机中的文件,当指定的文件不存在时,就不执行对应脚本,可参考 command 模块中的解释。
# 示例
# 下面命令表示 ansible 主机中的 /testdir/testscript.sh 脚本将在 web 主机中执行,执行此脚本之前,会先进入到 web 主机中的 /opt 目录
ansible web -m script -a "chdir=/opt /testdir/testscript.sh"

# 下面命令表示,web主机中的 /testdir/testfile1文件已经存在,ansible 主机中的 /testdir/testscript.sh 脚本将不会在 web 主机中执行。
ansible web -m script -a "creates=/testdir/testfile1 /testdir/testscript.sh"

# 下面命令表示,web 主机中的 /testdir/testfile1 文件存在,ansible 主机中的 /testdir/testscript.sh 脚本则会在 web 主机中执行。
ansible ansible-demo3 -m script -a "removes=/testdir/testfile1 /testdir/testscript.sh"
6.2.3、command模块(默认模块)
# 帮助
ansible-doc command -s(推荐)

# 简介
command模块 [执行远程命令]
# 默认模块,没有shell强大,基本上shell模块都可以支持command模块的功能

# 常用参数
free_form参数 :必须参数,指定需要远程执行的命令。需要说明一点,free_form 参数与其他参数(如果想要使用一个参数,那么则需要为这个参数赋值,也就是name=value模式)并不相同。比如,当我们想要在远程主机上执行 ls 命令时,我们并不需要写成”free_form=ls” ,这样写反而是错误的,因为并没有任何参数的名字是 free_form,当我们想要在远程主机中执行 ls 命令时,直接写成 ls 即可。因为 command 模块的作用是执行命令,所以,任何一个可以在远程主机上执行的命令都可以被称为 free_form。

chdir参数 : 此参数的作用就是指定一个目录,在执行对应的命令之前,会先进入到 chdir 参数指定的目录中。

creates参数 :看到 creates,你可能会从字面上理解这个参数,但是使用这个参数并不会帮助我们创建文件,它的作用是当指定的文件存在时,就不执行对应命令,比如,如果 /testdir/test文件存在,就不执行我们指定的命令。

removes参数 :与 creates 参数的作用正好相反,它的作用是当指定的文件不存在时,就不执行对应命令,比如,如果 /testdir/tests 文件不存在,就不执行我们指定的命令,此参数并不会帮助我们删除文件。
# 示例
# 上面命令表示在 web 主机上执行 ls 命令,因为使用的是 root 用户,所以默认情况下,ls 出的结果是 web 主机中 root 用户家目录中的文件列表。
ansible web -m command -a "ls"

# chdir 参数表示执行命令之前,会先进入到指定的目录中,所以上面命令表示查看 web 主机上 /testdir 目录中的文件列表,返回显示有2个文件。
ansible web -m command -a "chdir=/testdir ls"

# 下面命令表示 /testdir/testfile1 文件存在于远程主机中,则不执行对应命令。/testdir/testfile3 不存在,才执行”echo test”命令。
ansible web -m command -a "creates=/testdir/testfile1 echo test"

# 下面命令表示 /testdir/testfile3 文件不存在于远程主机中,则不执行对应命令。/testdir/testfile1 存在,才执行”echo test”命令。
ansible web -m command -a "removes=/testdir/testfile1 echo test"
6.2.4、raw模块
# 帮助
ansible-doc raw -s (推荐)

# 简介
raw模块 [类似于command模块、支持管道传递]

# 示例
ansible web -m raw -a "ifconfig eth0 |sed -n 2p |awk '{print \$2}' |awk -F: '{print \$2}'"
6.2.5、copy模块
# 帮助
ansible-doc copy -s (推荐)

# 示例
# -a,--args:后面接参数
ansible web -m copy -a 'src=/etc/ansible/hosts dest=/tmp/hosts owner=root group=bin mode=777'

# backup=yes/no:文件存在且文件内容不一样是否备份,默认不备份
ansible web -m copy -a 'src=/etc/ansible/hosts dest=/tmp/hosts owner=root group=bin mode=777 backup=yes'
6.2.6、fetch模块
# 帮助
ansible-doc fetch -s (推荐)

# 示例
# 跟copy支持的参数差不多,src:远端主机的目录,dest:主控端目录,其实真正存放的目录在:/tmp/192.168.182.129/tmp/up.sh,会按每台主机分组存放
#  This `must' be a file, not a directory:只支持单个文件获取
ansible 192.168.182.129 -m fetch -a "src=/etc/fstab dest=/testdir/ansible/"
6.2.7、unarchive模块(解包模块)
# 帮助
ansible-doc unarchive -s

# 参数
copy:默认为yes,当copy=yes,那么拷贝的文件是从ansible主机复制到远程主机上的,如果设置为copy=no,那么会在远程主机上寻找src源文件

src:源路径,可以是ansible主机上的路径,也可以是远程主机上的路径,如果是远程主机上的路径,则需要设置copy=no

dest:远程主机上的目标路径

mode:设置解压缩后的文件权限
# 示例
ansible 192.168.182.129 -m unarchive -a 'src=/testdir/ansible/data.tar.gz dest=/tmp/tmp/'
6.2.8、archive模块(打包模块)
# 帮助
ansible-doc unarchive -s

# 示例
# path:主控端目录,format:压缩格式,dest:被控端目录文件'
ansible 192.168.182.129 -m archive -a 'path=/tmp/ format=gz dest=/tmp/tmp/t.tar.gz'
6.2.9、user模块
# 帮助
ansible-doc user -s (推荐)

# 创建用户(present:默认,可以不写)
ansible web -m user -a 'name=test state=present'

# 删除用户(absent)
ansible web -m user -a 'name=test state=absent'

# 修改密码
# 步骤一、生成加密密码
echo '777777'|openssl passwd -1 -stdin

# 步骤二、修改秘密
ansible web -m user -a 'name=test password="$1$Jo5FD9Jr$2QB.BuybbtR35ga4O5o8N."'

# 修改shell
ansible web -m user -a 'name=test shell=/sbin/noglogin append=yes'
6.2.10、group模块
# 说明
ansible-doc group -s

# 示例
# 创建
ansible 192.168.182.129 -m group -a 'name=testgroup system=yes'
# 删除
ansible 192.168.182.129 -m group -a 'name=testgroup state=absent'
6.2.11、yum模块
# 帮助
ansible-doc yum -s (推荐)

# 示例
# 升级所有包
ansible web -m yum -a 'name="*" state=latest'

# 安装apache
ansible web -m yum -a 'name="httpd" state=latest'
6.2.12、service模块
# 帮助
ansible-doc service -s (推荐)

# 示例
ansible web -m service -a 'name=httpd state=started'

ansible web -m service -a 'name=httpd state=started enabled=yes'

ansible web -m service -a 'name=httpd state=stopped'

ansible web -m service -a 'name=httpd state=restarted'

ansible web -m service -a 'name=httpd state=started enabled=no'
6.2.13、file模块
# 帮助
ansible-doc file -s (推荐)

# 示例
# 创建文件
ansible web -m file -a 'path=/tmp/88.txt mode=777 state=touch'

# 创建目录
ansible web -m file -a 'path=/tmp/99 mode=777 state=directory'

# 删除
ansible web -m file -a 'path=/tmp/99 state=absent'
6.2.14、setup模块
# 帮助
ansible-doc setup -s (推荐)

# 示例
ansible web -m setup

ansible web -m setup -a 'filter=ansible_all_ipv4_addresses'
6.2.15、cron模块
# 帮助
ansible-doc cron -s

# 示例
# 创建定时任务
ansible 192.168.182.129 -m cron -a 'minute=* weekday=1,3,5,6,7 job="/usr/bin/wall FBI warning" name=warningcron'

# 关闭定时任务
ansible 192.168.182.129 -m cron -a 'disabled=true job="/usr/bin/wall FBI warning" name=warningcron'

# 删除定时任务
ansible 192.168.182.129 -m cron -a ' job="/usr/bin/wall FBI warning" name=warningcron state=absent'
6.2.16、hostname模块
# 帮助
ansible-doc hostname -s

# 示例
ansible 192.168.182.129 -m hostname -a 'name=192.168.182.129'
6.3、ansible-galaxy
# 说明
1、ansible-galaxy命令与Ansible捆绑在一起,您可以使用它从Galaxy或直接从基于git的SCM【安装角色】
2、默认情况下,命令行工具使用服务器地址【https://galaxy.ansible.com】与Galaxy网站API通信

# 示例
# 展示已安装的角色
ansible-galaxy list

# 删除角色
ansible-galaxy remove geerlingguy.nginx
6.4、ansible-vault
# 说明
管理加密解密yml文件

# 语法
ansible-vault [create|decrypt|edit|encrypt|rekey|view]

# 示例
# 加密
ansible-vault encrypt hello.yml

# 解密
ansible-vault decrypt hello.yml

# 查看
ansible-vault view hello.yml

# 编辑
ansible-vault edit hello.yml

# 修改
ansible-vault rekey hello.yml

# 创建
ansible-vault create hello.yml
6.5、ansible-console
# 查看帮助(?问好)
root@all (4)[f:5]$ ?

# 示例
# 切换操作列表
cd 192.168.182.129
cd web

# 查看hostname
command hostname

# 修改
hostname name='test'
七、YAML-YAML Ain't Markup Language非标记语言
7.1、官方网站:https://yaml.org/
7.2、什么是playbook?
playbook 翻译过来就是"剧本"
7.3、playbook的组成
play:定义的是主机的角色
task:定义的是具体执行的任务
playbook:由一个或多个play组成,一个play可以包含多个task

7.4、playbook的优势
1、功能比adhoc更全
2、控制好依赖
3、展现更直观
4、持久使用
7.5、yaml语法和变量
7.5.1、yaml语法
注意格式:
大小写敏感
使用缩进表示层级关系(只能空格不能使用tab)
yaml文件"---"作为文档的开始
7.5.2、yaml支持的数据结构

7.5.3、yaml变量的应用

7.5.4、tasks:任务列表
7.5.4.1、格式
第一种:action: module arguments

# 建议使用
第二种:module: arguments
7.5.4.2、注意
1)shell和command 模块后面跟命令,而非key=value

2)某任务的状态运行后为changed时,可通过"notify"通知给相应的handlers

3)任务可以通过"tags"打标签,而后可在ansible-playbook命令上使用-t指定进行调用

4)如果命令或者脚本退出码不为零,可以使用如下方式替代
tasks:
   - name: run this command and ignore the result
      shell: /usr/bin/somecommand || /bin/true
5)或者使用ignore_errors来忽略错误信息
tasks:
   - name: run this command and ignore the result
      shell: /usr/bin/somecommand
      ignore_errors: True
7.5.5、运行playbook的方式
ansible-playbook <filename.yml> ... [options]
7.5.6、常见选项
--check/-C:只检查可能会发生的改变,单不真正执行操作

--list-hosts:列出运行任务的主机

--limit:主机列表,只针对主机列表中的主机执行

-v:显示过程 -vv,-vvv更详细

# 示例
ansible-playbook file.yml --check 只检测

ansible-playbook file.yml

ansible-playbook file.yml --limit web
7.5.7、handlers和notify结合使用触发条件
7.5.7.1、handlers
是task列表,这些task与前述的task并没有本质上的不同,用于当关注的资源发生时,才会采取一定的操作
7.5.7.2、notify
notify此action可用于在每个play的最后被触发,这样可避免多次有改变发生时每次都执行指定的操作,仅在所有的变化发生完成后一次性地执行指定操作,在notify列出的操作称为handler,也即notify中调用handler中定义的操作
7.5.7.3、示例
---
- hosts: 192.168.182.129
  remote_user: root

  tasks:
    - name: install httpd package
      yum: name=httpd
    - name: copy conf file
      copy: src=files/httpd.conf dest=/etc/httpd/conf/ backup=yes
      notify: restart servie
    - name: start service
      service: name=httpd state=started enabled=yes

  handlers:
    - name: restart servie
      service: name=httpd state=restarted
7.5.5、tags
---
- hosts: 192.168.182.129
  remote_user: root

  tasks:
    - name: install httpd package
      yum: name=httpd
      tags: inshttpd
    - name: copy conf file
      copy: src=files/httpd.conf dest=/etc/httpd/conf/ backup=yes
      notify: restart servie
    - name: start service
      service: name=httpd state=started enabled=yes
      tags: rshttpd

  handlers:
    - name: restart servie
      service: name=httpd state=restarted
7.6、模板template
7.6.1、说明
文本文件,嵌套有脚本(使用模板编程语言编写)
只能通过playbook调用
7.6.2、Jinja2语言
7.6.2.1、字面量形式
字符串:使用单引号或双引号
数字:整数,浮点数
列表:[item1,item2,...]
元祖:(item1,item2,...)
字典:{key1:value1,key2:value2,...}
布尔值:true/false
7.6.2.2、算术运算
# //:除取整
+,-,*,/,//,%,**
7.6.2.3、比较操作
==,!=,>,>=,<,<=
7.6.2.4、逻辑操作
and,or,not
7.6.2.5、流表达式
1)when
# 说明
在task后添加when子句即可使用条件测试;when语句支持jinja2表达式语法

# 示例
---
- hosts: test
  remote_user: root

  tasks:
    - name: test when
      command: ls /tmp
      when: ansible_os_family == 'RedHat'
2)with_items
# 说明
遍历列表

# 示例
---
- hosts: test
  remote_user: root

  tasks:
    - name: touch file
      file: name=/tmp/tmp/{{ item }} state=touch
      with_items:
        - file1
        - file2
        - file3
    - name: install software
      yum: name={{ item }} state=present
      with_items:
        - htop
        - sl
        - hping3
3)template for if
# cat test_for.yml
---
- hosts: test
  remote_user: root
  vars:
    ports:
      - web1:
        port: 80
        name: web1.com
        rootdir: /data/website1
      - web2:
        port: 81
        #name: web2.com
        rootdir: /data/website2
      - web3:
        port: 83
        name: web3.com
        rootdir: /data/website3
  tasks:
    - name: copy conf
      template: src=for1.conf.j2 dest=/tmp/tmp/for1.conf

# cat templates/for1.conf.j2
{% for p in ports %}
server{
       listen {{ p.port }}
   {% if p.name is defined %}
       servername {{ p.name }}
   {% endif %}
       documentroot {{ p.rootdir }}
}
{% endfor %}
4)示例
---
- hosts: test
  remote_user: root

  tasks:
    - name: install package
      yum: name=nginx
    - name: copy template
      # src:默认会在当前目录templates
      template: src=nginx.conf.j2 dest=/etc/nginx/nginx.conf
      notify: restart service
    - name: start service
      service: name=nginx state=started
  handlers:
    - name: restart service
      service: name=nginx state=restarted
7.7、roles角色和场景演练
7.7.1、说明
roles就是通过分别将变量、文件、任务、模块及处理器放置于单独的目录中、并可以便捷地include他们的一种机制
例如:下面的场景演练的层次目录结构
7.7.2、为什么需要用到roles
# 什么是roles?
是一种利用在大型playbook中的剧本配置模式,有这自己特定结构

# 为什么需要用到roles?
和面向对象开发思想相似
利用大型的项目任务中,尽可能的将公共的任务、变量等内容独立
7.7.3、角色简单使用
# 1)创建roles目录,所以得角色都放在这个目录下
7.7.3.2、示例
1)安装nginx
# 目录结构
.
├── httpd
├── memcache
├── mysql
├── nginx
│   ├── tasks
│   │   ├── group.yml
│   │   ├── install.yml
│   │   ├── main.yml
│   │   ├── restart.yml
│   │   ├── start.yml
│   │   ├── templ.yml
│   │   └── user.yml
│   └── templates
│       └── nginx.conf.j2
└── nginx_role.yml

# nginx_role.yml
[root@bogon roles]# cat nginx_role.yml
- hosts: test
  remote_user: root
  roles:
    - role: nginx
# 调用
ansible-playbook nginx_role.yml
2)综合案例
# 目录结构
[root@bogon roles]# tree app
app
├── files
│   └── hosts
├── handlers
│   └── main.yml
├── tasks
│   ├── copyfile.yml
│   ├── group.yml
│   ├── main.yml
│   ├── start.yml
│   ├── templ.yml
│   ├── user.yml
│   └── yum.yml
├── templates
│   └── httpd.conf.j2
└── vars
    └── main.yml

# app_role.yml
[root@bogon roles]# cat app_role.yml
- hosts: test
  remote_user: root
  roles:
    - role: app
# 执行
ansible-playbook app_role.yml
相关文件的代码
1)app/files/hosts就是/etc/hosts
2)app/tasks/main.yml
- name: restart service
  service: name=httpd state=restarted
3)app/tasks/copyfile.yml
- name: copy file
  copy: src=hosts dest=/tmp/tmp/ backup=yes
4)app/tasks/group.yml
- name: create group
  group: name=app
5)app/tasks/main.yml
- include: group.yml
- include: user.yml
- include: yum.yml
- include: templ.yml
- include: copyfile.yml
- include: start.yml
6)app/tasks/start.yml
- name: start httpd
  service: name=httpd state=started enabled=yes
7)app/tasks/templ.yml
- name: copy template
  template: src=httpd.conf.j2 dest=/etc/httpd/conf/httpd.conf owner={{ user }}
  notify: restart service
8)app/tasks/user.yml
- name: create user
  user: name=app group=app system=yes shell=/sbin/nologin
10)app/tasks/yum.yml
- name: install apache
  yum: name=httpd state=present
11)app/templates/httpd.conf.j2
#
# This is the main Apache HTTP server configuration file.  It contains the
# configuration directives that give the server its instructions.
# See <URL:http://httpd.apache.org/docs/2.4/> for detailed information.
# In particular, see
# <URL:http://httpd.apache.org/docs/2.4/mod/directives.html>
# for a discussion of each configuration directive.
#
# Do NOT simply read the instructions in here without understanding
# what they do.  They're here only as hints or reminders.  If you are unsure
# consult the online docs. You have been warned.
#
# Configuration and logfile names: If the filenames you specify for many
# of the server's control files begin with "/" (or "drive:/" for Win32), the
# server will use that explicit path.  If the filenames do *not* begin
# with "/", the value of ServerRoot is prepended -- so 'log/access_log'
# with ServerRoot set to '/www' will be interpreted by the
# server as '/www/log/access_log', where as '/log/access_log' will be
# interpreted as '/log/access_log'.

#
# ServerRoot: The top of the directory tree under which the server's
# configuration, error, and log files are kept.
#
# Do not add a slash at the end of the directory path.  If you point
# ServerRoot at a non-local disk, be sure to specify a local disk on the
# Mutex directive, if file-based mutexes are used.  If you wish to share the
# same ServerRoot for multiple httpd daemons, you will need to change at
# least PidFile.
#
ServerRoot "/etc/httpd"

#
# Listen: Allows you to bind Apache to specific IP addresses and/or
# ports, instead of the default. See also the <VirtualHost>
# directive.
#
# Change this to Listen on specific IP addresses as shown below to
# prevent Apache from glomming onto all bound IP addresses.
#
#Listen 12.34.56.78:80
Listen {{ port_number }}

#
# Dynamic Shared Object (DSO) Support
#
# To be able to use the functionality of a module which was built as a DSO you
# have to place corresponding `LoadModule' lines at this location so the
# directives contained in it are actually available _before_ they are used.
# Statically compiled modules (those listed by `httpd -l') do not need
# to be loaded here.
#
# Example:
# LoadModule foo_module modules/mod_foo.so
#
Include conf.modules.d/*.conf

#
# If you wish httpd to run as a different user or group, you must run
# httpd as root initially and it will switch.
#
# User/Group: The name (or #number) of the user/group to run httpd as.
# It is usually good practice to create a dedicated user and group for
# running httpd, as with most system services.
#
User {{ user }}
Group {{ group}}

# 'Main' server configuration
#
# The directives in this section set up the values used by the 'main'
# server, which responds to any requests that aren't handled by a
# <VirtualHost> definition.  These values also provide defaults for
# any <VirtualHost> containers you may define later in the file.
#
# All of these directives may appear inside <VirtualHost> containers,
# in which case these default settings will be overridden for the
# virtual host being defined.
#

#
# ServerAdmin: Your address, where problems with the server should be
# e-mailed.  This address appears on some server-generated pages, such
# as error documents.  e.g. admin@your-domain.com
#
ServerAdmin root@localhost

#
# ServerName gives the name and port that the server uses to identify itself.
# This can often be determined automatically, but we recommend you specify
# it explicitly to prevent problems during startup.
#
# If your host doesn't have a registered DNS name, enter its IP address here.
#
#ServerName www.example.com:80

#
# Deny access to the entirety of your server's filesystem. You must
# explicitly permit access to web content directories in other
# <Directory> blocks below.
#
<Directory />
    AllowOverride none
    Require all denied
</Directory>

#
# Note that from this point forward you must specifically allow
# particular features to be enabled - so if something's not working as
# you might expect, make sure that you have specifically enabled it
# below.
#

#
# DocumentRoot: The directory out of which you will serve your
# documents. By default, all requests are taken from this directory, but
# symbolic links and aliases may be used to point to other locations.
#
DocumentRoot "/var/www/html"

#
# Relax access to content within /var/www.
#
<Directory "/var/www">
    AllowOverride None
    # Allow open access:
    Require all granted
</Directory>

# Further relax access to the default document root:
<Directory "/var/www/html">
    #
    # Possible values for the Options directive are "None", "All",
    # or any combination of:
    #   Indexes Includes FollowSymLinks SymLinksifOwnerMatch ExecCGI MultiViews
    #
    # Note that "MultiViews" must be named *explicitly* --- "Options All"
    # doesn't give it to you.
    #
    # The Options directive is both complicated and important.  Please see
    # http://httpd.apache.org/docs/2.4/mod/core.html#options
    # for more information.
    #
    Options Indexes FollowSymLinks

    #
    # AllowOverride controls what directives may be placed in .htaccess files.
    # It can be "All", "None", or any combination of the keywords:
    #   Options FileInfo AuthConfig Limit
    #
    AllowOverride None

    #
    # Controls who can get stuff from this server.
    #
    Require all granted
</Directory>

#
# DirectoryIndex: sets the file that Apache will serve if a directory
# is requested.
#
<IfModule dir_module>
    DirectoryIndex index.html
</IfModule>

#
# The following lines prevent .htaccess and .htpasswd files from being
# viewed by Web clients.
#
<Files ".ht*">
    Require all denied
</Files>

#
# ErrorLog: The location of the error log file.
# If you do not specify an ErrorLog directive within a <VirtualHost>
# container, error messages relating to that virtual host will be
# logged here.  If you *do* define an error logfile for a <VirtualHost>
# container, that host's errors will be logged there and not here.
#
ErrorLog "logs/error_log"

#
# LogLevel: Control the number of messages logged to the error_log.
# Possible values include: debug, info, notice, warn, error, crit,
# alert, emerg.
#
LogLevel warn

<IfModule log_config_module>
    #
    # The following directives define some format nicknames for use with
    # a CustomLog directive (see below).
    #
    LogFormat "%h %l %u %t \"%r\" %>s %b \"%{Referer}i\" \"%{User-Agent}i\"" combined
    LogFormat "%h %l %u %t \"%r\" %>s %b" common

    <IfModule logio_module>
      # You need to enable mod_logio.c to use %I and %O
      LogFormat "%h %l %u %t \"%r\" %>s %b \"%{Referer}i\" \"%{User-Agent}i\" %I %O" combinedio
    </IfModule>

    #
    # The location and format of the access logfile (Common Logfile Format).
    # If you do not define any access logfiles within a <VirtualHost>
    # container, they will be logged here.  Contrariwise, if you *do*
    # define per-<VirtualHost> access logfiles, transactions will be
    # logged therein and *not* in this file.
    #
    #CustomLog "logs/access_log" common

    #
    # If you prefer a logfile with access, agent, and referer information
    # (Combined Logfile Format) you can use the following directive.
    #
    CustomLog "logs/access_log" combined
</IfModule>

<IfModule alias_module>
    #
    # Redirect: Allows you to tell clients about documents that used to
    # exist in your server's namespace, but do not anymore. The client
    # will make a new request for the document at its new location.
    # Example:
    # Redirect permanent /foo http://www.example.com/bar

    #
    # Alias: Maps web paths into filesystem paths and is used to
    # access content that does not live under the DocumentRoot.
    # Example:
    # Alias /webpath /full/filesystem/path
    #
    # If you include a trailing / on /webpath then the server will
    # require it to be present in the URL.  You will also likely
    # need to provide a <Directory> section to allow access to
    # the filesystem path.

    #
    # ScriptAlias: This controls which directories contain server scripts.
    # ScriptAliases are essentially the same as Aliases, except that
    # documents in the target directory are treated as applications and
    # run by the server when requested rather than as documents sent to the
    # client.  The same rules about trailing "/" apply to ScriptAlias
    # directives as to Alias.
    #
    ScriptAlias /cgi-bin/ "/var/www/cgi-bin/"

</IfModule>

#
# "/var/www/cgi-bin" should be changed to whatever your ScriptAliased
# CGI directory exists, if you have that configured.
#
<Directory "/var/www/cgi-bin">
    AllowOverride None
    Options None
    Require all granted
</Directory>

<IfModule mime_module>
    #
    # TypesConfig points to the file containing the list of mappings from
    # filename extension to MIME-type.
    #
    TypesConfig /etc/mime.types

    #
    # AddType allows you to add to or override the MIME configuration
    # file specified in TypesConfig for specific file types.
    #
    #AddType application/x-gzip .tgz
    #
    # AddEncoding allows you to have certain browsers uncompress
    # information on the fly. Note: Not all browsers support this.
    #
    #AddEncoding x-compress .Z
    #AddEncoding x-gzip .gz .tgz
    #
    # If the AddEncoding directives above are commented-out, then you
    # probably should define those extensions to indicate media types:
    #
    AddType application/x-compress .Z
    AddType application/x-gzip .gz .tgz

    #
    # AddHandler allows you to map certain file extensions to "handlers":
    # actions unrelated to filetype. These can be either built into the server
    # or added with the Action directive (see below)
    #
    # To use CGI scripts outside of ScriptAliased directories:
    # (You will also need to add "ExecCGI" to the "Options" directive.)
    #
    #AddHandler cgi-script .cgi

    # For type maps (negotiated resources):
    #AddHandler type-map var

    #
    # Filters allow you to process content before it is sent to the client.
    #
    # To parse .shtml files for server-side includes (SSI):
    # (You will also need to add "Includes" to the "Options" directive.)
    #
    AddType text/html .shtml
    AddOutputFilter INCLUDES .shtml
</IfModule>

#
# Specify a default charset for all content served; this enables
# interpretation of all content as UTF-8 by default.  To use the
# default browser choice (ISO-8859-1), or to allow the META tags
# in HTML content to override this choice, comment out this
# directive:
#
AddDefaultCharset UTF-8

<IfModule mime_magic_module>
    #
    # The mod_mime_magic module allows the server to use various hints from the
    # contents of the file itself to determine its type.  The MIMEMagicFile
    # directive tells the module where the hint definitions are located.
    #
    MIMEMagicFile conf/magic
</IfModule>

#
# Customizable error responses come in three flavors:
# 1) plain text 2) local redirects 3) external redirects
#
# Some examples:
#ErrorDocument 500 "The server made a boo boo."
#ErrorDocument 404 /missing.html
#ErrorDocument 404 "/cgi-bin/missing_handler.pl"
#ErrorDocument 402 http://www.example.com/subscription_info.html
#

#
# EnableMMAP and EnableSendfile: On systems that support it,
# memory-mapping or the sendfile syscall may be used to deliver
# files.  This usually improves server performance, but must
# be turned off when serving from networked-mounted
# filesystems or if support for these functions is otherwise
# broken on your system.
# Defaults if commented: EnableMMAP On, EnableSendfile Off
#
#EnableMMAP off
EnableSendfile on

# Supplemental configuration
#
# Load config files in the "/etc/httpd/conf.d" directory, if any.
IncludeOptional conf.d/*.conf
12)app/vars/main.yml
port_number: 8080
user: app
group: app
最后说一下ansibel的缺点:
1、ansible毕竟是基于ssh操作,所以执行效率并不高,但是对于一两百机子还是够用的,再多的机子,可以考虑用saltstack,或者puppet
2、安全性不高,所以特别注意一些危险的操作(如:rm -f 之类的命令),可以通过创建特定的用户禁用一些危险操作
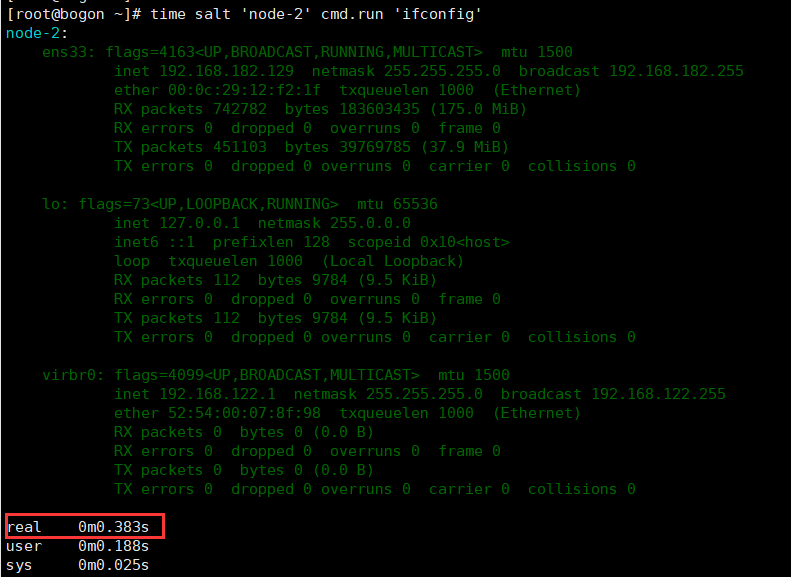
这里稍微对比一下ansible和saltstack速度,一目了然。

到此为止~~~

 浙公网安备 33010602011771号