<!DOCTYPE HTML>
<html>
<head>
    <meta charset="UTF-8">
    <title>value</title>
    <style type="text/css">

    </style>
</head>
<body>
    <form action="">
        <input type="radio" name="sex" value="112" />男
        <input type="radio" name="sex" value="11" checked="" />女
        <input type="radio" name="sex" value="113" />gay

        <input type="checkbox" value="a" checked=""/>吃饭
        <input type="checkbox" value="b" checked=""/>睡觉
        <input type="checkbox" value="c" checked=""/>打豆豆

        <select name="timespan" id="timespan" class="Wdate" >
            <option value="1">8:00-8:30</option>
            <option value="2">8:30-9:00</option>
            <option value="3">9:00-9:30</option>
        </select>
        <input type="text" name="" id="" value="111" />
    </form>
</body>
<script src="jquery-3.2.1.js"></script>
<script type="text/javascript">
    $(function () {
        //选择input的type类型可以直接用:属性值的方式
        //:radio :submit :file :text :disable ....
        console.log($(':radio'));

        //1.获取单选框中的value值(选中值标记为checked)
        console.log($('input[type=radio]:checked').val());

        //2.获取复选框中的value值 仅仅获取第一个值
        console.log($('input[type=checkbox]:checked').val());

        //3.下拉列表被选中的值(下拉列表中的选中用selected)
        var obj = $('#timespan option:selected');
        console.log(obj.val());

        //设置单选值,val里面必须是数组的形式 ???????? 似乎不管用,值的形式才有效?难道是高版本改了吗?
        $('input[type=radio]').val(['113']);

        //设置复选框,val里面必须是数组的形式 ????????
        $('input[type=checkbox]').val(['b','c']);

        //设置下拉列表 选中的值必须要用select
        $('select').val(['3']);

        //文本框 设置值和获取值
        console.log($('input[type=text]').val());
        $('input[type=text]').val(['222']);

    })
</script>
</html>
3.jquery中文档操作
<!DOCTYPE HTML PUBLIC "-//W3C//DTD HTML 4.01 Transitional//EN"
        "http://www.w3.org/TR/html4/loose.dtd">
<html>
<head>
    <meta charset="UTF-8">
    <title>文档操作</title>
</head>
<body>
    <span class="move">呵呵</span>
    <ul>

    </ul>
    <button id="btn">按钮</button>

    <div>
        <div id="tihuan"></div>
        <div ></div>
        <div ></div>
    </div>

    <div id="empty">
        <p>1</p>
        <p>2</p>
        <p>3</p>
    </div>

    <div id="remove">
        <p>1</p>
        <p>2</p>
        <p>3</p>
    </div>

</body>
<script src="jquery-3.2.1.js"></script>
<script type="text/javascript">
    $(function () {
        var oLi = document.createElement('li');
        oLi.innerHTML = '路飞';
        //append插入标签
        $('ul').append('<li>luffy</li>');
        $('ul').append(oLi);
        //如果直接的内容是当前页面中的某些元素,那么这些元素将从原位置上消失。简言之,就是一个移动操作
        $('ul').append($('.move'));

        //appendTo() 与append插入标签类似,只不过得先创建被插入的元素,书写顺序颠换
        $('<a href="#">路飞2</a>').appendTo($('ul'));

        //prepend / prependTo插入到被选中元素的第一个位置
        $('ul').prepend('<li>插入到第一个位置</li>');
        $('<li>插入到第0个位置</li>').prependTo($('ul'));

        //after before 在相关元素之前或者之后 insertBefore /insertAfter 同样颠换顺序
        $('ul').before('<h2>我是一个二级标题</h2>');
        $('<h2>我是第二个二级标题</h2>').insertBefore($('ul'));

        $('ul').after('<h3>我是一个三级标题</h3>');
        $('<h3>我是第二个三级标题</h3>').insertAfter($('ul'));

        //复制操作 clone() 克隆匹配的DOM元素并且选中这些克隆的副本
        // 1.clone():克隆匹配的DOM元素并且选中这些克隆的副本。
        // 2.clone(true):元素以及其所有的事件处理并且选中这些克隆的副本(简言之,副本具有与真身一样的事件处理能力)
        $('button').click(function () {
            $(this).clone(true).insertAfter($(this))
        });

        //替换
        $('#tihuan').replaceWith('<button>替换成按钮</button>');
        $('<a href="#">替换的超链接</a>').replaceAll('div div');

        //删除
        //empty() 将子内容清空
        $('#empty').empty();

        //remove() 将被选元素全部删除 什么都没有了
        $("#remove").remove();

        //detach() 移除匹配的节点元素 删除节点后返回节点数组 事件会保留
        var $btn = $('button').detach();
        console.log($btn[0]);
        $('ul').append($btn);

    })
</script>
</html>
4.jquery的位置属性
<!DOCTYPE html>
<html lang="en">
<head>
    <meta charset="UTF-8">
    <title>位置属性</title>
    <style type="text/css">
        *{padding: 0;margin: 0;}
        #box{position: relative;width: 200px;height: 200px;border: 1px solid red;padding: 10px 5px;}
        p{position: absolute;left:30px;top: 30px}
    </style>
</head>
<body style="height: 2000px; width: 2000px;">
    <div id="box">
        <p>我是一个段落标签</p>
    </div>

    <button id="btn">动画吧</button>

    <div style="width: 200px;height: 200px;margin:  100px auto;border: 1px solid deepskyblue;"></div>
</body>
<script src="jquery-3.2.1.js"></script>
<script type="text/javascript">
    $(function () {
        //posititon 获取匹配元素的相对父元素的偏移
        console.log($('p').position().left);

        var offSetTop = $('p').position().top + 50 + 'px';
        $('#btn').click(function () {
            $('p').animate({top:offSetTop,},1000);
        });

        //获取匹配元素相对滚动条卷起的位置信息(就是滚动过的区域) scrollTop scrollLeft
        scroll 实时监听功能
        $(document).scroll(function () {
            console.log($(document).scrollLeft());
            console.log($(document).scrollTop());
        });

        //offset 获取匹配元素在当前视口的相对偏移 相对于浏览器左上角
        console.log($("#box").offset());
        console.log($("p").offset().left);
        console.log($("p").offset().top);
        console.log($("#btn").offset().left);

        //获取元素的宽高
        console.log("宽"+ $('#box').width());
        console.log("高"+ $('#box').height());

        //设置宽高
        $('#box').width(400);

        //innerWidth outerWidth innerHeight outerHeight...
        //获取innerWidth width + 2 * padding 不包括边框 获取匹配元素的内部宽度
        console.log($('#box').innerWidth());
        //获取outerWidth width + 2 * (padding + border) 获取匹配元素的外部宽度
        console.log($('#box').outerWidth());
    })
</script>
</html>
5.仿淘宝导航栏(案例:滚动到一定位置显示搜索框)
<!DOCTYPE html>
<html lang="en">
<head>
    <meta charset="UTF-8">
    <title>导航栏</title>
    <style type="text/css">
        *{padding: 0;margin: 0;}
        div{width: 100%;}
        div img{width: 100%;}

        .nav{display: none;}
    </style>
</head>
<body>
    <div class="top">
        <img src="images/top.jpg" alt="" />

    </div>
    <div class="nav">
        <img src="images/nav.jpg"/>
    </div>
    <div class= 'taobao'>
        <img src="images/taobao1.png"/>
    </div>
</body>
<script src="jquery-3.2.1.js"></script>
<script type="text/javascript">
    $(function () {
        var h = $('.top').height();

        //监听
        $(document).scroll(function () {
            var scollTp = $(document).scrollTop();

            if(h<scollTp){
                $('.nav').css({display:'block',position:'fixed',top:'0'});
            }
            else{
                $('.nav').css({display:'none',position:'static',top:'0'});
            }
        })
    })
</script>
</html>
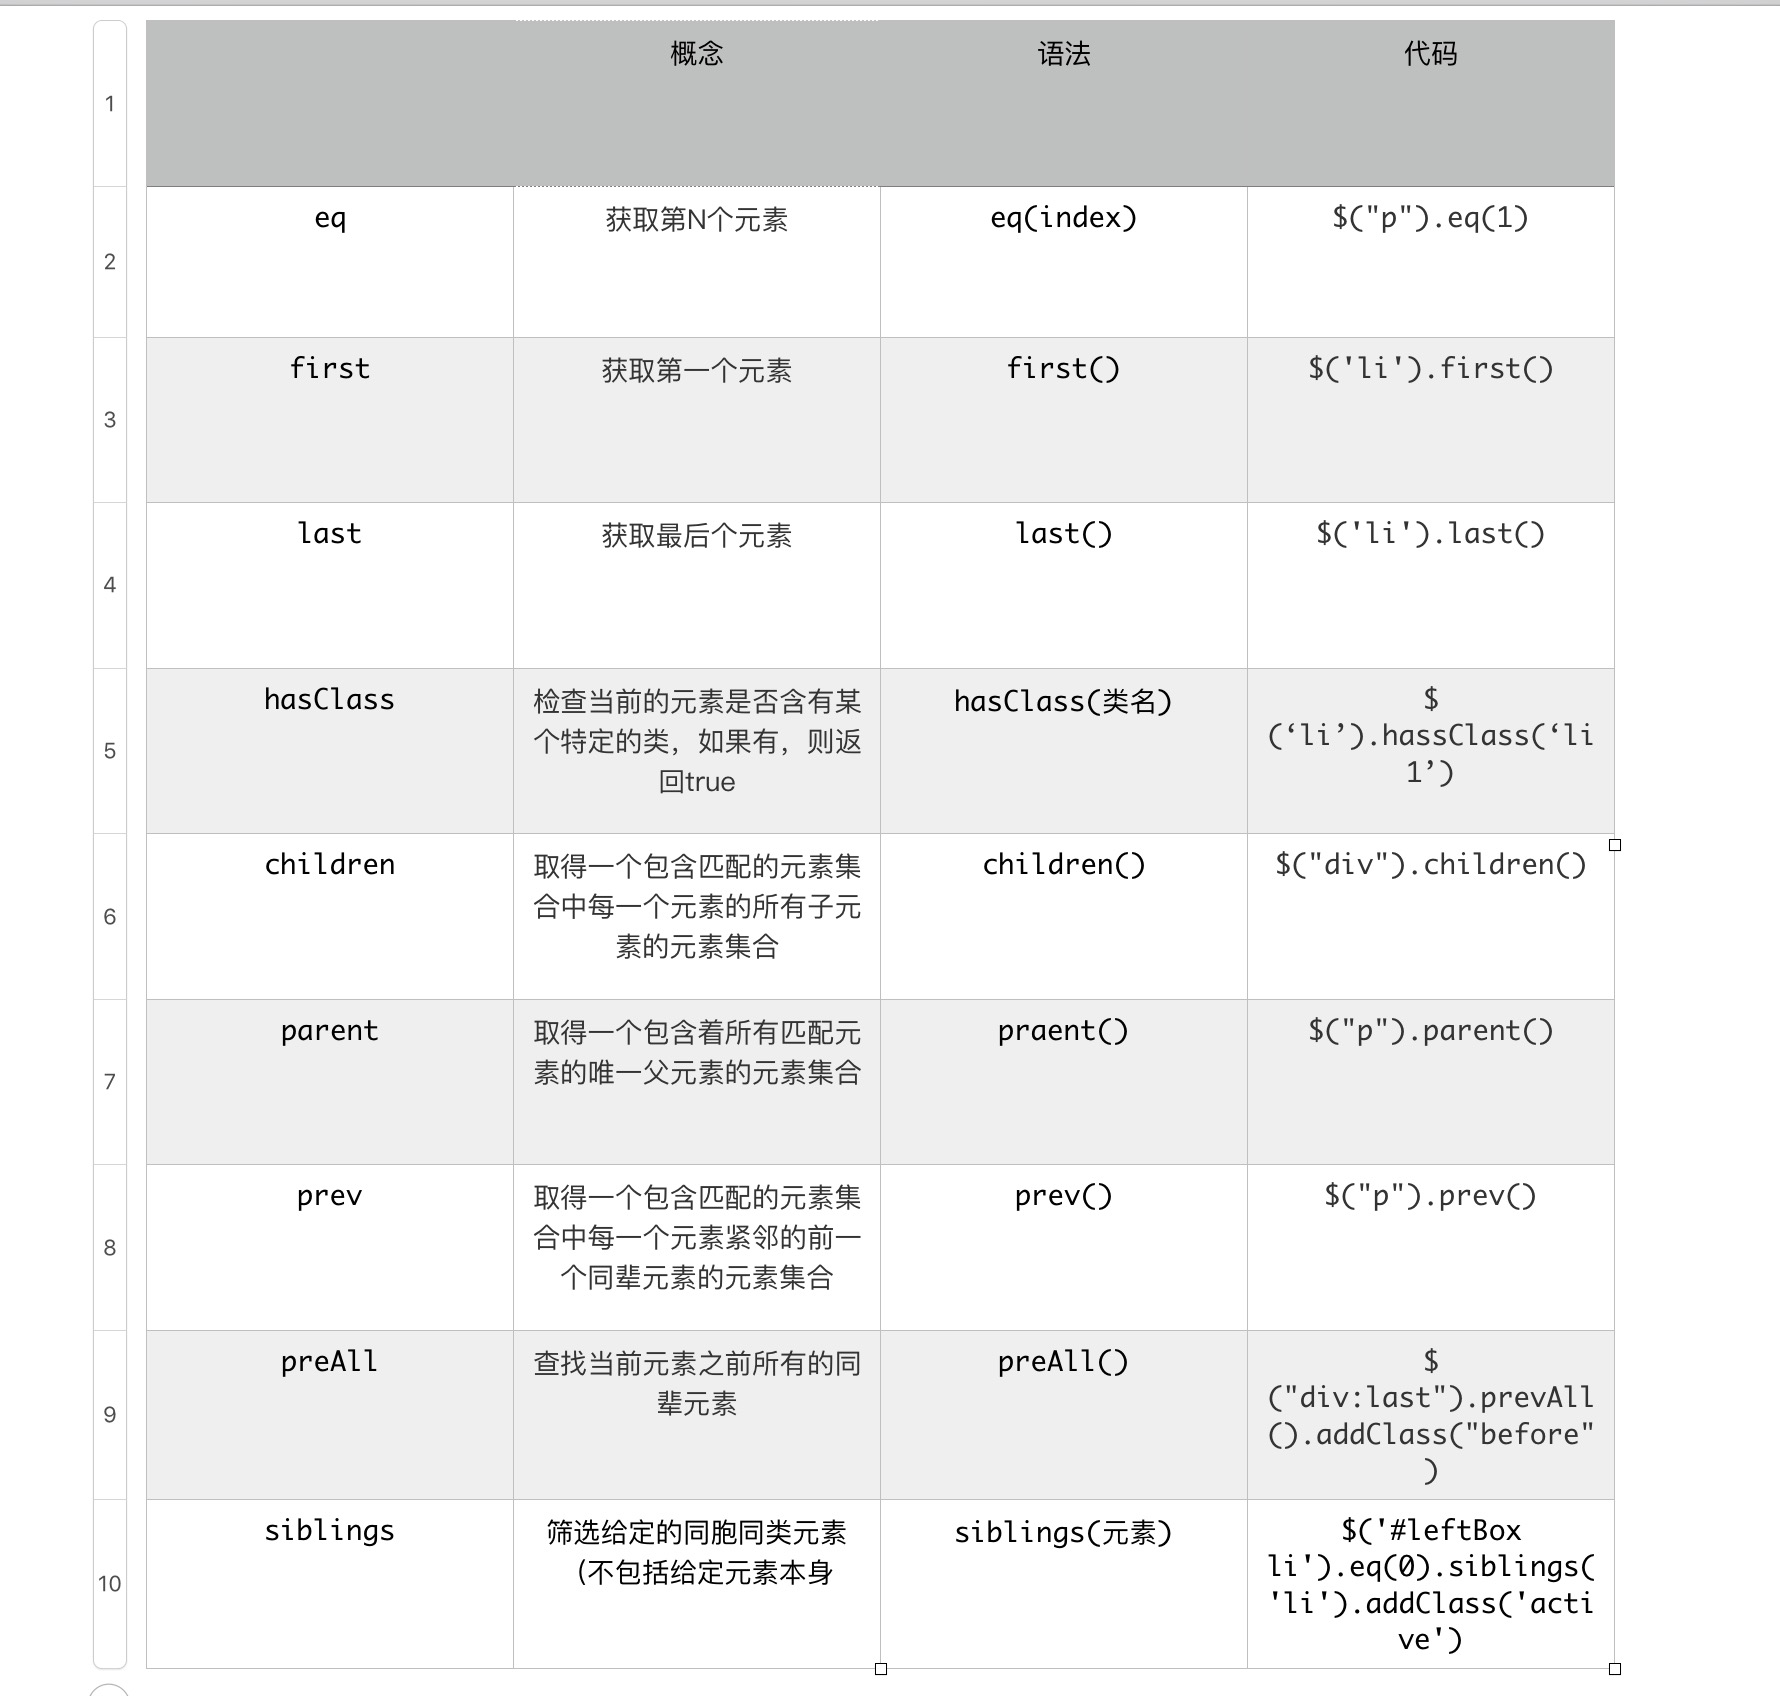
6.jquery的筛选方法
<!DOCTYPE html>
<html lang="en">
<head>
    <meta charset="UTF-8">
    <title>筛选</title>
    <style type="text/css">
        li.active{
            font-size: 50px;
        }
    </style>
</head>
<body>
    <ul>
        <li class="danger">1</li>
        <li>2</li>
        <li class="danger">3</li>
        <li>4</li>
        <a href="#">百度</a>
        <a href="#" id="anchor">百度</a>

    </ul>
</body>
<script src="jquery-3.2.1.js"></script>
<script type="text/javascript">
    $(function () {
        //jquery的遍历方法 .each() 传入function有两个参数,一个为索引,一个为内容
        //案例 改变类名为 danger的节点的样式
        $('li').each(function (index,ele) {
            console.log(index);
            console.log(ele);

            //hasClass判断当前对象内部是否有相应的类名,返回布尔值
            var isDanger = $(this).hasClass('danger');
            if(isDanger){
                $(this).css('color','red');
            }else{
                $(this).css('color','blue');
            }
        });

        //children
        //比如console.log($('ul').children());与
        //console.log($('li'));是一个效果

        //结合选择器的用法
        console.log($('ul').children('.danger'));

        //父级元素
        console.log($('li').parent());

        //prev 当前元素集合的紧邻着的前一个同辈元素集合(或者只有一个元素的时候选择元素的前一个对象)
        console.log($('li').last().prev());
        //prevAll 查找当前元素之前的所有元素
        console.log($('li').last().prevAll());

        //siblings 匹配同辈中所有相关的对象(不包含本身)
        console.log($('#anchor').siblings('li'));

        //(案例)鼠标移动变大变小效果
        $('li').hover(function () {
            $(this).addClass('active').siblings('li').removeClass('active');
        })

    })

</script>
</html>
7. 内嵌选项卡(案例)
<!DOCTYPE html>
<html lang="en">
<head>
    <meta charset="UTF-8">
    <title>选项卡嵌套</title>
    <style type="text/css">
        *{padding:0;margin: 0;}
        ul{list-style: none;}

        /*清除浮动产生的问题*/
        #box:after{
            content:'';
            display:block;
            clear:both;
        }
        #box{width:800px;border:1px solid black;
            margin: 20px auto;background: blue;}

        #leftBox{width:200px;float:left;}
        /*font:字体大小/行高*/
        #leftBox li{width: 200px;height:89px;background:red;
        margin-bottom: 2px;color:white;font:50px/89px '黑体';
        text-align: center;}

        #rightBox div{display:none;float:left;width:600px}
        #rightBox p{width:100%;height: 325px;font: 100px/325px "黑体";
                text-align: center;background: greenyellow ;}

        /* 父元素设置display:table使它成为一个块级表格元素
         * 子元素设置display:table-cell使子元素成为表格单元格,就好比是在表格中一样*/
        #rightBox ul{width: 600px;display: table;}
        #rightBox li{display: table-cell;background: purple;
             height: 40px;border-right: 2px solid blue;
             font: 30px/40px "黑体";text-align: center;color: white;}

        #leftBox .active{background: yellow;color:black;}
        #rightBox .active{background:white;color:black;}


    </style>
</head>
<body>
    <div id="box">
        <ul id="leftBox">
            <li>a</li>
            <li>b</li>
            <li>c</li>
            <li>d</li>
        </ul>

        <div id="rightBox">
            <div style="display:block">
                <p>a1</p>
                <ul>
                    <li class="active">a1</li>
                    <li>a2</li>
                    <li>a3</li>
                    <li>a4</li>
                </ul>
            </div>
            <div>
                <p>b1</p>
                <ul>
                    <li class="active">b1</li>
                    <li>b2</li>
                    <li>b3</li>
                    <li>b4</li>
                </ul>
            </div>
            <div>
                <p>c1</p>
                <ul>
                    <li class="active">c1</li>
                    <li>c2</li>
                    <li>c3</li>
                    <li>c4</li>
                </ul>
            </div>
            <div>
                <p>d1</p>
                <ul>
                    <li class="active">d1</li>
                    <li>d2</li>
                    <li>d3</li>
                    <li>d4</li>
                </ul>
            </div>
        </div>
    </div>
</body>
<script src="jquery-3.2.1.js"></script>
<script type="text/javascript">
    //鼠标移入的时候
    $('#leftBox li').mouseover(function () {
        //通过添加类名以及修改兄弟元素的类名来修改样式
        $(this).addClass("active").siblings('li').removeClass('active');

        //修改右边的div ,$(this).index() 获得与之对应的索引
        $('#rightBox div').eq($(this).index()).show().siblings('div').hide();
    });

    $('#rightBox li').click(function () {
        $(this).addClass('active').siblings("li").removeClass('active');

        var liValue = $(this).html();
        $(this).parent().prev().text(liValue);
    })
</script>
</html>
8.小米官网(部分案例)
<!DOCTYPE html>
<html lang="en">
<head>
    <meta charset="UTF-8">
    <title>小米案例</title>
    <style type="text/css">
        *{padding:0;margin: 0;}
        ul{list-style: none;}

        .wrap{width: 980px;height: 612px;margin: 20px auto 0;
        background: #52A7A7;border:1px solid gray;}

        li{float: left;margin-left: 10px;position: relative;
				overflow: hidden;width: 233px;height: 300px;}
        .img{
            width: 230px;
            height: 300px;
            margin-top: 10px;
            background-color: rgba(116,167,21,0.92);
        }
        ul li p{
            width: 233px;
            height: 100px;
            background: rgba(245,102,51,.7);
            position: absolute;
            bottom: -100px;
            text-align: center;
            color: white;
            line-height: 100px;
    }
    </style>
</head>
<body>
    <div class="wrap">
        <ul>
            <li><a href="#"><div class="img"></div></a><p>百度一下</p></li>
            <li><a href="#"><div class="img"></div></a><p>百度一下</p></li>
            <li><a href="#"><div class="img"></div></a><p>百度一下</p></li>
            <li><a href="#"><div class="img"></div></a><p>百度一下</p></li>
            <li><a href="#"><div class="img"></div></a><p>百度一下</p></li>
            <li><a href="#"><div class="img"></div></a><p>百度一下</p></li>
            <li><a href="#"><div class="img"></div></a><p>百度一下</p></li>
            <li><a href="#"><div class="img"></div></a><p>百度一下</p></li>
        </ul>
    </div>
</body>
<script src="jquery-3.2.1.js"></script>
<script type="text/javascript">
    //mouseenter 进入 mouseleave 离开
    //hover里面的两个个函数的效果对应上面的两个效果
    $('.wrap li').hover(function () {
        $(this).children('p').stop(true).animate({bottom:0},100);
    },function () {
        $(this).children('p').stop(true).animate({bottom:-100},100);
    })

</script>
</html>
9.焦点轮播图(案例)
<!DOCTYPE html>
<html lang="en">
<head>
    <meta charset="UTF-8">
    <title>焦点式轮播图</title>
    <style type="text/css">
        *{padding: 0;margin: 0;}
        ul,ol{list-style: none;}

        #wrap{width: 650px;height: 250px;margin: 100px auto 0;
				background: red;overflow: hidden;position: relative;}
        #wrap ul{height: 250px;position: relative;z-index: 1;}
        #wrap ol{height: 30px;position: absolute;z-index: 2;bottom: 0;right: 0;}

        #wrap>ul>li{
            position: absolute;
            top:0;
            left: 0;
        }

        #wrap>ol>li{
            float: left;
            width: 20px;
            height: 20px;
            text-align: center;
            line-height: 20px;
            border: 1px solid white;
            background: gray;
            margin-right: 5px;
        }
        #wrap>ol>li:hover{
            /*设置鼠标形状*/
            cursor: pointer;
        }
        #wrap li.active{
            padding: 2px;
            color: orange;
            margin-top: -4px;
            border: 1px solid orange;
        }

    </style>
</head>
<body>
    <div id="wrap">
        <ul>
            <!--为何要写z-index?设置绝对定位之后 脱离标准流 最后一个盒子层级提升了-->
            <li style="z-index: 1;"><a href="#"><img src="./images/01.jpg"></a></li>
            <li><a href="#"><img src="./images/02.jpg"></a></li>
            <li><a href="#"><img src="./images/03.jpg"></a></li>
            <li><a href="#"><img src="./images/04.jpg"></a></li>
            <li><a href="#"><img src="./images/05.jpg"></a></li>
        </ul>
        <ol>
            <li>1</li>
            <li>2</li>
            <li>3</li>
            <li>4</li>
            <li>5</li>
        </ol>
    </div>

</body>
<script src="jquery-3.2.1.js"></script>
<script type="text/javascript">
    //控制层次关系的索引
    var index = 0;
    $('#wrap>ol>li').mouseenter(function () {
        index++;
        //修改下标class
        $(this).addClass('active').siblings('li').removeClass('active');

        //修改图片
        $('#wrap>ul>li').eq($(this).index()).css({'left':650,'z-index':index}).animate({left:0},1000);

    })

</script>
</html>
10.动态轮播图
<!DOCTYPE html>
<html lang="en">
<head>
    <meta charset="UTF-8">
    <title>动态轮播图</title>
    <style type="text/css">
        *{padding:0;margin:0;}
        ul{list-style: none;}

        #box{
            /*240 180*/
            width:240px;
            height:180px;
            position:relative;
            margin:50px auto;
            overflow: hidden;
        }

        ul{
            width: 960px;
            position: absolute;
        }
        ul li{
            float:left;
        }

        p{
            position: absolute;
            left:80px;
            bottom: 30px;
        }

        p span{
            color:red;
            display:inline-block;
            width:20px;
            height:20px;
            line-height:20px;
            text-align:center;
            cursor:pointer;
        }
        p span.active{
            color:white;
            background: greenyellow;
        }
    </style>
</head>
<body>
    <div id="box">
        <ul>
            <!--显示轮播图-->
        </ul>
        <p>
            <!--显示索引-->
        </p>
    </div>
    <button id="play">轮播吧!</button>
    <button id="stop">暂停!</button>
</body>
<script src="jquery-3.2.1.js"></script>
<script type="text/javascript">
    //1.获取本地的图片数据 以后再后面的课程中这些数据会从后端服务器获取
    var imgArr = ['./动态轮播图/01.jpg','./动态轮播图/02.jpg','./动态轮播图/03.jpg','./动态轮播图/04.jpg'];

    //2.动态生成图片
    for(var i = 0;i < imgArr.length;i++){
        $('ul').append('<li><img src=' + imgArr[i] + '></li>')
    }

    //3.生成索引
    var str = '';
    $('li').each(function (i,ele) {
        str += '<span>' + (i + 1) + '</span>';
    }) ;
    $('p').html(str);

    //4.默认设置索引的第一个active
    $('span:first').addClass('active');

    var index = 0;

    //5.点击索引
    $('span').click(function () {
        $(this).addClass('active').siblings('span').removeClass('active');
        index = $(this).index();

        //将ul根据位置左移动
        $('ul').animate({
            left:-240 * index
        },500)
    });

    //按钮操作
    var timer = null;
    $('#play').click(function () {
        //0.开启定时器  1.索引跟着走 2.图片跟着走
        timer = setInterval(next,1000);

        function next(){
            if(index == imgArr.length){
                index = 0;
            }
            $('p span').eq(index).addClass('active').siblings('span').removeClass('active');
            $('ul').animate({left:-240 * index},500);
            index++;
        }
    });

    //停止动画
    $('#stop').click(function () {
        clearInterval(timer);
    })
</script>
</html>

 浙公网安备 33010602011771号