
Linux之Elasticsearch安装
Elasticsearch安装
1. 下载
1 https://www.elastic.co/cn/downloads/elasticsearch
2. 解压
1 tar -zxvf elasticsearch-6.8.8.tar.gz
3. 解决es强依赖jdk问题【es6.8.8版本不存在该问题】

cd /usr/local/elasticsearch688/bin
vim elasticsearch

############## 添加配置解决jdk版本问题 ##############
# 将jdk修改为es中自带jdk的配置目录
export JAVA_HOME=/usr/local/elasticsearch-7.13.2/jdk
export PATH=$JAVA_HOME/bin:$PATH

if [ -x "$JAVA_HOME/bin/java" ]; then
        JAVA="/usr/local/elasticsearch-7.13.2/jdk/bin/java"
else
        JAVA=`which java`
fi
4. 解决内存不足问题

vim /usr/local/elasticsearch688/config/jvm.options

默认配置如下:
-Xms2g
-Xmx2g
默认的配置占用内存太多了,调小一些:
-Xms256m
-Xmx256m
5. 创建专用用户启动ES(root用户不能直接启动es)

5.1 创建用户
1 useradd user-es
5.2 创建所属组
1 chown user-es:user-es -R /usr/local/elasticsearch688
5.3 切换user-es用户
1 su - user-es
5.4 启动es
1 /usr/local/elasticsearch688/bin/elasticsearch
埋坑:
启动报错:

坑【1】的解决办法:
vi /etc/security/limits.conf
//在文件末尾添加下面的参数值
* soft nofile 65536
* hard nofile 131072
坑【2】的解决办法:
vim /etc/sysctl.conf
//在文件末尾添加下面的参数值
vm.max_map_count=655360
5.5 执行 curl 127.0.0.1:9200
{
  "name" : "FyDCa4X",
  "cluster_name" : "elasticsearch",
  "cluster_uuid" : "kQaohzb3T5qkdK1Qp4KntQ",
  "version" : {
    "number" : "6.8.8",
    "build_flavor" : "default",
    "build_type" : "tar",
    "build_hash" : "2f4c224",
    "build_date" : "2020-03-18T23:22:18.622755Z",
    "build_snapshot" : false,
    "lucene_version" : "7.7.2",
    "minimum_wire_compatibility_version" : "5.6.0",
    "minimum_index_compatibility_version" : "5.0.0"
  },
  "tagline" : "You Know, for Search"
}
6. elasticsearch-head连接es
修改配置文件:
vim /usr/local/elasticsearch688/config/elasticsearch.yml
//在文件末尾添加如下内容
http.cors.enabled: true
http.cors.allow-origin: "*"
http.cors.allow-methods: OPTIONS, HEAD, GET, POST, PUT, DELETE
http.cors.allow-headers: "X-Requested-With, Content-Type, Content-Length, X-User"
network.host: 0.0.0.0
重启es和es-head

====================================================================================
7. 集群搭建
7.1 环境准备
准备3台单机的es
7.2 修改config/elasticsearch.yml配置文件 【注意版本不同,使用的参数不一样,修改3个节点的配置文件】

7.3 启动es集群服务
7.4 连接

五. FastDFS安装
1. 安装依赖库
yum install gcc libevent libevent-devel -y
2. 安装libfastcommon 库
libfastcommon 库是 FastDFS 文件系统运行需要的公共 C 语言函数库
2.1 下载地址:
https://github.com/happyfish100/libfastcommon/tree/V1.0.36 【注意版本】
2.2 解压:
unzip libfastcommon-1.0.36.zip
2.3 编译:
./make.sh
2.4 安装:
./make.sh install
3. 安装fastDFS
3.1 下载地址:
https://github.com/happyfish100/fastdfs/archive/V5.11.tar.gz 【注意版本】
3.2 解压:
tar -zxvf fastdfs-5.11.tar.gz
3.3 编译:
./make.sh
3.4 安装:
./make.sh install
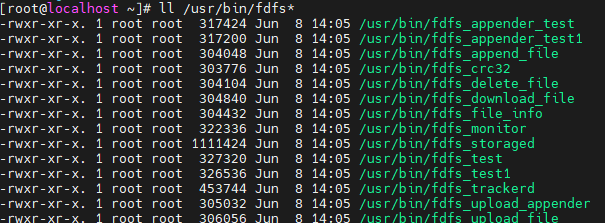
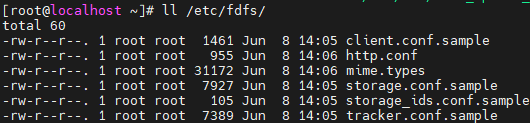
4. 检查编译安装后的文件
ll /usr/bin/fdfs*
ll /etc/fdfs/
cd /survey/storeSoftware/fastDFS/fastdfs-5.11/conf
执行:
cp http.conf /etc/fdfs/
cp mime.types /etc/fdfs/

 浙公网安备 33010602011771号