

今天讲一下做一个增删改查系统的具体过程,案例为之前发布的随笔,企业erp生产管理系统。
要完成整个系统的前端后端流程,配置系统环境是必不可少的,比如,我用到的环境有:
语言环境:Java1.8
数据库:mysql8.0
用到的数据库图形化软件:Navicat
由于项目是基于的SpingBoot,用到了Maven框架,用起来很方便
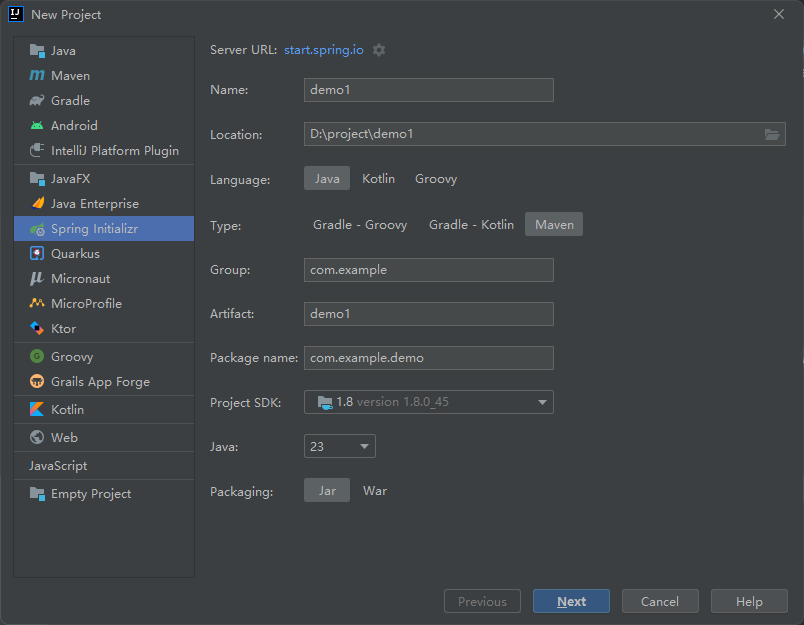
这些都可以在B站搜到配置教程,这些都配置好了就可以创建一个基于Springboot的项目,如下图
创建好以后,需要配置一下pom文件,一般有一个现成的项目就可以直接拿过来复制粘贴用了,下面是我的这个项目的pom代码,springboot的版本一定要对应自己的数据库,第一次配置会下载一段时间
<?xml version="1.0" encoding="UTF-8"?>
<project xmlns="http://maven.apache.org/POM/4.0.0" xmlns:xsi="http://www.w3.org/2001/XMLSchema-instance"
         xsi:schemaLocation="http://maven.apache.org/POM/4.0.0 https://maven.apache.org/xsd/maven-4.0.0.xsd">
    <modelVersion>4.0.0</modelVersion>
    <parent>
        <groupId>org.springframework.boot</groupId>
        <artifactId>spring-boot-starter-parent</artifactId>
        <version>2.7.8</version>
        <relativePath/> <!-- lookup parent from repository -->
    </parent>
    <groupId>com.example</groupId>
    <artifactId>ProductionPlan</artifactId>
    <version>0.0.1-SNAPSHOT</version>
    <name>ProductionPlan</name>
    <description>ProductionPlan</description>
    <url/>
    <licenses>
        <license/>
    </licenses>
    <developers>
        <developer/>
    </developers>
    <scm>
        <connection/>
        <developerConnection/>
        <tag/>
        <url/>
    </scm>
    <properties>
        <java.version>8</java.version>
    </properties>
    <dependencies>
        <dependency>
            <groupId>org.projectlombok</groupId>
            <artifactId>lombok</artifactId>
        </dependency>
        <dependency>
            <groupId>org.springframework.boot</groupId>
            <artifactId>spring-boot-starter-thymeleaf</artifactId>
        </dependency>
        <dependency>
            <groupId>org.springframework.boot</groupId>
            <artifactId>spring-boot-starter-web</artifactId>
        </dependency>
        <dependency>
            <groupId>org.mybatis.spring.boot</groupId>
            <artifactId>mybatis-spring-boot-starter</artifactId>
            <version>2.1.3</version>
        </dependency>

        <dependency>
            <groupId>com.mysql</groupId>
            <artifactId>mysql-connector-j</artifactId>
            <scope>runtime</scope>
        </dependency>
        <dependency>
            <groupId>org.springframework.boot</groupId>
            <artifactId>spring-boot-starter-test</artifactId>
            <scope>test</scope>
        </dependency>
<!--        <dependency>-->
<!--            <groupId>org.mybatis.spring.boot</groupId>-->
<!--            <artifactId>mybatis-spring-boot-starter-test</artifactId>-->
<!--            <version>3.0.3</version>-->
<!--            <scope>test</scope>-->
<!--        </dependency>-->
    </dependencies>

    <build>
        <plugins>
            <plugin>
                <groupId>org.springframework.boot</groupId>
                <artifactId>spring-boot-maven-plugin</artifactId>
            </plugin>
        </plugins>
    </build>

</project>
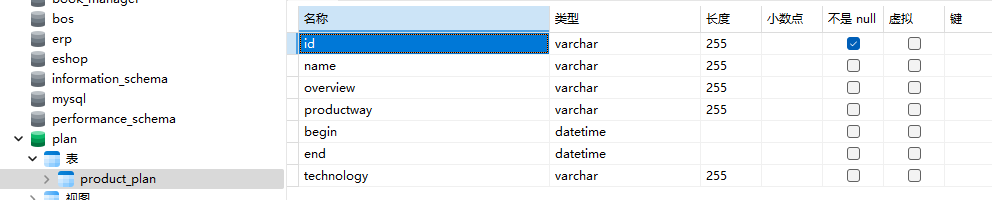
配置好pom文件加载成功后,才可以正常运行,然后按照要求创建数据库和字表信息,用navicat可以直接配置,也可以直接在idea中测试链接mysql,如图

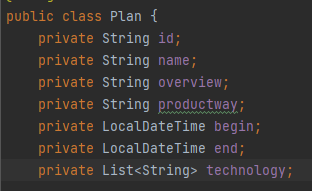
然后按照表中的数据写对应的dao层代码,尽量与数据库中的表对应,再编写getter setter toString方法,这里可以用到快捷键Alt+Insert快速编写 很方便
同时写一个Result记录响应后端能否接收数据,写相应成功和失败的函数,这里代码比较固定,Select类负责封装根据数据库中所含字段的函数
接下来写Bean层代码,一般用到Mapper接口和其镜像用起来很方便,在里面编写数据库增删改查语句,以调用数据库,如下是新增sql语句,每写一个语句在下面写后端数据的对应方法,注意调用函数的返回值要对应,比如新增的返回值为空就为Void,而查询的语句返回值需为整体Plan
@Insert("INSERT INTO product_plan(id, name, overview, productway, begin, end, technology) VALUES(#{id},#{name},#{overview},#{productway},#{begin},#{end},#{technology})")
    void insert(String id, String name, String overview, String productway, LocalDateTime begin, LocalDateTime end, String technology);
接下来需要编写接受前端数据的代码,也就是控制层,这里需要配置一个网页链接 创建一个逻辑访问层的对象, 并用这个对象处理接收的数据,增加用Post,删除Delete,修改用Put,查看用Get.,这里也比较通用,需要用到
@Autowired来自动装载对象
@RequestMapping("/plan")用来定位网页的地址

新增的举例
    //增加
    @PostMapping("/add")
    public Result addPlan(@RequestBody Plan plan) {
        try {
            System.out.println(plan);
            planService.addPlan(plan);
            return Result.success(plan);
        } catch (Exception e) {
            e.printStackTrace(); // 输出异常信息到控制台
            throw e; // 抛出异常以查看更多详细信息
        }
    }
这里需要调用逻辑访问层的新增代码,所以需要写Service层写对数据处理(增删改查)的函数方法,供给控制层调用处理前端接收的数据
Service层需要创建一个自动封装的Mapper对象,用这个对象写函数方便调用,如新增
 @Autowired
    private PlanMapper planMapper;

    //增加
    public void addPlan(Plan plan) {
        String id = plan.getId();
        String name = plan.getName();
        String overview = plan.getOverview();
        String productway = plan.getProductway();
        LocalDateTime begin = plan.getBegin();
        LocalDateTime end = plan.getEnd();
        String technology = String.join(",", plan.getTechnology());
        planMapper.insert(id, name, overview, productway, begin, end, technology);
    }
这里分别用到了dao层代码的各种get方法,实现了函数多层调用,最后用到了mapper层写的insert新增方法将新增的信息添加到数据库中,到这里后端的新增方法也就写的差不多了,但是还需要写前端的页面进行交互,
前端新增页面代码
<!DOCTYPE html>
<html lang="en">
<head>
    <meta charset="UTF-8">
    <title>新增生产计划</title>
    <style>
        body {
            font-family: Arial, sans-serif;
        }

        #root {
            margin: 20px;
        }

        h2 {
            font-size: 18px;
            margin-bottom: 10px;
        }

        label {
            display: block;
            margin-bottom: 5px;
        }

        input, select {
            width: 300px;
            padding: 5px;
            font-size: 16px;
        }

        button {
            display: block;
            margin-top: 10px;
            padding: 10px;
            background-color: #007bff;
            color: #fff;
            border: none;
            border-radius: 3px;
            cursor: pointer;
        }
    </style>
</head>
<body>
<h1 style="text-align: center">新增生产计划</h1>
<div id="root" style="border: 1px solid black">
    <h2>增加生产计划</h2>
    <form id="addForm">
        <label for="planId">计划编号:</label>
        <input type="text" id="planId" name="planId" required oninput="limitInput(this)" maxlength="10">
        <label for="planName">计划名称:</label>
        <input type="text" id="planName" name="planName" required>
        <label for="planOverview">计划概述:</label>
        <input type="number" id="planOverview" name="planOverview">
        <label>排产方式:</label>
        <div id="way">
            <label><input type="radio" name="way" value="串行排产">串行排产</label>
            <label><input type="radio" name="way" value="并行排产">并行排产</label>
            <label><input type="radio" name="way" value="串并行排产">串并行排产</label>
        </div>
        <label for="beginTime">开始时间:</label>
        <input type="datetime-local" id="beginTime" name="beginTime">
        <label for="endTime">结束时间:</label>
        <input type="datetime-local" id="endTime" name="endTime">
        <label>包含工艺:</label>
        <div id="technology">
            <label><input type="checkbox" name="technology" value="锯">锯</label>
            <label><input type="checkbox" name="technology" value="热">热</label>
            <label><input type="checkbox" name="technology" value="车">车</label>
            <label><input type="checkbox" name="technology" value="铣">铣</label>
            <label><input type="checkbox" name="technology" value="钳">钳</label>
            <label><input type="checkbox" name="technology" value="去">去</label>
            <label><input type="checkbox" name="technology" value="珩">珩</label>
            <label><input type="checkbox" name="technology" value="表镀铬">表镀铬</label>
            <label><input type="checkbox" name="technology" value="表喷砂">表喷砂</label>
            <label><input type="checkbox" name="technology" value="综检">综检</label>
            <label><input type="checkbox" name="technology" value="洗">洗</label>
            <label><input type="checkbox" name="technology" value="包">包</label>
            <label><input type="checkbox" name="technology" value="入">入</label>
            <label><input type="checkbox" name="technology" value="装">装</label>
        </div>
        <button type="submit">添加生产计划</button>
    </form>
    <div>
        <a href="index.html">
            <button>返回主界面</button>
        </a>
    </div>
</div>
</body>
<script>
    document.getElementById("addForm").addEventListener("submit", function (event) {
        event.preventDefault();
        const planId = document.getElementById("planId");
        const planName = document.getElementById("planName");
        const planOverview = document.getElementById("planOverview");
        const way = document.querySelectorAll('input[name="way"]');
        let w;

        way.forEach(radio => {
            if (radio.checked) {
                w = radio.value;
                alert(w);
            }
        });
        const begin = document.getElementById("beginTime");
        const end = document.getElementById("endTime");
        const technologies = document.querySelectorAll('input[name="technology"]:checked');
        const teList = [];
        for (const t of technologies) {
            teList.push(t.value);
        }
        fetch('plan/add',
            {
                method: 'POST',
                headers: {
                    'Content-Type': 'application/json'
                },
                body: JSON.stringify({
                    id: planId.value,
                    name: planName.value,
                    overview: planOverview.value,
                    productway: w,
                    begin: begin.value,
                    end: end.value,
                    technology: teList,
                })
            })
            .then(res => res.json())
            .then(data => {
                if (data.msg === 'success') {
                    alert("添加成功");
                    console.log(data);
                } else {
                    alert("添加失败  " + data.msg);
                }
            })
            .catch(error => {
                alert("请求失败,请重试");
                console.error(error);
            });
    });
</script>
<script>
    function limitInput(input) {
        const value = input.value;
        if (value.length > 10) {
            input.value = value.slice(0, 10);
        }
        if (value.length < 10) {
            input.setCustomValidity('计划编号前八位必须为年月份后两位为编号');
        } else {
            input.setCustomValidity('');
        }
    }
</script>
</html>
这里比较重要的是
fetch('plan/add',
            {
                method: 'POST',
                headers: {
                    'Content-Type': 'application/json'
                },
                body: JSON.stringify({
                    id: planId.value,
                    name: planName.value,
                    overview: planOverview.value,
                    productway: w,
                    begin: begin.value,
                    end: end.value,
                    technology: teList,
                })
            })
            .then(res => res.json())
            .then(data => {
                if (data.msg === 'success') {
                    alert("添加成功");
                    console.log(data);
                } else {
                    alert("添加失败  " + data.msg);
                }
            })
            .catch(error => {
                alert("请求失败,请重试");
                console.error(error);
            });
这里需要对页面上显示的数据进行一个接收并以josn的数据形式存在,以便于后端controller层进行调用时查到数据,正是后端用到了@PostMapping("/add")和 @RequestBody才能成功接受到数据,@RequestBody主要用来接收前端传递给后端的json字符串中的数据的至此一个简单的增删改查中的新增也就做好了,增删改查基本上是一个道理,换汤不换药,按照这个逻辑都可以迎刃而解。

 浙公网安备 33010602011771号