
mmdetection:在定制数据集上训练检测器
要训练新的检测器,通常需要做三件事:
1.验证新数据集
2.修改配置
3.训练新的检测器
有三种方法support MMDetection中的新数据集:
1. Reorganize the dataset into a COCO format
2. Reorganize the dataset into a middle format
3. Implement a new dataset
这里推荐前两种方法,因为它们通常比第三种更容易。
在本教程中,给出了一个将数据转换为COCO格式的示例,因为MMDetection目前只支持评估COCO格式数据集的mask AP 。其他方法和更高级的用法可以在这个链接中找到。
首先,让我们下载气球数据集。
# download and unzip the data
!wget https://github.com/matterport/Mask_RCNN/releases/download/v2.1/balloon_dataset.zip
!unzip balloon_dataset.zip > /dev/null
让我们看一下数据集图像
import mmcv
import matplotlib.pyplot as plt
img = mmcv.imread('balloon/train/10464445726_6f1e3bbe6a_k.jpg')
plt.figure(figsize=(15, 10))
plt.imshow(mmcv.bgr2rgb(img))
plt.show()
下载数据后,我们需要实现一个将注释格式转换为COCO格式的函数。然后,我们可以使用实现的COCO数据集加载数据并执行训练和评估。让我们看一下json文件。
# 检查单个图像的标签
annotation = mmcv.load('balloon/train/via_region_data.json')
# 注释是一个dict,其值如下
annotation['34020010494_e5cb88e1c4_k.jpg1115004']
根据上述观察,每个单个图像都有一个相应的注释,其中包含训练所需的key:文件名和区域。我们需要读取每个图像的注释,并将其转换为COCO格式,如下所示
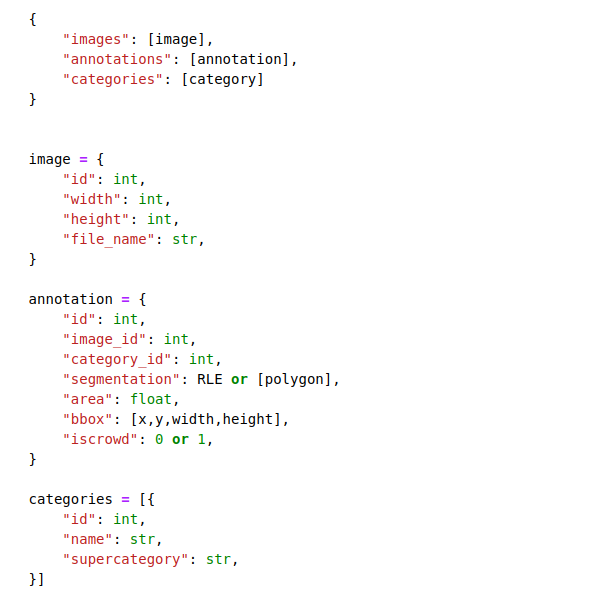
这里只列出了训练所需的关键,如上所示。有关完整的COCO格式,请点击
将注释格式的转换成coco格式
import os.path as osp

def convert_balloon_to_coco(ann_file, out_file, image_prefix):
    data_infos = mmcv.load(ann_file)
    annotations = []
    images = []
    obj_count = 0
    for idx, v in enumerate(mmcv.track_iter_progress(data_infos.values())):
        filename = v['filename']
        img_path = osp.join(image_prefix, filename)
        height, width = mmcv.imread(img_path).shape[:2]
        images.append(dict(
            id=idx,
            file_name=filename,
            height=height,
            width=width))
        bboxes = []
        labels = []
        masks = []
        for _, obj in v['regions'].items():
            assert not obj['region_attributes']
            obj = obj['shape_attributes']
            px = obj['all_points_x']
            py = obj['all_points_y']
            poly = [(x + 0.5, y + 0.5) for x, y in zip(px, py)]
            poly = [p for x in poly for p in x]
            x_min, y_min, x_max, y_max = (
                min(px), min(py), max(px), max(py))
            data_anno = dict(
                image_id=idx,
                id=obj_count,
                category_id=0,
                bbox=[x_min, y_min, x_max - x_min, y_max - y_min],
                area=(x_max - x_min) * (y_max - y_min),
                segmentation=[poly],
                iscrowd=0)
            annotations.append(data_anno)
            obj_count += 1
    coco_format_json = dict(
        images=images,
        annotations=annotations,
        categories=[{'id':0, 'name': 'balloon'}])
    mmcv.dump(coco_format_json, out_file)
将训练集和测试集分别转化转化成coco格式
convert_balloon_to_coco(
    'balloon/train/via_region_data.json',
    'balloon/train/annotation_coco.json',
    'balloon/train/')
convert_balloon_to_coco(
    'balloon/val/via_region_data.json',
    'balloon/val/annotation_coco.json',
    'balloon/val/
在下一步中,需要修改训练的配置。为了加速这一过程,使用预先训练的检测器对检测器进行微调。
from mmcv import Config
cfg = Config.fromfile('../configs/mask_rcnn/mask_rcnn_r50_caffe_fpn_mstrain-poly_1x_coco.py')
给定一个在COCO数据集上训练Mask R-CNN的配置,我们需要修改一些值以将其用于气球数据集上的训练
from mmdet.apis import set_random_seed

# Modify dataset type and path
cfg.dataset_type = 'COCODataset'

cfg.data.test.ann_file = 'balloon/val/annotation_coco.json'
cfg.data.test.img_prefix = 'balloon/val/'
cfg.data.test.classes = ('balloon',)

cfg.data.train.ann_file = 'balloon/train/annotation_coco.json'
cfg.data.train.img_prefix = 'balloon/train/'
cfg.data.train.classes = ('balloon',)

cfg.data.val.ann_file = 'balloon/val/annotation_coco.json'
cfg.data.val.img_prefix = 'balloon/val/'
cfg.data.val.classes = ('balloon',)

# modify num classes of the model in box head and mask head
cfg.model.roi_head.bbox_head.num_classes = 1
cfg.model.roi_head.mask_head.num_classes = 1

# We can still the pre-trained Mask RCNN model to obtain a higher performance
cfg.load_from = 'checkpoints/mask_rcnn_r50_caffe_fpn_mstrain-poly_3x_coco_bbox_mAP-0.408__segm_mAP-0.37_20200504_163245-42aa3d00.pth'

# Set up working dir to save files and logs.
cfg.work_dir = './tutorial_exps'

# The original learning rate (LR) is set for 8-GPU training.
# We divide it by 8 since we only use one GPU.
cfg.optimizer.lr = 0.02 / 8
cfg.lr_config.warmup = None
cfg.log_config.interval = 10

# We can set the evaluation interval to reduce the evaluation times
cfg.evaluation.interval = 12
# We can set the checkpoint saving interval to reduce the storage cost
cfg.checkpoint_config.interval = 12
cfg.device='cuda'
# Set seed thus the results are more reproducible
cfg.seed = 0
set_random_seed(0, deterministic=False)
cfg.gpu_ids = range(1)

# We can also use tensorboard to log the training process
cfg.log_config.hooks = [
    dict(type='TextLoggerHook'),
    dict(type='TensorboardLoggerHook')]

# We can initialize the logger for training and have a look
# at the final config used for training
print(f'Config:\n{cfg.pretty_text}')
最后,让我们初始化数据集和检测器,然后训练一个新的检测器
from mmdet.datasets import build_dataset
from mmdet.models import build_detector
from mmdet.apis import train_detector

# Build dataset
datasets = [build_dataset(cfg.data.train)]
# Build the detector
model = build_detector(cfg.model)
# Add an attribute for visualization convenience
model.CLASSES = datasets[0].CLASSES
# Create work_dir
mmcv.mkdir_or_exist(osp.abspath(cfg.work_dir))
train_detector(model, datasets, cfg, distributed=False, validate=True)
我们还可以检查tensorboard以查看loss和学习率的变化曲线
# load tensorboard in colab
%load_ext tensorboard
# see curves in tensorboard
%tensorboard --logdir ./tutorial_exps
测试经过训练的检测器
img = mmcv.imread('balloon/train/7178882742_f090f3ce56_k.jpg')

model.cfg = cfg
result = inference_detector(model, img)
show_result_pyplot(model, img, result)


 浙公网安备 33010602011771号