
SpringBoot学习
1.启动信息
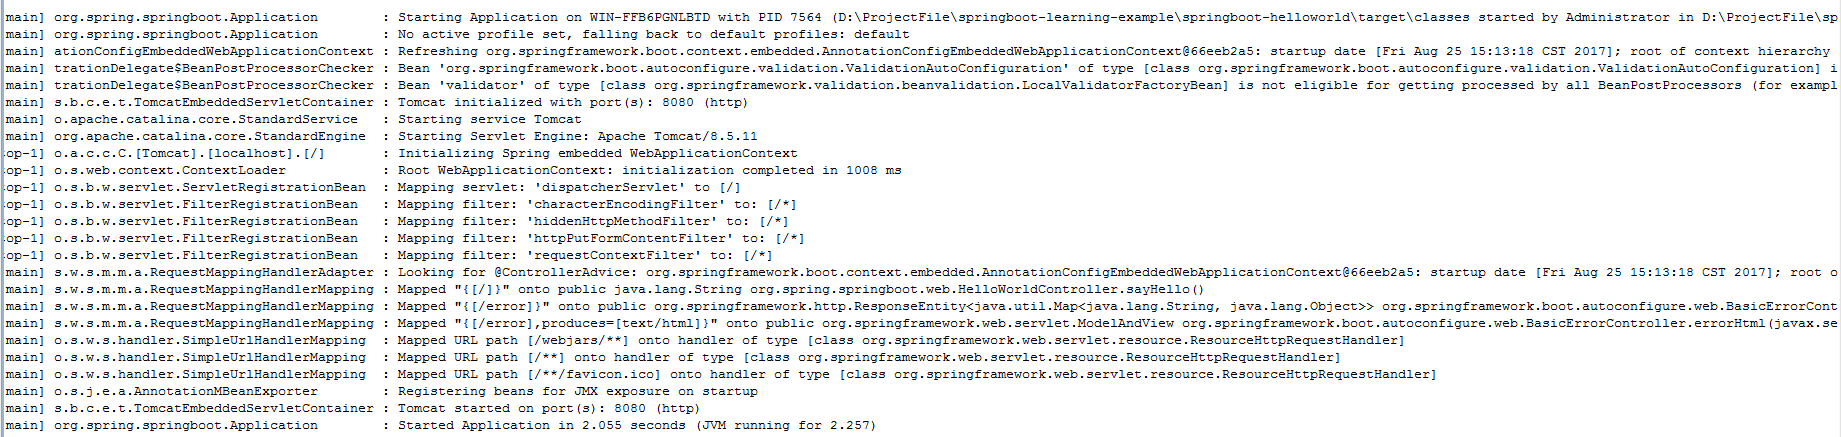
参考链接:http://www.bysocket.com/?p=1124 jdk要求1.7
2.Spring boot属性配置:http://www.bysocket.com/?p=1786
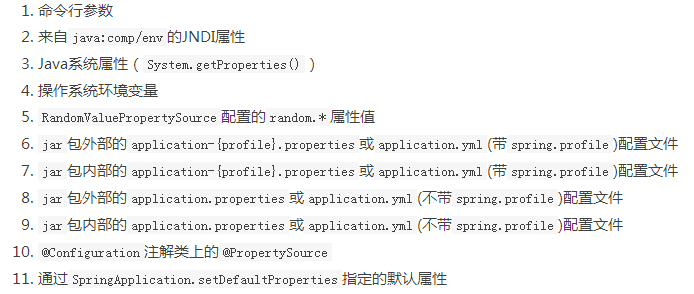
Spring Boot 不单单从 application.properties 获取配置,所以我们可以在程序中多种设置配置属性。按照以下列表的优先级排列:
1.命令行参数
2.java:comp/env 里的 JNDI 属性
3.JVM 系统属性
4.操作系统环境变量
5.RandomValuePropertySource 属性类生成的 random.* 属性
6.应用以外的 application.properties(或 yml)文件
7.打包在应用内的 application.properties(或 yml)文件
8.在应用 @Configuration 配置类中,用 @PropertySource 注解声明的属性文件
9.SpringApplication.setDefaultProperties 声明的默认属性
可见,命令行参数优先级最高。这个可以根据这个优先级,可以在测试或生产环境中快速地修改配置参数值,而不需要重新打包和部署应用。
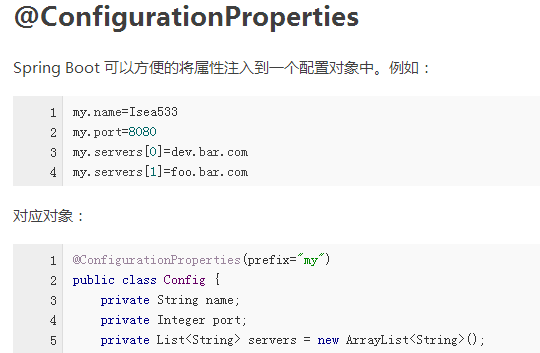
3.@ConfigurationProperties(prefix = “home”) 注解,将配置文件中以 home 前缀的属性值自动绑定到对应的字段中。同是用 @Component 作为 Bean 注入到 Spring 容器中。
注意:application.properties 配置中文值的时候,读取出来的属性值会出现乱码问题。但是 application.yml 不会出现乱码问题。因为Spring Boot 是以 iso-8859 的编码方式读取 application.properties 配置文件。
4.@Autowired是根据类型进行自动装配的,如果需要按名称进行装配,则需要搭配@Qualifier
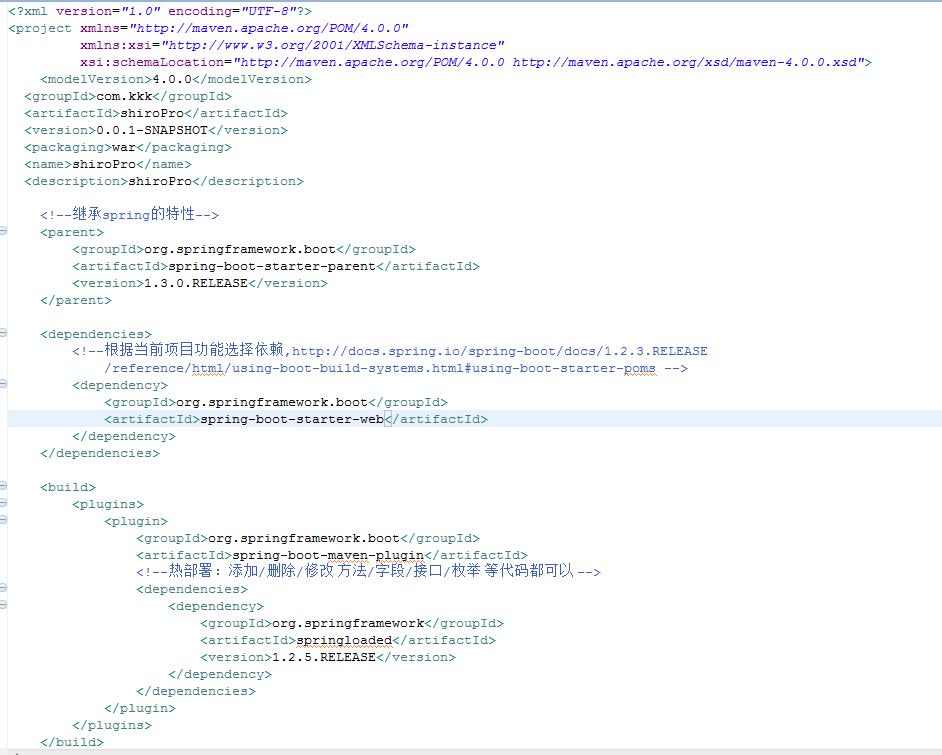
2.pom配置
2.注解解释:
@RestController :相当于同时添加@Controller和@ResponseBody注解。
@EnableAutoConfiguration :Spring Boot建议只有一个带有该注解的类,会自动根据你jar包的依赖来自动配置项目。
@EnableAutoConfiguration :Spring Boot建议只有一个带有该注解的类,会自动根据你jar包的依赖来自动配置项目。
若不想让Spring Boot自动创建,可以配置注解的exclude属性,@EnableAutoConfiguration(exclude={DataSourceAutoConfiguration.class})
@SpringBootApplication:可以替代@Configuration,@EnableAutoConfiguration,@ComponentScan三个注解
3.启动Spring Boot三种方法:
1.SpringApplication.run(Application.class, args);//返回一个
ApplicationContext对象 使用注解的时候返回的具体类型是
AnnotationConfigApplicationContext或AnnotationConfigEmbeddedWebApplicationContext,当支持web的时候是第二个。 2.SpringApplication application = new SpringApplication(Application.class);
application.run(args); 3.new SpringApplicationBuilder()
.showBanner(false)
.sources(Application.class)
.run(args);
![]()
![]()
![]() 、
、
当使用SpringMVC的时候由于需要使用子容器,就需要用到
SpringApplicationBuilder,该类有一个child(xxx...)方法可以添加子容器4.SpringBoot支持的配置方式:
5.将属性注入配置对象:
命名规范:
 、
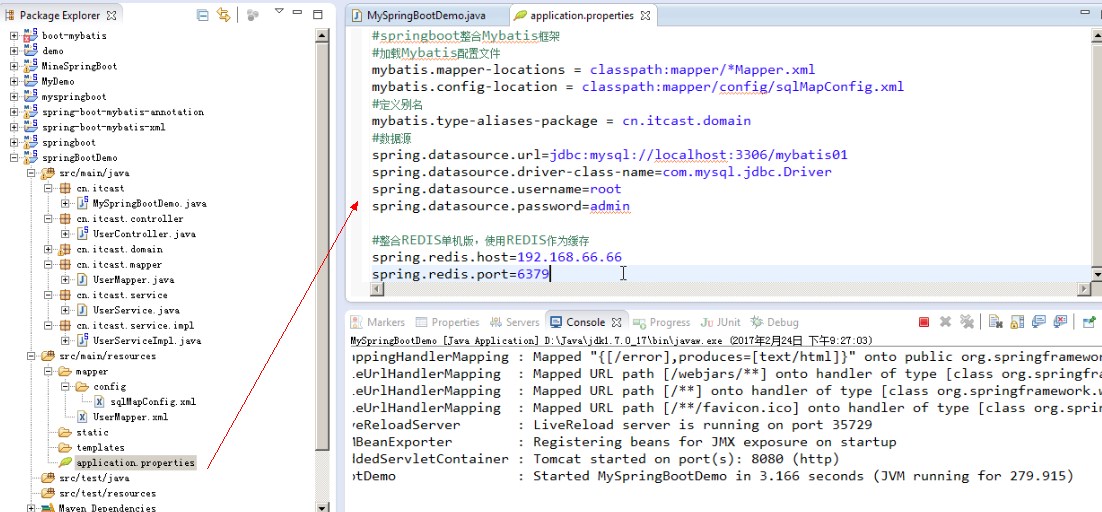
、6.集成mybatis:
mybatis:
mapperLocations: classpath:mapper/*.xmltypeAliasesPackage: tk.mapper.model
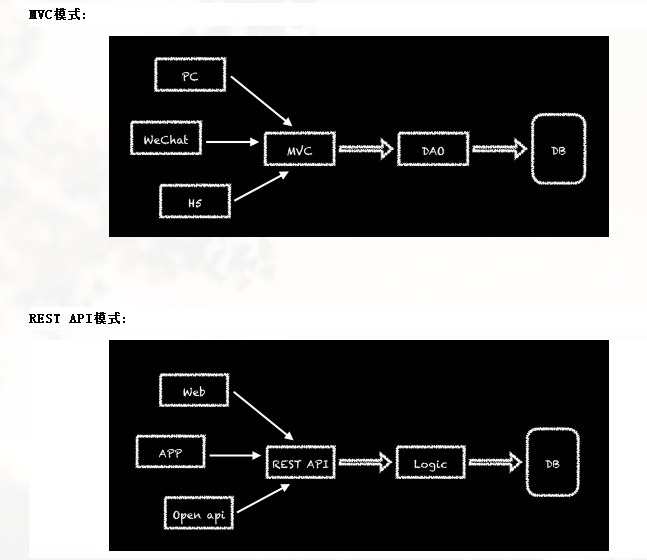
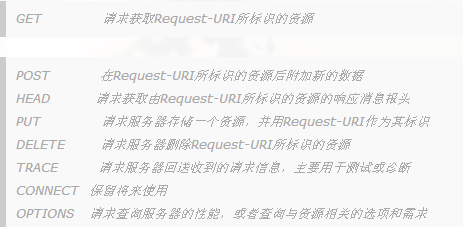
5.什么是 REST?
REST 是属于 WEB 自身的一种架构风格,是在 HTTP 1.1 规范下实现的。Representational State Transfer 全称翻译为表现层状态转化。
Resource:资源。比如 newsfeed;Representational:表现形式,比如用JSON,富文本等;State Transfer:状态变化。
6.![]()
7.freemarker配置:
spring.freemarker.allow-request-override=false # Set whether HttpServletRequest attributes are allowed to override (hide) controller generated model attributes of the same name.spring.freemarker.allow-session-override=false # Set whether HttpSession attributes are allowed to override (hide) controller generated model attributes of the same name.spring.freemarker.cache=false # Enable template caching.spring.freemarker.charset=UTF-8 # Template encoding.spring.freemarker.check-template-location=true # Check that the templates location exists.spring.freemarker.content-type=text/html # Content-Type value.spring.freemarker.enabled=true # Enable MVC view resolution for this technology.spring.freemarker.expose-request-attributes=false # Set whether all request attributes should be added to the model prior to merging with the template.spring.freemarker.expose-session-attributes=false # Set whether all HttpSession attributes should be added to the model prior to merging with the template.spring.freemarker.expose-spring-macro-helpers=true # Set whether to expose a RequestContext for use by Spring's macro library, under the name "springMacroRequestContext".spring.freemarker.prefer-file-system-access=true # Prefer file system access for template loading. File system access enables hot detection of template changes.spring.freemarker.prefix= # Prefix that gets prepended to view names when building a URL.spring.freemarker.request-context-attribute= # Name of the RequestContext attribute for all views.spring.freemarker.settings.*= # Well-known FreeMarker keys which will be passed to FreeMarker's Configuration.spring.freemarker.suffix= # Suffix that gets appended to view names when building a URL.spring.freemarker.template-loader-path=classpath:/templates/ # Comma-separated list of template paths.spring.freemarker.view-names= # White list of view names that can be resolved.
8.其他中配置:
posted on 2018-03-06 18:10 xiaojiayu0011 阅读(141) 评论(0) 收藏 举报


 浙公网安备 33010602011771号