MongoDB高可用集群配置方案
1. 集群架构(生产可用)
MongoDB机器信息
| 192.168.252.121 | 192.168.252.122 | 192.168.252.123 |
|---|---|---|
| mongos | mongos | mongos |
| config server | config server | config server |
| shard server1 主节点 | shard server1 副节点 | shard server1 仲裁 |
| shard server2 仲裁 | shard server2 主节点 | shard server2 副节点 |
| shard server3 副节点 | shard server3 仲裁 | shard server3 主节点 |
端口分配:
mongos:20000
config:21000
shard1:27001
shard2:27002
shard3:27003
Sharding分片技术
当数据量比较大的时候,我们需要把数据分片运行在不同的机器中,以降低CPU、内存和IO的压力,Sharding就是数据库分片技术。
MongoDB分片技术类似MySQL的水平切分和垂直切分,数据库主要由两种方式做Sharding:垂直扩展和横向切分。
垂直扩展的方式就是进行集群扩展,添加更多的CPU,内存,磁盘空间等。
横向切分则是通过数据分片的方式,通过集群统一提供服务:
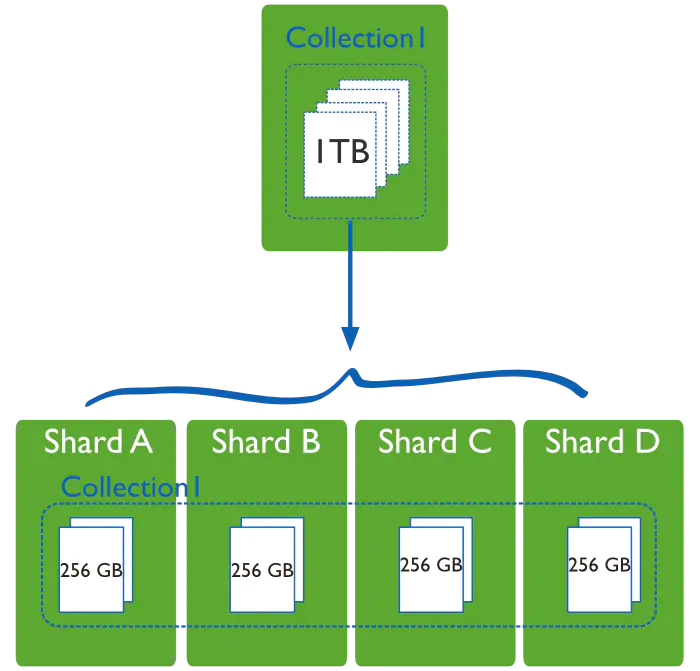
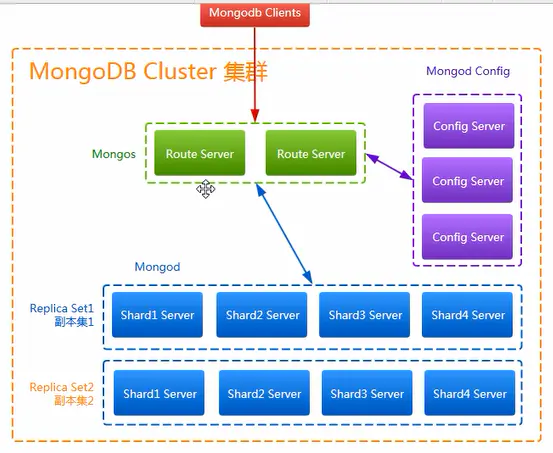
(1)MongoDB的Sharding架构
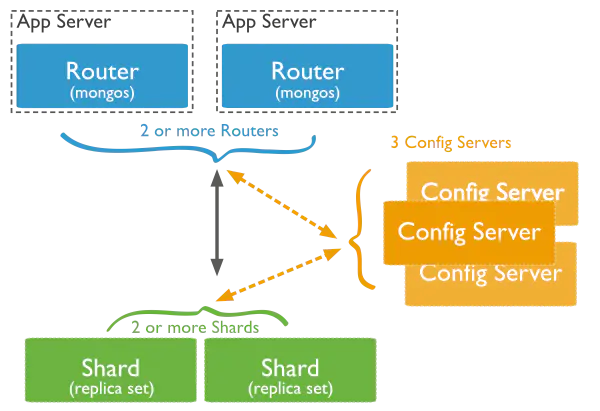
(2)MongoDB分片架构中的角色
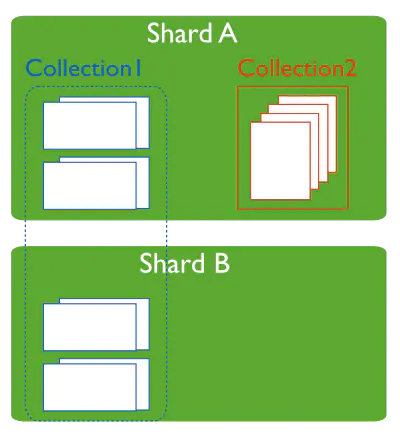
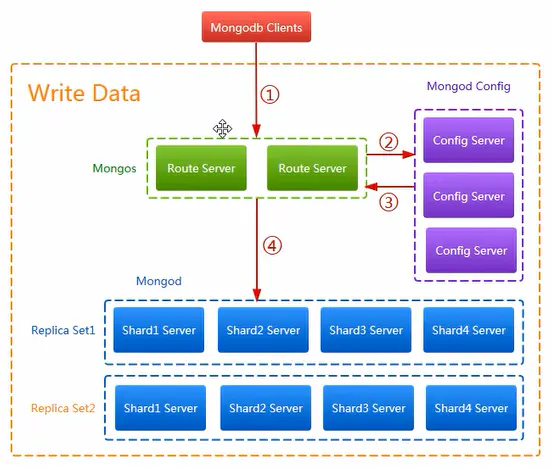
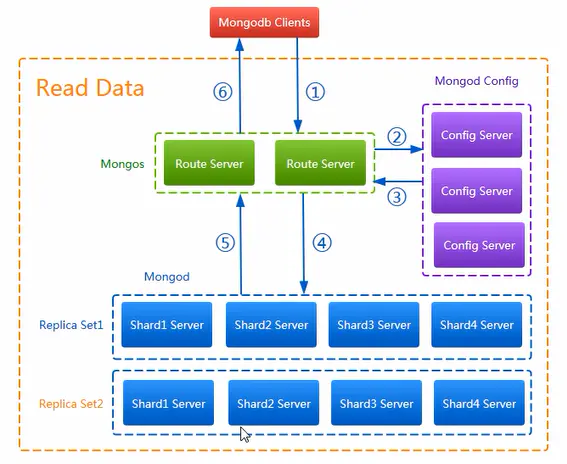
A.数据分片(Shards)
用来保存数据,保证数据的高可用性和一致性。可以是一个单独的mongod实例,也可以是一个副本集。
在生产环境下Shard一般是一个Replica Set,以防止该数据片的单点故障。所有Shard中有一个PrimaryShard,里面包含未进行划分的数据集合:
B.查询路由(Query Routers)
路由就是mongos的实例,客户端直接连接mongos,由mongos把读写请求路由到指定的Shard上去。
一个Sharding集群,可以有一个mongos,也可以有多mongos以减轻客户端请求的压力。
C.配置服务器(Config servers)
保存集群的元数据(metadata),包含各个Shard的路由规则。
Sharding分片技术(混合模式)高可用方案的大体架构图:
Sharding分片技术(混合模式)高可用方案架构下向mongodb写数据的流程图:
Sharding分片技术(混合模式)高可用方案架构下向mongodb读数据的流程图:
以下所有配置在3台服务器上都要进行配置
2. 下载安装
wget https://fastdl.mongodb.org/linux/mongodb-linux-x86_64-amazon-3.6.2.tgz
tar -xzvf mongodb-linux-x86_64-amazon-3.6.2.tgz  -C /usr/local/
所有版本二进制文件,自行下载
https://www.mongodb.org/dl/win32/x86_64-2008plus-ssl?_ga=2.87139544.1567998244.1517190032-1153843332.1517190032&_gac=1.204211492.1517212002.EAIaIQobChMI44v9_9b82AIV1AcqCh0lcABIEAAYASAAEgKI1_D_BwE
改名
cd /usr/local/
mv  mongodb-linux-x86_64-amazon-3.6.2 mongodb
分别在每台机器建立conf、mongos、config、shard1、shard2、shard3六个目录,因为mongos不存储数据,只需要建立日志文件目录即可。
mkdir -p /usr/local/mongodb/conf \
mkdir -p /usr/local/mongodb/mongos/log \
mkdir -p /usr/local/mongodb/config/data \
mkdir -p /usr/local/mongodb/config/log \
mkdir -p /usr/local/mongodb/shard1/data \
mkdir -p /usr/local/mongodb/shard1/log \
mkdir -p /usr/local/mongodb/shard2/data \
mkdir -p /usr/local/mongodb/shard2/log \
mkdir -p /usr/local/mongodb/shard3/data \
mkdir -p /usr/local/mongodb/shard3/log
配置环境变量
vi /etc/profile
# MongoDB 环境变量内容
export MONGODB_HOME=/usr/local/mongodb
export PATH=$MONGODB_HOME/bin:$PATH
使立即生效
source /etc/profile
3. 配置config server服务器
mongodb3.4以后要求配置服务器也创建副本集,不然集群搭建不成功。
添加配置文件
vi /usr/local/mongodb/conf/config.conf

## 配置文件内容
pidfilepath = /usr/local/mongodb/config/log/configsrv.pid
dbpath = /usr/local/mongodb/config/data
logpath = /usr/local/mongodb/config/log/congigsrv.log
logappend = true

bind_ip = 0.0.0.0
port = 21000
fork = true

#declare this is a config db of a cluster;
configsvr = true

#副本集名称
replSet = configs

#设置最大连接数
maxConns = 20000
启动三台服务器的config server
mongod -f /usr/local/mongodb/conf/config.conf
登录任意一台配置服务器,初始化配置副本集
连接 MongoDB
mongo --port 21000
config 变量
config = {
    _id : "configs",
    members : [
    {_id : 0, host : "192.168.252.121:21000" },
    {_id : 1, host : "192.168.252.122:21000" },
    {_id : 2, host : "192.168.252.123:21000" }
    ]
}
初始化副本集
rs.initiate(config)
其中,"_id" : "configs"应与配置文件中配置的 replicaction.replSetName 一致,"members" 中的 "host" 为三个节点的 ip 和 port
响应内容如下
> config = {
... _id : "configs",
... members : [
... {_id : 0, host : "192.168.252.121:21000" },
... {_id : 1, host : "192.168.252.122:21000" },
... {_id : 2, host : "192.168.252.123:21000" }
... ]
... }
{
    "_id" : "configs",
    "members" : [
        {
            "_id" : 0,
            "host" : "192.168.252.121:21000"
        },
        {
            "_id" : 1,
            "host" : "192.168.252.122:21000"
        },
        {
            "_id" : 2,
            "host" : "192.168.252.123:21000"
        }
    ]
}
> rs.initiate(config);
{
    "ok" : 1,
    "operationTime" : Timestamp(1517369899, 1),
    "$gleStats" : {
        "lastOpTime" : Timestamp(1517369899, 1),
        "electionId" : ObjectId("000000000000000000000000")
    },
    "$clusterTime" : {
        "clusterTime" : Timestamp(1517369899, 1),
        "signature" : {
            "hash" : BinData(0,"AAAAAAAAAAAAAAAAAAAAAAAAAAA="),
            "keyId" : NumberLong(0)
        }
    }
}
configs:SECONDARY>
此时会发现终端上的输出已经有了变化。
//从单个一个
>
//变成了
configs:SECONDARY>
查询状态
configs:SECONDARY> rs.status()
4. 配置分片副本集
第一分片副本集
配置文件
vi /usr/local/mongodb/conf/shard1.conf

#配置文件内容
#——————————————–
pidfilepath = /usr/local/mongodb/shard1/log/shard1.pid
dbpath = /usr/local/mongodb/shard1/data
logpath = /usr/local/mongodb/shard1/log/shard1.log
logappend = true

bind_ip = 0.0.0.0
port = 27001
fork = true

#副本集名称
replSet = shard1

#declare this is a shard db of a cluster;
shardsvr = true

#设置最大连接数
maxConns = 20000
启动三台服务器的shard1 server
mongod -f /usr/local/mongodb/conf/shard1.conf
登陆任意一台服务器,初始化副本集(除了192.168.252.123)
连接 MongoDB
mongo --port 27001
使用admin数据库
use admin
定义副本集配置
config = {
    _id : "shard1",
     members : [
         {_id : 0, host : "192.168.252.121:27001" },
         {_id : 1, host : "192.168.252.122:27001" },
         {_id : 2, host : "192.168.252.123:27001" , arbiterOnly: true }
     ]
 }
初始化副本集配置
rs.initiate(config)
响应内容如下
> use admin
switched to db admin
> config = {
...     _id : "shard1",
...      members : [
...          {_id : 0, host : "192.168.252.121:27001" },
...          {_id : 1, host : "192.168.252.122:27001" },
...          {_id : 2, host : "192.168.252.123:27001" , arbiterOnly: true }
...      ]
...  }
{
    "_id" : "shard1",
    "members" : [
        {
            "_id" : 0,
            "host" : "192.168.252.121:27001"
        },
        {
            "_id" : 1,
            "host" : "192.168.252.122:27001"
        },
        {
            "_id" : 2,
            "host" : "192.168.252.123:27001",
            "arbiterOnly" : true
        }
    ]
}
> rs.initiate(config)
{ "ok" : 1 }
此时会发现终端上的输出已经有了变化。
//从单个一个
>
//变成了
shard1:SECONDARY>
查询状态
shard1:SECONDARY> rs.status()
第二分片副本集
配置文件
vi /usr/local/mongodb/conf/shard2.conf

#配置文件内容
#——————————————–
pidfilepath = /usr/local/mongodb/shard2/log/shard2.pid
dbpath = /usr/local/mongodb/shard2/data
logpath = /usr/local/mongodb/shard2/log/shard2.log
logappend = true

bind_ip = 0.0.0.0
port = 27002
fork = true

#副本集名称
replSet=shard2

#declare this is a shard db of a cluster;
shardsvr = true

#设置最大连接数
maxConns=20000
启动三台服务器的shard2 server
mongod -f /usr/local/mongodb/conf/shard2.conf
连接 MongoDB
mongo --port 27002
使用admin数据库
use admin
定义副本集配置
config = {
    _id : "shard2",
     members : [
         {_id : 0, host : "192.168.252.121:27002"  , arbiterOnly: true },
         {_id : 1, host : "192.168.252.122:27002" },
         {_id : 2, host : "192.168.252.123:27002" }
     ]
 }
初始化副本集配置
rs.initiate(config)
响应内容如下
> use admin
switched to db admin
> config = {
...     _id : "shard2",
...      members : [
...          {_id : 0, host : "192.168.252.121:27002"  , arbiterOnly: true },
...          {_id : 1, host : "192.168.252.122:27002" },
...          {_id : 2, host : "192.168.252.123:27002" }
...      ]
...  }
{
    "_id" : "shard2",
    "members" : [
        {
            "_id" : 0,
            "host" : "192.168.252.121:27002",
            "arbiterOnly" : true
        },
        {
            "_id" : 1,
            "host" : "192.168.252.122:27002"
        },
        {
            "_id" : 2,
            "host" : "192.168.252.123:27002"
        }
    ]
}
> rs.initiate(config)
{ "ok" : 1 }
shard2:SECONDARY> rs.status()
第三分片副本集
vi /usr/local/mongodb/conf/shard3.conf

#配置文件内容
#——————————————–
pidfilepath = /usr/local/mongodb/shard3/log/shard3.pid
dbpath = /usr/local/mongodb/shard3/data
logpath = /usr/local/mongodb/shard3/log/shard3.log
logappend = true

bind_ip = 0.0.0.0
port = 27003
fork = true

#副本集名称
replSet=shard3

#declare this is a shard db of a cluster;
shardsvr = true

#设置最大连接数
maxConns=20000
启动三台服务器的shard3 server
mongod -f /usr/local/mongodb/conf/shard3.conf
登陆任意一台服务器,初始化副本集(除了192.168.252.121)
mongo --port 27003
使用admin数据库
use admin
定义副本集配置
config = {
    _id : "shard3",
     members : [
         {_id : 0, host : "192.168.252.121:27003" },
         {_id : 1, host : "192.168.252.122:27003" , arbiterOnly: true},
         {_id : 2, host : "192.168.252.123:27003" }
     ]
 }
初始化副本集配置
rs.initiate(config)
响应内容如下
> use admin
switched to db admin
> config = {
...     _id : "shard3",
...      members : [
...          {_id : 0, host : "192.168.252.121:27003" },
...          {_id : 1, host : "192.168.252.122:27003" , arbiterOnly: true},
...          {_id : 2, host : "192.168.252.123:27003" }
...      ]
...  }
{
    "_id" : "shard3",
    "members" : [
        {
            "_id" : 0,
            "host" : "192.168.252.121:27003"
        },
        {
            "_id" : 1,
            "host" : "192.168.252.122:27003",
            "arbiterOnly" : true
        },
        {
            "_id" : 2,
            "host" : "192.168.252.123:27003"
        }
    ]
}
> rs.initiate(config)
{ "ok" : 1 }
shard3:SECONDARY> rs.status()
5. 配置mongos路由服务器
(三台机器)先启动配置服务器和分片服务器,后启动路由实例启动路由实例:
vi /usr/local/mongodb/conf/mongos.conf

#内容
pidfilepath = /usr/local/mongodb/mongos/log/mongos.pid
logpath = /usr/local/mongodb/mongos/log/mongos.log
logappend = true

bind_ip = 0.0.0.0
port = 20000
fork = true

#监听的配置服务器,只能有1个或者3个 configs为配置服务器的副本集名字
configdb = configs/192.168.252.121:21000,192.168.252.122:21000,192.168.252.123:21000

#设置最大连接数
maxConns = 20000
启动三台服务器的mongos server
mongos -f /usr/local/mongodb/conf/mongos.conf
串联路由服务器
目前搭建了mongodb配置服务器、路由服务器,各个分片服务器,不过应用程序连接到mongos路由服务器并不能使用分片机制,还需要在程序里设置分片配置,让分片生效。
登陆任意一台mongos
mongo --port 20000
使用admin数据库
use admin
串联路由服务器与分配副本集
sh.addShard("shard1/192.168.252.121:27001,192.168.252.122:27001,192.168.252.123:27001");
sh.addShard("shard2/192.168.252.121:27002,192.168.252.122:27002,192.168.252.123:27002");
sh.addShard("shard3/192.168.252.121:27003,192.168.252.122:27003,192.168.252.123:27003");
查看集群状态
sh.status()
响应内容如下
mongos> sh.status()
--- Sharding Status ---
  sharding version: {
    "_id" : 1,
    "minCompatibleVersion" : 5,
    "currentVersion" : 6,
    "clusterId" : ObjectId("5a713a37d56e076f3eb47acf")
  }
  shards:
        {  "_id" : "shard1",  "host" : "shard1/192.168.252.121:27001,192.168.252.122:27001",  "state" : 1 }
        {  "_id" : "shard2",  "host" : "shard2/192.168.252.122:27002,192.168.252.123:27002",  "state" : 1 }
        {  "_id" : "shard3",  "host" : "shard3/192.168.252.121:27003,192.168.252.123:27003",  "state" : 1 }
  active mongoses:
        "3.6.2" : 3
  autosplit:
        Currently enabled: yes
  balancer:
        Currently enabled:  yes
        Currently running:  no
        Failed balancer rounds in last 5 attempts:  0
        Migration Results for the last 24 hours:
                No recent migrations
  databases:
        {  "_id" : "config",  "primary" : "config",  "partitioned" : true }

mongos>
启用集合分片生效
目前配置服务、路由服务、分片服务、副本集服务都已经串联起来了,但我们的目的是希望插入数据,数据能够自动分片。连接在mongos上,准备让指定的数据库、指定的集合分片生效。
登陆任意一台mongos
mongo --port 20000
使用admin数据库
use admin
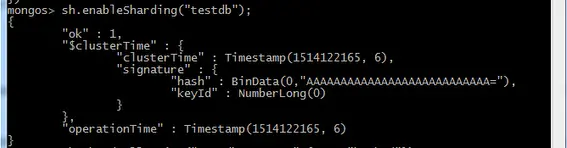
指定testdb分片生效,如下图:
db.runCommand( { enablesharding :"testdb"});

或

mongos> sh.enablesharding("testdb")
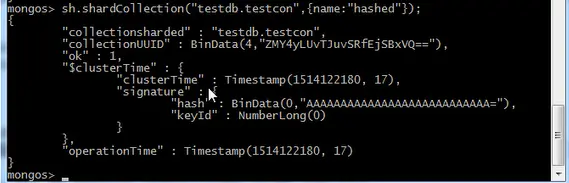
指定数据库里需要分片的集合和片键,哈希name分片,如下图:
db.runCommand( { shardcollection : "testdb.table1",key : {"name": "hashed"} } );

或

mongos> sh.shardcollection("testdb.table1", {"name": "hashed"})
通过命令查看mongodb路由服务器上的shards集合会有数据展示,如下图:
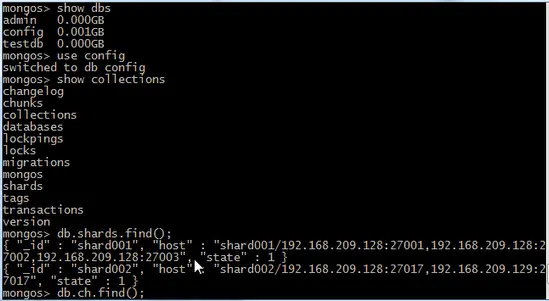
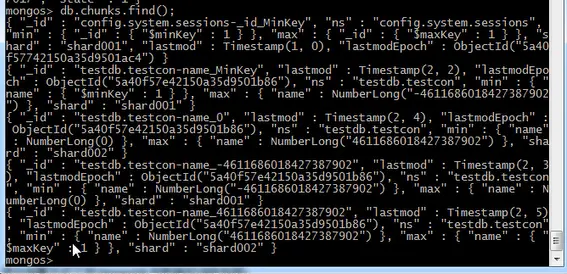
通过命令查看mongodb路由服务器上的chunks集合会有数据展示,如下图:
我们设置testdb的 table1 表需要分片,根据 id 或name自动分片到 shard1 ,shard2,shard3 上面去。要这样设置是因为不是所有mongodb 的数据库和表 都需要分片!
测试分片配置结果
连接 MongoDB 路由服务
mongo 127.0.0.1:20000
切换到 testdb 数据库
use testdb;
插入测试数据
for(i=1;i<=100000;i++){db.table1.insert({"id":i,"name":"penglei"})};
总条数
db.table1.aggregate([{$group : {_id : "$name", totle : {$sum : 1}}}])
查看分片情况如下
-
shard1: "count": 33755
-
shard2: "count": 33143,
-
shard3: "count": 33102
结论数据基本均匀
db.table1.stats();
mongos> db.table1.stats();
{
    "sharded": true,
    "capped": false,
    "ns": "testdb.table1",
    "count": 100000,
    "size": 5200000,
    "storageSize": 1519616,
    "totalIndexSize": 3530752,
    "indexSizes": {
        "_id_": 892928,
        "id_hashed": 2637824
    },
    "avgObjSize": 52,
    "nindexes": 2,
    "nchunks": 6,
    "shards": {
        "shard1": {
            "ns": "testdb.table1",
            "size": 1755260,
            "count": 33755,
            "avgObjSize": 52,
            "storageSize": 532480,
            "capped": false,
            "wiredTiger": {
            ...省略很多
            }
        },
        "shard2": {
            "ns": "testdb.table1",
            "size": 1723436,
            "count": 33143,
            "avgObjSize": 52,
            "storageSize": 479232,
            "capped": false,
            "wiredTiger": {
            ...省略很多
            }
        },
        "shard3": {
            "ns": "testdb.table1",
            "size": 1721304,
            "count": 33102,
            "avgObjSize": 52,
            "storageSize": 507904,
            "capped": false,
            "wiredTiger": {
            ...省略很多
            }
        }
    },
    "ok": 1,
    "$clusterTime": {
        "clusterTime": Timestamp(1517488062, 350),
        "signature": {
            "hash": BinData(0, "AAAAAAAAAAAAAAAAAAAAAAAAAAA="),
            "keyId": NumberLong(0)
        }
    },
    "operationTime": Timestamp(1517488062, 350)
}
mongos>
分组查看总数量是:100000
mongos> db.table1.aggregate([{$group : {_id : "$name", totle : {$sum : 1}}}])
{ "_id" : "penglei", "totle" : 100000 }
mongos>
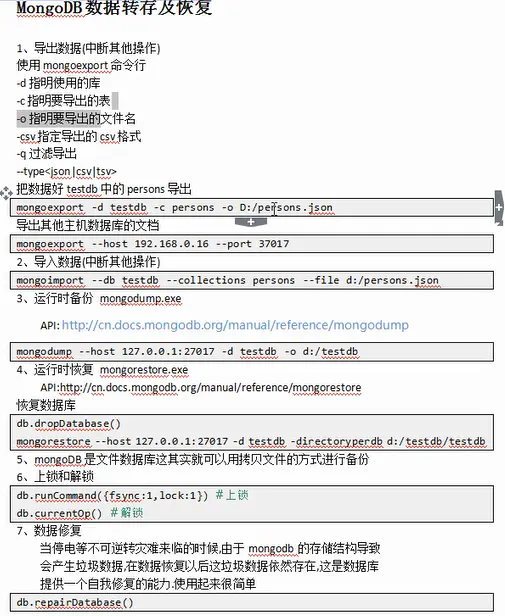
6. 后期运维
参考
手把手教你 MongoDB 的安装与详细使用(一)
http://www.ymq.io/2018/01/26/MongoDB-1/
手把手教你 MongoDB 的安装与详细使用(二)
http://www.ymq.io/2018/01/29/MongoDB-2/
创建索引
db.table1.createIndex({"name":1})
db.table1.getIndexes()


7. 启动说明
mongodb的启动顺序是,先启动配置服务器,在启动分片,最后启动mongos.
mongod -f /usr/local/mongodb/conf/config.conf
mongod -f /usr/local/mongodb/conf/shard1.conf
mongod -f /usr/local/mongodb/conf/shard2.conf
mongod -f /usr/local/mongodb/conf/shard3.conf
mongod -f /usr/local/mongodb/conf/mongos.conf
启动报错
about to fork child process, waiting until server is ready for connections.
forked process: 1303
child process started successfully, parent exiting
[root@node1 ~]# mongod -f /usr/local/mongodb/conf/shard1.conf
about to fork child process, waiting until server is ready for connections.
forked process: 1384
删除 mongod.lock
cd /usr/local/mongodb/shard1/data
rm -rf mongod.lock
关闭
#debian、ubuntu系统下:

apt-get install psmisc

#centos或、rhel系统下:

yum install psmisc
关闭时,直接killall杀掉所有进程
killall mongod
killall mongos
参考:
https://www.cnblogs.com/binyue/p/5901328.html
Runoob 教程:http://www.runoob.com/mongodb/mongodb-tutorial.html
MongoDB 官网地址:https://www.mongodb.com
MongoDB 官方英文文档:https://docs.mongodb.com/manual
MongoDB 各平台下载地址:https://www.mongodb.com/download-center#community
MongoDB 安装 https://docs.mongodb.com/manual/tutorial/install-mongodb-enterprise-on-ubuntu
mongodb高可用具体配置参考:
Mongodb主从复制 及 副本集+分片集群梳理:
https://www.cnblogs.com/nulige/p/7613721.html
搭建 MongoDB分片(sharding) / 分区 / 集群环境:https://www.jianshu.com/p/66e7ba201545

 浙公网安备 33010602011771号