rabbitmq监控之消息确认ack
一直以来,学习rabbitmq都是跟着各种各样的教程、博客、视频和文档,撸起袖子就是干!!!最后,也成功了。
当然,成功的标志也仅仅是生产者发送了消息,消费者消费了消息 。
。
真正在实际项目中,一旦出问题,需要分析问题的时候,仅仅了解这些是不够的。
老祖宗说过:实践,是检验真理的唯一标准。所以,研究分析一下消息确认模式ack的整个过程,到底怎么回事
一、测试环境
使用springboot环境:
- 一个Fanout交换机
fanout.exchange - 两个队列:
fanout.queue1和fanout.queue2
pom依赖:
<!-- 添加springboot对amqp的支持 -->
<dependency>
	<groupId>org.springframework.boot</groupId>
	<artifactId>spring-boot-starter-amqp</artifactId>
</dependency>
application配置:
# RabbitMQ 基本配置
spring.rabbitmq.host=192.168.183.220
spring.rabbitmq.port=5672
spring.rabbitmq.username=guest
spring.rabbitmq.password=guest

## 生产端配置
# 开启发布确认,就是confirm模式. 消费端ack应答后,才将消息从队列中删除
spring.rabbitmq.publisher-confirms=true
# 发布返回
spring.rabbitmq.publisher-returns=true

## 消费端配置
# 手动ack
spring.rabbitmq.listener.simple.acknowledge-mode=manual
# 消费者最小数量
spring.rabbitmq.listener.simple.concurrency=1
# 消费者最大数量
spring.rabbitmq.listener.simple.max-concurrency=10
# 在单个请求中处理的消息个数,他应该大于等于事务数量(unack的最大数量)
spring.rabbitmq.listener.simple.prefetch=1

## 模板配置
#设置为 true 后 消费者在消息没有被路由到合适队列情况下会被return监听,而不会自动删除
spring.rabbitmq.template.mandatory=true
RabbitConfig.java
import org.slf4j.Logger;
import org.slf4j.LoggerFactory;

import org.springframework.amqp.core.*;
import org.springframework.amqp.rabbit.connection.ConnectionFactory;
import org.springframework.amqp.rabbit.core.RabbitTemplate;
import org.springframework.beans.factory.annotation.Qualifier;
import org.springframework.context.annotation.Bean;
import org.springframework.context.annotation.Configuration;

@Configuration
public class RabbitConfig {

    private static final Logger log= LoggerFactory.getLogger(RabbitConfig.class);

    @Bean
    public Queue queue() {
        return new Queue("queue");
    }

    @Bean(name = "FQ1")
    public Queue fanoutQueue1() {
        return new Queue("fanout.queue1");
    }

    @Bean(name = "FQ2")
    public Queue fanoutQueue2() {
        return new Queue("fanout.queue2");
    }

    @Bean
    public FanoutExchange fanoutExchange() {
        return new FanoutExchange("fanout.exchange");
    }

    @Bean
    public Binding bindingFQ1(@Qualifier("FQ1") Queue queue, FanoutExchange exchange){
        return BindingBuilder.bind(queue).to(exchange);
    }

    @Bean
    public Binding bindingFQ2(@Qualifier("FQ2") Queue queue, FanoutExchange exchange){
        return BindingBuilder.bind(queue).to(exchange);
    }

    /**
     * 定制化amqp模版
     *
     * ConfirmCallback接口用于ack回调   即消息发送到exchange  ack
     * ReturnCallback接口用于消息发送失败回调  即消息发送不到任何一个队列中  ack
     */
    @Bean
    public RabbitTemplate rabbitTemplate(ConnectionFactory connectionFactory) {
        RabbitTemplate rabbitTemplate = new RabbitTemplate(connectionFactory);

        // 消息返回, 需要配置 publisher-returns: true
        rabbitTemplate.setReturnCallback((message, replyCode, replyText, exchange, routingKey) -> {
            String correlationId = message.getMessageProperties().getCorrelationId();
            log.debug("消息:{} 发送失败, 应答码:{} 原因:{} 交换机: {}  路由键: {}", correlationId, replyCode, replyText, exchange, routingKey);
        });

        // 消息确认, 需要配置 publisher-confirms: true
        rabbitTemplate.setConfirmCallback((correlationData, ack, cause) -> {
            if (ack) {
//                 log.debug("消息发送到exchange成功,id: {}", correlationData.getId());
                 log.debug("消息发送到exchange成功");
            } else {
                log.debug("消息发送到exchange失败,原因: {}", cause);
            }
        });
        return rabbitTemplate;
    }
}
HelloSender.java
import org.springframework.amqp.core.AmqpTemplate;
import org.springframework.beans.factory.annotation.Autowired;
import org.springframework.stereotype.Component;

@Component
public class HelloSender {
    @Autowired
    private AmqpTemplate template;

    public void sendAck(String msg) {
        template.convertAndSend("fanout.exchange","",msg);
    }

}
HelloReceive.java
import com.rabbitmq.client.Channel;
import org.springframework.amqp.core.Message;
import org.springframework.amqp.rabbit.annotation.RabbitListener;
import org.springframework.stereotype.Component;
import java.io.IOException;

@Component
public class HelloReceive {

    //手动确认消息
    @RabbitListener(queues = "fanout.queue1")
    public void FQ1(Message message, Channel channel) throws IOException {
        // 采用手动应答模式, 手动确认应答更为安全稳定
        System.out.println("FQ1:" + new String(message.getBody()));
        // 第一个参数是消息标识, 第二个是批量确认; false当前消息确认, true此次之前的消息确认
        channel.basicAck(message.getMessageProperties().getDeliveryTag(), false);
    }

    // 不确认消息,消息会重回队列
    @RabbitListener(queues = "fanout.queue2")
    public void FQ2(String str) {
        System.out.println("FQ2:" + str);
    }

}
单元测试
import com.lyf.springboot.SpringbootApplication;
import com.lyf.springboot.rabbitmq.HelloSender;
import org.junit.Test;
import org.junit.runner.RunWith;
import org.springframework.beans.factory.annotation.Autowired;
import org.springframework.boot.test.context.SpringBootTest;
import org.springframework.test.context.junit4.SpringJUnit4ClassRunner;

// SpringbootApplication Springboo启动类
@SpringBootTest(classes= SpringbootApplication.class)
@RunWith(SpringJUnit4ClassRunner.class)
public class TestRabbitMQ {

    @Autowired
    private HelloSender helloSender;

    @Test
    public void testRabbit2() {
        for (int i = 0; i < 10; i++) {
            helloSender.sendAck("haha~"+i);
            try {
                Thread.sleep(1000);
            } catch (InterruptedException e) {
                e.printStackTrace();
            }
        }
    }
}
二、启动测试
在确认消息的地方加上断点,方便查看消息确认的过程。

断点
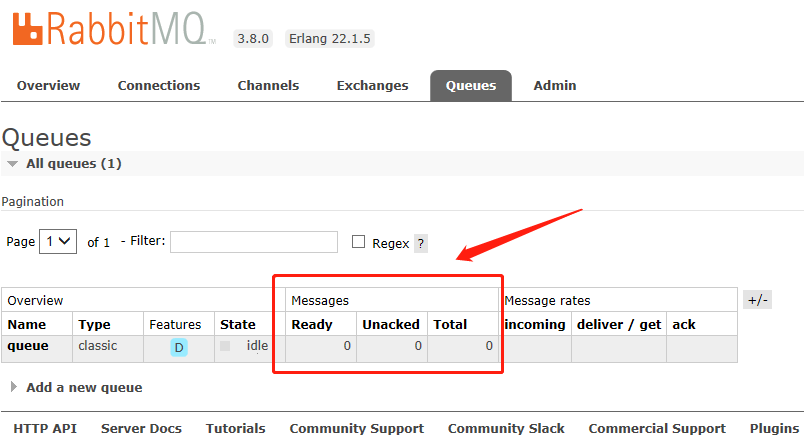
rabbitmq后台管理界面:

监控平台
Message
- Ready: 队列中等待消费的消息
- Unacked:队列中等待被确认的消息(此时消息已到达消费者,但是未被确认)
- Total:队列中消息总数
启动测试

第一次
一开始两个队列都收到了1条消息,因为开启了confirm模式,所以Message的Unacked状态都为1,Total为1。

第二次
收到第2条消息后,队列queue1执行了ack确认,所以队列中只有1条消息,1条消息等待被确认;队列queue2没有被ack确认,所以Ready=1,Unacked=1,Total=2。

第十次
收到第10条消息后,队列queue1依然是Ready=0,Unacked=1,Total=1;而队列queue2一直没有被ack确认,所以Ready=9,Unacked=1,Total=10。

最终结果
消息发送完后,队列queue1已经没有消息了,队列queue2还有10条等待被消费的消息。默认未被ack的消息重回队列中。
spring.rabbitmq.listener.simple.default-requeue-rejected=true
参考文档:
- SpringBoot 整合 RabbitMQ https://www.cnblogs.com/haixiang/p/10959551.html
- springboot整合rabbitmq,支持消息确认机制 https://www.cnblogs.com/milicool/p/9662447.html
- Spring Boot + RabbitMQ 配置参数解释 https://www.cnblogs.com/qts-hope/p/11242559.html
- RabbitMQ入门教程(十二):消息确认Ack https://blog.csdn.net/vbirdbest/article/details/78699913


 浙公网安备 33010602011771号