Python Windows 快捷键自动给剪贴板(复制)图片添加水印
 编写一个能在windows上使用的按下快捷键自动给剪贴板(复制)的图片添加水印的小工具。plyer、PIL、pyinstaller、pynput、win32clipboard库。记录自己踩过的坑,部分代码的理解。
本文章是第一次更新,更新于 2022年3月28日
准备工作😀
方案设想
方案设想来自2019年的文章 使用 Python 对接 PicGo,实现自动添加水印并上传 (写代码的明哥)
此方案部分代码已过时,由于pyclipboard库不支持windows,遂做出修改。编写一个能在windows上使用的剪贴板图片自动加水印工具,即按下快捷键自动给剪贴板(复制)的图片添加水印。 改动如下
- 使用最新的
Pynput全局快捷键监听器 - 使用
win32clipboard对windows剪贴板进行操作 - 使用
plyer进行windows弹窗通知 - 使用
pyinstaller进行exe包装 - 其他细节上的改动
PS:我踩了很多坑,这些坑都被记录下来,帮你们填完。
官方文档
下面是我参考过的文档
- https://pynput.readthedocs.io/en/latest/index.html
- https://plyer.readthedocs.io/en/latest/#plyer.facades.Notification
- https://pillow.readthedocs.io/en/stable/reference/ImageFont.html
- https://pillow.readthedocs.io/en/stable/reference/ImageDraw.html
- https://pillow.readthedocs.io/en/stable/handbook/text-anchors.html#text-anchors
- https://pillow.readthedocs.io/en/stable/reference/ImageGrab.html
- https://docs.microsoft.com/en-us/windows/win32/dataxchg/standard-clipboard-formats
- https://pyinstaller.readthedocs.io/en/stable/
资料下载

如果文章字体过小,请调整浏览器页面缩放。Windows: Ctrl + 鼠标滚轮
本篇文章代码注释使用了 vscode 的 better-comments 拓展
软件效果
原图片
修改后
按下快捷键后,你可以看到四层水印,分别在左上,左下,中间,右下。

开发过程
功能分割
我将程序分为了三个部分,通知处理模块Notify.py,图片处理模块Image.py,键盘监听模块Work.py
notify.py
具体功能
用于右下角的系统通知
Plyer
-
Install the
plyermodule withpip.pip install plyer -
plyercomes with a class callednotification, which helps us create a notification. Import it like this:from plyer import notification -
For Example
#import notification from plyer module 导入 player 里的 notification 方法
from plyer import notification
#import time 导入时间库
import time

#Use while loop to create notifications indefinetly 死循环
while(True):
    #notification 进行系统提示
    notification.notify(
        title = "Reminder to take a break",
        message = '''Drink water, take a walk''',
        timeout = 60
    )
    #System pause the execution of this programm for 60 minutes 每60分钟执行一次
    time.sleep(60*60)
Windows有效的可选参数:

title (str): 显示通知标题

message (str): 显示通知信息

app_icon (str): 显示通知图标,注意windows只能使用ico

timeout (int): 通知显示时间
notify.py
对notification进行简单封装
from plyer import notification
import os
import random
import sys

path = os.path.dirname(__file__)

appname = "自动水印"

def resource_path(relative_path):
    """ Get absolute path to resource, works for dev and for PyInstaller """
    try:
        # PyInstaller creates a temp folder and stores path in _MEIPASS
        base_path = sys._MEIPASS
    except Exception:
        base_path = os.path.abspath(".")

    return os.path.join(base_path, relative_path)


def notify(title, message, icon):
    notification.notify(
        title=title,
        message=message,
        app_name=appname,
        app_icon=resource_path('{}.ico'.format(icon)),
        timeout=2
    )
代码当中有一个 resource_path方法,这个是取当前文件夹路径,是为了打包成exe之后能够使用依赖资源,因为使用的不是exe当前的目录,而是temp缓存目录,pyinstaller打包出来的可执行程序会将temp目录保存到 sys._MEIPASS,os.path.abspath(".")通过绝对路径方法获取当前目录位置。
注意:执行exe时 os.path.dirname(__file__) 将会出错无法得到正确路径,只能用于本地测试。
image.py
具体功能
- 从剪贴板获取图片
- 处理图片
- 将图片放回剪贴板
PIL 库使用
PIL 是 Python 的图像处理标准库
官方文档
- https://pillow.readthedocs.io/en/stable/reference/ImageFont.html 字体的设置
- https://pillow.readthedocs.io/en/stable/reference/ImageDraw.html 图像的处理,比如添加字体
- https://pillow.readthedocs.io/en/stable/handbook/text-anchors.html#text-anchors 添加字体锚点
- https://pillow.readthedocs.io/en/stable/reference/ImageGrab.html 从剪贴板取图片数据
其他资料
https://www.liaoxuefeng.com/wiki/1016959663602400/1017785454949568 PIL介绍与使用
https://blog.csdn.net/weixin_43790276/article/details/108478270 PIL简单图片处理
图片存入剪贴板
Windows 剪贴板仅支持 BMP 位图格式,所以我们需要对Image进行格式转换。存入剪贴板的数据需要去除BMP格式的头部信息(位图信息)。
图片转化后,我们需要一组二进制字节流,用于存储图片的数据,再从二进制流里读取数据放入剪贴板中。
    img_byte_arr = io.BytesIO()  # 生成二进制字节流
    img.save(img_byte_arr, format='BMP')  # 将图片输入二进制字节流中
    img_byte_arr = img_byte_arr.getvalue()[14:]  # 取出二进制字节流并切片截取
存入剪贴板需要使用 win32clipboard 库,需要 pip install pywin32
如何画粗体字
https://stackoverflow.com/questions/1815165/draw-bold-italic-text-with-pil
添加文字框的方法中发现并没有字体变粗的属性,具体实现有两种
-
切换字体,像微软雅黑UI 有三种字体,分别是 粗、普通、细,文件名也不同
-
描边,对
drawTXT.text添加参数,最好颜色一致,这种可以自定义字体粗的程度drawTXT.text((x/2, y/2), "xiaoneng1024", font=font, fill=(220, 220, 220, 16), anchor='mm',stroke_width=2,stroke_fill = "black")
image.py
import io
import os
import random
import win32clipboard
import time
from PIL import Image, ImageFont, ImageDraw, ImageGrab
from notify import notify
path = os.path.dirname(__file__)
# img = Image.open(path + "/lazy.jpeg") # ^ 测试用
def main():
# ^ 运行主流程
img = getClipboard()
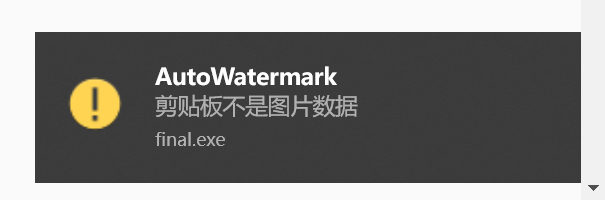
if img == None:
notify('AutoWatermark', '剪贴板不是图片数据', 'warn')
return
# print(img.size, img.mode)
try:
img = imgProcessing(img)
img_bytes = imgToBytes(img)
res = setClipboard(img_bytes)
except:
notify('AutoWatermark', '异常错误 ERROR', 'file')
return
if res == True:
notify('AutoWatermark', '图片已自动添加水印', 'file')
else:
notify('AutoWatermark', '剪贴板读取失败:拒绝访问', 'warn')
def getClipboard():
# ^ 获取剪贴板数据
try:
img = ImageGrab.grabclipboard()
except:
return None
return img
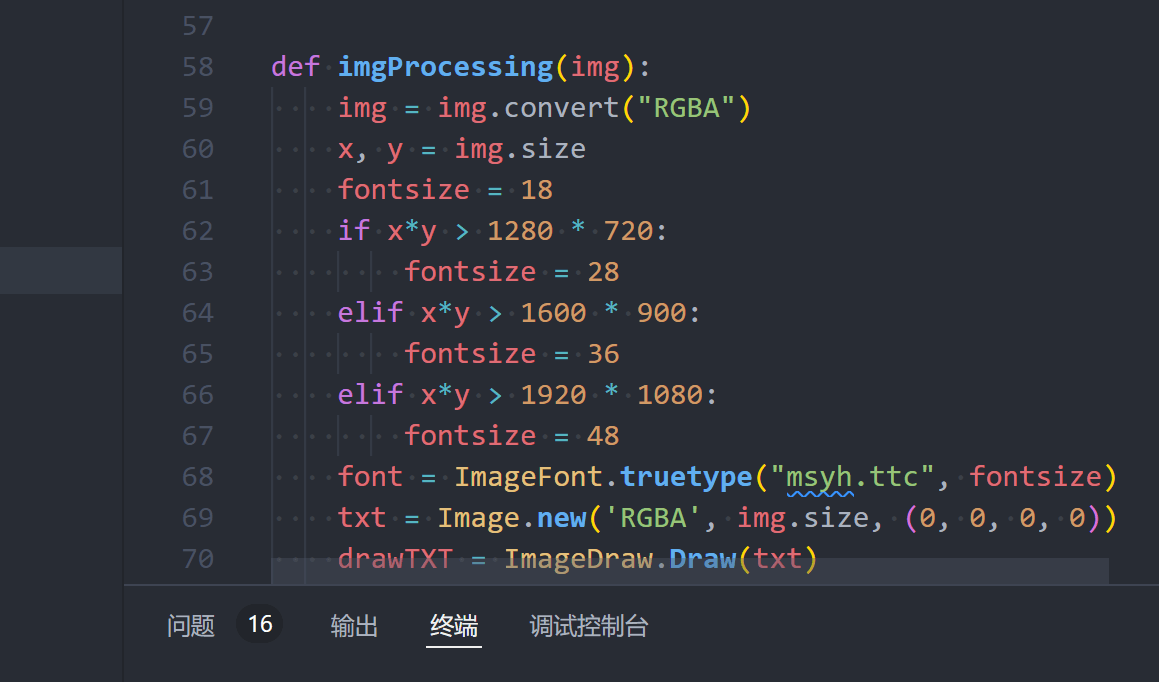
def imgProcessing(img):
# ^ 图像处理
# @ 将图像转换为RGBA,添加通道值方便后期与字体图层叠加
img = img.convert("RGBA")
x, y = img.size
fontsize = 18
# @ 根据截取大小调整字体大小
if x*y > 1280 * 720:
fontsize = 28
elif x*y > 1600 * 900:
fontsize = 36
elif x*y > 1920 * 1080:
fontsize = 48
# @ 选择字体,这里我选择微软雅黑
font = ImageFont.truetype("msyh.ttc", fontsize)
# @ 新建一个存文字框的图层
txt = Image.new('RGBA', img.size, (0, 0, 0, 0))
# @ 创建Draw对象,可以对图层绘图操作
drawTXT = ImageDraw.Draw(txt)
drawTXT.text((x-4, y-4), "cnblogs.com/linxiaoxu", font=font, fill=(220, 220, 220, 156), anchor='rs') # stroke_width=2,stroke_fill = "black"
drawTXT.text((x/2, y/2), "xiaoneng1024", font=font, fill=(220, 220, 220, 16), anchor='mm')
drawTXT.text((4, 4), time.strftime("%Y-%m-%d", time.gmtime()), font=font, fill=(220, 220, 220, 24), anchor='la') # stroke_width=2,stroke_fill = "black"
drawTXT.text((4, y), "小能1024", font=font, fill=(220, 220, 220, 24), anchor='lb')
# @ 将两个图层合并
img = Image.alpha_composite(img, txt)
return img
def imgToBytes(img):
# ^ 将图像转换为二进制流,并裁剪头部信息
img_byte_arr = io.BytesIO()
img.save(img_byte_arr, format='BMP')
img_byte_arr = img_byte_arr.getvalue()[14:]
# print(img_byte_arr, type(img_byte_arr))
return img_byte_arr
def setClipboard(img_byte_arr):
# ^ 设置系统剪贴板数据
try:
win32clipboard.OpenClipboard()
win32clipboard.EmptyClipboard()
win32clipboard.SetClipboardData(win32clipboard.CF_DIB, img_byte_arr)
win32clipboard.CloseClipboard()
return True
except:
return False
if __name__ == '__main__':
main()
work.py
pynput 包
我们需要有一个对全局键盘事件进行监听并响应事件的线程,这时 pynput 包作用就出来了,用于控制和监视鼠标、键盘的类
https://pynput.readthedocs.io/en/latest/index.html
work.py
from pynput import keyboard
from image import main
from notify import notify


def on_activate():
    print('Global hotkey activated!')
    main()


def for_canonical(f):
    return lambda k: f(l.canonical(k))


notify('AutoWatermark', '程序已启动!', 'warn')

hotkey = keyboard.HotKey(
    keyboard.HotKey.parse('<ctrl>+<shift>+,'),
    on_activate)
with keyboard.Listener(
        on_press=for_canonical(hotkey.press),
        on_release=for_canonical(hotkey.release)) as l:
    l.join()
on_activate 是触发快捷键的方法
for_canonical(f) 是修饰器,返回一个匿名函数,为了调用 listener 的方法 canonical 使用户输入的按键规范化
奇数行是直接调用,不使用修饰器。偶数行使用修饰器,可以看到原本的 Key.alt_l 被规范成 Key.alt
第1次 Key.alt_l <enum 'Key'>
第1次 Key.alt <enum 'Key'>
第2次 Key.ctrl_l <enum 'Key'>
第2次 Key.ctrl <enum 'Key'>
hotkey = keyboard.HotKey(
    keyboard.HotKey.parse('<ctrl>+<shift>+,'),
    on_activate)
这个是设置HotKey对象,parse方法方便转换组合的快捷键,on_activate 是触发时调用的方法
with keyboard.Listener(
        on_press=for_canonical(hotkey.press),
        on_release=for_canonical(hotkey.release)) as l:
    l.join()
这个是阻塞式的用法,开始一个新线程监听键盘事件
打包exe
安装 pyinstaller
pip install pyinstaller
[已解决] ModuleNotFoundError: No module named ‘pip‘
在安装 pyinstaller 的过程中控制台报错,ModuleNotFoundError: No module named ‘pip‘
解决方法
python -m ensurepip
python -m pip install --upgrade pip
一个py打包exe
合并py
我们将三个py合并为一个py
执行命令
在当前终端执行如下命令
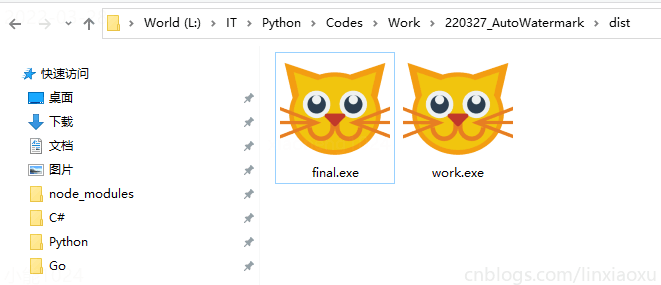
pyinstaller --windowed --icon cat.ico -i cat.ico --onefile --add-data "L:/IT/Python/Codes/Work/220327_AutoWatermark/file.ico;." --add-data "L:/IT/Python/Codes/Work/220327_AutoWatermark/warn.ico;." --hidden-import plyer.platforms.win.notification --hidden-import PIL final.py
参数介绍
- --windowed 最小化运行
- --icon 设置图表
- --onefile 生成一个exe文件
- --add-data 添加第三方依赖
- --hidden-import 手动添加需要打包的库
- final.py 当前需要打包的py脚本
多个py打包exe
执行命令
在当前终端执行如下命令
pyinstaller --windowed --icon cat.ico -i cat.ico --onefile --add-data "L:/IT/Python/Codes/Work/220327_AutoWatermark/file.ico;." --add-data "L:/IT/Python/Codes/Work/220327_AutoWatermark/warn.ico;." --hidden-import plyer.platforms.win.notification --hidden-import PIL work.py -p notify.py -p image.py
参数介绍
- -p 其他脚本
打包错误
Plyer 库未被打包导致方法调用失败
Traceback (most recent call last):
    ...
ModuleNotFoundError: No module named 'plyer.platforms'
Traceback (most recent call last):
  File "notification test.py", line 3, in <module>
  File "plyer\facades\notification.py", line 79, in notify
  File "plyer\facades\notification.py", line 88, in _notify
NotImplementedError: No usable implementation found!
[12520] Failed to execute script 'notification test' due to unhandled exception!
https://stackoverflow.com/questions/67489963/failed-to-execute-script-pyinstaller
plyer 模块不会自动被打包,需要手动添加命令 --hidden-import plyer.platforms.win.notification
另一种方法
PIL库也可能未被打包,先打包一次,在当前目录下找到被打包py的spec文件,打开修改添加库所在的位置。我是win10,库文件夹目录在C:\Users\Administrator\AppData\Local\Programs\Python\Python310\Lib\site-packages
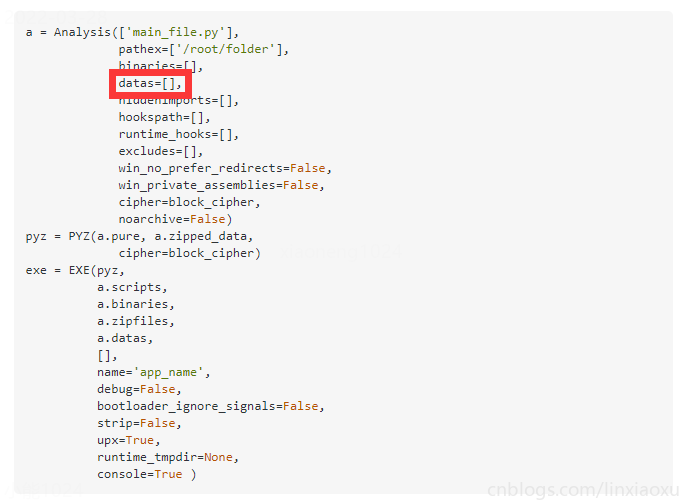
datas=[('C:/Users/Administrator/AppData/Local/Programs/Python/Python310/Lib/site-packages/PIL','PIL'),],
其他资料
https://pypi.org/project/auto-py-to-exe/ 打包工具
https://www.imooc.com/article/286538 打包指南
https://www.zhihu.com/question/281858271/answer/611320245 打包文件太大了
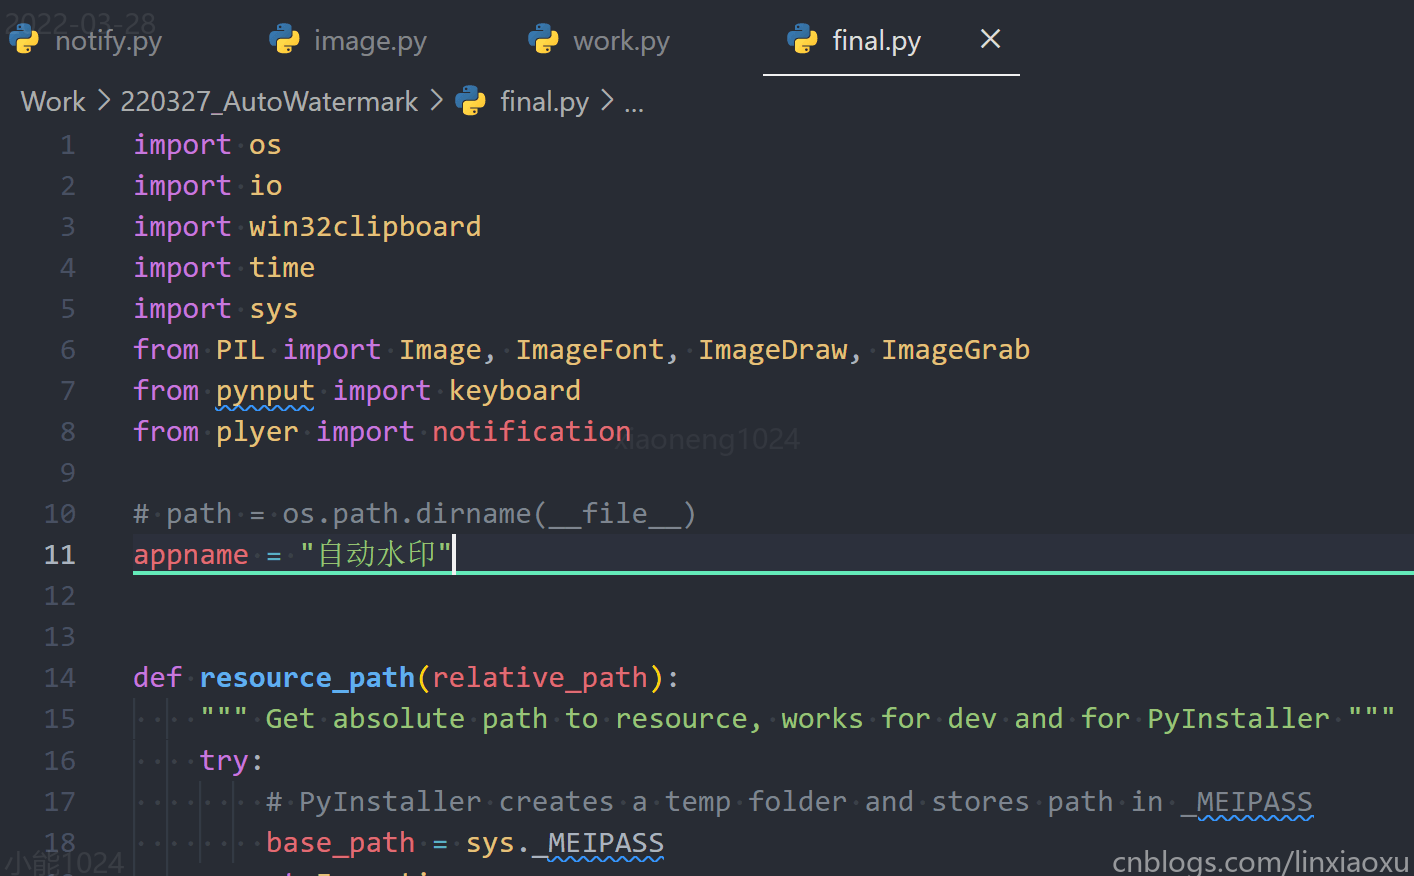
final.py
import os
import io
import win32clipboard
import time
import sys
from PIL import Image, ImageFont, ImageDraw, ImageGrab
from pynput import keyboard
from plyer import notification

# path = os.path.dirname(__file__)
appname = "自动水印"


def resource_path(relative_path):
    """ Get absolute path to resource, works for dev and for PyInstaller """
    try:
        # PyInstaller creates a temp folder and stores path in _MEIPASS
        base_path = sys._MEIPASS
    except Exception:
        base_path = os.path.abspath(".")

    return os.path.join(base_path, relative_path)


def notify(title, message, icon):
    notification.notify(
        title=title,
        message=message,
        app_name=appname,
        app_icon=resource_path('{}.ico'.format(icon)),
        timeout=19
    )


def main():
    img = getClipboard()
    if img == None:
        notify('AutoWatermark', '剪贴板不是图片数据', 'warn')
        return
    # print(img.size, img.mode)
    try:
        img = imgProcessing(img)
        img_bytes = imgToBytes(img)
        res = setClipboard(img_bytes)
    except:
        notify('AutoWatermark', '异常错误 ERROR', 'file')
        return
    if res == True:
        notify('AutoWatermark', '图片已自动添加水印', 'file')
    else:
        notify('AutoWatermark', '剪贴板读取失败:拒绝访问', 'warn')


def getClipboard():
    try:
        img = ImageGrab.grabclipboard()
    except:
        return None
    return img


def imgProcessing(img):
    img = img.convert("RGBA")
    x, y = img.size
    fontsize = 18
    if x*y > 1280 * 720:
        fontsize = 28
    elif x*y > 1600 * 900:
        fontsize = 36
    elif x*y > 1920 * 1080:
        fontsize = 48
    font = ImageFont.truetype("msyh.ttc", fontsize)
    txt = Image.new('RGBA', img.size, (0, 0, 0, 0))
    drawTXT = ImageDraw.Draw(txt)
    drawTXT.text((x-4, y-4), "cnblogs.com/linxiaoxu", font=font, fill=(220, 220, 220, 156), anchor='rs')  # stroke_width=2,stroke_fill = "black"
    drawTXT.text((x/2, y/2), "xiaoneng1024", font=font, fill=(220, 220, 220, 16), anchor='mm')
    drawTXT.text((4, 4), time.strftime("%Y-%m-%d", time.gmtime()), font=font, fill=(220, 220, 220, 24), anchor='la')  # stroke_width=2,stroke_fill = "black"
    drawTXT.text((4, y), "小能1024", font=font, fill=(220, 220, 220, 24), anchor='lb')
    img = Image.alpha_composite(img, txt)
    return img


def imgToBytes(img):
    img_byte_arr = io.BytesIO()
    img.save(img_byte_arr, format='BMP')
    img_byte_arr = img_byte_arr.getvalue()[14:]
    # print(img_byte_arr, type(img_byte_arr))
    return img_byte_arr


def setClipboard(img_byte_arr):
    try:
        win32clipboard.OpenClipboard()
        win32clipboard.EmptyClipboard()
        win32clipboard.SetClipboardData(win32clipboard.CF_DIB, img_byte_arr)
        win32clipboard.CloseClipboard()
        return True
    except:
        return False


def on_activate():
    print('Global hotkey activated!')
    main()


def for_canonical(f):
    return lambda k: f(l.canonical(k))


notify('AutoWatermark', '程序已启动!', 'warn')

hotkey = keyboard.HotKey(
    keyboard.HotKey.parse('<ctrl>+<shift>+,'),
    on_activate)
with keyboard.Listener(
        on_press=for_canonical(hotkey.press),
        on_release=for_canonical(hotkey.release)) as l:
    l.join()

 浙公网安备 33010602011771号