
二十一节课预习
第二十一课预习任务
12.7 默认虚拟主机
12.8 Nginx用户认证
12.9 Nginx域名重定向
12.10 Nginx访问日志
12.11 Nginx日志切割
12.12 静态文件不记录日志和过期时间
12.13 Nginx防盗链
12.14 Nginx访问控制
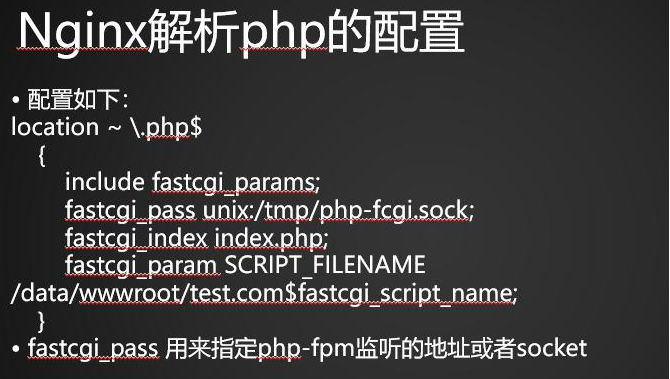
12.15 Nginx解析php相关配置
12.16 Nginx代理
扩展
nginx.conf 配置详解
https://coding.net/u/aminglinux/p/nginx/git/tree/master/3z
nginx rewrite四种flag
http://unixman.blog.51cto.com/10163040/1711943
https://coding.net/u/aminglinux/p/nginx/git/blob/master/rewrite/break.md
502问题汇总 http://ask.apelearn.com/question/9109
location优先级 https://coding.net/u/aminglinux/p/nginx/git/blob/master/location/priority.md
12.7
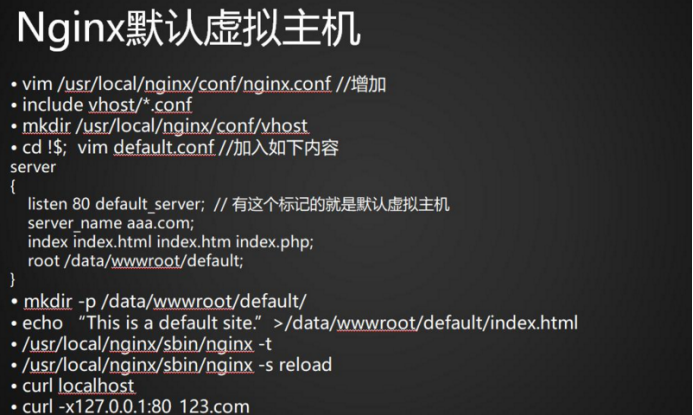
首先编辑配置文件
vim /usr/local/nginx/conf/vhost
把server以下的内容删除
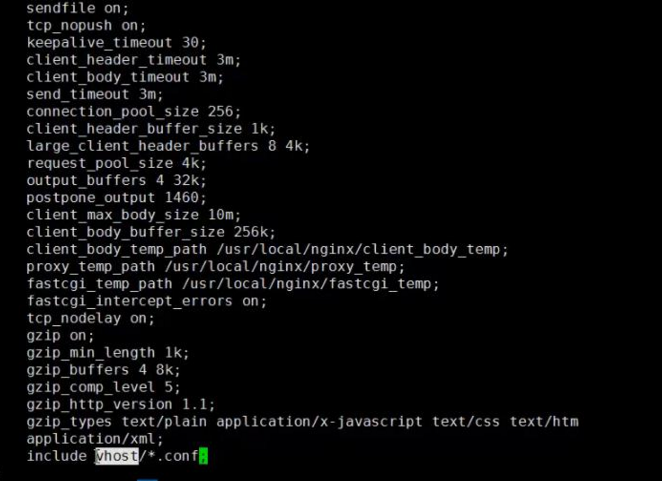
再增加 include vhost/*.conf
以上步聚都完成后,测试
Curl localhost
Curl -x127.0.0.1:80 bbb.com
12.8
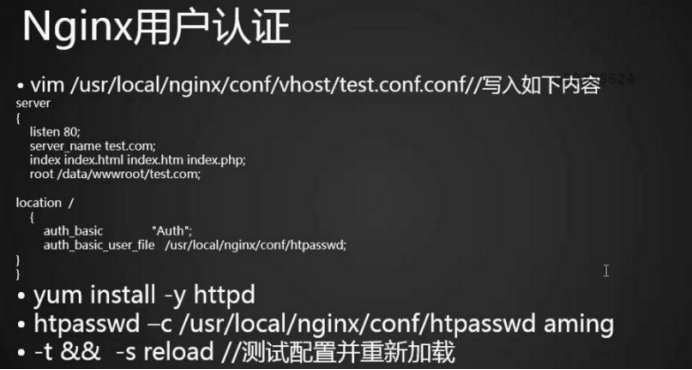
如果没有安装过httpd那就要先安装 ,如果已安装了就直接用httpd命令指定用户名和密码
如果再添加用户这时候就不要加-c,加-c会重置用户与密码
/usr/local/apache3.4/bin/htpasswd -c /usr/local/nginx/conf/htpasswd aming
Cat /usr/local/nginx/conf/httasswd
/usr/local/apache3.4/bin/htpasswd /usr/local/nginx/conf/htpasswd user1
/usr/local/nginx/sbin/nginx -t
/usr/local/nginx/sbin/nginx -s reload
测试提示401错误,没有指定用户密码的原因
Curl -x 127.0.0.1:80 test.com
指定用户密码,提示404错误,是因为没有创建test.com目录
Curl -uaming:lishiming -x 127.0.0.1:80 test.com
创建目录并写入内容
Mkdir /data/wwwroot/test.com
Echo “test.com”>/data/wwwroot/test.com/index.html
再次测试成功
Curl -uaming:123456 -x 127.0.0.1:80 test.com
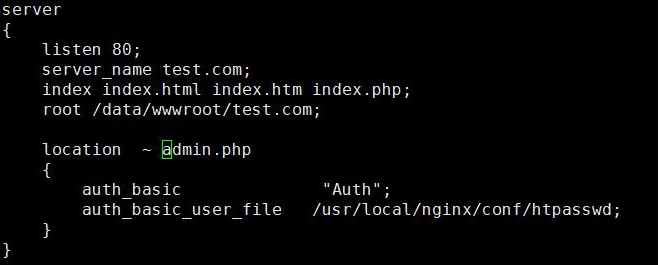
还有另一种场景,就是只访问admin才使用用户认证,需要修改一下配置文件
Vim test.com.conf
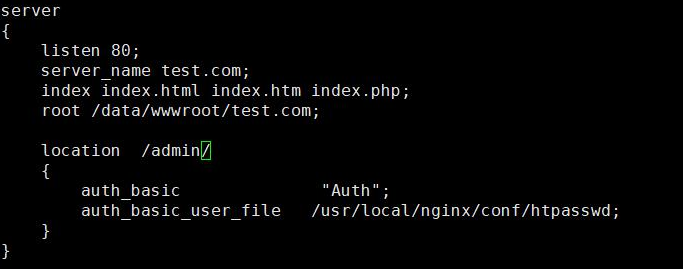
当访问不是admin目录就不需要指定用户密码,访问admin目录就需要了,会提示401错误
Curl -x 127.0.0.1:80 test.com
Curl -x 127.0.0.1:80 test.com/admin/ 401
Makdir /data/wwwroot/test.com/admin
Curl -x 127.0.0.1:80 test.com/admin/ --404
Curl -x 127.0.0.1:80 test.com/admin/
针对某一个curl用户认证
vim /usr/local/nginx/conf/vhost
12.9
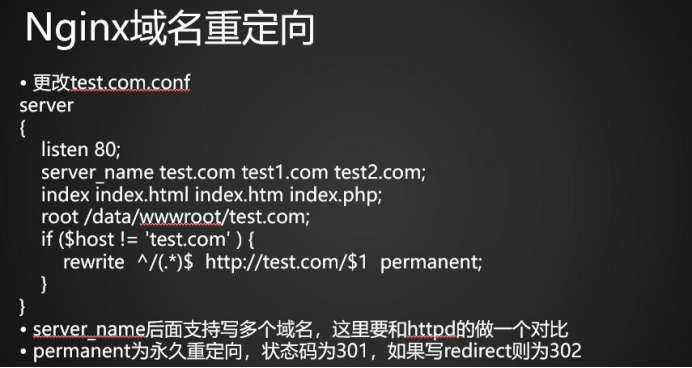
测试,状态码为301
Curl -x 127.0.0.1:80 test2.com/admin/index.html -l ---301
如果更改为test4.com,则它会去访问默认虚拟主机,而不是设定重定向的test.com
Curl -x 127.0.0.1:80 test2.com/admin/index.html/laksdlfkj -l --404
12.10
vim /usr/local/nginx/conf/nginx.conf
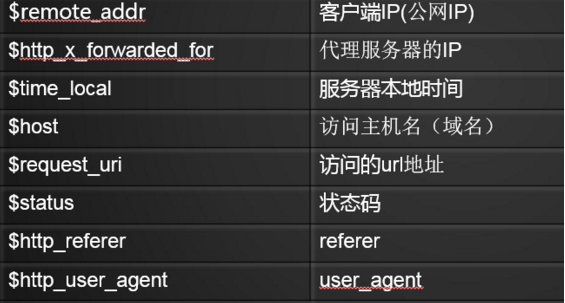
log_format aming '$remote_addr $http_x_forwarded_for [$time_local]'
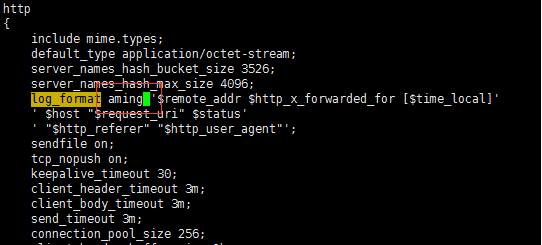
日志格式字段含义如下:
combined_realip为日志格式的名字,后面可以调用它。
2.到虚拟主机配置文件中指定访问日志的路径。
vim /usr/local/nginx/conf/vhost/test.com.conf
增加如下内容:
access_log /tmp/test.com.log combined_realip;
//这里的combined_realip就是在nginx.conf中定义的日志格式名字

3.测试语法及重新加载配置
/usr/local/nginx/sbin/nginx -t
nginx: the configuration file /usr/local/nginx/conf/nginx.conf syntax is ok
nginx: configuration file /usr/local/nginx/conf/nginx.conf test is successful
/usr/local/nginx/sbin/nginx -s reload
4.使用curl测试
curl -x127.0.0.1:80 test.com -I ------200
curl -x127.0.0.1:80 test2.com/admin -I --301
curl -x127.0.0.1:80 test2.com/admin/index.html -I --301
cat /tmp/test.com.log
Nginx日志切割
1.自定义一个脚本
vim /usr/local/sbin/nginx_log_rotate.sh
定义如下内容:
#!/bin/bash## 假设nginx的日志存放路径为/data/logs/
d=`date -d "-1 day" +%Y%m%d` //这个日期是昨天的日期,因为日志切割是第二天才执行这个脚本的。
logdir="/data/logs"
nginx_pid="/usr/local/nginx/logs/nginx.pid"cd $logdirfor log in `ls *.log`do
mv $log $log-$ddone
/bin/kill -HUP `cat $nginx_pid` //跟Nginx的-s重新加载配置文件一样
2.执行脚本
sh执行,-x是显示执行的过程
sh -x /usr/local/sbin/nginx_log_rotate.sh
ls /tmp/
3.任务计划
crontab -e //添加任务计划
增加如下内容:
0 0 * * * /bin/bash /usr/local/sbin/nginx_log_rotate.sh
静态文件不记录日志和过期时间
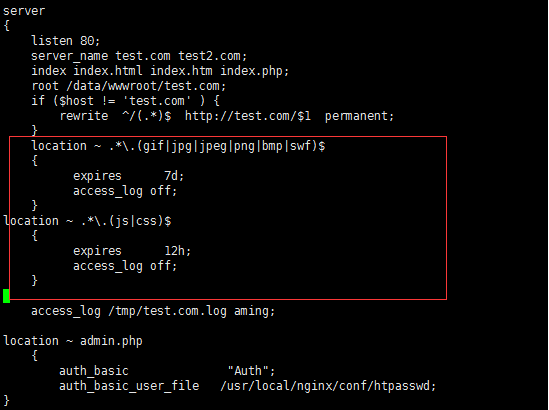
1.修改虚拟主机配置文件
vim /usr/local/nginx/conf/vhost/test.com.conf
增加如下内容:
location ~ .*\.(gif|jpg|jpeg|png|bmp|swf)$ //匹配脱义静态文件
{
expires 7d; //配置过期时间
access_log off;
}
location ~ .*\.(js|css)$ //匹配js,css文件
{
expires 12h;
access_log off;
}
2.测试语法及重新加载配置
/usr/local/nginx/sbin/nginx -t
nginx: the configuration file /usr/local/nginx/conf/nginx.conf syntax is ok
nginx: configuration file /usr/local/nginx/conf/nginx.conf test is successful
/usr/local/nginx/sbin/nginx -s reload
3.使用curl测试
cd /data/wwwroot/test.com
vim 1.gif
echo "dgagadgadgs" > /data/wwwroot/test.com/2.js
curl -x127.0.0.1:80 test.com/1.gif
dggagadggagdag
curl -x127.0.0.1:80 test.com/2.js
dgagadgadgs
curl -x127.0.0.1:80 test.com/index.html
“test.com”
curl -x127.0.0.1:80 test.com/index.html
“test.com”
curl -x127.0.0.1:80 test.com/2.js
dgagadgadgs
curl -x127.0.0.1:80 test.com/2.jsagdaga----------404
curl -x127.0.0.1:80 -I test.com/2.js
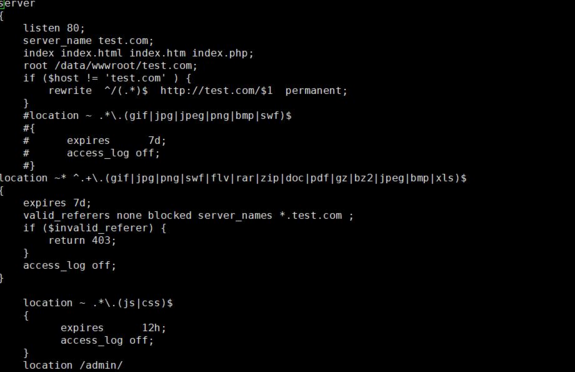
12.13
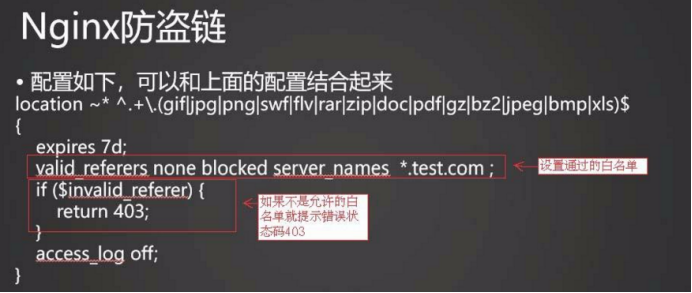
cd /usr/local/nginx/conf/vhost
vi test.com.conf
将以上内容复制到下图位置
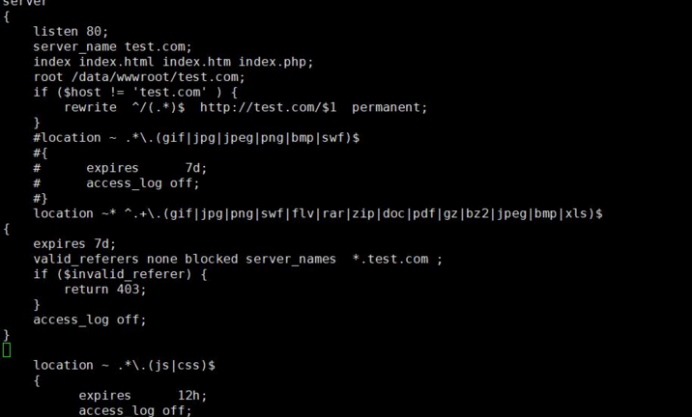
测试,成功
前提data/wwwroot/test.com目录下要有1.gif
12.14 Nginx访问控制

cd /usr/local/nginx/conf/vhost
vi test.com.conf
测试状态码是200
更换IP再测试状态码是200
查看日志,192.168.133.150的来源IP是192.168.133.130
禁止.php解析
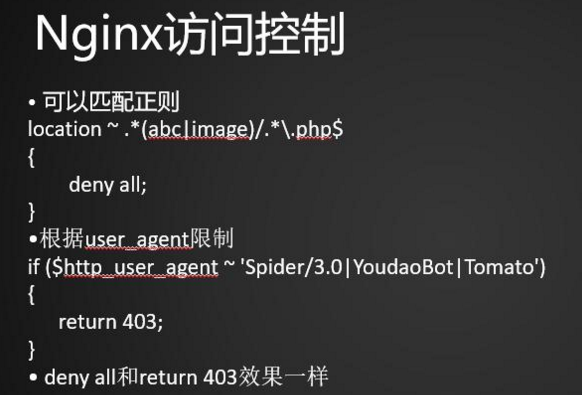
匹配正则,禁止某个的php访问
编辑配置文件
加载服务与创建文件
测试被拒绝访问了
如何访问2.txt就允许被访问了
查看日志
根据user_agent限制
测试
如何要忽略大小写就要匹配符号~后面加一个添加号前测试
添加*号后
创建vi /data/wwwroot/test.com/3.php
写入内容
<?php
phpinfo();
curl访问3.php,没办法解析只显示它的代码
Curl -x127.0.0.1:80 test.com/3.php
/usr/local/nginx/sbin/nginx -t
/usr/local/nginx/sbin/nginx -s reload
再执行curl -x127.0.0.1 test.com/3.php就可以解析了
unix:/tmp/php-fcgi.sock写错了少了一个f,那么访问就会提示502
Curl -x127.0.0.1:80 test.com/3.php
是因为找不到sock的文件
查看日志
Tail /usr/local/nginx/logs/nginx_error.log
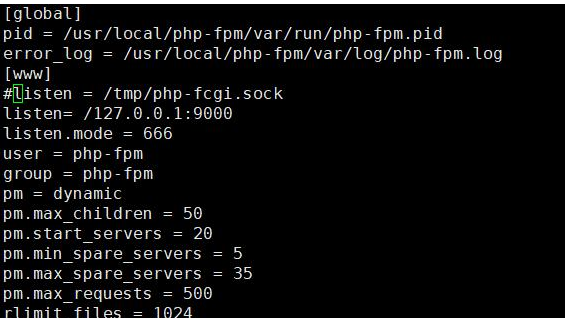
vi /usr/local/php-fpm/etc/php-fpm.conf
将监听端口改为IP
usr/local/php-fpm/sbin/php-fpm -t
/usr/local/nginx/sbin/nginx -s reload
然后需要重启 /etc/init.d/php-fpm reload
查看监听端口
Netstat -lntp
访问提示502
Curl -x127.0.0.1:80 test.com/3.php
Tail /usr/local/nginx/logs/nginx_error.log
这时候需更改配置文件
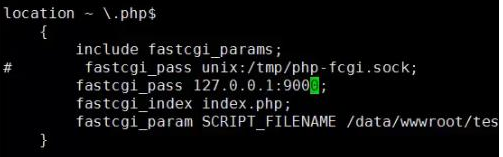
Vi /usr/local/nginx/conf/vhost/test.com.conf
/usr/local/php-fpm/sbin/php-fpm -t
/usr/local/php-fpm/sbin/nginx -t
/etc/init.d/php-fpm reload
再curl访问就不是502了
所以以后出现502错误就要检查监听的端口是什么,是不是与配置文件对应起来
还有一种情况不是php-fpm进程耗尽了也会提示502,这种情况就需要去优化
12.16 Nginx代理
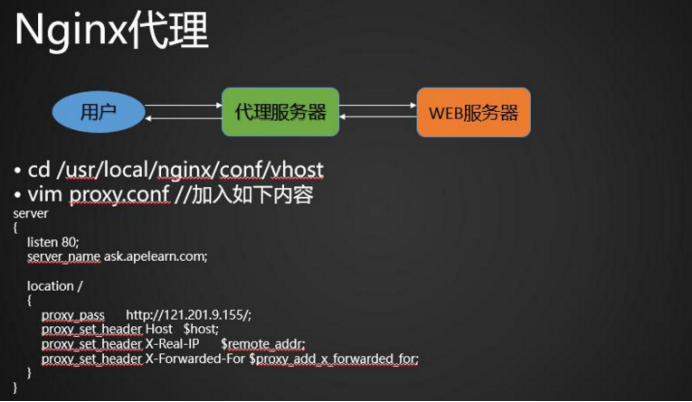
/usr/local/nginx/sbin/nginx -t
/usr/local/nginx/sbin/nginx -s reload
测试
curl -x127.0.0.1:9080 ask.apelearn.com/robots.txt

 浙公网安备 33010602011771号