Kubernetes学习之路(九)之kubernetes命令式快速创建应用
1、使用命令kubectl run创建应用
语法:
  kubectl run NAME --image=image [--env="key=value"] [--port=port] [--replicas=replicas] [--dry-run=bool]
[--overrides=inline-json] [--command] -- [COMMAND] [args...] [options]
实用举例:
[root@k8s-master ~]# kubectl run nginx-deploy --image=nginx:1.14-alpine --port=80 --replicas=1    #创建一个nginx的应用,副本数为1
deployment.apps/nginx-deploy created

[root@k8s-master ~]# kubectl get deployment  #获取应用信息,查看应用是否符合预期状态
NAME           DESIRED   CURRENT   UP-TO-DATE   AVAILABLE   AGE
nginx-deploy   1         1         1            1           40s

[root@k8s-master ~]# kubectl get pods  #获取pod信息
NAME                          READY     STATUS    RESTARTS   AGE
nginx-deploy-5b595999-44zwq   1/1       Running   0          1m


[root@k8s-master ~]# kubectl get pods -o wide    #查看pod运行在哪个节点上
NAME                          READY     STATUS    RESTARTS   AGE       IP           NODE
nginx-deploy-5b595999-44zwq   1/1       Running   0          1m        10.244.2.2   k8s-node02
从上面创建的应用可以得知,nginx-deploy应用的pod的ip为10.244.2.2,这是一个pod ip,仅仅可以在集群内部访问,如下:
[root@k8s-master ~]# curl 10.244.2.2 -I
HTTP/1.1 200 OK
Server: nginx/1.14.0
Date: Thu, 28 Feb 2019 06:13:03 GMT
Content-Type: text/html
Content-Length: 612
Last-Modified: Fri, 06 Jul 2018 16:53:43 GMT
Connection: keep-alive
ETag: "5b3f9e97-264"
Accept-Ranges: bytes

[root@k8s-node01 ~]# curl 10.244.2.2 -I
HTTP/1.1 200 OK
Server: nginx/1.14.0
Date: Thu, 28 Feb 2019 06:12:04 GMT
Content-Type: text/html
Content-Length: 612
Last-Modified: Fri, 06 Jul 2018 16:53:43 GMT
Connection: keep-alive
ETag: "5b3f9e97-264"
Accept-Ranges: bytes

[root@k8s-node02 ~]# curl 10.244.2.2 -I
HTTP/1.1 200 OK
Server: nginx/1.14.0
Date: Thu, 23 Aug 2018 09:22:18 GMT
Content-Type: text/html
Content-Length: 612
Last-Modified: Fri, 06 Jul 2018 16:53:43 GMT
Connection: keep-alive
ETag: "5b3f9e97-264"
Accept-Ranges: bytes
这里要注意的是pod的客户端有2类,1类是其他pod,1类是集群外部客户端,那么集群外部的客户端如何访问到pod呢?pod的地址是随时变化的,假设先删除创建的pod:
[root@k8s-master ~]# kubectl delete pods nginx-deploy-5b595999-44zwq
pod "nginx-deploy-5b595999-44zwq" deleted
要明白pod是通过控制器进行管理的,当控制器发现pod的状态不满足预期的状态时,将会重新创建一个pod
[root@k8s-master ~]# kubectl get pods -o wide    #由于在node01节点上没有镜像,需要重新下载
NAME                          READY     STATUS              RESTARTS   AGE       IP        NODE
nginx-deploy-5b595999-872c7   0/1       ContainerCreating   0          24s       <none>    k8s-node01
[root@k8s-master ~]# kubectl get pods -o wide
NAME                          READY     STATUS    RESTARTS   AGE       IP           NODE
nginx-deploy-5b595999-872c7   1/1       Running   0          56s       10.244.1.2   k8s-node01
此时可以看到新建的pod的ip地址已经更改了,并且本次创建的pod是在node01节点上,这样就需要提供一个固定端点,给集群外部客户端进行访问。这个固定端点就是service:
语法如下:
  kubectl expose (-f FILENAME | TYPE NAME) [--port=port] [--protocol=TCP|UDP] [--target-port=number-or-name]
[--name=name] [--external-ip=external-ip-of-service] [--type=type] [options]

[root@k8s-master ~]# kubectl expose deployment nginx-deploy --name=nginx --port=80 --target-port=80 --protocol=TCP  #创建一个nginx的service
service/nginx exposed

[root@k8s-master ~]# kubectl get svc
NAME         TYPE        CLUSTER-IP       EXTERNAL-IP   PORT(S)   AGE
kubernetes   ClusterIP   10.96.0.1        <none>        443/TCP   1d
nginx        ClusterIP   10.106.162.254   <none>        80/TCP    19s

[root@k8s-master ~]# curl 10.106.162.254 -I  #通过ClusterIP进行访问nginx pod
HTTP/1.1 200 OK
Server: nginx/1.14.0
Date: Thu, 23 Aug 2018 09:38:09 GMT
Content-Type: text/html
Content-Length: 612
Last-Modified: Fri, 06 Jul 2018 16:53:43 GMT
Connection: keep-alive
ETag: "5b3f9e97-264"
Accept-Ranges: bytes
10.106.162.254这网段依然是集群内部的网段,只能被集群内部所能访问,外部是无法通过service的ip进行访问的。那么针对pod的客户端除了通过service ip访问还可以通过service的名称进行访问,但是前提是需要对service的名称能够进行解析。而解析时是依赖coredns服务的,而我们本地的dns指向并非coredns,如下:
[root@k8s-master ~]# curl nginx
curl: (6) Could not resolve host: nginx; Unknown error
[root@k8s-master ~]# cat /etc/resolv.conf
# Generated by NetworkManager
nameserver 8.8.8.8
nameserver 114.114.114.114
下面查看一下coredns的ip地址:
[root@k8s-master ~]# kubectl get pods -n kube-system -o wide
NAME                                 READY     STATUS    RESTARTS   AGE       IP              NODE
coredns-78fcdf6894-nmcmz             1/1       Running   0          1d        10.244.0.3      k8s-master
coredns-78fcdf6894-p5pfm             1/1       Running   0          1d        10.244.0.2      k8s-master
etcd-k8s-master                      1/1       Running   1          1d        192.168.56.11   k8s-master
kube-apiserver-k8s-master            1/1       Running   8          1d        192.168.56.11   k8s-master
kube-controller-manager-k8s-master   1/1       Running   4          1d        192.168.56.11   k8s-master
kube-flannel-ds-n5c86                1/1       Running   0          1d        192.168.56.11   k8s-master
kube-flannel-ds-nrcw2                1/1       Running   0          5h        192.168.56.13   k8s-node02
kube-flannel-ds-pgpr7                1/1       Running   1          1d        192.168.56.12   k8s-node01
kube-proxy-glzth                     1/1       Running   0          5h        192.168.56.13   k8s-node02
kube-proxy-rxlt7                     1/1       Running   1          1d        192.168.56.11   k8s-master
kube-proxy-vxckf                     1/1       Running   0          1d        192.168.56.12   k8s-node01
kube-scheduler-k8s-master            1/1       Running   2          1d        192.168.56.11   k8s-master
而一般,也不会直接通过coredns的这个pod ip地址进行访问,而是通过service进行访问,查看一下coredns的service:
[root@k8s-master ~]# kubectl get svc -n kube-system
NAME       TYPE        CLUSTER-IP   EXTERNAL-IP   PORT(S)         AGE
kube-dns   ClusterIP   10.96.0.10   <none>        53/UDP,53/TCP   1d
那么就可以通过这个service ip:10.96.0.10进行解析上面的nginx服务,如下:
[root@k8s-master ~]# yum install -y bind-utils

[root@k8s-master ~]# dig -t A nginx.default.svc.cluster.local @10.96.0.10  #这里需要使用完整的服务名称,否则会因为dns搜索域的问题而导致无法解析成功

; <<>> DiG 9.9.4-RedHat-9.9.4-61.el7 <<>> -t A nginx.default.svc.cluster.local @10.96.0.10
;; global options: +cmd
;; Got answer:
;; ->>HEADER<<- opcode: QUERY, status: NOERROR, id: 78
;; flags: qr aa rd ra; QUERY: 1, ANSWER: 1, AUTHORITY: 0, ADDITIONAL: 1

;; OPT PSEUDOSECTION:
; EDNS: version: 0, flags:; udp: 4096
;; QUESTION SECTION:
;nginx.default.svc.cluster.local. IN    A

;; ANSWER SECTION:
nginx.default.svc.cluster.local. 5 IN    A    10.106.162.254  #这样就可以正常解析出nginx的service ip了

;; Query time: 155 msec
;; SERVER: 10.96.0.10#53(10.96.0.10)
;; WHEN: Thu Aug 23 05:40:22 EDT 2018
;; MSG SIZE  rcvd: 107
那么再演示通过pod 客户端进行访问:
[root@k8s-master ~]# kubectl run client --image=busybox --replicas=1 -it --restart=Never  #创建pod
[root@k8s-master ~]# kubectl exec -it client /bin/sh    #首次创建如果没进入到容器,可以使用这命令进入

/ # cat /etc/resolv.conf   #查看dns,这里就是自动指向coredns
nameserver 10.96.0.10
search default.svc.cluster.local svc.cluster.local cluster.local
options ndots:5

/ # wget -O - -q http://nginx:80  #请求解析nginx
<!DOCTYPE html>
<html>
<head>
<title>Welcome to nginx!</title>
<style>
    body {
        width: 35em;
        margin: 0 auto;
        font-family: Tahoma, Verdana, Arial, sans-serif;
    }
</style>
</head>
<body>
<h1>Welcome to nginx!</h1>
<p>If you see this page, the nginx web server is successfully installed and
working. Further configuration is required.</p>

<p>For online documentation and support please refer to
<a href="http://nginx.org/">nginx.org</a>.<br/>
Commercial support is available at
<a href="http://nginx.com/">nginx.com</a>.</p>

<p><em>Thank you for using nginx.</em></p>
</body>
</html>
这就是service提供给pod的固定访问端点的使用,而pod的增删改查,并不会影响通过service进行访问,可以通过以下命令来查看service的详细信息:
[root@k8s-master ~]# kubectl describe svc nginx
Name:              nginx
Namespace:         default
Labels:            run=nginx-deploy
Annotations:       <none>
Selector:          run=nginx-deploy
Type:              ClusterIP
IP:                10.106.162.254
Port:              <unset>  80/TCP
TargetPort:        80/TCP
Endpoints:         10.244.1.5:80  #pod 的ip,会根据资源变化改变,但是实际访问的service 依旧有效
Session Affinity:  None
Events:            <none>
那么pod的增删改,service又是如何确定对pod的访问呢?这就需要通过标签选择器进行选定,无论pod的ip如何变化,但是标签不会变化,从而达到固定端点的访问效果,查看一下pod的标签:
[root@k8s-master ~]# kubectl get pods --show-labels
NAME                          READY     STATUS    RESTARTS   AGE       LABELS
client                        1/1       Running   0          21h       run=client
nginx-deploy-5b595999-872c7   1/1       Running   2          22h       pod-template-hash=16151555,run=nginx-deploy
run=nginx-deploy就是这个应用的标签,所以当pod的改变,并不会影响service的访问。
2、应用副本的动态伸缩
语法如下:
kubectl scale [--resource-version=version] [--current-replicas=count] --replicas=COUNT (-f FILENAME | TYPE NAME)

(1)创建应用myapp
[root@k8s-master ~]# kubectl run myapp --image=ikubernetes/myapp:v1 --replicas=2
deployment.apps/myapp created

[root@k8s-master ~]# kubectl get deployment
NAME           DESIRED   CURRENT   UP-TO-DATE   AVAILABLE   AGE
myapp          2         2         2            1           15s
nginx-deploy   1         1         1            1           22h

(2)查看pod详细信息
[root@k8s-master ~]# kubectl get pods -o wide
NAME                          READY     STATUS         RESTARTS   AGE       IP           NODE
client                        1/1       Running        0          21h       10.244.2.3   k8s-node02
client2                       1/1       Running        0          48m       10.244.1.6   k8s-node01
client3                       1/1       Running        0          27m       10.244.2.4   k8s-node02
myapp-848b5b879b-bdp7t        1/1       Running        0          26s       10.244.1.7   k8s-node01
myapp-848b5b879b-swt2c        0/1       ErrImagePull   0          26s       10.244.2.5   k8s-node02
nginx-deploy-5b595999-872c7   1/1       Running        2          22h       10.244.1.5   k8s-node01

(3)配置service端点
[root@k8s-master ~]# kubectl expose deployment myapp --name=myapp --port=80
service/myapp exposed

(4)查看服务信息
[root@k8s-master ~]# kubectl get svc
NAME         TYPE        CLUSTER-IP       EXTERNAL-IP   PORT(S)   AGE
kubernetes   ClusterIP   10.96.0.1        <none>        443/TCP   2d
myapp        ClusterIP   10.106.67.242    <none>        80/TCP    14s
nginx        ClusterIP   10.106.162.254   <none>        80/TCP    21h

(5)Pod客户端访问
/ #  wget -O - -q http://myapp:80
Hello MyApp | Version: v1 | <a href="hostname.html">Pod Name</a>

(6)副本增加到5
[root@k8s-master ~]# kubectl scale --replicas=5 deployment myapp
deployment.extensions/myapp scaled

[root@k8s-master ~]# kubectl get pods
NAME                          READY     STATUS             RESTARTS   AGE
client                        1/1       Running            0          21h
client2                       1/1       Running            0          51m
client3                       1/1       Running            0          30m
myapp-848b5b879b-6p6ml        1/1       Running            0          1m
myapp-848b5b879b-7xmnj        0/1       ImagePullBackOff   0          1m
myapp-848b5b879b-bdp7t        1/1       Running            0          3m
myapp-848b5b879b-swt2c        0/1       ImagePullBackOff   0          3m
myapp-848b5b879b-zlvl2        1/1       Running            0          1m
nginx-deploy-5b595999-872c7   1/1       Running            2          22h

(7)副本收缩到3
[root@k8s-master ~]# kubectl scale --replicas=3 deployment myapp
deployment.extensions/myapp scaled
3、应用的版本升级
语法如下:
kubectl set image (-f FILENAME | TYPE NAME) CONTAINER_NAME_1=CONTAINER_IMAGE_1 ... CONTAINER_NAME_N=CONTAINER_IMAGE_N
(1)版本升级为v2
[root@k8s-master ~]# kubectl set image deployment myapp myapp=ikubernetes/myapp:v2
deployment.extensions/myapp image updated

(2)查看升级过程
[root@k8s-master ~]# kubectl rollout status deployment myapp    #查看更新过程
Waiting for deployment "myapp" rollout to finish: 1 out of 3 new replicas have been updated...
Waiting for deployment "myapp" rollout to finish: 1 out of 3 new replicas have been updated...
Waiting for deployment "myapp" rollout to finish: 1 out of 3 new replicas have been updated...
Waiting for deployment "myapp" rollout to finish: 2 out of 3 new replicas have been updated...
Waiting for deployment "myapp" rollout to finish: 2 out of 3 new replicas have been updated...
Waiting for deployment "myapp" rollout to finish: 2 out of 3 new replicas have been updated...
Waiting for deployment "myapp" rollout to finish: 1 old replicas are pending termination...
Waiting for deployment "myapp" rollout to finish: 1 old replicas are pending termination...
deployment "myapp" successfully rolled out

(3)获取pod信息
[root@k8s-master ~]# kubectl get pods
NAME                          READY     STATUS    RESTARTS   AGE
client                        1/1       Running   0          21h
client2                       1/1       Running   0          53m
client3                       1/1       Running   0          33m
myapp-74c94dcb8c-2djgg        1/1       Running   0          1m
myapp-74c94dcb8c-92d9p        1/1       Running   0          28s
myapp-74c94dcb8c-nq7zt        1/1       Running   0          25s
nginx-deploy-5b595999-872c7   1/1       Running   2          22h

[root@k8s-master ~]# kubectl describe pods myapp-74c94dcb8c-2djgg

(4)pod客户端测试访问,可以看到是v2版本
/ #  wget -O - -q http://myapp:80
Hello MyApp | Version: v2 | <a href="hostname.html">Pod Name</a>
4、应用的版本回滚
语法如下:
kubectl rollout undo (TYPE NAME | TYPE/NAME) [flags] [options]
[root@k8s-master ~]# kubectl rollout undo deployment myapp    #不指定版本直接回滚到上一个版本
deployment.extensions/myapp

/ #  wget -O - -q http://myapp:80
Hello MyApp | Version: v1 | <a href="hostname.html">Pod Name</a>
5、实现外部访问service
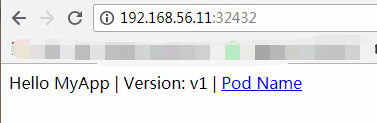
[root@k8s-master ~]# kubectl edit svc myapp
TYPE:CLUSTER-IP改为
TYPE:NodePort

[root@k8s-master ~]# kubectl get svc
NAME         TYPE        CLUSTER-IP       EXTERNAL-IP   PORT(S)        AGE
kubernetes   ClusterIP   10.96.0.1        <none>        443/TCP        2d
myapp        NodePort    10.106.67.242    <none>        80:32432/TCP   18m
nginx        ClusterIP   10.106.162.254   <none>        80/TCP         22h
这里再查看service信息,可以看到myapp进行了端口映射,将myapp的80端口映射到本地32432端口,则可以使用http://192.168.56.11:32432进行访问。如图:

 浙公网安备 33010602011771号