
Ui自动化测试上传文件方法都在这里了
 前言
实施UI自动化测试的时候,经常会遇见上传文件的操作,那么对于上传文件你知道几种方法呢?今天我们就总结一下几种常用的上传文件的方法,并分析一下每个方法的优点和缺点以及哪种方法效率,稳定性更高
前言
实施UI自动化测试的时候,经常会遇见上传文件的操作,那么对于上传文件你知道几种方法呢?今天我们就总结一下几种常用的上传文件的方法,并分析一下每个方法的优点和缺点以及哪种方法效率,稳定性更高
前言
实施UI自动化测试的时候,经常会遇见上传文件的操作,那么对于上传文件你知道几种方法呢?今天我们就总结一下几种常用的上传文件的方法,并分析一下每个方法的优点和缺点以及哪种方法效率,稳定性更高
被测HTML代码
<!--upload_file.html-->


<!DOCTYPE html>
<html lang="en">
<head>
    <meta charset="UTF-8">
    <title>上传文件</title>
</head>
<body>
    <input id="upload_file" type="file">
</body>
</html>
第一种方法:使用webdriver api 提供的方法send_keys上传文件
send_keys方法
实例
------------------------------------
@Time : 2019/7/17 19:03
@Auth : linux超
@File : upload_file_send_keys.py
@IDE  : PyCharm
@Motto: Real warriors,dare to face the bleak warning,dare to face the incisive error!
@QQ   : 28174043@qq.com
@GROUP: 878565760
------------------------------------
"""
from selenium import webdriver
import time


driver = webdriver.Firefox()
driver.get(r'file:///e:/CnblogCode/upload_file.html')
upload_element = driver.find_element_by_xpath('//*[@id="upload_file"]')
time.sleep(3)  # 为了看效果
upload_element.send_keys(r'E:\CnblogCode\upload_file.html')
执行过程

可以看到执行过程很顺利,且代码实现简单,也没有报错
但是往往现实是残酷的,因为有的网站的上传文件并不是采用 input标签来定义的上传文件按钮,所以就无法使用send_keys方法上传,这也是这个方法的限制
AutoIt工具
第二种方法是AutoIT工具,它是一个类似脚本语言的软件,利用此软件我们可以方便的实现模拟键盘、鼠标、窗口等操作,实现自动化
安装
官网地址:https://www.autoitscript.com/site/autoit/downloads/
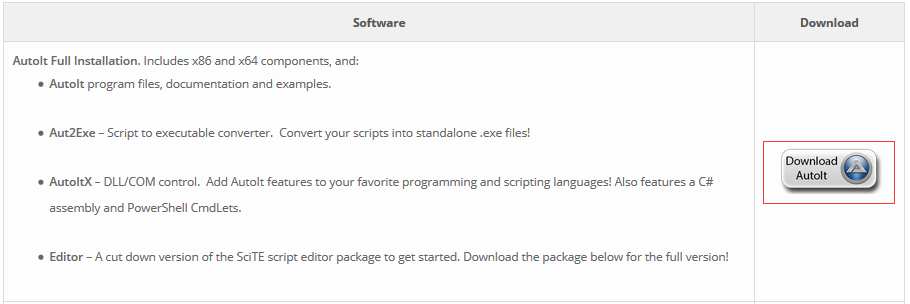
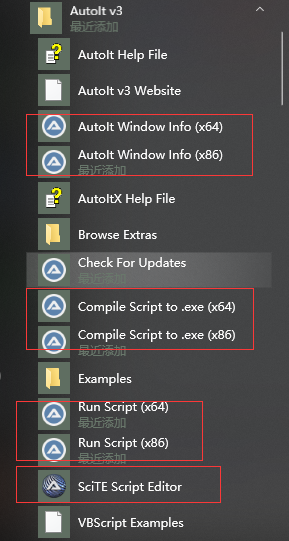
安装完后可以找到如下一些工具
使用
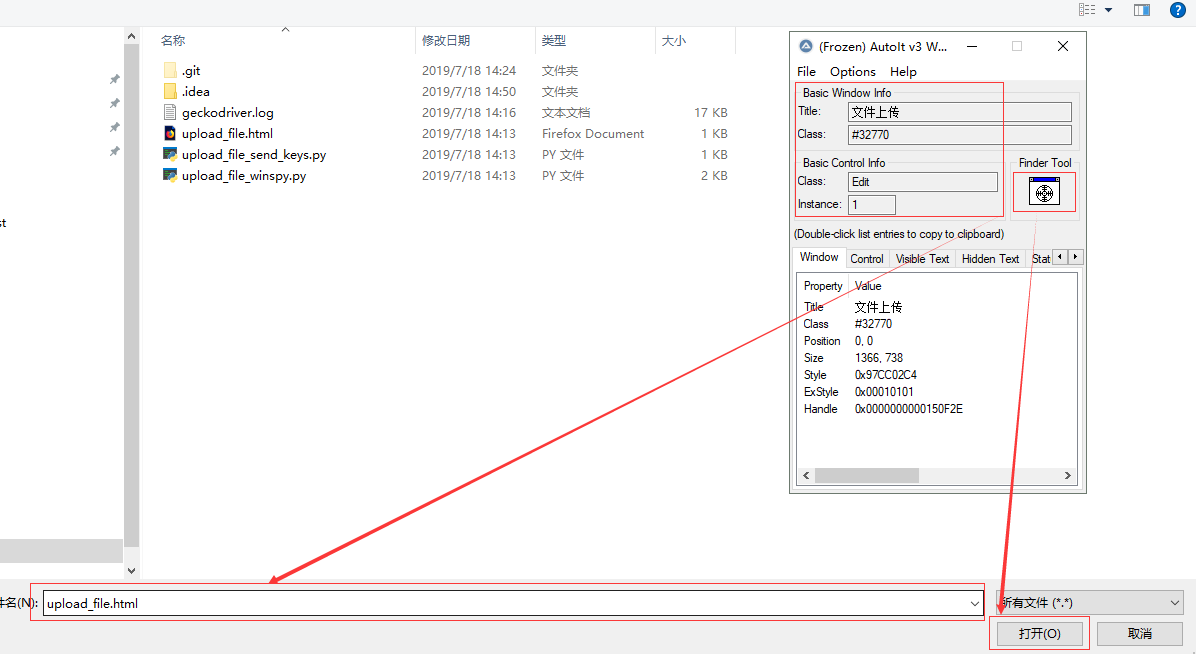
1. 打开被测试的HTML页面,并点击上传文件,弹出上传文件窗口,并保持当前窗口
2. 打开AutoIt Window Info(x86/x64)工具
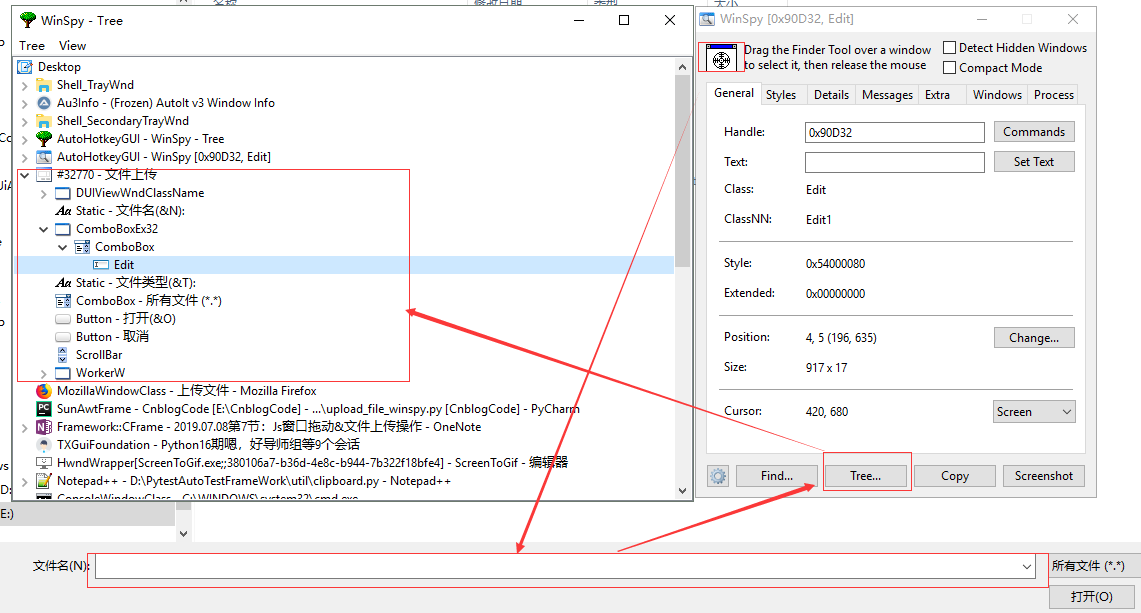
3. 点击工具中Finder Tool标签下的按钮,开始分别定位上传文件的【输入框】和【打开】按钮,并记录Title,Class,Instance(图中红色窗口中的信息)
注意:不同的浏览器抓取的Title是不一样的(Firefox:文件上传,Chrome:打开,IE:选择要加载的文件)
4. 打开 SciTE Script Editor![]() 工具开始编写脚本(注意脚本中的Edit1是class 和 instance 拼接的)
工具开始编写脚本(注意脚本中的Edit1是class 和 instance 拼接的)
;first make sure the number of arguments passed into the scripts is more than 1
If $CmdLine[0]<2 Then Exit EndIf ;if parmas num <2 ,then break
;$CmdLine[0] ;参数的数量
;$CmdLine[1] ;第一个参数 (脚本名称后面)
;$CmdLine[2] ;第二个参数
;都是从cmd传入参数
 handleUpload($CmdLine[1],$CmdLine[2])

;定义上传函数,有两个参数,第一个是浏览器名字,第二参数是文件路径
 Func handleUpload($browser, $uploadfile)
     Dim $title                          ;定义一个title变量
            ;根据弹窗的title来判断是什么浏览器
            If $browser="ie" Then                          ; 代表IE浏览器
                  $title="选择要加载的文件"
            ElseIf $browser="chrome" Then               ; 代表谷歌浏览器
                 $title="打开"
            ElseIf    $browser="firefox" Then             ; 代表火狐浏览器
                  $title="文件上传"
            EndIf

            if WinWait($title,"",4) Then ;等待弹出出现,最大等待时间是4秒
                   WinActivate($title)                  ;找到弹出窗口之后,激活当前窗口
                   ControlSetText($title,"","Edit1",$uploadfile)   ;把文件路径放入输入框,此”Edit1“是用FinderTool获取到的
                   ControlClick($title,"","Button1")                ;点击保存或者打开或者上传按钮,此“Button1”使用FinderTool获取到的
            Else
            Return False
            EndIf
 EndFunc
5. 编译脚本为exe可执行文件
编写完脚本之后,保存文件并打开Compile Script to .exe(x64/x86)工具 ![]() ,将保存后的脚本.au3文件转换为.exe可执行文件
,将保存后的脚本.au3文件转换为.exe可执行文件
6. 执行转换后的脚本
在执行脚本之前,先确保上传文件的窗口已经打开,接下来打开cmd执行exe程序 C:\Users\v-xug\Desktop>upload_file_new.exe firefox E:\CnblogCode\upload_file.html
7. 执行效果

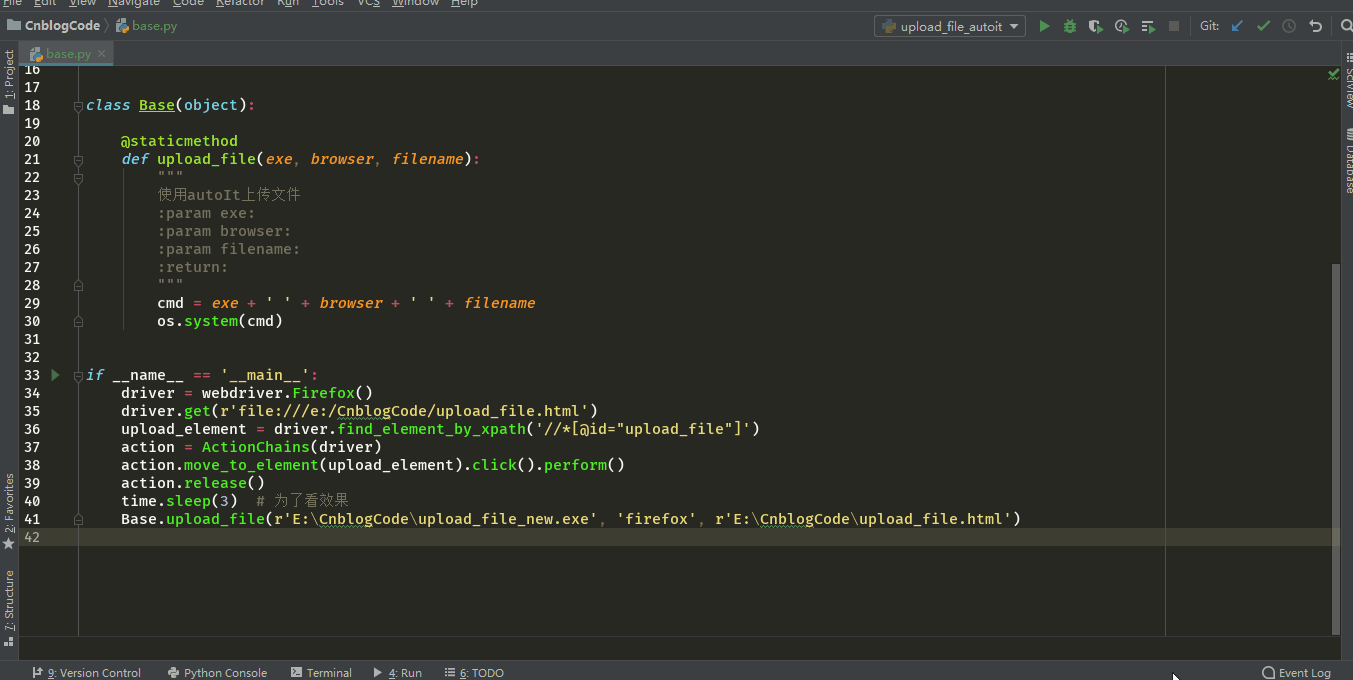
8. 编写selenium脚本
实例
"""
------------------------------------
@Time : 2019/7/18 16:20
@Auth : linux超
@File : base.py
@IDE  : PyCharm
@Motto: Real warriors,dare to face the bleak warning,dare to face the incisive error!
@QQ   : 28174043@qq.com
@GROUP: 878565760
------------------------------------
"""
from selenium.webdriver.common.action_chains import ActionChains
import os
from selenium import webdriver
import time


class Base(object):

    @staticmethod
    def upload_file(exe, browser, filename):
        """
        使用autoIt上传文件
        :param exe: 上传文件的exe程序所在目录
        :param browser: 浏览器类型: firefox chrome ie
        :param filename: 待上传文件路径
        :return: none
        """
        cmd = exe + ' ' + browser + ' ' + filename
        os.system(cmd)


if __name__ == '__main__':
    driver = webdriver.Firefox()
    driver.get(r'file:///e:/CnblogCode/upload_file.html')  # 打开被测html
    upload_element = driver.find_element_by_xpath('//*[@id="upload_file"]')
    action = ActionChains(driver)
    action.move_to_element(upload_element).click().perform()  # 点击上传文件弹出上传文件窗口
    action.release()
    time.sleep(3)  # 为了看效果
    Base.upload_file(r'E:\CnblogCode\upload_file_new.exe', 'firefox', r'E:\CnblogCode\upload_file.html')  # 上传文件
执行过程
以上就是使用AutoId工具完成上传文件的过程,其实还是挺复杂的, 但是配置一次之后,以后就可以重复使用编译生成的exe文件了,执行效果还是不错的 没出什么错误,执行效率也还可以
模拟键盘
第三种方法:模拟键盘的粘贴与回车操作并结合剪切板的操作来完成上传文件,基本原理是向剪切板中发送文件(文件路径字符串),然后再从剪切板中获取到文件,最后通过模拟键盘的ctrl+v与enter键来完成文件上传
这种方法需要第三方库的支持,安装pypiwin32库: pip install pypiwin32
实例
模拟键盘操作代码


"""
------------------------------------
@Time : 2019/7/18 17:14
@Auth : linux超
@File : keyboard.py
@IDE  : PyCharm
@Motto: Real warriors,dare to face the bleak warning,dare to face the incisive error!
@QQ   : 28174043@qq.com
@GROUP: 878565760
------------------------------------
"""
import win32api
import win32con
import time


class KeyBoard(object):
    """模拟按键"""
    # 键盘码
    vk_code = {
        'enter' : 0x0D,
        'ctrl' : 0x11,
        'v' : 0x56
    }

    @staticmethod
    def keyDown(key_name):
        """按下键"""
        key_name = key_name.lower()
        try:
            win32api.keybd_event(KeyBoard.vk_code[key_name], 0, 0, 0)
        except Exception as e:
            print('未按下enter键')
            raise e

    @staticmethod
    def keyUp(key_name):
        """抬起键"""
        key_name = key_name.lower()
        win32api.keybd_event(KeyBoard.vk_code[key_name], 0, win32con.KEYEVENTF_KEYUP, 0)

    @staticmethod
    def oneKey(key):
        """模拟单个按键"""
        key = key.lower()
        KeyBoard.keyDown(key)
        time.sleep(2)
        KeyBoard.keyUp(key)

    @staticmethod
    def twoKeys(key1, key2):
        """模拟组合按键"""
        key1 = key1.lower()
        key2 = key2.lower()
        KeyBoard.keyDown(key1)
        KeyBoard.keyDown(key2)
        KeyBoard.keyUp(key1)
        KeyBoard.keyUp(key2)


if __name__ == '__main__':
    pass
剪切板操作代码
"""
------------------------------------
@Time : 2019/7/18 17:18
@Auth : linux超
@File : clipboard.py
@IDE  : PyCharm
@Motto: Real warriors,dare to face the bleak warning,dare to face the incisive error!
@QQ   : 28174043@qq.com
@GROUP: 878565760
------------------------------------
"""
import win32con
import win32clipboard as WC


class ClipBoard(object):
    """设置剪切板内容和获取剪切板内容"""

    @staticmethod
    def getText():
        """获取剪切板的内容"""
        WC.OpenClipboard()
        value = WC.GetClipboardData(win32con.CF_TEXT)
        WC.CloseClipboard()
        return value

    @staticmethod
    def setText(value):
        """设置剪切板的内容"""
        WC.OpenClipboard()
        WC.EmptyClipboard()
        WC.SetClipboardData(win32con.CF_UNICODETEXT, value)
        WC.CloseClipboard()


if __name__ == '__main__':
    pass
上传文件代码
"""
------------------------------------
@Time : 2019/7/18 17:20
@Auth : linux超
@File : upload_file_board.py
@IDE  : PyCharm
@Motto: Real warriors,dare to face the bleak warning,dare to face the incisive error!
@QQ   : 28174043@qq.com
@GROUP: 878565760
------------------------------------
"""
from clipboard import ClipBoard
from keyboard import KeyBoard

from selenium import webdriver
import time
from selenium.webdriver.common.action_chains import ActionChains


if __name__ == '__main__':
    ClipBoard.setText(r'E:\CnblogCode\upload_file.html')  # 待上传文件设置到剪切板
    driver = webdriver.Firefox()
    driver.get(r'file:///e:/CnblogCode/upload_file.html')
    upload_element = driver.find_element_by_xpath('//*[@id="upload_file"]')
    action = ActionChains(driver)
    action.move_to_element(upload_element).click().perform()
    action.release()
    time.sleep(3)  # 为了看效果
    KeyBoard.twoKeys('ctrl', 'v')
    KeyBoard.oneKey('enter')
执行过程

失败

可以看到第二个动画上传文件未成功,这也就这个方法的弊端,只要移动了鼠标就有可能就不会成功,毕竟模拟的是enter键,这个过程你点击了别的地方,那么enter的效果就变了,所以这种方法很不稳定,也不难发现,代码量也很多,而且需要掌握模拟键盘和剪切板的操作,最不推荐使用的就是这种方法
之前我的实战项目里面,用到过这种方法, 当时我已经发现了这种方法的弊端, 但是为了掌握这种模拟键盘的方法,所以才使用的,当然模拟键盘操作用到一些特殊的情况还是能解决很多实际问题的
WinSpy工具
第四种方法:这个工具其实和AutoIt工具的元素定位方式一样,但是不需要生成exe文件,其实只是个辅助工具,主要用来获取windows窗口句柄,进而通过python脚本来控制
WinSpy安装
https://sourceforge.net/projects/winspyex/
下载完直接解压打开WinSpy32(64).exe即可使用
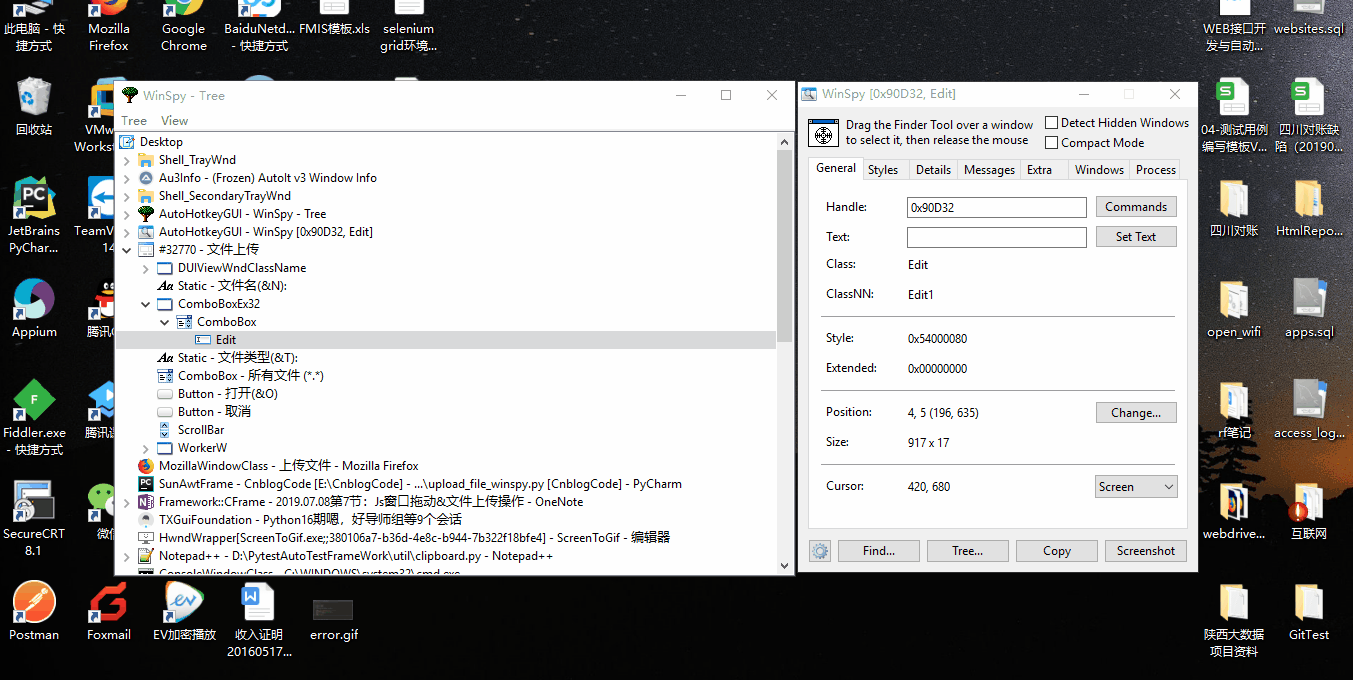
使用方法和autoId一样,请按照下图的步骤操作,记录winspy-Tree中红框信息
编写代码之前,同样需要提前安装 pypiwin32库
实例
"""
------------------------------------
@Time : 2019/7/17 19:14
@Auth : linux超
@File : upload_file_winspy.py
@IDE  : PyCharm
@Motto: Real warriors,dare to face the bleak warning,dare to face the incisive error!
@QQ   : 28174043@qq.com
@GROUP: 878565760
------------------------------------
"""
from selenium.webdriver.common.action_chains import ActionChains
from selenium import webdriver
import win32con
import win32gui
import time


def upload_file(browser: str, file: str):
    browser_type = {
        "firefox": "文件上传",
        "chrome": "打开",
        "ie": "选择要加载的文件"
    }
    time.sleep(2)
    dialog = win32gui.FindWindow("#32770", browser_type[browser])  # 火狐浏览器为”文件上传“,谷歌为”打开“
    combobox_ex32 = win32gui.FindWindowEx(dialog, 0, "ComboBoxEx32", None)
    combobox = win32gui.FindWindowEx(combobox_ex32, 0, 'ComboBox', None)
    edit = win32gui.FindWindowEx(combobox, 0, 'Edit', None)
    button = win32gui.FindWindowEx(dialog, 0, 'Button', None)
    win32gui.SendMessage(edit, win32con.WM_SETTEXT, None, file)
    win32gui.SendMessage(dialog, win32con.WM_COMMAND, 1, button)


if __name__ == '__main__':
    driver = webdriver.Firefox()
    driver.get(r'file:///e:/CnblogCode/upload_file.html')
    upload_element = driver.find_element_by_xpath('//*[@id="upload_file"]')
    action = ActionChains(driver)
    action.move_to_element(upload_element).click().perform()
    action.release()
    time.sleep(3)  # 为了看效果
    upload_file('firefox', r'E:\CnblogCode\upload_file.html')
执行过程
此方法也比较稳定,只要通过传递不同的浏览器参数,即可完成不同浏览器中的上传文件操作,而且相比于AutoId而言,这种方法可以直接使用python编写代码且不需要编译成exe程序,可以随时对代码进行修改,易维护
总结
最后总结一下每个方法的优缺点
1. send_keys(): 如果所遇见的上传文件使用的是input标签且属性type=file,均可使用,也最好采用此方法,方便,简单,执行效率高
2. AutoId: 需编写VBS代码并编译为exe可执行文件,过程繁琐,编写selenium测试用例时无法随时调试内部代码,但send_keys()无法使用时,可以采用此方法,执行效率较高,稳定性也算可以
3. 模拟键盘和剪切板: 此方法需要掌win32api,win32gui模块的使用,且代码编写繁琐,上传文件时如果鼠标点击其他地方会导致上传失败,脚本稳定性差,且效率低,但是如果用到一些特殊地方会起到比较好的效果
4. WinSpay:windows窗口句柄抓取工具,不需要编译脚本为exe文件,且上传文件操作使用的脚本是python第三方库实现,易维护,执行效率也较高,推荐send_keys()不可使用时,首先考虑此方法
----------------------------真正的勇士, 敢于直面惨淡的Warning、 敢于正视淋漓的Error--------------------------
版权声明
出处: 博客园Linux超的技术博客--https://www.cnblogs.com/linuxchao/
您的支持是对博主最大的鼓励,感谢您的认真阅读
本文版权归作者所有,欢迎转载,但未经作者同意必须保留此段声明, 且在文章页面明显位置给出原文连接,否则保留追究法律责任的权利。
作者: Linux超

 浙公网安备 33010602011771号