OpenCV学习笔记(一)
OpenCV学习笔记(一)
图像的缩放
dst = cv.resize( src, dsize[, dst[, fx[, fy[, interpolation]]]] )test
src: 为输入图像
dst: 输出图像
dsize: 输出图像的大小。
如果这个参数不为0,那么就代表将原图像缩放到这个Size(width,height)指定的大小;如果这个参数为0,那么原图像缩放之后的大小就要通过下面的公式来计算:
其中,fx和fy就是下面要说的两个参数,是图像width方向和height方向的缩放比例。
fx: width方向的缩放比例,如果它是0,那么它就会按照(double)dsize.width/src.cols来计算;
fy: height方向的缩放比例,如果它是0,那么它就会按照(double)dsize.height/src.rows来计算;
interpolation: 这个是指定插值的方式,参数用来指定重新计算像素的,有以下几种:
- INTER_NEAREST 最邻近插值
- INTER_LINEAR 双线性插值,如果最后一个参数你不指定,默认使用这种方法
- INTER_CUBIC 4x4像素邻域内的双立方插值
- INTER_LANCZOS4 - 8x8像素邻域内的Lanczos插值
例子如下
import cv2 as cv
import numpy as np

img = cv.imread("/home/eldenqi/图片/opencv_p/test1.png")

res = cv.resize(img, None, fx=1.5, fy=1.5, interpolation=cv.INTER_CUBIC)
cv.imshow('img',res)
cv.waitKey(0)
cv.destroyAllWindows()
# OR
# height, width = img.shape[:2]
# res = cv.resize(img, (2 * width, 2 * height), interpolation=cv.INTER_CUBIC)
图像的旋转
retval = cv.getRotationMatrix2D( center, angle, scale )
center: 图像中心,一般使用((cols-1)/2.0,(rows-1)/2.0)代替
angle: 旋转角度,正表示逆时针
scale: 用于缩放
例子如下
M = cv.getRotationMatrix2D(((cols - 1) / 2.0, (rows - 1) / 2.0), 90, 0.5)
dst = cv.warpAffine(img, M, (cols, rows))
cv.imshow('img', dst)
cv.waitKey(0)
cv.destroyAllWindows()
图像的平移
dst = cv.warpAffine( src, M, dsize[, dst[, flags[, borderMode[, borderValue]]]] )
不演示
例子如下
# move
rows, cols, channels = img.shape
M = np.float32([[1, 0, 100], [0, 1, 50]]) #100:x的平移距离,50:y的平移距离
dst = cv.warpAffine(img, M, (cols, rows))
cv.imshow('img', dst)
cv.waitKey(0)
cv.destroyAllWindows()
仿射变换
在仿射变换中,原始图像中的所有平行线在输出图像中仍然是平行的。为了找到变换矩阵,我们需要从输入图像中取三个点及其在输出图像中的对应位置。然后 cv.getAffineTransform 将创建一个 2x3 矩阵,该矩阵将传递给 cv.warpAffine 。
例子如下
rows, cols, ch = img.shape
pts1 = np.float32([[50, 50], [200, 50], [50, 100]]) # 之前的点
pts2 = np.float32([[10, 100], [200, 50], [100, 250]]) # 变换后点的位置
M = cv.getAffineTransform(pts1, pts2)
dst = cv.warpAffine(img, M, (cols, rows))
cv.imshow('img', img)
cv.imshow('dst', dst)

cv.waitKey(0)
cv.destroyAllWindows()
在使用matplotlib的时候会出现XIO: fatal IO error 25这样的错误,原因暂时未查清。
更正:加上
import matplotlib
matplotlib.use('TKAgg')
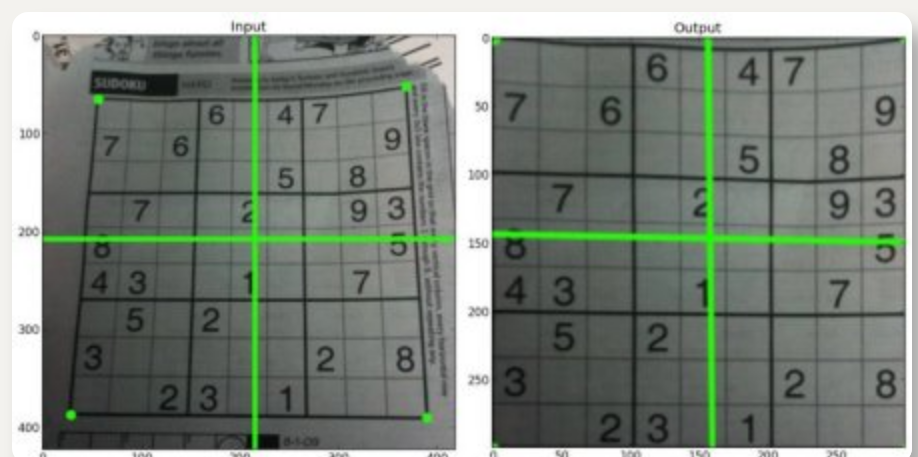
透视变换
对透视转换,你需要一个 3x3 变换矩阵。即使在转换之后,直线也将保持直线。要找到这个变换矩阵,需要输入图像上的 4 个点和输出图像上的相应点。在这四点中,任意三点不应该共线。然后通过 cv.getPerspectiveTransform 找到变换矩阵。然后对这个 3x3 变换矩阵使用 cv.warpPerspective。
例子如下
rows, cols, ch = img.shape
pts1 = np.float32([[56, 65], [368, 52], [28, 387], [389, 390]])
pts2 = np.float32([[0, 0], [300, 0], [0, 300], [300, 300]])
M = cv.getPerspectiveTransform(pts1, pts2)
dst = cv.warpPerspective(img, M, (300, 300))
plt.subplot(121), plt.imshow(img), plt.title('Input')
plt.subplot(122), plt.imshow(dst), plt.title('Output')
plt.show()
来源
https://opencv.apachecn.org/#/docs/4.0.0/4.2-tutorial_py_geometric_transformations
https://docs.opencv.org/4.x/d9/df8/tutorial_root.html

 浙公网安备 33010602011771号