gitlab HA集群
https://docs.gitlab.com/ee/administration/high_availability/gitlab.html
https://about.gitlab.com/high-availability/
https://www.oschina.net/translate/gitlab-high-availability?lang=chs
gitlab目录结构:
find / -name gitlab |grep -v "^/opt/"
/run/gitlab # pid目录
/etc/gitlab # 配置目录
/var/log/gitlab # 日志目录
/var/opt/gitlab # 应用数据保存目录,要同步的主要是这里的部分数据
/opt/gitlab # bin程序目录
架构图:
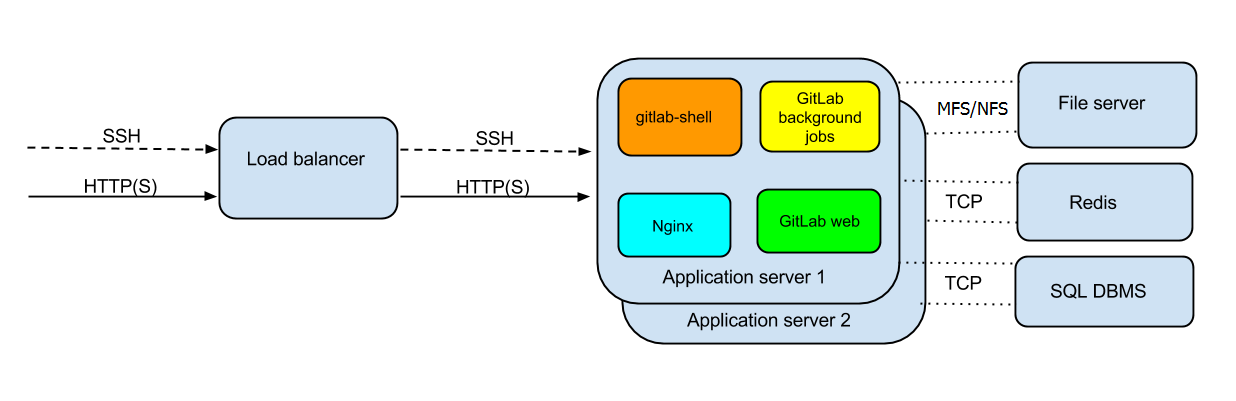
git1
git2:
(gitlab 允许多个节点,多活)
postgresql集群:
redis集群(哨兵模式)
MFS网络文件存储
# MFS集群部署见 http://www.cnblogs.com/linkenpark/p/7416998.html
redis集群(哨兵模式):http://blog.51cto.com/tianshili/1759289
# PostgreSQL 主从集群部署 http://www.cnblogs.com/linkenpark/p/8339936.html
安装postgresql扩展pg_trgm
yum -y install postgresql96-contrib-9.6.8 # 默认的 yum -y install postgresql-contrib
创建用户及库
su - postgres
psql
create role gitlab login encrypted password 'pass';
\du   ;显示用户


create database gitlabhq_production owner=gitlab ENCODING = 'UTF8';
\l     ;列出数据库


;添加pg_trgm扩展
CREATE EXTENSION pg_trgm;
在MFS服务端根目录下创建一个项目给gitlab用
mkdir gitlab
cd gitlab; mkdir -p .ssh gitlab-rails/uploads gitlab-rails/shared gitlab-ci/builds git-data
git1、git2 挂载MFS目录
mkdir -p /var/opt/gitlab/.ssh /var/opt/gitlab/gitlab-rails/uploads /var/opt/gitlab/gitlab-rails/shared /var/opt/gitlab/gitlab-ci/builds /var/opt/gitlab/git-data
cat /etc/fstab
mfsmount /var/opt/gitlab/.ssh    fuse    mfsmaster=mfsmaster,mfsport=9421,mfssubfolder=/gitlab/.ssh,mfspassword=passwd,_netdev 0 0
mfsmount /var/opt/gitlab/gitlab-rails/uploads    fuse    mfsmaster=mfsmaster,mfsport=9421,mfssubfolder=/gitlab/gitlab-rails/uploads,mfspassword=passwd,_netdev 0 0
mfsmount /var/opt/gitlab/gitlab-rails/shared    fuse    mfsmaster=mfsmaster,mfsport=9421,mfssubfolder=/gitlab/gitlab-rails/shared,mfspassword=passwd,_netdev 0 0
mfsmount /var/opt/gitlab/gitlab-ci/builds    fuse    mfsmaster=mfsmaster,mfsport=9421,mfssubfolder=/gitlab/gitlab-ci/builds,mfspassword=passwd,_netdev 0 0
mfsmount /var/opt/gitlab/git-data    fuse    mfsmaster=mfsmaster,mfsport=9421,mfssubfolder=/gitlab/git-data,mfspassword=passwd,_netdev 0 0
git1、git2安装gitlab
添加gitlab yum源
cat /etc/yum.repos.d/gitlab-ce.repo
[gitlab-ce]
name=Gitlab CE Repository
baseurl=https://mirrors.tuna.tsinghua.edu.cn/gitlab-ce/yum/el$releasever/
gpgcheck=0
enabled=1
yum install -y curl policycoreutils-python openssh-server sudo systemctl enable sshd
systemctl start sshd
firewall-cmd --permanent --add-service=http
systemctl reload firewalld

yum -y install postfix
systemctl enable postfix
systemctl start postfix
yum install -y gitlab-ce

gitlab启动脚本
cat /etc/systemd/system/gitlab.service
[Unit]
Description=gitlab

[Service]
Type=oneshot
RemainAfterExit=yes
ExecStart=/bin/gitlab-ctl start
ExecStop=/bin/gitlab-ctl stop

[Install]
WantedBy=multi-user.target
systemctl enable gitlab
git1配置
grep -Ev "^#|^$" /etc/gitlab/gitlab.rb
external_url 'http://git.conf.com'

gitlab_rails['time_zone'] = 'Asia/Shanghai'


# Disable components that will not be on the GitLab application server
roles ['application_role']

# Prevent GitLab from starting if MFS data mounts are not available
high_availability['mountpoint'] = '/var/opt/gitlab/git-data'

# PostgreSQL connection details
postgresql['enable'] = false
gitlab_rails['db_adapter'] = "postgresql"
gitlab_rails['db_encoding'] = "utf8"
gitlab_rails['db_database'] = "gitlabhq_production"
gitlab_rails['db_username'] = "gitlab"
gitlab_rails['db_password'] = "db_password"
gitlab_rails['db_host'] = "172.16.3.203"
gitlab_rails['db_port'] = 5432

# Redis connection details(单实例、或主从集群)
redis['enable'] = false
gitlab_rails['redis_host'] = "172.16.3.203"
gitlab_rails['redis_port'] = 6379
gitlab_rails['redis_password'] = "redis_password"
gitlab_rails['redis_database'] = 0

# Redis connection details(哨兵集群)
# redis连接方式只设置一种就可以,CE版也可以连接redis sentinel集群
redis['enable'] = false
gitlab_rails['redis_sentinels'] = [
    {'host' => 'sentinel-0.conf.com', 'port' => 26379},
    {'host' => 'sentinel-1.conf.com', 'port' => 26379},
    {'host' => 'sentinel-2.conf.com', 'port' => 26379},
    {'host' => 'sentinel-3.conf.com', 'port' => 26379},
]
redis['master_name'] = 'mymaster'
redis['master_password'] = 'redis_auth_pass'
gitlab_rails['redis_database'] = 0


# nginx enable
nginx['enable'] = true
使配置生效
gitlab-ctl reconfigure
如要再次初始化数据,运行 gitlab-rake gitlab:setup(一般前面执行了gitlab-ctl reconfigure已经初始化发数据)
gitlab-ctl start
git2配置
从git1把/etc/gitlab/gitlab-secrets.json 复制到 git2的/etc/gitlab目录下
touch /etc/gitlab/skip-auto-migrations
grep -v "^#" /etc/gitlab/gitlab.rb
external_url 'http://git.conf.com'

gitlab_rails['time_zone'] = 'Asia/Shanghai'

# Disable components that will not be on the GitLab application server
roles ['application_role']

# Prevent GitLab from starting if MFS data mounts are not available
high_availability['mountpoint'] = '/var/opt/gitlab/git-data'

# disable automatic database migrations
gitlab_rails['auto_migrate'] = false

# PostgreSQL connection details
postgresql['enable'] = false
gitlab_rails['db_adapter'] = "postgresql"
gitlab_rails['db_encoding'] = "utf8"
gitlab_rails['db_database'] = "gitlabhq_production"
gitlab_rails['db_username'] = "gitlab"
gitlab_rails['db_password'] = "db_password"
gitlab_rails['db_host'] = "172.16.3.203"
gitlab_rails['db_port'] = 5432

# Redis connection details(单实例、或主从集群)
redis['enable'] = false
gitlab_rails['redis_host'] = "172.16.3.203"
gitlab_rails['redis_port'] = 6379
gitlab_rails['redis_password'] = "redis_password"
gitlab_rails['redis_database'] = 0

# Redis connection details(哨兵集群)
# redis连接方式只设置一种就可以,CE版也可以连接redis sentinel集群
redis['enable'] = false
gitlab_rails['redis_sentinels'] = [
    {'host' => 'sentinel-0.conf.com', 'port' => 26379},
    {'host' => 'sentinel-1.conf.com', 'port' => 26379},
    {'host' => 'sentinel-2.conf.com', 'port' => 26379},
    {'host' => 'sentinel-3.conf.com', 'port' => 26379},
]
redis['master_name'] = 'mymaster'
redis['master_password'] = 'redis_auth_pass'
gitlab_rails['redis_database'] = 0


# nginx enable
nginx['enable'] = true
gitlab-ctl reconfigure
gitlab-ctl start
如有更多的 second app 请参照git2配置
# 前端负载均衡
前端再分别对http负载(可用nginx反向代理)
ssh(可用HAproxy代理,或nginx TCP代理)
由其他gitlab服务器数据迁移到此gitlab集群
原gitlab服务器数据备份
可以通过/etc/gitlab/gitlab.rb配置文件来修改默认存放备份文件的目录
gitlab_rails['backup_path'] = "/var/opt/gitlab/backups"
/var/opt/gitlab/backups修改为你想存放备份的目录即可, 修改完成之后使用gitlab-ctl reconfigure命令重载配置文件即可.
/opt/gitlab/bin/gitlab-rake gitlab:backup:create #执行备份命令
如 /var/opt/gitlab/backups/1524449406_2018_04_23_10.6.4_gitlab_backup.tar
把 备份的数据 1524449406_2018_04_23_10.6.4_gitlab_backup.tar 复制到 gitlab集群的第一个节点的/var/opt/gitlab/backups目录下
chmod 777 /var/opt/gitlab/backups/1524449406_2018_04_23_10.6.4_gitlab_backup.tar
# 停止相关数据连接服务
gitlab-ctl stop unicorn
gitlab-ctl stop sidekiq
umount /var/opt/gitlab/gitlab-rails/uploads # 由于恢复时会把该目录重启命令成 /var/opt/gitlab/gitlab-rails/uploads.时间戳 ,生产新的/var/opt/gitlab/gitlab-rails/uploads目录,但该目录被挂载了会提示设备busy
umount /var/opt/gitlab/gitlab-ci/builds # 由于恢复时会把该目录重启命令成/var/opt/gitlab/gitlab-ci/builds.时间戳 ,生产新的/var/opt/gitlab/gitlab-ci/builds目录,但该目录被挂载了会提示设备busy
gitlab-rake gitlab:backup:restore BACKUP=1524449406_2018_04_23_10.6.4 #执行恢复备份
mv /var/opt/gitlab/gitlab-rails/uploads /var/opt/gitlab/gitlab-rails/uploads_ok
mkdir -p /var/opt/gitlab/gitlab-rails/uploads
mount /var/opt/gitlab/gitlab-rails/uploads
cp -ap /var/opt/gitlab/gitlab-rails/uploads_ok/* /var/opt/gitlab/gitlab-rails/uploads
mv /var/opt/gitlab/gitlab-ci/builds /var/opt/gitlab/gitlab-ci/builds_ok
mkdir -p /var/opt/gitlab/gitlab-ci/builds
mount /var/opt/gitlab/gitlab-ci/builds
cp -rp /var/opt/gitlab/gitlab-ci/builds_ok/* /var/opt/gitlab/gitlab-ci/builds
gitlab-ctl start unicorn
gitlab-ctl start sidekiq
完成恢复
# key认证问题
可能报错:
报错情况1:(key没有从master复制过来)
IT IS POSSIBLE THAT SOMEONE IS DOING SOMETHING NASTY!
Someone could be eavesdropping on you right now (man-in-the-middle attack)!
It is also possible that a host key has just been changed.
The fingerprint for the ECDSA key sent by the remote host is
SHA256:9DdK4jo9LPLg7snd/vueT3wI2dy0hb7CVYRRGOTU8TY.
Please contact your system administrator.
Add correct host key in /c/Users/cd/.ssh/known_hosts to get rid of this message.
Offending ECDSA key in /c/Users/cd/.ssh/known_hosts:4
ECDSA host key for git.tuandai888.com has changed and you have requested strict checking.
Host key verification failed.
fatal: Could not read from remote repository.
Please make sure you have the correct access rights
and the repository exists.
报错情况2:(从master复制过来的key权限没设置好)
ssh_exchange_identification: Connection closed by remote host
fatal: Could not read from remote repository.
Please make sure you have the correct access rights
and the repository exists.
解决方法:
把master的 /etc/ssh/*key* 文件全部复制到从节点来,并注意权限与master的设置一样,
scp root@[master_IP]:/etc/ssh/*key* /etc/ssh
chown root:ssh_keys ssh_host_ecdsa_key ssh_host_ed25519_key ssh_host_rsa_key
# 注意
只有连接Postgresql master库, gitlab才能正常使用。因为gitlab web登录时就要求写数据库。连接到postgresql从库,gitlab web登录失败,报500错。ssh连接仓库正常。


 浙公网安备 33010602011771号