

SpringCloud分布式微服务搭建(二)
这个例子主要是将zuul和eureka结合起来使用,zuul作为反向代理,同时起到负载均衡的作用,同时网关后面的消费者也作为服务提供者,同时提供负载均衡。
一.API网关(摘自百度)
API网关是一个服务器,是系统的唯一入口。从面向对象设计的角度看,它与外观模式类似。API网关封装了系统内部架构,为每个客户端提供一个定制的API。它可能还具有其它职责,如身份验证、监控、负载均衡、缓存、请求分片与管理、静态响应处理。
API网关方式的核心要点是,所有的客户端和消费端都通过统一的网关接入微服务,在网关层处理所有的非业务功能。通常,网关也是提供REST/HTTP的访问API。服务端通过API-GW注册和管理服务。
二. 整体架构
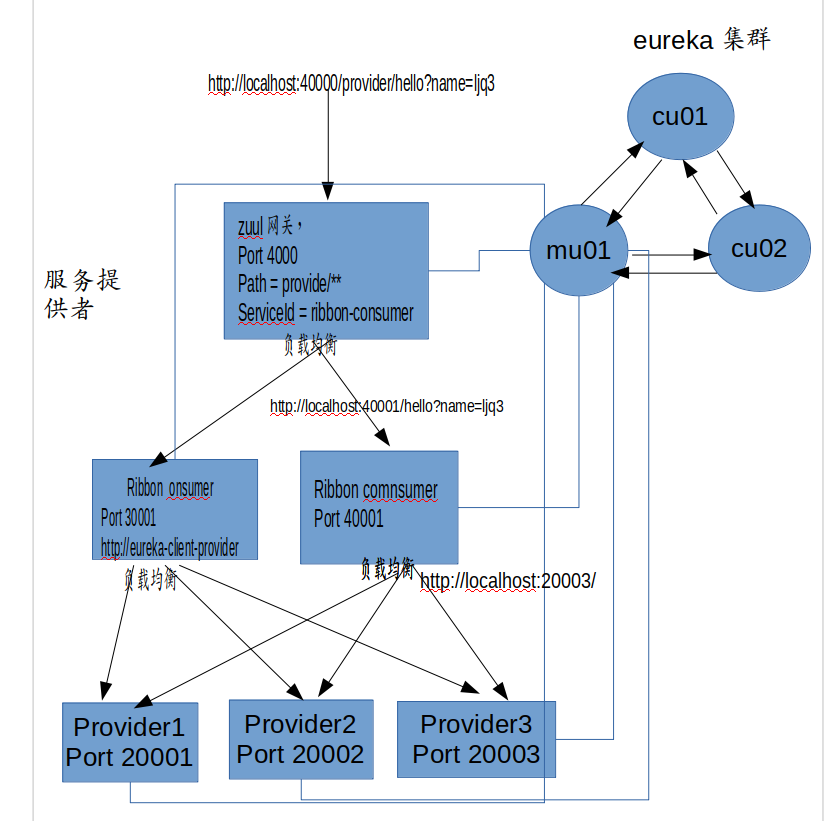
(1)http://localhost:40000/provider/hello?name=ljq3经过zuul网关之后,由于zuul对路径映射
zuul.routes.api-a.path=/provider/**
zuul.routes.api-a.serviceId=ribbon-consumer
(2)把provider映射到ribbon-cunsumer这个服务上,zuul利用负载均衡的方式选一个服务地址,然后将路径替换,得到
http://localhost:40001/hello?name=ljq3
(3)ribbon-consummer再利用ribbon负载均衡选择一个provider,但是因为我在代码中只把地址传递,而没有传递参数,所以得到的url是
http://localhost:20003/

(4)github地址:https://github.com/linjiaqin/scdemo
三. zuul代码结构
这里把zuul的服务作为一个服务提供者去注册到eureka中,要使用这个注解表名是一个服务提供者@EnableEurekaClient
1.引导类
package com.ljq;

import org.slf4j.Logger;
import org.slf4j.LoggerFactory;
import org.springframework.boot.SpringApplication;
import org.springframework.boot.autoconfigure.SpringBootApplication;
import org.springframework.cloud.netflix.eureka.EnableEurekaClient;
import org.springframework.cloud.netflix.zuul.EnableZuulProxy;
import org.springframework.context.annotation.Bean;

@EnableZuulProxy
@SpringBootApplication
@EnableEurekaClient
//把zuul作为服务提供者到eureka注册
public class GatewayApplication {

   private static final Logger LOGGER = LoggerFactory.getLogger(GatewayApplication.class);
   GatewayApplication(){
      LOGGER.info("app init");
   }
   public static void main(String[] args) {
      LOGGER.info("app start");
      SpringApplication.run(GatewayApplication.class, args);
   }

}
2.配置文件
这里把的路径匹配规则是当访问的符合provider这个路径时,自动映射到serviceId上,去eureka找到serviceID的所有可用地址,负载均衡选取一个后替换成这个地址
spring.application.name=gateway-service-zuul
server.port=40000
eureka.client.serviceUrl.defaultZone=http://mu01:8761/eureka,http://cu01:8762/eureka,http://cu02:8763/eureka
zuul.routes.api-a.path=/provider/**
zuul.routes.api-a.serviceId=eureka-client-service-provider
3. beanconfig
package com.ljq;

import org.slf4j.Logger;
import org.slf4j.LoggerFactory;
import org.springframework.context.annotation.Bean;
import org.springframework.context.annotation.Configuration;
import org.springframework.stereotype.Service;

@Service
public class MyBaenConfig {
    private static final Logger LOGGER = LoggerFactory.getLogger(MyBaenConfig.class);
    MyBaenConfig(){
        LOGGER.info("service init");
    }
    @Bean
    public MyFilter myFilter() {
        LOGGER.info("bean init");
        return new MyFilter();
    }
}
4. zuul的核心filter类,用来过滤请求
package com.ljq;


import com.netflix.zuul.ZuulFilter;
import com.netflix.zuul.context.RequestContext;
import org.apache.commons.lang.StringUtils;
import org.slf4j.Logger;
import org.slf4j.LoggerFactory;
import javax.servlet.http.HttpServletRequest;

public class MyFilter extends ZuulFilter {

    private final Logger LOGGER = LoggerFactory.getLogger(MyFilter.class);

    MyFilter(){
        LOGGER.info("filter init");
    }
    @Override
    public String filterType() {
        return "pre"; // 可以在请求被路由之前调用
    }

    @Override
    public int filterOrder() {
        return 0; // filter执行顺序,通过数字指定 ,优先级为0,数字越大,优先级越低
    }

    @Override
    public boolean shouldFilter() {
        return true;// 是否执行该过滤器,此处为true,说明需要过滤
    }

    @Override
    public Object run() {
        RequestContext ctx = RequestContext.getCurrentContext();
        HttpServletRequest request = ctx.getRequest();

        LOGGER.info("--->>> MyFilter {},{}", request.getMethod(), request.getRequestURL().toString());

        String token = request.getParameter("name");// 获取请求的参数

        if (StringUtils.isNotBlank(token)) {
            ctx.setSendZuulResponse(true); //对请求进行路由
            ctx.setResponseStatusCode(200);
            ctx.set("isSuccess", true);
            return null;
        } else {
            ctx.setSendZuulResponse(false); //不对其进行路由
            ctx.setResponseStatusCode(400);
            ctx.setResponseBody("parameter name is empty");
            ctx.set("isSuccess", false);
            return null;
        }
    }

}
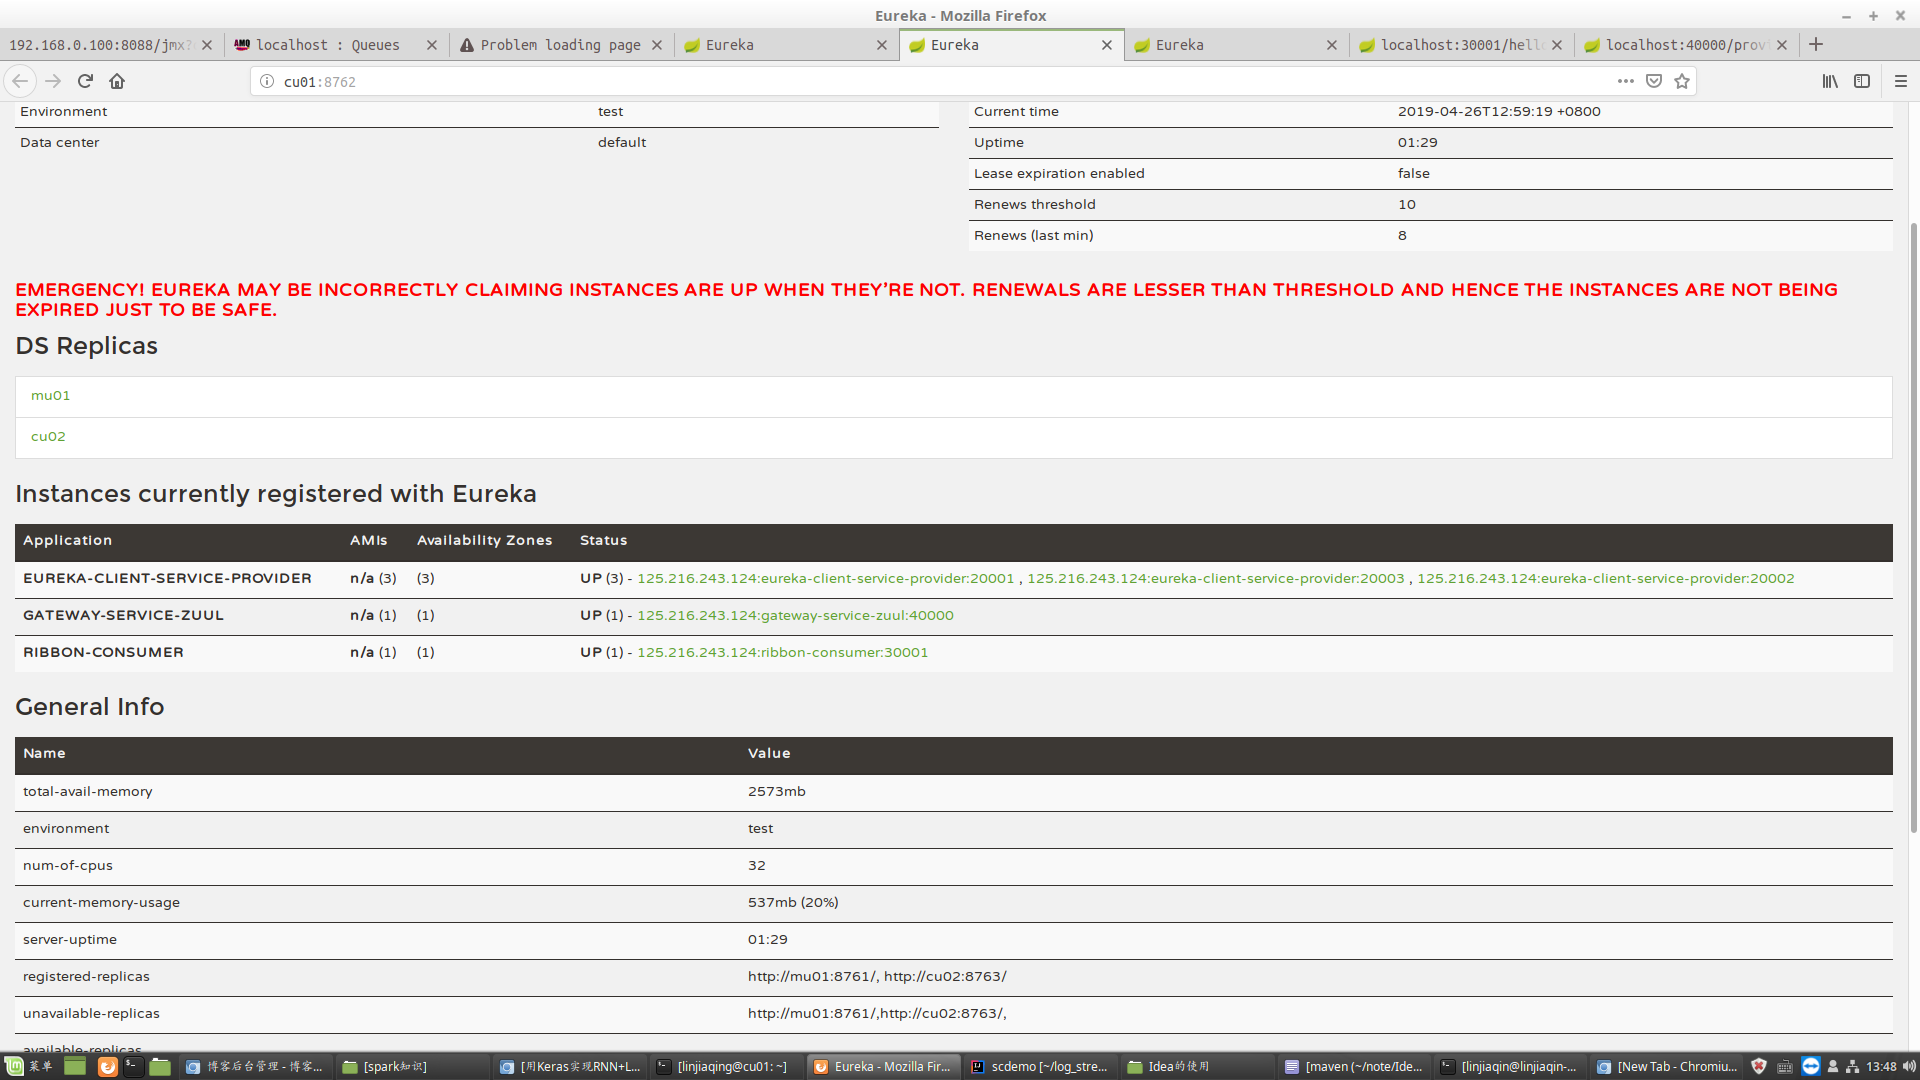
5.mvn spring-boot:run起来之后,就可以看到网关服务在eureka上注册了
curl http://localhost:40000/provider 可以看到负载均衡的效果
6.网关的默认路由规则
但是如果后端服务多达十几个的时候,每一个都这样配置也挺麻烦的,spring cloud zuul已经帮我们做了默认配置。
默认情况下,Zuul会代理所有注册到Eureka Server的微服务,
并且Zuul的路由规则如下:http://ZUUL_HOST:ZUUL_PORT/微服务在Eureka上的serviceId/**会被转发到serviceId对应的微服务。
二 .Ribbon Consumer
这里的consummer不仅是服务消费者去后面拿取provider的内容,同时也作为一个服务提供者对外提供服务
1.引导类
@SpringBootApplication
@EnableDiscoveryClient
@EnableEurekaClient
public class ConsumerApplication {

    public static void main(String[] args) {
        SpringApplication.run(ConsumerApplication.class, args);
    }

}
2.beanconfig类
package com.ljq;

import org.slf4j.Logger;
import org.slf4j.LoggerFactory;
import org.springframework.cloud.client.loadbalancer.LoadBalanced;
import org.springframework.context.annotation.Bean;
import org.springframework.context.annotation.Configuration;
import org.springframework.web.client.RestTemplate;

@Configuration
public class ljqConfig {
    private static final Logger logger = LoggerFactory.getLogger(ljqConfig.class);
    ljqConfig(){
        logger.info("config init");
    }
    @Bean
    @LoadBalanced
    public RestTemplate restTemplate(){
        logger.info("restTemplate function");
        return new RestTemplate();
    }
}
3.controller
package com.ljq;

import org.slf4j.Logger;
import org.slf4j.LoggerFactory;
import org.springframework.beans.factory.annotation.Autowired;
import org.springframework.web.bind.annotation.GetMapping;
import org.springframework.web.bind.annotation.RestController;
import org.springframework.web.client.RestTemplate;

import javax.servlet.http.HttpServletRequest;

@RestController
public class ljqController {
    private static final Logger logger = LoggerFactory.getLogger(ljqController.class);
    ljqController(){
        logger.info("controller init");
    }
    @Autowired
    private RestTemplate restTemplate;

    //这里不写eureka的注册中心,而是写服务提供者的应用名
    @GetMapping(value = "/hello")
    public String hello(HttpServletRequest request){
        logger.info("hello function");
        logger.info(request.getPathInfo());
        logger.info("--->>> consumer contorller {},{}", request.getMethod(), request.getRequestURL().toString());

        String token = request.getParameter("name");// 获取请求的参数
        logger.info(token);

        return restTemplate.getForEntity("http://eureka-client-service-provider/", String.class).getBody();
    }
}
配置与上篇文章一致
spring.application.name=ribbon-consumer
server.port=30001
eureka.client.serviceUrl.defaultZone=http://mu01:8761/eureka,http://cu01:8762/eureka,http://cu02:8763/eureka
springboot的执行顺序
注解
三. provider
代码与上篇文章基本一直
import org.slf4j.Logger;
import org.slf4j.LoggerFactory;
import org.springframework.beans.factory.annotation.Value;
import org.springframework.web.bind.annotation.RequestMapping;
import org.springframework.web.bind.annotation.RestController;

import javax.servlet.http.HttpServletRequest;

@RestController
public class ljqController {
    private final Logger logger = LoggerFactory.getLogger(ljqController.class);
    @Value("${server.port}")
    String port;

    @RequestMapping("/")
    public String home(HttpServletRequest request){
        logger.info(request.getPathInfo());
        logger.info("--->>> consumer contorller {},{}", request.getMethod(), request.getRequestURL().toString());

        String token = request.getParameter("name");// 获取请求的参数
        logger.info(token);
        return "Hello world, port is:" + port;
    }
}
一键启动脚本
#首先开启eureka,上篇文章中我们把eureka放在集群上,并单独写了一个脚本了,这里不在赘述
#然后开启zuul
cd /home/linjiaqin/log_stream_platform/source/scdemo/gateway;
nohup mvn spring-boot:run > /dev/null 2>&1  &
#开两个ribbon-consumer
cd /home/linjiaqin/log_stream_platform/source/scdemo/consumer
nohup mvn spring-boot:run -Dserver.port=30001 > /dev/null 2>&1  &
nohup mvn spring-boot:run -Dserver.port=30002 > /dev/null 2>&1  &
#开启三个provider
cd /home/linjiaqin/log_stream_platform/source/scdemo/provider
nohup mvn spring-boot:run -Dserver.port=20001 > /dev/null 2>&1  &
nohup mvn spring-boot:run -Dserver.port=20002 > /dev/null 2>&1  &
nohup mvn spring-boot:run -Dserver.port=20003 > /dev/null 2>&1  &
测试结果
linjiaqin@linjiaqin-computer:~$ curl http://localhost:40000/provider/hello?name=ljq2
Hello world, port is:20003
linjiaqin@linjiaqin-computer:~$ curl http://localhost:40000/provider/hello?name=ljq3
Hello world, port is:20003
linjiaqin@linjiaqin-computer:~$ curl http://localhost:40000/provider/hello?name=ljq4
Hello world, port is:20003
linjiaqin@linjiaqin-computer:~$ curl http://localhost:40000/provider/hello?name=ljq5
Hello world, port is:20002
linjiaqin@linjiaqin-computer:~$ curl http://localhost:40000/provider/hello?name=ljq6
Hello world, port is:20002

 浙公网安备 33010602011771号