idea搭建Spring boot+webService
1.idea创建spring boot工程
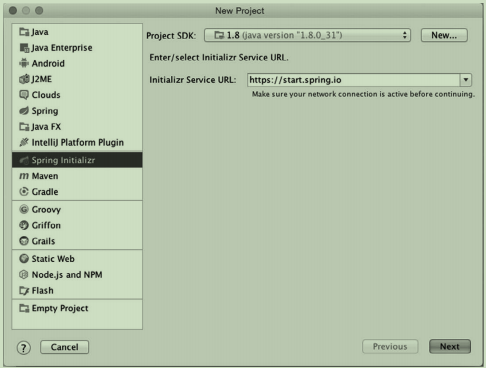
要在IntelliJ IDEA里创建新的Spring Boot应用程序,在File菜单里选择New > Project。

Spring Boot初始化向导的第二屏要求你提供项目的一些基本信息,比如项目名称、Maven
Group和Artifact、Java版本,以及你是想用Maven还是Gradle来构建项目。
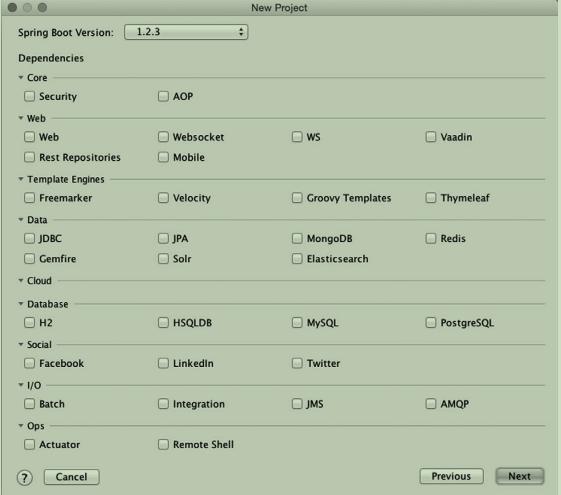
第三屏就开始问你要往项目里添加什么依赖了。和之前一
样,屏幕里的复选框和Spring Boot起步依赖是对应的。选完之后点击Next就到了向导的最后一屏
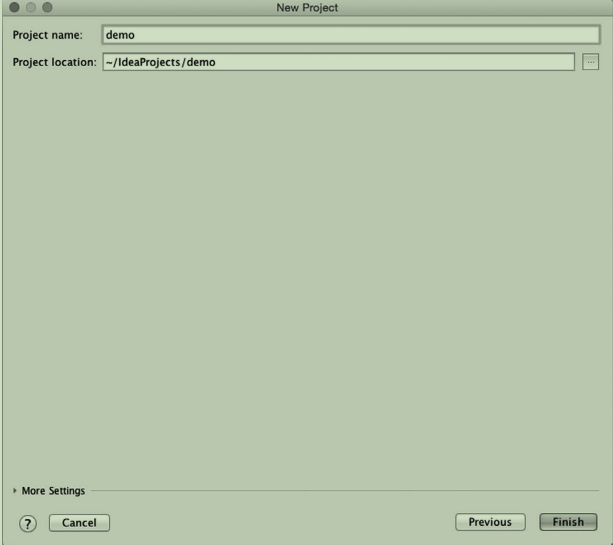
最后一屏问你项目叫什么名字,还有要在哪里创建项目。一切准备就绪之后,点击Finish按
钮,就能在IDE里得到一个空的Spring Boot项目了
***以上内容参考Spring Boot实战
***以下内容参考https://blog.csdn.net/u011410529/article/details/68063541?winzoom=1
开始搭建webService
1.往pom.xml增加webService需要的依赖
    <!-- spring boot的包 -->
    <dependency>
      <groupId>org.springframework.boot</groupId>
      <artifactId>spring-boot-starter-web</artifactId>
      <version>1.5.2.RELEASE</version>
    </dependency>

    <!--spring web Service的包-->
    <dependency>
      <groupId>org.springframework.boot</groupId>
      <artifactId>spring-boot-starter-web-services</artifactId>
      <version>1.5.2.RELEASE</version>
    </dependency>

    <!--spring web service wsdl包-->
    <dependency>
      <groupId>wsdl4j</groupId>
      <artifactId>wsdl4j</artifactId>
      <version>1.6.3</version>
    </dependency>
2.我们来写wsdl描述文件,创建test.xsd文件


<xs:schema xmlns:xs="http://www.w3.org/2001/XMLSchema" xmlns:tns="http://www.yourcompany.com/webservice"
           targetNamespace="http://www.yourcompany.com/webservice" elementFormDefault="qualified">

    <xs:element name="getCountryRequest">
        <xs:complexType>
            <xs:sequence>
                <xs:element name="name" type="xs:string"/>
            </xs:sequence>
        </xs:complexType>
    </xs:element>

    <xs:element name="getCountryResponse">
        <xs:complexType>
            <xs:sequence>
                <xs:element name="country" type="tns:country"/>
            </xs:sequence>
        </xs:complexType>
    </xs:element>

    <xs:complexType name="country">
        <xs:sequence>
            <xs:element name="name" type="xs:string"/>
            <xs:element name="population" type="xs:int"/>
            <xs:element name="capital" type="xs:string"/>
            <xs:element name="currency" type="tns:currency"/>
        </xs:sequence>
    </xs:complexType>

    <xs:simpleType name="currency">
        <xs:restriction base="xs:string">
            <xs:enumeration value="GBP"/>
            <xs:enumeration value="EUR"/>
            <xs:enumeration value="PLN"/>
        </xs:restriction>
    </xs:simpleType>
</xs:schema>
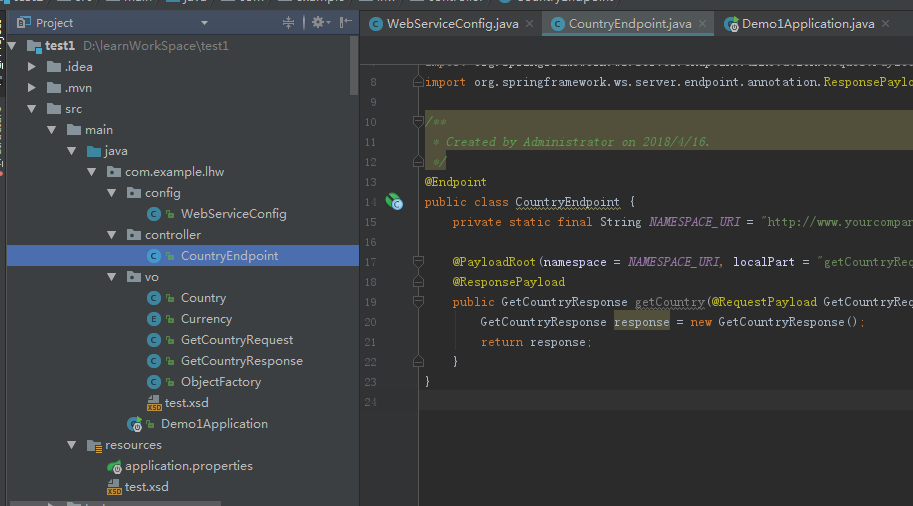
3.对test.xsd右键,然后选中web service那一项,generate java code from xml schema using jaxb,选择要生成文件的位置
4.然后编写webServiceConfig文件,指定url什么的。
package com.example.lhw.config;

import org.springframework.boot.web.servlet.ServletRegistrationBean;
import org.springframework.context.ApplicationContext;
import org.springframework.context.annotation.Bean;
import org.springframework.context.annotation.Configuration;
import org.springframework.core.io.ClassPathResource;
import org.springframework.ws.config.annotation.EnableWs;
import org.springframework.ws.config.annotation.WsConfigurerAdapter;
import org.springframework.ws.transport.http.MessageDispatcherServlet;
import org.springframework.ws.wsdl.wsdl11.DefaultWsdl11Definition;
import org.springframework.xml.xsd.SimpleXsdSchema;
import org.springframework.xml.xsd.XsdSchema;

/**
 * Created by Administrator on 2018/4/16.
 */
@EnableWs
@Configuration
public class WebServiceConfig  extends WsConfigurerAdapter {
    @Bean
    public ServletRegistrationBean messageDispatcherServlet(ApplicationContext applicationContext) {
        MessageDispatcherServlet servlet = new MessageDispatcherServlet();
        servlet.setApplicationContext(applicationContext);
        servlet.setTransformWsdlLocations(true);
        return new ServletRegistrationBean(servlet, "/webService/*");---定义查看wsdl的地址http://localhost:8080/webService/countries.wsdl
    }

    @Bean(name = "countries")
    public DefaultWsdl11Definition defaultWsdl11Definition(XsdSchema countriesSchema) {
        DefaultWsdl11Definition wsdl11Definition = new DefaultWsdl11Definition();
        wsdl11Definition.setPortTypeName("CountriesPort");
        wsdl11Definition.setLocationUri("/webService123");//服务调用地址
        wsdl11Definition.setTargetNamespace("http://localhost:8080/webservices");
        wsdl11Definition.setSchema(countriesSchema);
        return wsdl11Definition;
    }

    @Bean
    public XsdSchema countriesSchema() {
        return new SimpleXsdSchema(new ClassPathResource("test.xsd"));
    }
}
5.然后编写endpoint,类似于controller,然后我就丢在controller里面了
package com.example.lhw.controller;

import com.example.lhw.vo.GetCountryRequest;
import com.example.lhw.vo.GetCountryResponse;
import org.springframework.ws.server.endpoint.annotation.Endpoint;
import org.springframework.ws.server.endpoint.annotation.PayloadRoot;
import org.springframework.ws.server.endpoint.annotation.RequestPayload;
import org.springframework.ws.server.endpoint.annotation.ResponsePayload;

/**
 * Created by Administrator on 2018/4/16.
 */
@Endpoint
public class CountryEndpoint {
    private static final String NAMESPACE_URI = "http://www.yourcompany.com/webservice";

    @PayloadRoot(namespace = NAMESPACE_URI, localPart = "getCountryRequest")
    @ResponsePayload
    public GetCountryResponse getCountry(@RequestPayload GetCountryRequest request) {
        GetCountryResponse response = new GetCountryResponse();
        return response;
    }
}
7.启动项目
8.访问这个http://localhost:8080/webService/countries.wsdl 可以看到项目启动成功
目录结构:

 浙公网安备 33010602011771号