BOM与DOM操作
_____egon新书来袭请看:https://egonlin.com/book.html
一 BOM操作
1.1 介绍
BOM:Browser Object Model,浏览器对象模型。BOM的结构图:
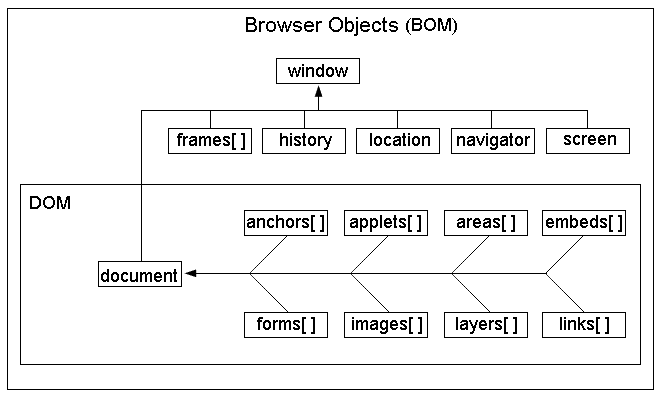
从上图可以看出来:
#1、DOM对象也是BOM的一部分

#2、window对象是BOM的顶层(核心)对象
需要注意的是
#1、在调用window对象的方法和属性时,可以省略window,例如:window.document.location可以简写为document.location

#2、全局变量也是windows对象的属性,全局的函数时window对象的方法
1.2 对象history、navigator、screen(了解即可)
#1、history对象包不包含浏览器的历史
history.back() //后退一页,等同于history.go(-1)
history.forward() //前进一页,等同于history.go(1)
history.go(0) //0是刷新
用的不多。因为浏览器中已经自带了这些功能的按钮:

#2、navigator对象包含了浏览器相关信息。
navigator.appName  // Web浏览器全称
navigator.userAgent  // 客户端绝大部分信息
navigator.platform   // 浏览器运行所在的操作系统

#3、可以用screen对象得到可用的屏幕宽读和高度
screen.availWidth  //可用的屏幕宽度
screen.availHeight  //可用的屏幕高度


================page11.html
<!DOCTYPE html>
<html lang="en">
<head>
    <meta charset="UTF-8">
    <title>Title</title>
</head>
<body>
<p>第一个页</p>
<a href="page22.html">点我进入下一页</a>
</body>
</html>


================page22.html
<!DOCTYPE html>
<html lang="en">
<head>
    <meta charset="UTF-8">
    <title>Title</title>
</head>
<body>
<p>第二个页</p>
<a href="page33.html">点我进入下一页</a>
</body>
</html>


================page33.html
<!DOCTYPE html>
<html lang="en">
<head>
    <meta charset="UTF-8">
    <title>Title</title>
    <script>
        function back() {
            window.history.back()
        }
    </script>
</head>
<body>
<p>第三个页</p>

<input type="button" value="点我进入上一页" onclick="back()">

</body>
</html>
1.3 localtion对象
location.href  //获取URL
location.href="URL" // 跳转到指定页面
location.reload() //重新加载页面
<!doctype html>
<html lang="en">
<head>
    <meta charset="UTF-8">
    <title>Document</title>
</head>
<body>
<div id="div1">点我一下</div>
<script>
    var oDiv = document.getElementById('div1');
    oDiv.onclick = function () {
        window.location.href = 'https://www.cnblogs.com/linhaifeng';
    }
</script>
</body>
</html>
<!doctype html>
<html lang="en">
<head>
    <meta charset="UTF-8">
    <title>Document</title>
</head>
<body>
<div>这天下,本就是大争之世,孤的儿子,不仅要争,而且要争的光芒万丈</div>
<script>
    setTimeout(function () {
        location.href = 'https://www.cnblogs.com/linhaifeng';
    }, 3000)
</script>
</body>
</html>
<!doctype html>
<html lang="en">
<head>
    <meta charset="UTF-8">
    <title>Document</title>
</head>
<body>
<div>这天下,本就是大争之世,孤的儿子,不仅要争,而且要争的光芒万丈</div>
<script>
    setTimeout(function () {
        location.reload();
    }, 3000)
</script>
</body>
</html>
1.4 弹出系统对话框
alert(1)是window.alert(1)的简写,因为它是window的子方法。

系统对话框有三种:

    alert("egon警告你:人丑还不读书,是找不到女朋友的"); //不同浏览器中的外观是不一样的
    confirm("你真的要这么做吗小伙子");  //兼容不好
    prompt("输入用户名:");   //不推荐使用

# 示例
var x=confirm("你真到要这么做吗")
console.log(x)

var username=prompt("输入用户名:")
console.log(username);
1.5 打开关闭窗口
#1、open("url地址","新窗口的位置_blank或者_self","新窗口的特征")
window.open("http://www.w3school.com.cn","_blank", "width=400, height=400")

#2、close()关闭当前窗口
var x=window.open("http://www.w3school.com.cn","_blank", "width=400, height=400")
x.close()
1.6 浏览器窗口内部的高度和宽度
window.innerHeight - 浏览器窗口的内部高度
window.innerWidth - 浏览器窗口的内部宽度
1.7 定时器
#1.setTimeOut()
只在指定时间后执行一次,通常用于延迟执行某方法或功能,

//定时器 异步运行
function say(){
    alert("hello");
}
//使用方法名字执行方法
var t1 = setTimeout(hello,1000);
var t2 = setTimeout("hello()",3000); //使用字符串执行方法
clearTimeout(t2); //去掉定时器


#2.setInterval()
在指定时间为周期循环执行,通常用于刷新表单,对于一些表单的假实时指定时间刷新同步,动画效果等。

//实时刷新时间单位为毫秒
var t3 = setInterval(say,3000);
var t4 = setInterval('say()',3000);

clearInterval(t3);
clearInterval(t4);
二 DOM操作
2.1 介绍
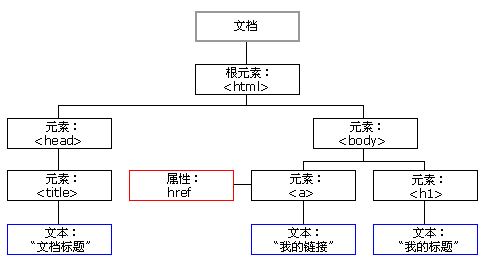
当网页被加载时,浏览器会创建页面的文档对象模型(Document Object Model),DOM标准规定HTML文档中的每个成员都是一个节点(node),HTML DOM树如下图
2.2 查找节点
#1、直接查找
document.getElementById                 #根据ID获取唯一一个标签
document.getElementsByClassName   #根据class属性获取一系列标签
document.getElementsByTagName     #根据标签名获取一系列标签

#2、间接查找如下表
| 语法 | 含义 |
|---|---|
| childNodes | 获取所有的子节点,除了元素还有文本等 |
| children | 获取所有元素子节点,不包含文本 |
| parentNode | 获取父节点 |
| previousSibling | 获取上一个兄弟节点,包含文本 |
| previousElementSibling | 获取上一个兄弟元素节点,不包含文本 |
| nextSibling | 获取下一个兄弟节点,包含文本 |
| nextElementSibling | 获取下一个兄弟元素节点,不包含文本 |
| firstChild | 获取第一个子节点,包含文本 |
| firstElementChild | 获取第一个子节点,不包含文本 |
| lastChild | 获取最后一个子节点,包含文本 |
| lastElementChild | 获取父元素最后一个元素节点。不包含文本 |
2.3 增加节点
#1、创建新节点
var divEle = document.createElement('div');

#2、追加一个子节点(放到最后)
somenode.appendChild(新的子节点);

#3、插入一个子节点(插入到某个节点前)
somenode.insertBefore(新的子节点,某个节点);
2.4 删除、替换节点
somenode.removeChild(要删除的子节点);
somenode.replaceChild(新的子节点, 某个子节点);
2.5 修改/设置节点属性
#1、获取文本节点的值:
var divEle = document.getElementById("d1")
divEle.innerText
divEle.innerHTML

#2、设置文本节点的值:
var divEle = document.getElementById("d1")
divEle.innerText="1"
divEle.innerHTML="<p>2</p>"

#3、attribute操作
var divEle = document.getElementById("d1");
divEle.setAttribute("age","18")
divEle.getAttribute("age")
divEle.removeAttribute("age")

#4、自带的属性还可以直接.属性名来获取和设置
imgEle.src
imgEle.src="..."
2.6 获取元素的值
#适用于input、select、textarea标签

var x=document.getElementById('input')
var y=document.getElementById('select')
var z=document.getElementById('textarea')

x.value
y.value
z.value
2.7 class操作
var x=document.getElementById('div1')

x.classList.remove('col1')
x.classList.add('col1')
x.classList.contains('col1')
x.classList.toggle('col1')
2.8 css操作
obj.style.backgroundColor="red"
JS操作CSS属性的规律:
1.对于没有中横线的CSS属性一般直接使用style.属性名即可。如:
obj.style.margin
obj.style.width
obj.style.left
obj.style.position
2.对含有中横线的CSS属性,将中横线后面的第一个字母换成大写即可。如:
obj.style.marginTop
obj.style.borderLeftWidth
obj.style.zIndex
obj.style.fontFamily
2.9 事件
HTML 4.0 的新特性之一是有能力使 HTML 事件触发浏览器中的动作(action),比如当用户点击某个 HTML 元素时执行一段JavaScript。下面是一个属性列表,这些属性可插入 HTML 标签来定义事件动作。
1、常用事件
onclick        当用户点击某个对象时调用的事件句柄。
ondblclick     当用户双击某个对象时调用的事件句柄。

onfocus        元素获得焦点。               // 练习:输入框
onblur         元素失去焦点。               应用场景:用于表单验证,用户离开某个输入框时,代表已经输入完了,我们可以对它进行验证.
onchange       域的内容被改变。             应用场景:通常用于表单元素,当元素内容被改变时触发.(select联动)

onkeydown      某个键盘按键被按下。          应用场景: 当用户在最后一个输入框按下回车按键时,表单提交.
onkeypress     某个键盘按键被按下并松开。
onkeyup        某个键盘按键被松开。
onload         一张页面或一幅图像完成加载。
onmousedown    鼠标按钮被按下。
onmousemove    鼠标被移动。
onmouseout     鼠标从某元素移开。
onmouseover    鼠标移到某元素之上。

onselect      在文本框中的文本被选中时发生。
onsubmit      确认按钮被点击,使用的对象是form。
2、绑定方式
#方式一:
<div id="div1" onclick="changeColor(this);">我是div,我去你妹的,点我</div>
<script>
  function changeColor(ths) {
    ths.style.backgroundColor="green";
  }
</script>

注意:
this是实参,表示触发事件的当前元素。
函数定义过程中的ths为形参。

#方式二:
<div id="div1">来,点亮我的绿</div>
<script>
    var oDiv = document.getElementById('div1');
    oDiv.onclick = function() {
        this.style.backgroundColor = 'red';
    }
</script>
<!doctype html>
<html lang="en">
<head>
    <meta charset="UTF-8">
    <title>Document</title>
    <style>
        * {
            margin: 0;
            padding: 0;
        }

        html, body {
            height: 100%;
        }

        #bg {
            height: 100%;
            background-color: rgba(0, 0, 0, 0.3);
        }

        #content {
            position: relative;
            top: 150px;
            width: 400px;
            height: 200px;
            line-height: 200px;
            text-align: center;
            color: red;
            background-color: white;
            margin: 0 auto;

        }

        #cancel {
            position: absolute;
            top: 0;
            right: 0;
            color: white;
            width: 30px;
            height: 30px;
            line-height: 30px;
            text-align: center;
            background-color: red;
        }
    </style>
</head>
<body>
<input type="button" value="弹出模态框" id="btn">
<script>
    var oBtn = document.getElementById('btn');
    var oDiv = document.createElement('div');
    var oP = document.createElement('p');
    var oSpan = document.createElement('span');

    oDiv.id = 'bg';
    oP.id = 'content';
    oSpan.id = 'cancel';

    oP.innerHTML = '弹出模态框';
    oSpan.innerHTML = 'X';

    oDiv.appendChild(oP);
    oP.appendChild(oSpan);


    oBtn.onclick = function () {
        this.parentNode.replaceChild(oDiv, this);
    };

    oSpan.onclick =function () {
        oDiv.parentNode.replaceChild(oBtn,oDiv);
    }

</script>
</body>
</html>


<!doctype html>
<html lang="en">
<head>
    <meta charset="UTF-8">
    <title>Document</title>
    <style>
        * {
            margin: 0;
            padding: 0;
        }
        html,body {
            height: 100%;
        }

        #bg {
            position: absolute;
            top: 0;
            left: 0;
            right: 0;
            bottom: 0;
            background-color: rgba(0,0,0,0.3);
            display: none;
        }
        #content {
            position: absolute;
            top: 100px;
            left: 50%;
            margin-left: -150px;
            background-color: white;
            width: 300px;
            height: 200px;

        }
        #content p:nth-child(3) {
            position: absolute;
            top: 100px;
        }


    </style>
</head>
<body>
<input type="button" value="弹出" id="btn">
<div id="bg">
    <div id="content">
        <p>
            <label for="inp-username">用户名: </label><input type="text" name="username" id="inp-username">
        </p>
        <p>
            <label for="inp-password">密码: </label><input type="text" name="username" id="inp-password">
        </p>
        <p>
            <input type="button" value="提交" >
            <input type="button" value="取消" id="cancel">
        </p>
    </div>
</div>

<script>
        var oBtn = document.getElementById('btn');
        var oBg = document.getElementById('bg');
        var oInpUsername=document.getElementById('inp-username');
        var oInpPwd=document.getElementById('inp-password');

        var oInp=document.getElementById('cancel');
        oBtn.onclick=function () {
            oBg.style.display='block';
        }

        oInp.onclick=function () {
            oInpUsername.value='';
            oInpPwd.value='';
            oBg.style.display='none'
        }


</script>

</body>
</html>
<!doctype html>
<html lang="en">
<head>
    <meta charset="UTF-8">
    <title>Document</title>
    <style>
        * {
            margin: 0;
            padding: 0;
        }

        .box {
            width: 200px;
            height: 200px;
            background: red;
            text-align: center;
            color: white;
            line-height: 200px;
            font-size: 23px;
            font-weight: bold;
            margin: 20px auto;
        }
    </style>
</head>
<body>
<div class="box">点击有惊喜!!!</div>
<script>
    var oBox = document.getElementsByClassName('box')[0];

    //初始化点击的次数。通过次数的增加来改变DOM的样式
    var a = 0;
    oBox.onclick = function () {
        a++;
        console.log(a % 4);
        if (a % 4 === 1) {
            this.style.background = 'green';
            this.innerText = '继续点击哦!!!';
        } else if (a % 4 == 2) {
            this.style.background = 'blue';
            this.innerText = '骗你的,傻逼';
        } else if (a % 4 == 3) {
            this.style.background = 'transparent';
            this.innerText = '';
        } else {
            this.style.background = 'red';
            this.innerText = '点击有惊喜!!!';
        }

    }
</script>
</body>
</html>
<!doctype html> <html lang="en"> <head> <meta charset="UTF-8"> <title>Document</title> <style> * { margin: 0; padding: 0; } #comment { background-color: #b0b0b0; width: 500px; } #comment ul li { list-style: none; background-color: wheat; border: 1px dashed #000; margin: 0px 10px 10px; word-break: break-all; word-wrap: break-word; } </style> </head> <body> <div id="comment"> <p>评论内容:</p> </div> <div id="box"> <p>留言内容:</p> <textarea name="" id="content" cols="30" rows="10"></textarea> <p> <input type="button" value="提交" id="btn"> <input type="button" value="统计" id="calculate"> </p> </div> <script> var comment = document.getElementById('comment'); var box = document.getElementById('box'); var submit = document.getElementById('submit'); var content = document.getElementById('content'); var btn = document.getElementById('btn'); var calculate=document.getElementById('calculate'); var ul = document.createElement('ul'); comment.appendChild(ul); var count=0; btn.onclick = function () { var val = content.value; if (val.length != 0) { var date = new Date(); var subTime = date.toLocaleString(); var li = document.createElement('li'); var p1 = document.createElement('h3'); var p2 = document.createElement('p'); var spans = document.getElementsByClassName('del'); count=spans.length+1; p1.innerHTML = '#'+'<span class="num">'+count+'</span>'+'楼'+' '+subTime + '<span class="del"> 删除</span>'; p2.innerHTML = val; li.appendChild(p1); li.appendChild(p2); ul.appendChild(li); content.value = ''; } function aa() { var spans = document.getElementsByClassName('del'); for (var i = 0; i < spans.length; i++) { spans[i].onclick=function (currentIndex) { function bb() { ul.removeChild(this.parentNode.parentNode); count--; var ss=document.getElementsByClassName('num'); for (var j=currentIndex;j<ss.length;j++){ ss[j].innerHTML=parseInt(ss[j].innerHTML)-1; } aa(); } return bb; }(i); } } aa() }; calculate.onclick = function () { alert('一共发布了'+count+'条评论'); } </script> </body> </html>
<!doctype html>
<html lang="en">
<head>
    <meta charset="UTF-8">
    <title>Document</title>
    <style>
        * {
            margin: 0;
            padding: 0;
        }
        .tab {
            width: 480px;
            height: 200px;
            border: 1px solid red;
            margin: 0 auto;
        }

        ul li {
            list-style: none;
            width: 160px;
            height: 60px;
            line-height: 60px;
            text-align: center;
            background-color: #b0b0b0;
            float: left;
        }

        li.active {
            background-color: #55BBBB;
        }
        p {
            display: none;
            height: 200px;
            text-align: center;
            line-height: 200px;
            background-color: white;
        }
        p.active {
            display: block;
        }
    </style>
</head>
<body>
<div class="tab">
    <ul>
        <li class="active">首页</li>
        <li>新闻</li>
        <li>图片</li>
    </ul>
    <p class="active">首页内容</p>
    <p>新闻内容</p>
    <p>图片内容</p>
</div>
<script>
    var aLi=document.getElementsByTagName('li');
    var aP=document.getElementsByTagName('p');
    for (var i=0;i<aLi.length;i++){
        aLi[i].index=i;
        aLi[i].onclick=function () {
            for (var j=0;j<aLi.length;j++){
                aLi[j].className='';
                aP[j].className='';
            }
            this.className='active';
            aP[this.index].className='active';
        }
    }
</script>
</body>
</html>
<!doctype html>
<html lang="en">
<head>
    <meta charset="UTF-8">
    <title>Document</title>
    <style>
        * {
            margin: 0;
            padding: 0;
        }

        #search {
            position: relative;
        }

        input {
            outline: none;
            display: block;
            border: 2px solid #f2a83c;
            border-radius: 10px;
            width: 490px;
            height: 50px;
            margin-top: 20px;
        }

        label {
            position: absolute;
            top: 20px;
            left: 10px;
            font-size: 8px;
            color: gray;
        }
    </style>
</head>
<body>
<div id="search">
    <input type="text" id="text">
    <label for="text" id="msg">老男孩上海校区</label>
</div>

<script>
    var txt = document.getElementById('text');
    var msg = document.getElementById('msg');

    //检测用户表单输入的时候
    txt.oninput = function () {
        //控制元素显示隐藏
        if (this.value == '') {
            msg.style.display = 'block';
        } else {
            msg.style.display = 'none';
        }
    }
</script>
</body>
</html>
<!doctype html>
<html lang="en">
<head>
    <meta charset="UTF-8">
    <title>Document</title>
</head>
<body>


<script>
    setInterval(function () {

        var date = new Date();

        var y = date.getFullYear();
        var m = date.getMonth();
        var d = date.getDate();
        var h = date.getHours();
        var min = date.getMinutes();
        var s = date.getSeconds();

        //今天是2018年2月23日 8:23:09


        document.body.innerHTML = "今天是" + y + '年' + num(m + 1) + "月" + num(d) + "日" + num(h) + ":" + num(min) + ":" + num(s)

    }, 1000)

    function num(n) {
        if (n < 10) {
            return "0" + n;

        }
        return n
    }
</script>
</body>
</html>
<!doctype html>
<html lang="en">
<head>
    <meta charset="UTF-8">
    <title>Document</title>
    <style>
        * {
            padding: 0;
            margin: 0;
        }

        .box {
            width: 200px;
            height: 200px;
            background-color: #FF0000;
            position: absolute;
            top: 50px;
            left: 0px;
        }
    </style>
</head>
<body>
<div id="wrap">

    <button id="btn1">前进</button>
    <button id="btn2">后退</button>
    <div class="box" id="box1">

    </div>

</div>

<script>
    var btn1 = document.getElementById('btn1');
    var btn2 = document.getElementById('btn2');

    var box1 = document.getElementById('box1')

    var count = 0;
    var time1 = null;
    var time2 = null;

    btn1.onclick = function () {
        clearInterval(time2);

        time1 = setInterval(function () {
            count += 10;
            if (count > 1000) {
                box1.style.left = '1000px';
                box1.style.borderRadius = '50%';

                clearInterval(time1);
            } else {
                box1.style.left = count + 'px';
                box1.style.borderRadius = count / 2000 * 100 + '%';
            }


        }, 10)

    };
    btn2.onclick = function () {
        clearInterval(time1);
        time2 = setInterval(function () {
            count -= 10;
            if (count <= 0) {
                box1.style.left = '0px';
                box1.style.borderRadius = '';

                clearInterval(time2);
            } else {
                box1.style.left = count + 'px';
                box1.style.borderRadius = count / 2000 * 100 + '%';
                ;

            }


        }, 10)

    }


</script>
</body>
</html>
<!doctype html>
<html lang="en">
<head>
    <meta charset="UTF-8">
    <title>Document</title>
    <style>
        * {
            padding: 0;
            margin: 0;
        }

        img {
            position: fixed;
            width: 300px;
        }

        ul {
            list-style: none;
        }

        #left {
            left: 0;
        }

        #right {
            right: 0;
        }

        ul li {
            font-size: 25px;
        }
    </style>
</head>
<body>
<img src="images/1.jpg" id="left">
<img src="images/1.jpg" id="right">
<ul>
    <li>屠龙宝刀,点击就送</li>
    <li>屠龙宝刀,点击就送</li>
    <li>屠龙宝刀,点击就送</li>
    <li>屠龙宝刀,点击就送</li>
    <li>屠龙宝刀,点击就送</li>
    <li>屠龙宝刀,点击就送</li>
    <li>屠龙宝刀,点击就送</li>
    <li>屠龙宝刀,点击就送</li>
    <li>屠龙宝刀,点击就送</li>
    <li>屠龙宝刀,点击就送</li>
    <li>屠龙宝刀,点击就送</li>
    <li>屠龙宝刀,点击就送</li>
    <li>屠龙宝刀,点击就送</li>
    <li>屠龙宝刀,点击就送</li>
    <li>屠龙宝刀,点击就送</li>
    <li>屠龙宝刀,点击就送</li>
    <li>屠龙宝刀,点击就送</li>
    <li>屠龙宝刀,点击就送</li>
    <li>屠龙宝刀,点击就送</li>
    <li>屠龙宝刀,点击就送</li>
    <li>屠龙宝刀,点击就送</li>
    <li>屠龙宝刀,点击就送</li>
    <li>屠龙宝刀,点击就送</li>
    <li>屠龙宝刀,点击就送</li>
    <li>屠龙宝刀,点击就送</li>
    <li>屠龙宝刀,点击就送</li>
    <li>屠龙宝刀,点击就送</li>
    <li>屠龙宝刀,点击就送</li>
    <li>屠龙宝刀,点击就送</li>
    <li>屠龙宝刀,点击就送</li>

</ul>

<script>
    window.onload = function () {
        var left = document.getElementById('left');
        var right = document.getElementById('right');

        setTimeout(function () {
            left.style.display = 'none';
            right.style.display = 'none';


        }, 5000)
    }

</script>
</body>
</html>
<!doctype html>
<html lang="en">
<head>
    <meta charset="UTF-8">
    <title>Document</title>
    <style>
        * {
            padding: 0;
            margin: 0;
        }

        .wrap {
            width: 512px;
            height: 400px;
            border: 3px solid #808080;
            position: relative;
            overflow: hidden;
            margin: 100px auto;
        }

        .wrap span {
            width: 100%;
            height: 200px;
            position: absolute;
            background-color: transparent;
            border: 1px solid #000;
        }

        .up {
            top: 0;
        }

        .down {
            bottom: 0;
        }

        img {
            position: absolute;
            top: 0;
            left: 0;
            height: 200px;
        }
    </style>
</head>
<body>
<div id="box" class="wrap">
    <img src="images/mi.png" id="xiaomi">

    <span class="up" id="picUp">11111</span>

    <span class="down" id="picDown">22222</span>


</div>

<script>
    var up = document.getElementById('picUp');
    var down = document.getElementById('picDown');

    var img = document.getElementById('xiaomi');

    var count = 0;
    var time = null;
    //鼠标移入的时候吧
    up.onmouseover = function () {

        //不管怎样 上来先清定时器
        clearInterval(time);
        time = setInterval(function () {
            count -= 3;

            count >= -1070 ? img.style.top = count + 'px' : clearInterval(time);


        }, 30)
    };
    down.onmouseover = function () {
        clearInterval(time);

        time = setInterval(function () {
            count += 1;

            count < 0 ? img.style.top = count + 'px' : clearInterval(time);


        }, 30)
    }

</script>
</body>
</html>
<!doctype html>
<html lang="en">
<head>
    <meta charset="UTF-8">
    <title>Document</title>
    <style>
        * {
            padding: 0;
            margin: 0;
        }

        ul {
            list-style: none;
        }

        .box {
            width: 600px;
            height: 700px;
            margin: 50px auto;
            overflow: hidden;
            position: relative;
            border: 1px solid #000;

        }

        ul li {
            float: left;
        }

        .box ul {
            width: 500%;
            position: absolute;
            top: 0;
            left: 0;


        }
        img {
            width: 600px;
        }
    </style>
</head>
<body>
<div class="box">
    <ul>
        <li><img src="https://images2018.cnblogs.com/blog/1036857/201805/1036857-20180516225816920-580320384.jpg"/></li>
        <li><img src="https://images2018.cnblogs.com/blog/1036857/201805/1036857-20180516225809591-1990809146.jpg"/></li>
        <li><img src="https://images2018.cnblogs.com/blog/1036857/201805/1036857-20180516225724530-539090864.jpg"/></li>
        <li><img src="https://images2018.cnblogs.com/blog/1036857/201805/1036857-20180516225751362-1832630751.jpg"/></li>
        <li><img src="https://images2018.cnblogs.com/blog/1036857/201805/1036857-20180516225816920-580320384.jpg"/></li>

    </ul>


</div>

<script>
    var box = document.getElementsByClassName('box')[0];

    var ul = box.children[0];


    var num = 0;
    var timer = null;

    timer = setInterval(autoPlay, 3);

    //函数的声明
    function autoPlay() {
        num--;


        num <= -2400? num = 0: num;
        ul.style.left = num + 'px'

    }

    //鼠标移动上去
    box.onmouseover = function () {
        clearInterval(timer)
    };
    box.onmouseout = function () {
        timer = setInterval(autoPlay, 3);
    }
</script>
</body>
</html>
<!doctype html>
<html lang="en">
<head>
    <meta charset="UTF-8">
    <meta name="viewport"
          content="width=device-width, user-scalable=no, initial-scale=1.0, maximum-scale=1.0, minimum-scale=1.0">
    <meta http-equiv="X-UA-Compatible" content="ie=edge">
    <title>Document</title>
    <style>
        span {
            background-color: red;
        }

    </style>
</head>
<body>
<form>
    <p>
        <input type="text" name="username">
        <span></span>
    </p>

    <p>
        <input type="password" name="password">
        <span></span>

    </p>

    <p>
        <input type="button" value="提交" id="btn">
    </p>
</form>


<script>
    var isOk1=false
    var reg1=new RegExp('(?!^[0-9]+$)(?!^[a-zA-Z]+$)^[0-9A-Za-z]{4}$')
    var inp1 = document.getElementsByName("username")[0]

    inp1.onblur=function () {
        var res=reg1.test(this.value)
        this.style.border="1px solid red"

        if (!res) {
            this.nextElementSibling.innerText="用户名必须由4位字母和数字组成"
            setTimeout(function () {
                inp1.nextElementSibling.innerText=""
                inp1.value=""
            },3000)
        }else {
            this.style.border="1px solid green"
            isOk1=true
        }
    }


    var isOk2=false
    var reg2=new RegExp('(?!^[0-9]+$)(?!^[a-zA-Z]+$)^[0-9A-Za-z]{6}$')
    var inp2 = document.getElementsByName("password")[0]

    inp2.onblur=function () {
        var res=reg2.test(this.value)
        this.style.border="1px solid red"

        if (!res) {
            this.nextElementSibling.innerText="密码必须由6位字母和数字组成"
            setTimeout(function () {
                inp2.nextElementSibling.innerText=""
                inp2.value=""
            },3000)
        }else {
            this.style.border="1px solid green"
            isOk2=true
        }
    }

    var btn=document.getElementById("btn")
    btn.onclick=function () {
        if(isOk1 && isOk2) {
            alert("提交成功")
        }else {
            alert("请重新填写")
        }
    }
</script>
</body>
</html>

 浙公网安备 33010602011771号