Day5
一、级联与特异性
1、The !important declaration——重要的声明
在对想要不被修改的属性后面加上important,该属性就不会被后续的标签给覆盖。例如
#mydiv {
 font-weight: bold !important; /* 这个属性不会被下面的规则覆盖*/
}
#outerdiv #mydiv {
 font-weight: normal; /* 因为mydiv的字体权重不会被设置为正常,即使它有更高的特异性,因为*/ }上面的!重要的声明*/
}
2、级联
这个是说明,更靠近属性的标签越能对属性起到关键控制作用。
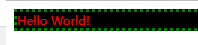
.mystyle { color: blue; }
div { color: red; }
<div class="mystyle">Hello World</div>
Hello World输出来的颜色会是蓝色,而不是红色,就是因为.mystle更靠近属性。
如果级联的级别一样。内部级联(在CSS里面)和外部级联(写在HTML里面)。在这种情况下,如果您有相同的选择器,级联启动,并确定最后加载的“获胜”
3、 More complex specifificity example——更多复杂的特异例子
通过实践得出。标签越靠近属性就对属性的控制权利越大,同时对id的标签控制权利 小于 对class标签控制权利。
代码:
<head>
    <meta charset="utf-8">
    <style>
        div {
            font-size: 7px;
            border: 3px dotted pink;
            background-color: yellow;
            color: purple;
        }

        body.mystyle>div.myotherstyle {
            font-size: 11px;
            border-color: green;
        }

        .elmnt1 {
            font-size: 24px;
            background-color: red;
        }

        .mystyle .myotherstyle {
            font-size: 16px;
            background-color: black;
            color: red;
        }
    </style>
</head>

<body class="mystyle">
    <div id="elmnt1" class="myotherstyle">Hello World!</div>
</body>
实现:
二、Opacity——不透明性
1、Opacity Property
代码:
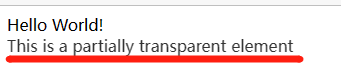
<div style="opacity:0.8;">
 This is a partially transparent element
</div>
实现:
对比上面Hello World, This is a partially transparent element 变的透明起来。透明程度为0.8。数值越小,越透明(类比弹幕)
三、长度单位
1、使用rems和ems创建可伸缩的元素
代码:
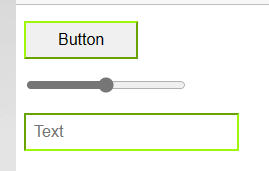
<head>
    <meta charset="utf-8">
    <style>
        html {
            font-size: 16px;
        }

        input[type="button"] {
            font-size: 1rem;
            padding: 0.5rem 2em;
            border-color:  rgb(159, 246, 9);
        }

        input[type="range"] {
            font-size: 1rem;
            width: 10em;
        }

        input[type=text] {
            font-size: 1rem;
            padding: 0.5em;
            border-color:  rgb(159, 246, 9);
        }
    </style>
</head>

<body>
    <div>
        <p><input type="button" value="Button"></p>
        <p><input type="range"></p>
        <p><input type="text" placeholder="Text"></p>
    </div>
</body>
实现:
2、使用百分比
代码:
<head>
    <meta charset="utf-8">
    <style>
        *{
            color: #CCC;
        }

        .parent {
            background-color: blue;
            width: 100px;
        }

        .child {
            background-color: green;
            width: 50%;
        }
    </style>
</head>

<body>
    <div class="parent">
        PARENT
        <div class="child">
            CHILD
        </div>
</body>
实现:

四、伪元素
1、伪元素
代码:
<head>
    <meta charset="utf-8">
    <style>
        div::after {
            content: 'after';
            color: red;
            border: 1px solid red;
        }

        div {
            color: black;
            border: 1px solid black;
            padding: 1px;
        }

        div::before {
            content: 'before';
            color: green;
            border: 1px solid green;
        }
    </style>
</head>

<body>
    <div >
        before div element after
</body>
实现:

2、列表中的伪元素
代码:
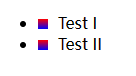
<head>
    <meta charset="utf-8">
    <style>
        li:before {
            content: "";
            display: inline-block;
            margin-right: 10px;
            height: 10px;
            width: 10px;
            background: linear-gradient(red, blue);
        }
    </style>
</head>

<body>
    <ul>
        <li>Test I</li>
        <li>Test II</li>
    </ul>
</body>
实现:
五、位置
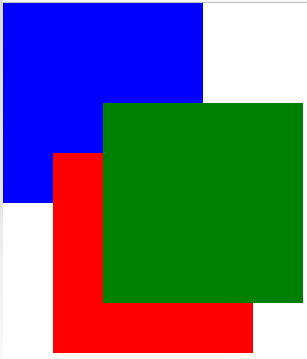
1、Overlapping Elements with z-index——与Z索引重叠的元素(空间坐标系的Z轴。z-index数字是几,就在空间上是几)
代码:
<head>
    <meta charset="utf-8">
    <style>
        div {
            position: absolute;
            height: 200px;
            width: 200px;
        }

        div#div1 {
            z-index: 1;
            left: 0px;
            top: 0px;
            background-color: blue;
        }

        div#div2 {
            z-index: 3;
            left: 100px;
            top: 100px;
            background-color: green;
        }

        div#div3 {
            z-index: 2;
            left: 50px;
            top: 150px;
            background-color: red;
        }
    </style>
</head>

<body>
    <div id="div1"></div>
    <div id="div2"></div>
    <div id="div3"></div>
</body>
实现:
2、绝对位置(position:后面放的属性)
1. top
2. left
3. right
4. bottom
六、Layout Control——布局控制
1、The display property——display属性
代码:
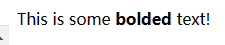
<head>
    <meta charset="utf-8">
    <style>
        .span{
            display: inline;
        }
    </style>
</head>

<body>
    <span>This is some
        <b>bolded</b>
         text!
    </span>
</body>
实现:
代码:
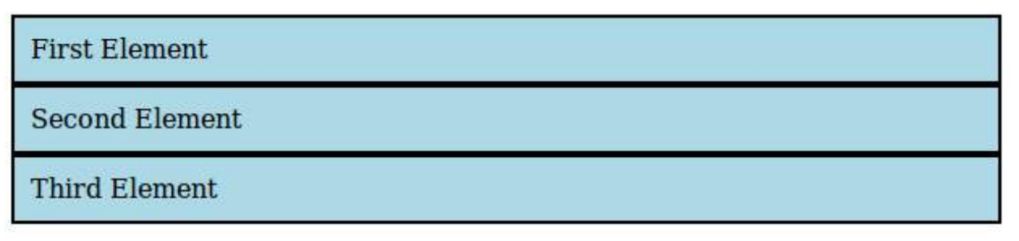
<head>
    <meta charset="utf-8">
    <style>
        li {
            display: inline;//如果是block。页面排序就是横向排序。如果是inline-block,就是横向的,每一个li对应的内容是独立分开的
            background: lightblue;
            padding: 10px;
            border-width: 2px;
            border-color: black;
            border-style: solid;
        }
    </style>
</head>

<body>
    <ul>
        <li>First Element </li>
        <li>Second Element </li>
        <li>Third Element </li>
    </ul>
</body>
实现:


 浙公网安备 33010602011771号