

1.1 Jdbc模板概述
它是spring框架中提供的一个对象,是对原始Jdbc API对象的简单封装。spring框架为我们提供了很多的操作模板类,入下图所示:

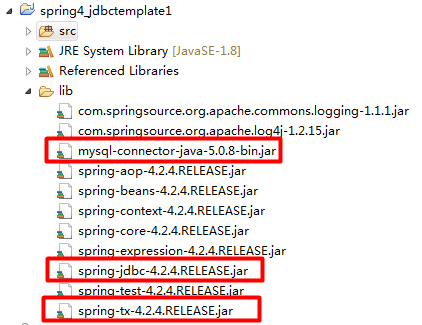
我们今天的主角在spring-jdbc-4.24.RELEASE.jar中,我们在导包的时候,除了要导入这个jar包外,还需要导入一个spring-tx-4.2.4.RELEASE.jar(它是和事务相关的)。
1、Spring中的jdbc模板入门
1.1.1. 创建工程、引入jar包
1.1.2. 创建测试表
CREATE TABLE account(
id BIGINT PRIMARY KEY AUTO_INCREMENT,
NAME VARCHAR(40),
money DOUBLE
)CHARACTER SET utf8 COLLATE utf8_general_ci;
1.1.3. 创建测试类
注意:需要导入c3p0的jar包
public class TestJdbcTemplate {
@Test
public void test1(){
//创建jdbc模板对象
JdbcTemplate jdbcTemplate = new JdbcTemplate();
//创建c3p0数据源
ComboPooledDataSource dataSource = new ComboPooledDataSource();
try {
dataSource.setDriverClass("com.mysql.jdbc.Driver");
dataSource.setJdbcUrl("jdbc:mysql://localhost:3306/spring_itheima10");
dataSource.setUser("root");
dataSource.setPassword("123456");
} catch (PropertyVetoException e) {
e.printStackTrace();
}
//设置数据源
jdbcTemplate.setDataSource(dataSource);
//插入操作
jdbcTemplate.update("insert into account(name,money) values(?,?)","张三",1000.0);
}
1.1.4. 将JdbcTemplate交给Spring管理(讲某一对象或者围着交给spring进行管理,需要的时候直接从注解中进行管理是实现,降低耦合性)
<!-- 配置JdbcTemplate -->
<bean id="jdbcTemplate" class="org.springframework.jdbc.core.JdbcTemplate">
<property name="dataSource" ref="dataSource"></property>
</bean>
<!-- 配置数据源 -->
<bean id="dataSource" class="com.mchange.v2.c3p0.ComboPooledDataSource">
<property name="driverClass" value="com.mysql.jdbc.Driver"></property>
<property name="jdbcUrl" value="jdbc:mysql://localhost:3306/spring_itheima10"></property>
<property name="user" value="root"></property>
<property name="password" value="123456"></property>
</bean>
1.1.5. 在DAO中使用JdbcTemplate
n 创建AccountDao接口
public interface AccountDao {
public void save(Account account);
}
n 创建AccountDaoImpl实现类
public class AccountDaoImpl implements AccountDao {
private JdbcTemplate jdbcTemplate;
}
@Override
public void save(Account account) {
this.jdbcTemplate.update("insert into account(name,money) values(?,?)",account.getName(),account.getMoney());
}
}
1.1.6. 把JdbcTemplate注入给DAO(然后再通过spring把持久层中需要的东西添加给这个表上的是直接从spring容器中获取,不用从业务层中进行获取)
<bean id="accountDao" class="cn.itcast.dao.impl.AccountDaoImpl">
<property name="jdbcTemplate" ref="jdbcTemplate"></property>
</bean>
<bean id="jdbcTemplate" class="org.springframework.jdbc.core.JdbcTemplate">
<property name="dataSource" ref="dataSource"></property>
</bean>
<bean id="dataSource" class="com.mchange.v2.c3p0.ComboPooledDataSource">
<property name="driverClass" value="com.mysql.jdbc.Driver"></property>
<property name="jdbcUrl" value="jdbc:mysql://localhost:3306/spring_itheima10"></property>
<property name="user" value="root"></property>
<property name="password" value="123456"></property>
</bean>
1.1.7. 编写测试类
/**
* 测试保存
*/
@Test
public void test2(){
Account account = new Account();
account.setName("JAY");
account.setMoney(1000.0);
accountDao.save(account);
}
1.2. 配置DBCP连接池
1.2.1. 导入jar包
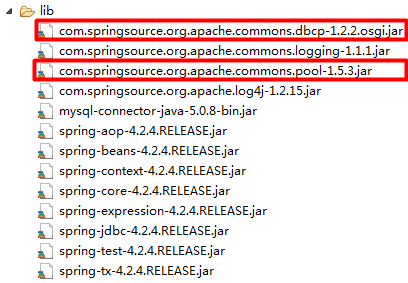
1.2.2. 配置DBCP连接池
<!-- 配置dbcp数据库源 -->
<bean id="dataSource" class="org.apache.commons.dbcp.BasicDataSource">
<property name="driverClassName" value="com.mysql.jdbc.Driver"></property>
<property name="url" value="jdbc:mysql://localhost:3306/spring"></property>
<property name="username" value="root"></property>
<property name="password" value="123456"></property>
</bean>
1.3. 配置Spring自带的数据库连接池
<!-- 配置spring自带的数据源 -->
<bean id="dataSource" class="org.springframework.jdbc.datasource.DriverManagerDataSource">
<property name="driverClassName" value="com.mysql.jdbc.Driver"></property>
<property name="url" value="jdbc:mysql://localhost:3306/spring_itheima10"></property>
<property name="username" value="root"></property>
<property name="password" value="123456"></property>
</bean>
总结:
三种方式:一种是c3p0数据源进行配置,一种是dbcp数据源进行配置,第三种Spring自带的数据源进行配置实现这个过程中的数据。
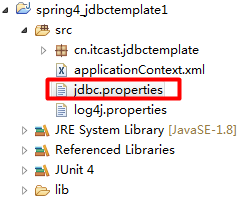
1.4. 将数据库连接信息保存到属性文件中
1.4.1. 新建jdbc.properties属性文件
jdbc.driverClass=com.mysql.jdbc.Driver
jdbc.url=jdbc:mysql://localhost:3306/hibernate_itcast55
jdbc.username=root
jdbc.password=123456
1.4.2. 在applicationContext.xml中引入jdbc.properties文件
n 配置bean引入
<!-- 配置bean引入jdbc.properties -->
<bean class="org.springframework.beans.factory.config.PropertyPlaceholderConfigurer">
<property name="location" value="classpath:jdbc.properties"></property>
</bean>
<!-- 配置数据源 -->
<bean id="dataSource" class="org.springframework.jdbc.datasource.DriverManagerDataSource">
<property name="driverClassName" value="${driverClass}"></property>
<property name="url" value="${jdbcUrl}"></property>
<property name="username" value="${user}"></property>
<property name="password" value="${password}"></property>
</bean>
n 通过context标签引入
<!-- 通过context标签引入jdbc.properties -->
<context:property-placeholder location="classpath:jdbc.properties"/>
提示:此处不加classpath也行,因为jdbc.properties就放在类路径下,就放在类一般加上。
总结:引入jdbc.properties配置文件的两种方式:1、使用配置bean进行引入(第一种方式)
2、通过context方式进行引入
1.5. 使用Jdbc模板完成CRUD
1.5.1. 新增数据
/**
* JdbcTemplate之新增
*/
@Test
public void test1(){
jdbcTemplate.update("insert into account(name,money) values(?,?)","李四",1000);
}
1.5.2. 修改数据
/**
* JdbcTemplate之修改
*/
@Test
public void test2(){
jdbcTemplate.update("update account set money = ? where id = ?",1100,1);
}
1.5.3. 删除数据
/**
* JdbcTemplate之删除
*/
@Test
public void test3(){
jdbcTemplate.update("delete from account where id = ?",2);
}
查询数据比较简单此处省略
1.1.1.1. 查询某列的值
/**
* JdbcTemplate之查询某列的值
*/
@Test
public void test5(){
double money = jdbcTemplate.queryForObject("select money from account where id = ?", Double.class, 1);
System.out.println(money);
}
1.1.1.1. 查询一个对象
n 创建实体类
public class Account implements Serializable{
private static final long serialVersionUID = 1L;
private Long id;
private String name;
private Double money;
public Long getId() {
return id;
}
public void setId(Long id) {
this.id = id;
}
public String getName() {
return name;
}
public void setName(String name) {
this.name = name;
}
public Double getMoney() {
return money;
}
public void setMoney(Double money) {
this.money = money;
}
@Override
public String toString() {
return "Account [id=" + id + ", name=" + name + ", money=" + money + "]";
}
}
n 创建RowMapper
public class AccountRowMapper implements RowMapper<Account>{
@Override
public Account mapRow(ResultSet rs, int rownum) throws SQLException {
Account account = new Account();
account.setId(rs.getInt("id"));
account.setName(rs.getString("name"));
account.setMoney(rs.getDouble("money"));
return account;
}
}
n 查询得到一个对象
/**
* JdbcTemplate之查询一个对象
*/
@Test
public void test4(){
AccountRowMapper mapper = new AccountRowMapper();
Account account = jdbcTemplate.queryForObject("select * from account where id = ?", mapper, 1);
System.out.println(account);
}
1.1.1.2. 查询一个集合
/**
* JdbcTemplate之查询一个集合
*/
@Test
public void test6(){
AccountRowMapper rowMapper = new AccountRowMapper();
List<Account> accounts = jdbcTemplate.query("select * from account", rowMapper);
for(int i = 0;i < accounts.size();i++){
System.out.println(accounts.get(i));
}
}
1.6. 在DAO中使用JdbcTemplate的两种方式
1.6.1. 方式一:在DAO中直接注入JdbcTemplate
编写DAO,注入JdbcTemplate
public class AccountDaoImpl implements AccountDao {
private JdbcTemplate jdbcTemplate;
public void setJdbcTemplate(JdbcTemplate jdbcTemplate) {
this.jdbcTemplate = jdbcTemplate;
}
@Override
public void save(Account account) {
jdbcTemplate.update("insert into account(name,money) values(?,?)", account.getName(),account.getMoney());
}
}
把DAO配置到Spring中
<bean id="accountDao" class="cn.itcast.dao.impl.AccountDaoImpl">
<property name="jdbcTemplate" ref="jdbcTemplate"></property>
</bean>
1.6.2. 方式二:在DAO中使用JdbcDaoSupport
让DAO继承JdbcDaoSupport
public class AccountDaoImpl extends JdbcDaoSupport implements AccountDao {
@Override
public void save(Account account) {
this.getJdbcTemplate().update("insert into account(name,money) values(?,?)", account.getName(),account.getMoney());
}
}
给DAO注入DataSource
<bean id="accountDao" class="cn.itcast.dao.impl.AccountDaoImpl">
<property name="dataSource" ref="dataSource"></property>
</bean>
比较:两版Dao有什么区别呢?
第一种在Dao类中定义JdbcTemplate的方式,适用于所有配置方式(xml和注解都可以)。
第二种让Dao继承JdbcDaoSupport的方式,只能用于基于XML的方式,注解用不了。
两种dao类中定义jdbcTemplate的方式,适用于所有的配置方式,(xml和注解都是可以使用的一种方式)
2、第二大块内容介绍----------------------------------------------Spring中的事务控制
事务的回顾:
l 事务的概念
n 事务是逻辑上一组操作,组成这组操作各个逻辑单元,要么一起成功,要么一起失败。
l 事务的特性
n 原子性
n 一致性
n 隔离性
n 持久性
l 如果不考虑隔离性,引发安全问题
n 读问题
u 脏读
u 不可重复读
u 虚读
n 写问题
u 丢失更新
l 解决读问题
n 设置事务隔离级别
u read uncommitted
u read committed
u repeatable read
u Serializable
