

LNMP环境配置
目录
15.1 -------------------------------------------------------------------------安装mysql
15.2--------------------------------------------------------------------------安装php
15.3--------------------------------------------------------------------------安装nginx
15.4--------------------------------------------------------------------------nginx配置
15.4.1-------------------------------------------默认虚拟主机
15.4.2-------------------------------------------用户认证
15.4.3-------------------------------------------域名重定向
15.4.4-------------------------------------------nginx的访问日志
15.4.5-------------------------------------配置静态文件不记录日志并添加过期时间
15.4.6-------------------------------------------nginx防盗链
15.4.7-------------------------------------------访问控制
15.4.8-------------------------------------------nginx解析php
15.4.9-------------------------------------------nginx代理
15.4.10-----------------------------------------nginx配置SSL
15.5---------------------------------------------------------------------php-fpm配置
15.5.1-------------------------------------------php-fpm的pool
15.5.2-------------------------------------------php-fpm的慢执行日志
15.5.3-------------------------------------------php-fpm定义open_basedir
15.5.4-------------------------------------------php-fpm进程管理
15.1 安装mysql
 1 cd /usr/local/src
 2 tar -zxf mysql-5.6.43-linux-glibc2.12-x86_64.tar.gz
 3 mv mysql-5.6.43-linux-glibc2.12-x86_64 /usr/local/mysql
 4 useradd -s /sbin/nologin mysql
 5 cd /usr/local/mysql
 6 mkdir -p /data/mysql
 7 chown -R mysql:mysql /data/mysql
 8 ./scripts/mysql_install_db --user=mysql --datadir=/data/mysql(需要安装perl-Module-Install)
 9 [root@localhost mysql]# cp support-files/my-default.cnf /etc/my.cnf
10 cp:是否覆盖"/etc/my.cnf"? y
11 [root@localhost mysql]#cp support-files/mysql.server /etc/init.d/mysqld
12 [root@localhost mysql]# chmod 755 /etc/init.d/mysqld
13 [root@localhost mysql]# vim /etc/init.d/mysqld
14 basedir=/usr/local/mysql
15 datadir=/data/mysql
把启动脚本加入服务项,设定开机自启并启动mysql
1 [root@localhost mysql]# chkconfig --add mysqld
2 [root@localhost mysql]# chkconfig mysqld on
3 [root@localhost mysql]# service mysqld start
  Starting MySQL.Logging to '/data/mysql/localhost.localdomain.err'.
  SUCCESS!
15.2 安装php
解压php源码包,创建账号,编译安装(编译安装前需要安装yum install -y gcc epel-release libxml2 libxml2-devel openssl openssl-devel libpng libpng-devel freetype freetype-devel bzip2 bzip2-devel libmcrypt-devel libcurl libcurl-devel)
[root@localhost mysql]# cd /usr/local/src
[root@localhost src]# tar -zxf php-5.6.30.tar.gz
[root@localhost src]# useradd -s /sbin/nologin php-fpm
[root@localhost src]# cd php-5.6.30
[root@localhost php-5.6.30]# ./configure --prefix=/usr/local/php-fpm --with-config-file-path=/usr/local/php-fpm/etc --enable-fpm --with-fpm-user=php-fpm  --with-fpm-group=php-fpm --with-mysql=/usr/local/mysql --with-mysql-sock=/tmp/mysql.sock --with-libxml-dir --with-gd --with-png-dir --with-freetype-dir --with-iconv-dir --with-zlib-dir --with-mcrypt --enable-soap --enable-gd-native-ttf --enable-mbstring --enable-exif --enable-ftp --disable-ipv6 --with-pear --with-curl --with-openssl
[root@localhost php-5.6.30]# make && make install
修改配置文件
[root@localhost php-5.6.30]# cp php.ini-production /usr/local/php-fpm/etc/php.ini
[root@localhost php-5.6.30]# vim /usr/local/php-fpm/etc/php-fpm.conf
[global]
pid = /usr/local/php-fpm/var/run/php-fpm.pid
error_log = /usr/local/php-fpm/var/log/php-fpm.log
[www]
listen = /tmp/php-fcgi.sock
listen.mode = 666
user = php-fpm
group = php-fpm
pm = dynamic
pm.max_children = 50
pm.start_servers = 20
pm.min_spare_servers = 5
pm.max_spare_servers = 35
pm.max_requests = 500
rlimit_files = 1024
检查配置是否正确,如果显示test is successful说明配置没有问题
[root@localhost php-5.6.30]# /usr/local/php-fpm/sbin/php-fpm -t
[03-Dec-2020 03:05:12] NOTICE: configuration file /usr/local/php-fpm/etc/php-fpm.conf test is successful
启动php-fpm
[root@localhost php-5.6.30]# cp /usr/local/src/php-5.6.30/sapi/fpm/init.d.php-fpm /etc/init.d/php-fpm
[root@localhost php-5.6.30]# chmod 755 /etc/init.d/php-fpm
[root@localhost php-5.6.30]# useradd -s /sbin/nologin php-fpm
useradd:用户“php-fpm”已存在
[root@localhost php-5.6.30]# service php-fpm start
Starting php-fpm  done
设置开机启动
[root@localhost php-5.6.30]# chkconfig php-fpm on
检测php-fpm是否启动
[root@localhost php-5.6.30]# ps aux | grep php-fpm
15.3 安装nginx
(1)解压nginx,编译配置选项
cd /usr/local/src
tar -zxf nginx-1.12.2.tar.gz
cd nginx-1.12.2
./configure --prefix=/usr/local/nginx
(2)编译安装nginx
[root@localhost nginx-1.12.2]# make && make install
(3)编写nginx启动脚本并加入系统服务
[root@localhost nginx-1.12.2]# vim /etc/init.d/nginx
#!/bin/bash
# chkconfig: - 30 21
# description: http service.
# Source Function Library
. /etc/init.d/functions
# Nginx Settings

NGINX_SBIN="/usr/local/nginx/sbin/nginx"
NGINX_CONF="/usr/local/nginx/conf/nginx.conf"
NGINX_PID="/usr/local/nginx/logs/nginx.pid"
RETVAL=0
prog="Nginx"

start()
{
    echo -n $"Starting $prog: "
    mkdir -p /dev/shm/nginx_temp
    daemon $NGINX_SBIN -c $NGINX_CONF
    RETVAL=$?
    echo
    return $RETVAL
}

stop()
{
    echo -n $"Stopping $prog: "
    killproc -p $NGINX_PID $NGINX_SBIN -TERM
    rm -rf /dev/shm/nginx_temp
    RETVAL=$?
    echo
    return $RETVAL
}

reload()
{
    echo -n $"Reloading $prog: "
    killproc -p $NGINX_PID $NGINX_SBIN -HUP
    RETVAL=$?
    echo
    return $RETVAL
}

restart()
{
    stop
    start
}

configtest()
{
    $NGINX_SBIN -c $NGINX_CONF -t
    return 0
}

case "$1" in
    start)
         start
         ;;
    stop)
         stop
         ;;
    reload)
         reload
         ;;
    restart)
         restart
         ;;
    configtest)
         configtest
         ;;
    *)
         echo $"Usage: $0 {start|stop|reload|restart|configtest}"
         RETVAL=1
esac

exit $RETVAL
保存该脚本后更改权限:
[root@localhost nginx-1.12.2]# chmod 755 /etc/init.d/nginx
[root@localhost nginx-1.12.2]# chkconfig --add nginx
[root@localhost nginx-1.12.2]# chkconfig nginx on
(4)更改nginx配置文件
先把原来的配置文件清空,重定向符号单独使用时可以快速清空一个文本文档
[root@localhost nginx-1.12.2]# > /usr/local/nginx/conf/nginx.conf
[root@localhost ~]# vim /usr/local/nginx/conf/nginx.conf
user nobody nobody;
worker_processes 2;
error_log /usr/local/nginx/logs/nginx_error.log crit;
pid /usr/local/nginx/logs/nginx.pid;
worker_rlimit_nofile 51200;

events
{
    use epoll;
    worker_connections 6000;
}

http
{
    include mime.types;
    default_type application/octet-stream;
    server_names_hash_bucket_size 3526;
    server_names_hash_max_size 4096;
    log_format combined_realip '$remote_addr $http_x_forwarded_for [$time_local]'
    ' $host "$request_uri" $status'
    ' "$http_referer" "$http_user_agent"';
    sendfile on;
    tcp_nopush on;
    keepalive_timeout 30;
    client_header_timeout 3m;
    client_body_timeout 3m;
    send_timeout 3m;
    connection_pool_size 256;
    client_header_buffer_size 1k;
    large_client_header_buffers 8 4k;
    request_pool_size 4k;
    output_buffers 4 32k;
    postpone_output 1460;
    client_max_body_size 10m;
    client_body_buffer_size 256k;
    client_body_temp_path /usr/local/nginx/client_body_temp;
    proxy_temp_path /usr/local/nginx/proxy_temp;
    fastcgi_temp_path /usr/local/nginx/fastcgi_temp;
    fastcgi_intercept_errors on;
    tcp_nodelay on;
    gzip on;
    gzip_min_length 1k;
    gzip_buffers 4 8k;
    gzip_comp_level 5;
    gzip_http_version 1.1;
    gzip_types text/plain application/x-javascript text/css text/htm
    application/xml;

    server
    {
        listen 80;
        server_name localhost;
        index index.html index.htm index.php;
        root /usr/local/nginx/html;

        location ~ \.php$
        {
            include fastcgi_params;
            fastcgi_pass unix:/tmp/php-fcgi.sock;
            fastcgi_index index.php;
            fastcgi_param SCRIPT_FILENAME /usr/local/nginx/html$fastcgi_script_name;
        }
    }
}
保存配置文件后,检查是否有错误,显示如下内容是正确的。
[root@localhost ~]# /usr/local/nginx/sbin/nginx -t
nginx: the configuration file /usr/local/nginx/conf/nginx.conf syntax is ok
nginx: configuration file /usr/local/nginx/conf/nginx.conf test is successful
(5)启动nginx
[root@localhost ~]# service nginx start
(6)测试是否正确解析php
创建测试文件:
[root@localhost ~]# vim /usr/local/nginx/html/2.php
<?php
echo "test php scripts.";
?>
测试文件:
[root@localhost ~]# curl localhost/2.php
test php scripts. [root@localhost ~]#
显示的内容说明php解析正常
15.4 nginx配置
15.4.1 默认虚拟主机
第一个被nginx加载的虚拟主机就是默认主机,他还有一个配置用来标记默认虚拟主机,如果没有这个标记,第一个虚拟主机为默认虚拟主机。
修改主配置文件,在结束符号}上面加入一行配置:
[root@localhost ~]# vim /usr/local/nginx/conf/nginx.conf
    include vhost/*.conf;
}
意思是,/usr/local/nginx/conf/vhost/下面的所有以.conf结尾的文件都会加载,这样就可以把所有虚拟主机配置文件放到vhost目录下面了。
[root@localhost ~]# mkdir /usr/local/nginx/conf/vhost
[root@localhost ~]# cd /usr/local/nginx/conf/vhost
[root@localhost vhost]# vim default.conf
server
{
    listen 80 default_server;//有这个default_server标记的就是默认虚拟主机
    server_name aaa.com;
    index index.html index.htm index.php;
    root /data/nginx/default;
}
[root@localhost vhost]# /usr/local/nginx/sbin/nginx -t
nginx: the configuration file /usr/local/nginx/conf/nginx.conf syntax is ok
nginx: configuration file /usr/local/nginx/conf/nginx.conf test is successful
[root@localhost vhost]# /usr/local/nginx/sbin/nginx -s reload
[root@localhost vhost]# echo "default_server" > /data/nginx/default/index.html //创建索引页
[root@localhost vhost]# curl -xlocalhost:80 aaa.com //访问aaa.com
default_server
[root@localhost vhost]# curl -xlocalhost:80 1111.com //访问没定义过的域名,也会访问到aaa.com
default_server
15.4.2 用户认证
在vhost目录下创建一个新的虚拟主机,auth_basic打开认证,auth_basic_user_file指定用户密码文件
[root@localhost vhost]# cd /usr/local/nginx/conf/vhost/
[root@localhost vhost]# vim test.com.conf
server
{
    listen 80;
    server_name test.com;
    index index.html index.htm index.php;
    root /data/nginx/test.com;

    location  /
    {
        auth_basic             "Auth";   //打开认证
        auth_basic_user_file  /usr/local/nginx/conf/.htpasswd;
        //指定用户密码文件
    }
}
[root@localhost vhost]# yum install -y httpd
[root@localhost vhost]# htpasswd -c /usr/local/nginx/conf/.htpasswd lijinli    //创建lijinli用户
New password:
Re-type new password:
Adding password for user lijinli
[root@localhost vhost]# /usr/local/nginx/sbin/nginx -t
nginx: the configuration file /usr/local/nginx/conf/nginx.conf syntax is ok
nginx: configuration file /usr/local/nginx/conf/nginx.conf test is successful
[root@localhost vhost]# /usr/local/nginx/sbin/nginx -s reload
使用curl命令进行验证:
[root@localhost vhost]# mkdir /data/nginx/test.com
[root@localhost vhost]# echo "test.com" > /data/nginx/test.com/index.html
[root@localhost vhost]# curl -I -xlocalhost:80 test.com
HTTP/1.1 401 Unauthorized
Server: nginx/1.12.2
Date: Thu, 03 Dec 2020 01:23:49 GMT
Content-Type: text/html
Content-Length: 195
Connection: keep-alive
WWW-Authenticate: Basic realm="Auth"
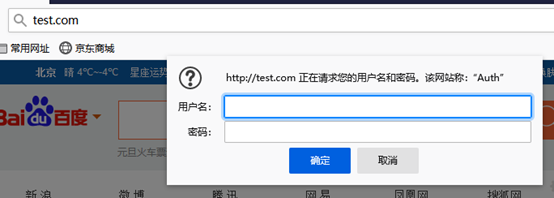
状态码为401说明该网站需要验证。
打开windows的hosts文件,加入一行

进入浏览器访问test.com,输入用户名和密码才可以访问
针对某个目录做用户认证,需要修改location后面的路径
    location  /admin/
    {
        auth_basic             "Auth";
        auth_basic_user_file  /usr/local/nginx/conf/.htpasswd;
    }
15.4.3 域名重定向
[root@localhost vhost]# vim test.com.conf
server
{
    listen 80;
    server_name test.com test1.com test2.com;
    index index.html index.htm index.php;
    root /data/nginx/test.com;

    if ($host != 'test.com' ) {
       rewrite ^/(.*)$ http://test.com/$1 permanent;
     }
}
在Nginx配置中 , server_name后面可以跟多个域名, permanent为永久重定向,相当于httpd的R=301。另外还有一个常用的redirect,相当于httpd的R=302。测试过程如下:
[root@localhost vhost]# /usr/local/nginx/sbin/nginx -t
nginx: the configuration file /usr/local/nginx/conf/nginx.conf syntax is ok
nginx: configuration file /usr/local/nginx/conf/nginx.conf test is successful
[root@localhost vhost]# /usr/local/nginx/sbin/nginx -s reload
[root@localhost vhost]# curl -xlocalhost:80 test1.com/123.txt -I
HTTP/1.1 301 Moved Permanently
Server: nginx/1.12.2
Date: Thu, 03 Dec 2020 02:26:40 GMT
Content-Type: text/html
Content-Length: 185
Connection: keep-alive
Location: http://test.com/123.txt
15.4.4 nginx的访问日志
[root@localhost vhost]# vim test.com.conf
server
{
    listen 80;
    server_name test.com test1.com test2.com;
    index index.html index.htm index.php;
    root /data/nginx/test.com;

    if ($host != 'test.com' ) {
       rewrite ^/(.*)$ http://test.com/$1 permanent;
    }
    access_log /tmp/1.log combined_realip;
}
使用access_log来指定日志的储存路径,最后面指定日志的格式名字,测试如下:
[root@localhost vhost]# /usr/local/nginx/sbin/nginx -t
nginx: the configuration file /usr/local/nginx/conf/nginx.conf syntax is ok
nginx: configuration file /usr/local/nginx/conf/nginx.conf test is successful
[root@localhost vhost]# /usr/local/nginx/sbin/nginx -s reload
[root@localhost vhost]# curl -xlocalhost:80 test.com/111
<html>
<head><title>404 Not Found</title></head>
<body bgcolor="white">
<center><h1>404 Not Found</h1></center>
<hr><center>nginx/1.12.2</center>
</body>
</html>
[root@localhost vhost]# cat /tmp/1.log
127.0.0.1 - [03/Dec/2020:10:53:06 +0800] test.com "/111" 404 "-" "curl/7.29.0"
nginx的日志切割脚本:
[root@localhost vhost]# vim /usr/local/sbin/nginx_log_rotate.sh
#! /bin/bash
d=`date -d "-1 day" +%Y%m%d`
logdir=" /data/logs"
nginx_pid="/usr/local/nginx/logs/nginx.pid"
cd $logdir
for log in `ls *.log`
do
    mv $log $log-$d
done
/bin/kill -HUP `cat $nginx_pid

[root@localhost vhost]# crontab -e
no crontab for root - using an empty one
0 0 * * * /bin/bash /usr/local/sbin/nginx_log_rotate.sh
15.4.5 配置静态文件不记录日志并添加过期时间
[root@localhost vhost]# vim test.com.conf
server
{
    listen 80;
    server_name test.com test1.com test2.com;
    index index.html index.htm index.php;
    root /data/nginx/test.com;

    if ($host != 'test.com' ) {
       rewrite ^/(.*)$ http://test.com/$1 permanent;
    }
    location ~ .*\.(gif|jpg|jpeg|png|bmp|swf)$
    {
        expires     7d;
        access_log off;
    }
    location ~ .*\.(js|css)$
    {
        expires    12h;
        access_log off;
    }
    access_log /tmp/1.log combined_realip;
}
[root@localhost vhost]# /usr/local/nginx/sbin/nginx -t
nginx: the configuration file /usr/local/nginx/conf/nginx.conf syntax is ok
nginx: configuration file /usr/local/nginx/conf/nginx.conf test is successful
[root@localhost vhost]# /usr/local/nginx/sbin/nginx -s reload
[root@localhost vhost]# echo "111111111" >/data/nginx/test.com/1.js
[root@localhost vhost]# echo "222222222" >/data/nginx/test.com/2.jpg
[root@localhost vhost]# touch /data/nginx/test.com/2.jss
[root@localhost vhost]# curl -I -xlocalhost:80 test.com/1.js
HTTP/1.1 200 OK
Server: nginx/1.12.2
Date: Mon, 07 Dec 2020 13:32:17 GMT
Content-Type: application/javascript
Content-Length: 10
Last-Modified: Mon, 07 Dec 2020 13:30:55 GMT
Connection: keep-alive
ETag: "5fce2e8f-a"
Expires: Tue, 08 Dec 2020 01:32:17 GMT
Cache-Control: max-age=43200
Accept-Ranges: bytes

[root@localhost vhost]# curl -I -xlocalhost:80 test.com/2.jpg
HTTP/1.1 200 OK
Server: nginx/1.12.2
Date: Mon, 07 Dec 2020 13:32:23 GMT
Content-Type: image/jpeg
Content-Length: 10
Last-Modified: Mon, 07 Dec 2020 13:31:10 GMT
Connection: keep-alive
ETag: "5fce2e9e-a"
Expires: Mon, 14 Dec 2020 13:32:23 GMT
Cache-Control: max-age=604800
Accept-Ranges: bytes

[root@localhost vhost]# curl -I -xlocalhost:80 test.com/2.jss
HTTP/1.1 200 OK
Server: nginx/1.12.2
Date: Mon, 07 Dec 2020 13:32:31 GMT
Content-Type: application/octet-stream
Content-Length: 0
Last-Modified: Mon, 07 Dec 2020 13:31:56 GMT
Connection: keep-alive
ETag: "5fce2ecc-0"
Accept-Ranges: bytes

[root@localhost vhost]# cat /tmp/1.log
127.0.0.1 - [03/Dec/2020:10:53:06 +0800] test.com "/111" 404 "-" "curl/7.29.0"
127.0.0.1 - [03/Dec/2020:11:32:31 +0800] test.com "/2.jss" 200 "-" "curl/7.29.0"
刚刚访问的js以及jpg都没有记录到访问日志中。
15.4.6 nginx防盗链
在vhost目录下修改配置文件vim test.com.conf
    [root@localhost vhost]# vim test.com.conf
server
{
    listen 80;
    server_name test.com test1.com test2.com;
    index index.html index.htm index.php;
    root /data/nginx/test.com;

    if ($host != 'test.com' ) {
       rewrite ^/(.*)$ http://test.com/$1 permanent;
    }
    location ~* ^.+\.(gif|jpg|jpeg|png|bmp|swf|flv|rar|zip|doc|pdf|gz|bz2|)$
    {
        expires     7d;
        valid_referers none blocked server_names *.test.com ;
        if ($invalid_referer) {
           return 403;
        }
        access_log off;
    }
    access_log /tmp/1.log combined_realip;
}
测试如下
[root@localhost vhost]# /usr/local/nginx/sbin/nginx -t
nginx: the configuration file /usr/local/nginx/conf/nginx.conf syntax is ok
nginx: configuration file /usr/local/nginx/conf/nginx.conf test is successful
[root@localhost vhost]# /usr/local/nginx/sbin/nginx -s reload
[root@localhost vhost]# curl -xlocalhost:80 -I -e "http://aaa.com/1.txt" test.com/2.jpg
HTTP/1.1 403 Forbidden
Server: nginx/1.12.2
Date: Thu, 03 Dec 2020 08:29:04 GMT
Content-Type: text/html
Content-Length: 169
Connection: keep-alive

[root@localhost vhost]# curl -xlocalhost:80 -I -e "http://test.com/1.txt" test.com/2.jpg
HTTP/1.1 200 OK
Server: nginx/1.12.2
Date: Thu, 03 Dec 2020 08:29:46 GMT
Content-Type: image/jpeg
Content-Length: 11
Last-Modified: Thu, 03 Dec 2020 03:14:57 GMT
Connection: keep-alive
ETag: "5fc85831-b"
Expires: Thu, 10 Dec 2020 08:29:46 GMT
Cache-Control: max-age=604800
Accept-Ranges: bytes
可以看到不仅有过期时间,还有防盗链的功能
15.4.7 访问控制
需求:使访问admin目录的请求只允许192.168.150.40访问,配置如下:
编辑配置文件test.com.conf
    location /admin/
    {
        allow 192.168.150.40;
        deny all;
    }
配置httpd时需要用order定义先allow还是先deny,在nginx里只匹配规则就结束了。测试一下:
[root@localhost vhost]# /usr/local/nginx/sbin/nginx -t
nginx: the configuration file /usr/local/nginx/conf/nginx.conf syntax is ok
nginx: configuration file /usr/local/nginx/conf/nginx.conf test is successful
[root@localhost vhost]# /usr/local/nginx/sbin/nginx -s reload
[root@localhost vhost]# mkdir /data/nginx/test.com/admin
[root@localhost vhost]# echo "123" > /data/nginx/test.com/admin/1.html
[root@localhost vhost]# curl -xlocalhost:80 test.com/admin/1.html
<html>
<head><title>403 Forbidden</title></head>
<body bgcolor="white">
<center><h1>403 Forbidden</h1></center>
<hr><center>nginx/1.12.2</center>
</body>
</html>
[root@localhost vhost]# curl -x192.168.150.40:80 test.com/admin/1.html
123
配置文件中的ip也可以是ip段,比如写成allow 192.168.150.0/24。如果只拒绝几个ip就可以这样来写:
    location /admin/
    {
        deny 192.168.150.40;
        deny 127.0.0.1;
    }
如果是黑名单形式,就不需要写allow,因为默认是允许所有。除了这种简单的限制目录之外,还可以使用正则匹配来限制:
    location ~ .*(abc|image)/.*\.php$
    {
        deny all;
    }
小括号里面的竖线为分隔符,它们之间是“或者”的意思,这样就可以把访问的URL中带有abc或者image字符串,并且是PHP的请求拒绝访问。
针对user_agent做一些限制,配置如下:
    if ($http_user_agent ~ 'Spider/3.0|YoudaoBot|Tomato')
    {
        return 403;
    }
其中~为匹配符号,只要user_agent中含有Spider/3.0或者YoudaoBot或者Tomato字符串的,都会被拒绝,return 403为直接返回403的状态码,也可以把它替换为deny all。
15.4.8 nginx解析php
编辑配置文件:
[root@localhost vhost]# cat test.com.conf
server
{
    listen 80;
    server_name test.com test1.com test2.com;
    index index.html index.htm index.php;
    root /data/nginx/test.com;

    if ($host != 'test.com' ) {
       rewrite ^/(.*)$ http://test.com/$1 permanent;
    }

    location ~ \.php$
    {
       include fastcgi_params;
       fastcgi_pass unix:/tmp/php-fcgi.sock;
       fastcgi_index index.php;
       fastcgi_param SCRIPT_FILENAME /data/nginx/test.com$fastcgi_script_name;
    }
    access_log /tmp/1.log combined_realip;
}
其中fastcgi_pass用来指定php-fpm的地址,如果php-fpm监听的是一个tcp:port的地址(比如127.0.0.1:9000 ),那么也需要在这里改成fastcgi_pass 127.0.0.1:9000。这个地址一定要和php-fpm服务监听的地址匹配,否则会报502错误。factcgi_param SCRIPT_FILENANE后面跟的路径为该站点的根目录,和前面定义的root那个路径保持一致。如果配置不对,访问PHP页面会出现404。
15.4.9 nginx代理
当一个没有公网ip的服务器要提供web服务,可以通过代理来实现,如果nginx后面有多台web服务器同时代理,那么nginx在这里就会起到一个负载均衡的作用。配置nginx代理:
[root@localhost vhost]# cd /usr/local/nginx/conf/vhost/
[root@localhost vhost]# vim proxy.conf
server
{
    listen 80;
    server_name baidu.com;

    location /
    {
        proxy_pass   http:// 220.181.38.148/;
        proxy_set_header Host    $host;
        proxy_set_header x-Real-IP   $remote_addr;
        proxy_set_header X-Forwarded-For $proxy_add_x_forwarded_for;
    }
}
proxy_pass指定要代理的域名所在的服务器ip,后面的行为定义发往后端web服务器的请求头,第二行必须有,它表示后端web服务器的域名和当前配置文件中的server_name保持一致,第三四行可省略。
重新加载nginx并验证:
[root@localhost vhost]# /usr/local/nginx/sbin/nginx -t
nginx: the configuration file /usr/local/nginx/conf/nginx.conf syntax is ok
nginx: configuration file /usr/local/nginx/conf/nginx.conf test is successful
[root@localhost vhost]# /usr/local/nginx/sbin/nginx -s reload
[root@localhost vhost]# curl -x127.0.0.1:80 baidu.com -I
HTTP/1.1 200 OK
Server: nginx/1.12.2
Date: Mon, 07 Dec 2020 18:00:59 GMT
Content-Type: text/html
Content-Length: 81
Connection: keep-alive
Last-Modified: Tue, 12 Jan 2010 13:48:00 GMT
ETag: "51-47cf7e6ee8400"
Accept-Ranges: bytes
Cache-Control: max-age=86400
Expires: Tue, 08 Dec 2020 10:08:05 GMT

[root@localhost vhost]# curl baidu.com -I
HTTP/1.1 200 OK
Date: Mon, 07 Dec 2020 10:08:18 GMT
Server: Apache
Last-Modified: Tue, 12 Jan 2010 13:48:00 GMT
ETag: "51-47cf7e6ee8400"
Accept-Ranges: bytes
Content-Length: 81
Cache-Control: max-age=86400
Expires: Tue, 08 Dec 2020 10:08:18 GMT
Connection: Keep-Alive
Content-Type: text/html
负载均衡示例:
先使用dig(bind-utils软件包)命令查看一下baidu.com域名对应的ip:
[root@localhost vhost]# dig www.baidu.com

; <<>> DiG 9.11.4-P2-RedHat-9.11.4-26.P2.el7_9.2 <<>> www.baidu.com
;; global options: +cmd
;; Got answer:
;; ->>HEADER<<- opcode: QUERY, status: NOERROR, id: 64482
;; flags: qr rd ra; QUERY: 1, ANSWER: 3, AUTHORITY: 0, ADDITIONAL: 1

;; OPT PSEUDOSECTION:
; EDNS: version: 0, flags:; udp: 512
;; QUESTION SECTION:
;www.baidu.com.                 IN      A

;; ANSWER SECTION:
www.baidu.com.          1033    IN      CNAME   www.a.shifen.com.
www.a.shifen.com.       37      IN      A       110.242.68.4
www.a.shifen.com.       37      IN      A       110.242.68.3

;; Query time: 43 msec
;; SERVER: 114.114.114.114#53(114.114.114.114)
;; WHEN: 二 12月 08 02:08:41 CST 2020
;; MSG SIZE  rcvd: 101
验证一下这两个ip是否都能访问到www.baidu.com
[root@localhost vhost]# curl -x110.242.68.4:80 www.baidu.com -I
HTTP/1.1 200 OK
Accept-Ranges: bytes
Cache-Control: private, no-cache, no-store, proxy-revalidate, no-transform
Connection: keep-alive
Content-Length: 277
Content-Type: text/html
Date: Mon, 07 Dec 2020 10:16:41 GMT
Etag: "575e1f59-115"
Last-Modified: Mon, 13 Jun 2016 02:50:01 GMT
Pragma: no-cache
Server: bfe/1.0.8.18

[root@localhost vhost]# curl -x110.242.68.3:80 www.baidu.com -I
HTTP/1.1 200 OK
Accept-Ranges: bytes
Cache-Control: private, no-cache, no-store, proxy-revalidate, no-transform
Connection: keep-alive
Content-Length: 277
Content-Type: text/html
Date: Mon, 07 Dec 2020 10:16:53 GMT
Etag: "575e1f59-115"
Last-Modified: Mon, 13 Jun 2016 02:50:01 GMT
Pragma: no-cache
Server: bfe/1.0.8.18
两个ip返回结果一样,有两个ip就可以走负载均衡了,配置过程如下:
编辑配置文件vim /usr/local/nginx/conf/vhost/load.conf
[root@localhost vhost]# vim /usr/local/nginx/conf/vhost/load.conf
upstream baidu_com
{
    ip_hash;
    server 110.242.68.4:80;
    server 110.242.68.3:80;
}

server
{
    listen 80;
    server_name www.baidu.com;

    location /
    {
        proxy_pass    http://baidu_com;
        proxy_set_header Host $host;
        proxy_set_header X-Real-IP    $remote_addr;
        proxy_set_header X-Forwarded-For $proxy_add_x_forwarded_for;
    }
}
负载均衡的upstream在这里定义后端的web server,可以是一个或多个,ip_hash为负载均衡的算法,表示根据IP地址把请求发到不同的服务器上。测试结果:
[root@localhost vhost]# /usr/local/nginx/sbin/nginx -t
nginx: the configuration file /usr/local/nginx/conf/nginx.conf syntax is ok
nginx: configuration file /usr/local/nginx/conf/nginx.conf test is successful
[root@localhost vhost]# /usr/local/nginx/sbin/nginx -s reload
[root@localhost vhost]# curl -x127.0.0.1:80 www.baidu.com -I
HTTP/1.1 200 OK
Server: nginx/1.12.2
Date: Mon, 07 Dec 2020 18:21:27 GMT
Content-Type: text/html
Content-Length: 277
Connection: keep-alive
Accept-Ranges: bytes
Cache-Control: private, no-cache, no-store, proxy-revalidate, no-transform
Etag: "575e1f59-115"
Last-Modified: Mon, 13 Jun 2016 02:50:01 GMT
Pragma: no-cache
自己的虚拟机也可以访问www.baidu.com了,这就是代理的作用。
15.4.10 Nginx配置SSL
配置过程如下:
生成key文件(通常称为私钥),2048为加密字符串长度,会让我们输入一个密码,密码太短不成功
[root@localhost vhost]# cd /usr/local/nginx/conf/
[root@localhost conf]# openssl genrsa -des3 -out tmp.key 2048
Generating RSA private key, 2048 bit long modulus
...............................+++
.........+++
e is 65537 (0x10001)
Enter pass phrase for tmp.key:
Verifying - Enter pass phrase for tmp.key:
把刚刚生成的tmp.key再转换成ljllinux.key,目的是删除刚刚设置的密码,如果key文件有密码,则必须在nginx加载它的时候输入密码不方便。
[root@localhost conf]# openssl rsa -in tmp.key -out ljllinux.key
Enter pass phrase for tmp.key:
writing RSA key
这步时生成证书请求文件,必须要有,key文件和此csr文件一起生成最终的公钥文件,其中Common Name为后面配置nginx配置文件的server_name
[root@localhost conf]# rm -f tmp.key
[root@localhost conf]# openssl req -new -key ljllinux.key -out ljllinux.csr
You are about to be asked to enter information that will be incorporated
into your certificate request.
What you are about to enter is what is called a Distinguished Name or a DN.
There are quite a few fields but you can leave some blank
For some fields there will be a default value,
If you enter '.', the field will be left blank.
-----
Country Name (2 letter code) [XX]:
State or Province Name (full name) []:
Locality Name (eg, city) [Default City]:
Organization Name (eg, company) [Default Company Ltd]:
Organizational Unit Name (eg, section) []:
Common Name (eg, your name or your server's hostname) []:ljl.com
Email Address []:

Please enter the following 'extra' attributes
to be sent with your certificate request
A challenge password []:000000
An optional company name []:
这样才生成最终的CRT证书文件,也就是公钥
[root@localhost conf]# openssl x509 -req -days 365 -in ljllinux.csr -signkey ljllinux.key -out ljllinux.crtSignature ok
subject=/C=XX/L=Default City/O=Default Company Ltd/CN=ljl.com
Getting Private key
有了ljllinux.key和ljllinux.crt这两个文件就可以配置nginx了,配置如下:
[root@localhost conf]# vim /usr/local/nginx/conf/vhost/ssl.conf
server
{
    listen 443;
    server_name ljl.com;
    index index.html index.php;
    root /data/nginx/ljl.com;

    ssl on;
    ssl_certificate ljllinux.crt;
    ssl_certificate_key ljllinux.key;
    ssl_protocols TLSv1 TLSv1.1 TLSv1.2;

    location ~ \.php$
    {
        include fastcgi_params;
        fastcgi_pass unix:/tmp/php-fcgi.sock;
        fastcgi_index index.php;
        fastcgi_param sCRIPT_FILENAME /data/nginx/aming.com$fastcgi_script_name;
    }
    access_log /tmp/1.log combined_realip;
}
检查配置是否有问题:
[root@localhost conf]# /usr/local/nginx/sbin/nginx -t
nginx: [emerg] unknown directive "ssl" in /usr/local/nginx/conf/vhost/ssl.conf:8
nginx: configuration file /usr/local/nginx/conf/nginx.conf test failed
这说明当前的Nginx不支持SSL,这是因为在先前的Nginx编译时,并没有额外配置支持SSL的参数,要解决该问题只能重新编译一遍Nginx。操作过程如下:
[root@localhost conf]# cd /usr/local/src/nginx-1.12.2
[root@localhost nginx-1.12.2]# ./configure --prefix=/usr/local/nginx --with-http_ssl_module
[root@localhost nginx-1.12.2]# make && make install
重新检验一下:
[root@localhost nginx-1.12.2]# /usr/local/nginx/sbin/nginx -t
nginx: the configuration file /usr/local/nginx/conf/nginx.conf syntax is ok
nginx: configuration file /usr/local/nginx/conf/nginx.conf test is successful
创建对应的目录和测试文件
[root@localhost nginx-1.12.2]# mkdir /data/nginx/ljl.com
[root@localhost nginx-1.12.2]# echo "<?php phpinfo(); ?>" > /data/nginx/ljl.com/1.php
[root@localhost nginx-1.12.2]# /etc/init.d/nginx restart
Restarting nginx (via systemctl):                          [  确定  ]
在编辑hosts文件,写入一行

用浏览器访问会显示不安全:
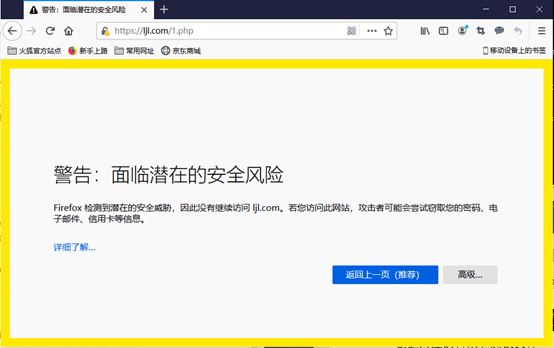
该证书是自己制作的没有得到浏览器认可,继续访问点高级,添加例外,确认安全例外,就可以访问网站内容了
15.5 php-fpm配置
php-fpm的配置文件为/usr/local/php-fpm/etc/php-fpm.conf,它同样支持include语句。
15.5.1 php-fpm的pool
php-fpm支持配置多个pool,每个pool可以监听一个端口,也可以监听一个socket。更改配置文件php-fpm.conf
[root@localhost ~]# vim /usr/local/php-fpm/etc/php-fpm.conf
[global]
pid = /usr/local/php-fpm/var/run/php-fpm.pid
error_log = /usr/local/php-fpm/var/log/php-fpm.log
include = etc/php-fpm.d/*.conf
创建配置文件目录和子配置文件
[root@localhost ~]# cd /usr/local/php-fpm/etc/
[root@localhost etc]# mkdir php-fpm.d
[root@localhost etc]# cd php-fpm.d/
[root@localhost php-fpm.d]# vim www.conf
[www]
listen = /tmp/www.sock
listen.mode=666
user = php-fpm
group= php-fpm
pm = dynamic
pm.max_children = 50
pm.start_servers = 20
pm.min_spare_servers = 5
pm.max_spare_servers = 35
pm.max_requests = 500
rlimit_files = 1024
编辑另外的配置文件:
[root@localhost php-fpm.d]# vim ljl.conf
[ljl]
listen = /tmp/ljl.sock
listen.mode=666
user = php-fpm
group= php-fpm
pm = dynamic
pm.max_children = 50
pm.start_servers = 20
pm.min_spare_servers = 5
pm.max_spare_servers = 35
pm.max_requests = 500
rlimit_files = 1024
这样就有两个子配置文件,也就是有两个pool,第一个pool监听了/tmp/www.sock,第二个pool监听了/tmp/ljl.sock,验证一下配置是否有问题:
[root@localhost php-fpm.d]# /usr/local/php-fpm/sbin/php-fpm -t
[07-Dec-2020 16:35:15] NOTICE: configuration file /usr/local/php-fpm/etc/php-fpm.conf test is successful
重启一下php-fpm服务
[root@localhost php-fpm.d]# /etc/init.d/php-fpm restart
Gracefully shutting down php-fpm . done
Starting php-fpm  done
再来查看/tmp/目录下面的sock文件
[root@localhost php-fpm.d]# ls /tmp/*.sock
/tmp/ljl.sock  /tmp/mysql.sock  /tmp/php-fcgi.sock
15.5.2 php-fpm的慢执行日志
慢执行日志可以帮助你快速的追踪到问题点,开启和查看慢执行日志,操作步骤如下:
[root@localhost php-fpm.d]# vim /usr/local/php-fpm/etc/php-fpm.d/www.conf
//在配置文件中加入如下两行
request_slowlog_timeout = 1
slowlog = /usr/local/php-fpm/var/log/www-slow.log
第一行定义超时时间,即php脚本执行时间超过一秒就会执行日志,第二行定义慢执行日志的路径和名字。遇到php网站访问卡顿问题时,记得看慢执行日志
15.5.3 php-fpm定义open_basedir
open_basedir的目的就是安全, httpd可以针对每个虚拟主机设置一个open_basedir,php-fpm同样也可以针对不同的pool设置不同的open_basedir。
[root@localhost php-fpm.d]# vim /usr/local/php-fpm/etc/php-fpm.d/ljl.conf
//在配置文件中加入如下一行
php_admin_value[open_basedir]=/data/www/:/tmp/
15.5.4 php-fpm进程管理
看这一段配置:
pm = dynamic
pm.max_children = 50
pm.start_servers = 20
pm.min_spare_servers = 5
pm.max_spare_servers = 35
pm.max_requests = 500
第一行,定义php-fpm的子进程启动模式,dynamic为动态模式;一开始只启动少量的子进程,根据实际需求,动态地增加或减少子进程,但不会超过pm.max_children定义的数值。另外一种模式为static,子进程数量由pm.max_children决定,一次性启动这么多,不减少也不增加。
pm.start_servers针对dynamic模式,它定义php-fpm服务在启动服务时产生的子进程数量。pm.min_spare_servers针对dynamic模式,它定义在空闲时段子进程数的最少数量,如果达到这个数值时,php-fpm服务会自动派生新的子进程。pm.max_spare_servers也针对dynamic模式,它定义在空闲时段子进程数的最大值,如果高于这个数值就清理空闲的子进程。pm.max_requests针对dynamic模式,它定义一个子进程最多处理的请求数,就是在一个php-fpm的子进程中最多可以处理这么多请求,当达到这个数值时,它会自动退出。

 浙公网安备 33010602011771号