
面向java消息服务编程学习
## 面向java消息服务编程学习(JMS)
一、什么是JMS
1、概述:
JMS即Java消息服务(Java Message Service)应用程序接口,是一个Java平台中关于面向消息中间件(MOM)的API,用于在两个应用程序之间,或分布式系统中发送消息,进行异步通信。Java消息服务是一个与具体平台无关的API,绝大多数MOM提供商都对JMS提供支持(百度百科给出的概述)。我们可以简单的理解:两个应用程序之间需要进行通信,我们使用一个JMS服务,进行中间的转发,通过JMS 的使用,我们可以解除两个程序之间的耦合
2、优势
-
Asynchronous(异步)
JMS is asynchronous by default. So to receive a message, the client is not required to send the request. The message will arrive automatically to the client as they become available.(JMS 原本就是一个异步的消息服务,客户端获取消息的时候,不需要主动发送请求,消息会自动发送给可用的客户端)
-
Reliable(可靠)
JMS provides the facility of assurance that the message will delivered once and only once. You know that duplicate messages create problems. JMS helps you avoiding such problems.(JMS保证消息只会递送一次。大家都遇到过重复创建消息问题,而JMS能帮你避免该问题。)
3、JMS的消息模型
JMS具有两种通信模式:
1、Point-to-Point Messaging Domain (点对点)
2、Publish/Subscribe Messaging Domain (发布/订阅模式)
在JMS API出现之前,大部分产品使用“点对点”和“发布/订阅”中的任一方式来进行消息通讯。JMS定义了这两种消息发送模型的规范,它们相互独立。任何JMS的提供者可以实现其中的一种或两种模型,这是它们自己的选择。JMS规范提供了通用接口保证我们基于JMS API编写的程序适用于任何一种模型。
(1)、Point-to-Point Messaging Domain(点对点通信模型)
a、模式图:

b、涉及到的概念:
在点对点通信模式中,应用程序由消息队列,发送方,接收方组成。每个消息都被发送到一个特定的队列,接收者从队列中获取消息。队列保留着消息,直到他们被消费或超时。
c、特点:
-
每个消息只要一个消费者
-
发送者和接收者在时间上是没有时间的约束,也就是说发送者在发送完消息之后,不管接收者有没有接受消息,都不会影响发送方发送消息到消息队列中。
-
发送方不管是否在发送消息,接收方都可以从消息队列中去到消息(The receiver can fetch message whether it is running or not when the sender sends the message)
-
接收方在接收完消息之后,需要向消息队列应答成功
(2)、Publish/Subscribe Messaging Domain(发布/订阅通信模型)
a、模式图:
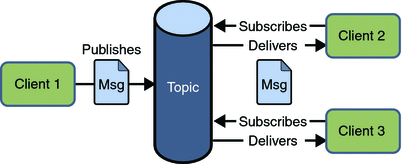
b、涉及到的概念:
在发布/订阅消息模型中,发布者发布一个消息,该消息通过topic传递给所有的客户端。该模式下,发布者与订阅者都是匿名的,即发布者与订阅者都不知道对方是谁。并且可以动态的发布与订阅Topic。Topic主要用于保存和传递消息,且会一直保存消息直到消息被传递给客户端。
c、特点:
-
一个消息可以传递个多个订阅者(即:一个消息可以有多个接受方)
-
发布者与订阅者具有时间约束,针对某个主题(Topic)的订阅者,它必须创建一个订阅者之后,才能消费发布者的消息,而且为了消费消息,订阅者必须保持运行的状态。
-
为了缓和这样严格的时间相关性,JMS允许订阅者创建一个可持久化的订阅。这样,即使订阅者没有被激活(运行),它也能接收到发布者的消息。
4、JMS接收消息
在JMS中,消息的产生和消息是异步的。对于消费来说,JMS的消息者可以通过两种方式来消费消息。
(1)、同步(Synchronous)
在同步消费信息模式模式中,订阅者/接收方通过调用 receive()方法来接收消息。在receive()方法中,线程会阻塞直到消息到达或者到指定时间后消息仍未到达。
(2)、异步(Asynchronous)
使用异步方式接收消息的话,消息订阅者需注册一个消息监听者,类似于事件监听器,只要消息到达,JMS服务提供者会通过调用监听器的onMessage()递送消息。
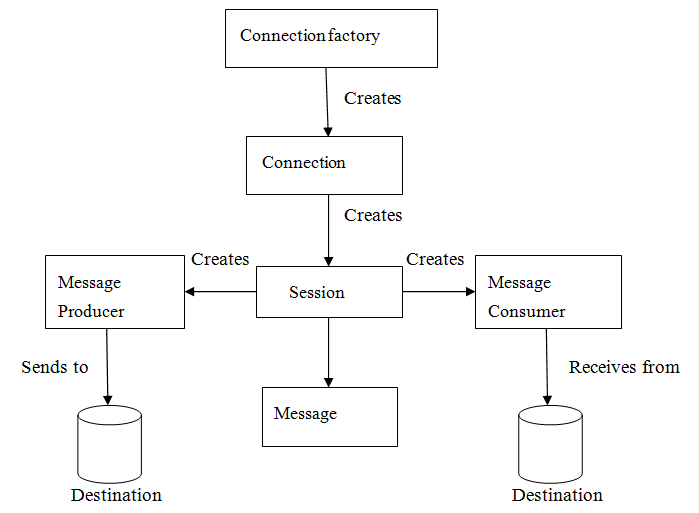
5、JMS编程模型
- 管理对象(Administered objects)-连接工厂(Connection Factories)和目的地(Destination)
- 连接对象(Connections)
- 会话(Sessions)
- 消息生产者(Message Producers)
- 消息消费者(Message Consumers)
- 消息监听者(Message Listeners)
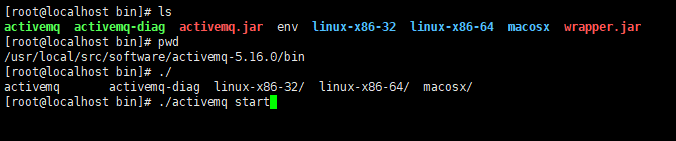
二、使用ActiveMQ
1、ActiveMQ安装(./activemq start)
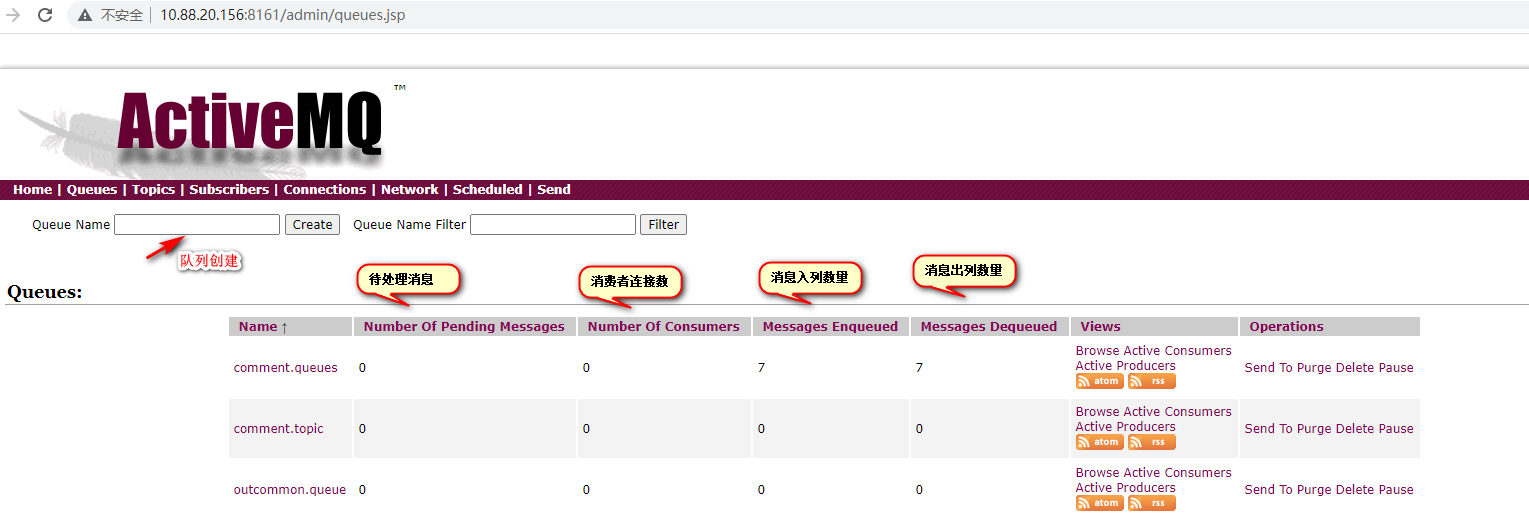
2、activeMQ的两个默认端口8161和61616的区别
8161:是后台管理系统(url中访问后台管理页用此端口)
61616:是给java用的tcp端口
3、SpringBoot整合ActiveMQ
1、pom.xml文件添加依赖
<!--activeMQ-->
<dependency>
    <groupId>org.springframework.boot</groupId>
    <artifactId>spring-boot-starter-activemq</artifactId>
</dependency>

<!--消息队列连接池-->
<dependency>
    <groupId>org.apache.activemq</groupId>
    <artifactId>activemq-pool</artifactId>
    <version>5.15.0</version>
</dependency>
2、定义bean配置类将点对点队列和订阅发布模式的初始化交给spring管理
package com.ljc.test1.activemq.config;

import org.apache.activemq.command.ActiveMQQueue;
import org.apache.activemq.command.ActiveMQTopic;
import org.springframework.context.annotation.Bean;
import org.springframework.context.annotation.Configuration;

import javax.jms.Queue;
import javax.jms.Topic;

/**
 * 定义bean配置类将点对点队列和订阅发布模式的初始化交给spring管理
 */
@Configuration
public class BeanConfig {
    /**
     * 功能描述:定义存放消息的队列,并交给spring管理(点对点模式)
     * @return
     */
    @Bean
    public Queue getQueue(){
        return new ActiveMQQueue("comment.queues");
    }

    /**
     * 功能描述:定义存放消息的队列,并交给spring管理(发布订阅模式)
     * @return
     */
    @Bean
    public Topic getTopic(){
        return new ActiveMQTopic("comment.topic");
    }
}
3、spring整理两种模式(queue和topic)
package com.ljc.test1.activemq.config;

import org.springframework.context.annotation.Bean;
import org.springframework.context.annotation.Configuration;
import org.springframework.jms.config.DefaultJmsListenerContainerFactory;
import org.springframework.jms.config.JmsListenerContainerFactory;

import javax.jms.ConnectionFactory;

@Configuration
public class MyActiveMqConfig {

    /**
     * Topic模式
     * @param connectionFactory
     * @return
     */
    @Bean
    public JmsListenerContainerFactory<?> jmsListenerContainerTopic(ConnectionFactory connectionFactory){
        DefaultJmsListenerContainerFactory bean = new DefaultJmsListenerContainerFactory();
        bean.setPubSubDomain(true);
        bean.setConnectionFactory(connectionFactory);
        return bean;
    }

    /**
     * Queue模式
     * @param connectionFactory
     * @return
     */
    @Bean
    public JmsListenerContainerFactory<?> jmsListenerContainerQueue(ConnectionFactory connectionFactory){
        DefaultJmsListenerContainerFactory bean = new DefaultJmsListenerContainerFactory();
        bean.setConnectionFactory(connectionFactory);
        return bean;
    }

}
4、配置yml文件
spring:
    activemq:   #整合ActiveMQ
      broker-url: tcp://10.88.20.156:61616
      in-memory: true   #true 表示使用内置的MQ,false则连接服务器
      pool:   #开启连接池
        enabled: false
        max-connections: 10
5、编辑ProductServiceImpl接口(消息生产者)
package com.ljc.test1.service;
import com.ljc.test1.activemq.config.BeanConfig;
import org.springframework.beans.factory.annotation.Autowired;
import org.springframework.jms.core.JmsMessagingTemplate;
import org.springframework.stereotype.Service;
import javax.jms.Destination;

/**
 * ActiveMQ生产者
 */
@Service
public class ProductServiceImpl {

    /**
     * 获取队列配置类对象(点对点\发布点阅)
     */
    @Autowired
    private BeanConfig beanConfig;

    /**
     * 注入springboot封装的工具类
     */
    @Autowired
    private JmsMessagingTemplate template;

    /**
     * 功能描述:选择默认队列生产数据
     */
    public void sendMessage(String msg){
        template.convertAndSend(beanConfig.getQueue(), msg);
    }

    /**
     * 功能描述:自定义队列生产数据
     */
    public void sendMessage(Destination distinct, String msg){
        template.convertAndSend(distinct, msg);
    }

    /**
     * 功能描述:发布订阅模式
     */
    public void topic( String msg){
        template.convertAndSend(beanConfig.getTopic(), msg);
    }
}
6、定义controller接口
package com.ljc.test1.controller;
import com.ljc.test1.service.ProductServiceImpl;
import org.apache.activemq.command.ActiveMQQueue;
import org.springframework.beans.factory.annotation.Autowired;
import org.springframework.web.bind.annotation.RequestMapping;
import org.springframework.web.bind.annotation.RestController;

import javax.jms.Queue;
/**
 * 消息生产者接口
 */
@RestController
@RequestMapping("order")
public class OrderController {

    @Autowired
    private ProductServiceImpl productService;

    @RequestMapping("/common")
    public String common(String msg){
        productService.sendMessage(msg);
        return msg;
    }

    @RequestMapping("/order")
    public String order(String queue, String msg){
        Queue bean = new ActiveMQQueue(queue);
        productService.sendMessage(bean, msg);
        return msg;
    }

    @RequestMapping("/topic")
    public String order(String msg){
        productService.topic(msg);
        return msg;
    }
}
7、编辑消费者接口
package com.ljc.test1.jms;

import org.springframework.beans.factory.annotation.Autowired;
import org.springframework.jms.annotation.JmsListener;
import org.springframework.jms.core.JmsMessagingTemplate;
import org.springframework.stereotype.Component;

/**
 * 功能描述:点对点消费者
 */
@Component
public class CommonConsumer {

    @Autowired
    private JmsMessagingTemplate jmsMessagingTemplate;

    /**
     * 使用JmsListener配置消费者监听的队列,其中name是接收到的消息
     */
    @JmsListener(destination = "comment.queues", containerFactory = "jmsListenerContainerQueue")
    public void common(String text){
        System.out.println("点对点模式1:"+text);
    }
}
//控制台打印
点对点模式1:"测试发布订阅消息队列"
package com.ljc.test1.jms;

import org.springframework.jms.annotation.JmsListener;
import org.springframework.stereotype.Component;

/**
 * 功能描述:订阅发布消费者
 */
@Component
public class TopicConsumer {

    @JmsListener(destination = "comment.topic", containerFactory = "jmsListenerContainerTopic")
    public void topic1(String msg){
        System.out.println("topic发布订阅模式1:"+msg);
    }

    @JmsListener(destination = "comment.topic", containerFactory = "jmsListenerContainerTopic")
    public void topic2(String msg){
        System.out.println("topic发布订阅模式2:"+msg);
    }

    @JmsListener(destination = "comment.topic", containerFactory = "jmsListenerContainerTopic")
    public void topic3(String msg){
        System.out.println("topic发布订阅模式3:"+msg);
    }
}
//控制台打印
topic发布订阅模式2:"测试发布订阅消息队列"
topic发布订阅模式1:"测试发布订阅消息队列"
topic发布订阅模式3:"测试发布订阅消息队列"


 浙公网安备 33010602011771号