RestTemplate打印日志的正确知识
背景
现在随着微服务的逐渐发展,越来越多的公司开始采用微服务架构,但随之而来的问题是,服务间如何调用,如何还能负载均衡,还必须开箱即用?答案就是Spring的RestTemplate啦(并不一定要使用RestTemplate,也不一定要是微服务架构,涉及到Http调用的服务,方式都可以,我这个是为了引出主题),但伴随而来的是一个问题,如何打印好日志,留下现场(防止扯皮),这才是我们关心的。这也是我们这篇文章的主题-RestTemplate打印日志的正确姿势。好了,不凑字数了,接下来进入正文。
1. 老实人干事
作为一个老实人,对于打日志这类请求,就是通过代理,找出核心方法,在方法后,打印日志参数即可。实时,我也就是这么做的,如下图:
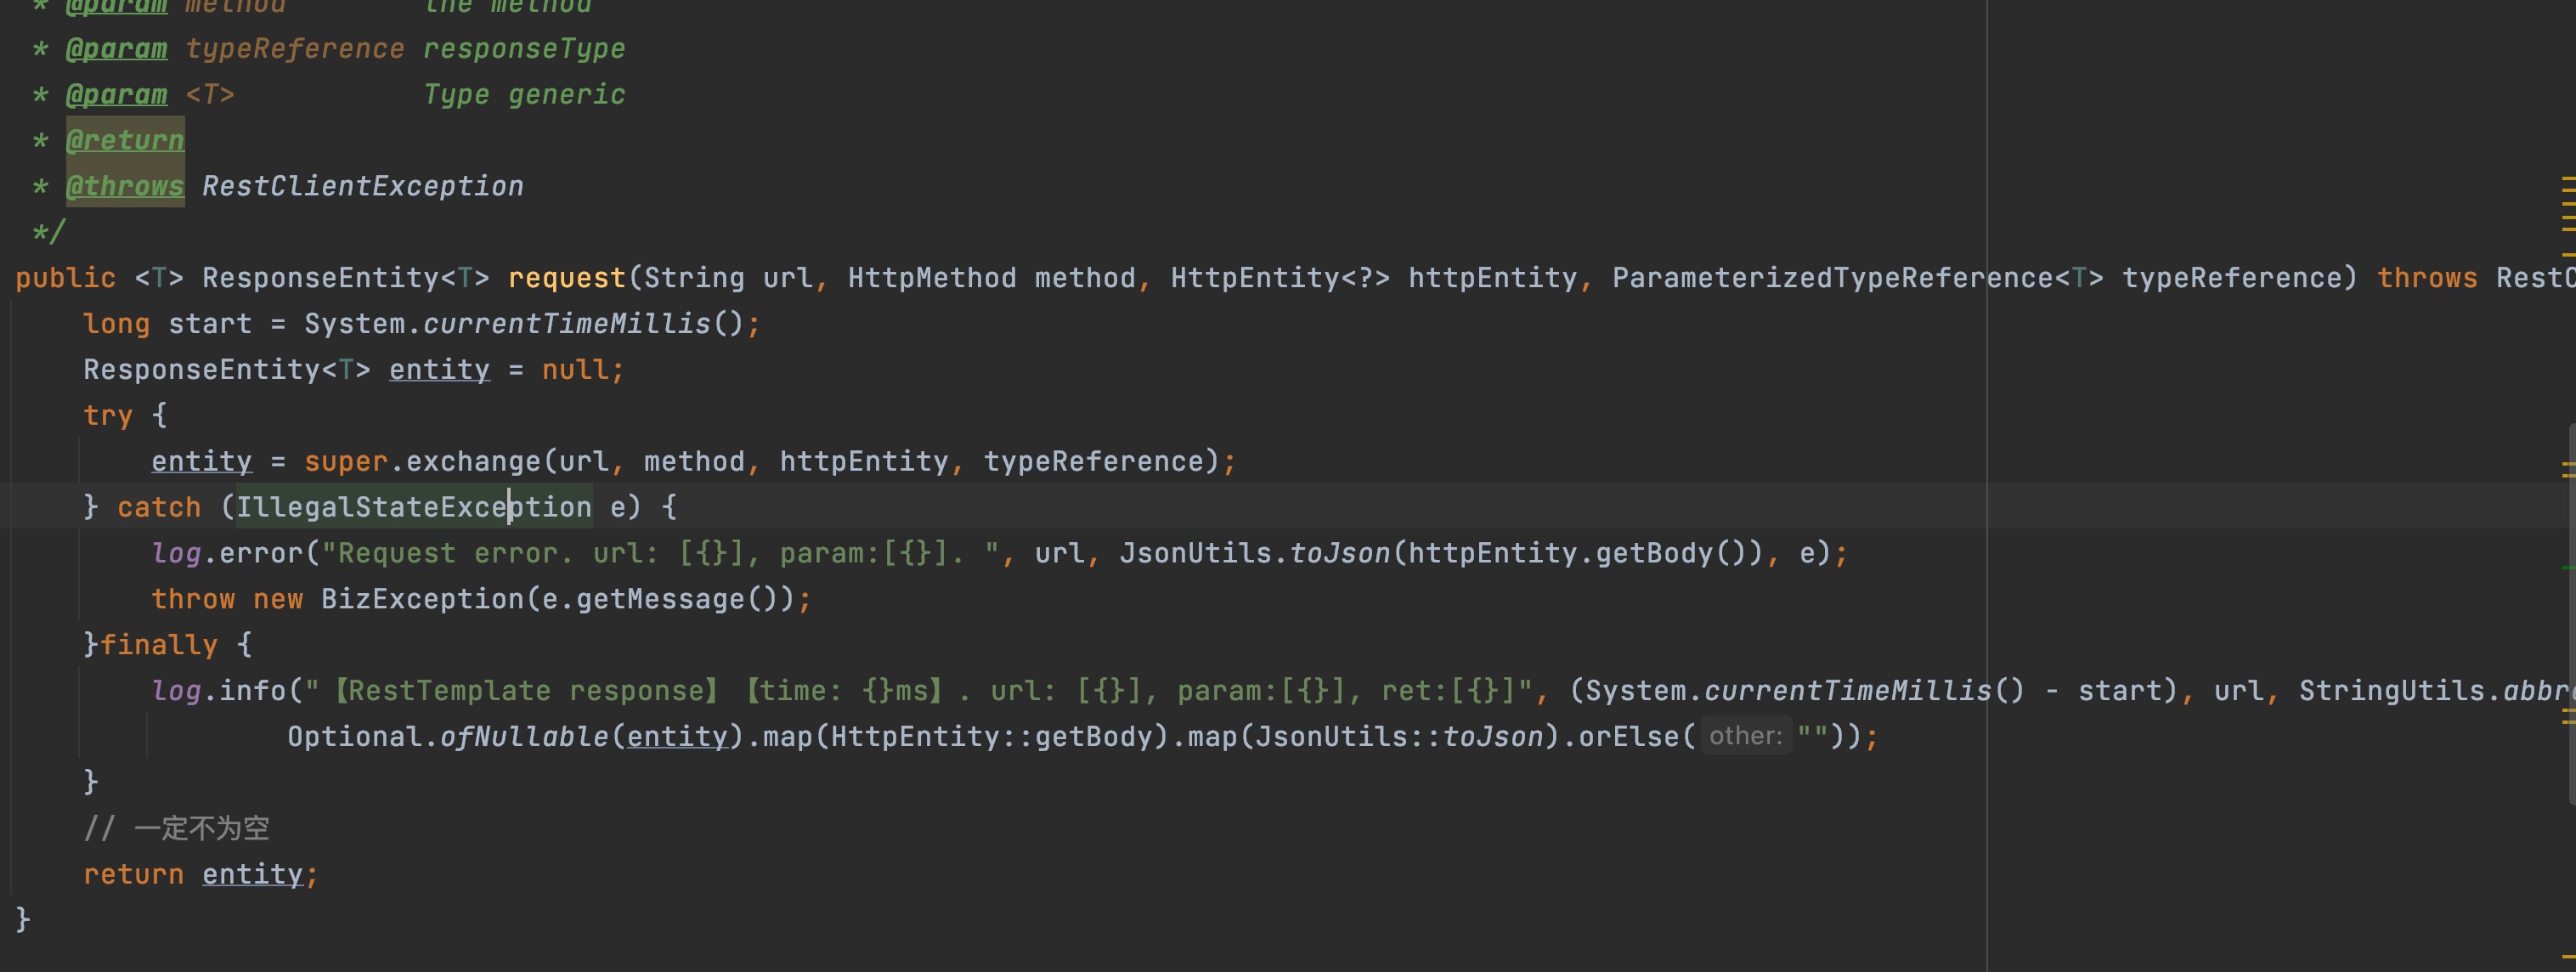
我把RestTemplate的最底层方法进行了包装,然后在执行后,返回结果前但因日志。这样做,说实话,没毛病,并且我拿去运行,放在线上运行了好长一段时间,没出任何问题。但是..但是...,现实就是偏偏就欺(bu)负(xi)老(xin)实(ren)人(zhen)
2. 老实人翻盘
为什么说是欺(bu)负(xi)老(xin)实(ren)人(zhen)呢?最近我在看代码的时候,发现了ResTemplate提供了一个方法RestTemplate#setInterceptors,我们通过名称就知道,是设置拦截器的。只看名称,那还不一定,我们需要去瞅瞅源码才行。
2.1 源码追踪
setInterceptors方法如下:
// 设置拦截器
public void setInterceptors(List<ClientHttpRequestInterceptor> interceptors) {
	// Take getInterceptors() List as-is when passed in here
	if (this.interceptors != interceptors) {
        	this.interceptors.clear();
		this.interceptors.addAll(interceptors);
                // 对拦截器进行排序
	        AnnotationAwareOrderComparator.sort(this.interceptors);
	}
}
setInterceptors逻辑很简单,就是添加拦截器。我们接下来要看看拦截器是在哪里使用的,这也是我们需要确认的点。接着往下。
// 构建RequestFactory
public ClientHttpRequestFactory getRequestFactory() {
  // 获取拦截器
  List<ClientHttpRequestInterceptor> interceptors = getInterceptors();
  if (!CollectionUtils.isEmpty(interceptors)) {
    // 拦截器不为空
    ClientHttpRequestFactory factory = this.interceptingRequestFactory;
    if (factory == null) {
      // 使用拦截器构建的RequestFactory
      factory = new InterceptingClientHttpRequestFactory(super.getRequestFactory(), interceptors);
      this.interceptingRequestFactory = factory;
    }
    return factory;
  }
  else {
    // 返回默认的 SimpleClientHttpRequestFactory,可以自己查看一下
    return super.getRequestFactory();
  }
}
在getRequestFactory中搜寻到了拦截器的使用,是通过拦截器,构建了一个InterceptingClientHttpRequestFactory对象。目前,我们通过名字大意可以看到,是构建了一个拦截器的请求工厂,但还是没有具体信息,让我们接着往下,看看这个InterceptingClientHttpRequestFactory里面是怎么使用的。
省略中间简单的逻辑,我们找到了最终逻辑。在InterceptingRequestExecution源代码如下:
private class InterceptingRequestExecution implements ClientHttpRequestExecution {

  private final Iterator<ClientHttpRequestInterceptor> iterator;

  public InterceptingRequestExecution() {
    // 胡哦哦去拦截器的迭代器
    this.iterator = interceptors.iterator();
  }

  @Override
  public ClientHttpResponse execute(HttpRequest request, byte[] body) throws IOException {
    if (this.iterator.hasNext()) {
      ClientHttpRequestInterceptor nextInterceptor = this.iterator.next();
      //每次将当前对象传入,循环迭代调用拦截器
      return nextInterceptor.intercept(request, body, this);
    }
    else {
      // 当拦截器执行完,开始执行请求逻辑
      HttpMethod method = request.getMethod();
      Assert.state(method != null, "No standard HTTP method");
      ClientHttpRequest delegate = requestFactory.createRequest(request.getURI(), method);
      request.getHeaders().forEach((key, value) -> delegate.getHeaders().addAll(key, value));
      ...
      // 执行请求,并返回执行结果对象。ClientHttpResponse
      return delegate.execute();
    }
  }
}
在执行execute方法时,循环调用拦截器方法。当拦截器执行完后,构建请求对象,执行请求。请求执行完,返回请求结果对象。
3. 拨开迷雾
源码看我我TM悟了,原来别人提供了拦截器,我还自己搞那么复杂。这不是吃力不讨好吗?那不行,我的改造我的代码。
3.1 实现拦截器接口-ClientHttpRequestInterceptor
贴上我写的代码,如下所示:
/**
 * <br>日志拦截器</br>
 *
 * @author fattyca1
 * @since 1.0
 */
@Slf4j
public class LoggingRequestInterceptor implements ClientHttpRequestInterceptor {
		// 用来记录接口执行时间的最小接收值
    private final long timeoutMs;

    public LoggingRequestInterceptor(long timeoutMs) {
        this.timeoutMs = timeoutMs;
    }

    @Override
    public ClientHttpResponse intercept(HttpRequest request, byte[] body, ClientHttpRequestExecution execution) throws IOException {

        long start = System.currentTimeMillis();
        ClientHttpResponse response = execution.execute(request, body);
        long cost = System.currentTimeMillis() - start;
        if (cost > timeoutMs) {
            log.warn("Request uri: [{}], Cost times: {}ms", request.getURI(), cost);
        }
      	// 打印日志
        trace(request, body, response);
        return response;
    }

    private void trace(HttpRequest request, byte[] body, ClientHttpResponse response) throws IOException {
        // 记录日志
        String responseStr = IOUtils.toString(response.getBody(), StandardCharsets.UTF_8);
        log.info(
                "\n" +
                        "URI             : {}, \n" +
                        "Method       : {}, \n" +
                        "Headers      : {}, \n" +
                        "Param         : {}, \n" +
                        "RespStatus  : {}, \n" +
                        "Response    : {}", request.getURI(),
                request.getMethod(), request.getHeaders(), new String(body, StandardCharsets.UTF_8), response.getStatusCode(), responseStr);
    }
}
代码逻辑很简单,实现拦截器,在拦截器中执行请求的时候,根据入参,出参,并打印结果。
3.2 构建RestTemplate对象
构建RestTemplate对象代码如下所示:
private RestTemplateWrapper buildHttpRestTemplate(CloseableHttpClient client) {
    RestTemplateWrapper restTemplate = new RestTemplateWrapper();
    HttpComponentsClientHttpRequestFactory clientHttpRequestFactory
            = new HttpComponentsClientHttpRequestFactory(client);
    // 连接超时
    clientHttpRequestFactory.setConnectTimeout(httpClientProperties.getConnectionTimeOut());
    // 数据读取超时时间
    clientHttpRequestFactory.setReadTimeout(httpClientProperties.getSocketTimeOut());
    // 连接不够用的等待时间
    clientHttpRequestFactory.setConnectionRequestTimeout(httpClientProperties.getConnectionRequestTimeout());
    // 需要支持从response重复获取body数据
    // restTemplate.setRequestFactory(new BufferingClientHttpRequestFactory(clientHttpRequestFactory));
    restTemplate.setRequestFactory(clientHttpRequestFactory);
    // 设置拦截器
    restTemplate.setInterceptors(Collections.singletonList(new LoggingRequestInterceptor(httpClientProperties.getLogTimeoutMs())));
    return restTemplate;
}
我们通过一些列操作,到了构建RestTemplate对象这,并且设置了拦截器,可以开开心心的去注入RestTemplate对象啦。
3.3 坑,你躲开了吗
大家拿着RestTemplate开开心心去使用的时候,发现了没,会出错!!! 是的,会报错!!!好气,我辛辛苦苦搞半天,还会出错,错误如下:
Caused by: java.io.IOException: Attempted read from closed stream.
出现这个错误原因,主要是因为response.getBody()只能获取一次,在后续RestTemplate获取输出转化时会再次调用response.getBody()。
 // 拦截器的打印日志代码中 response.getBody() 只能获取一次,然后会关闭流,有兴趣的可以看看源码
 String responseStr = IOUtils.toString(response.getBody(), StandardCharsets.UTF_8);
既然知道问题了,那我们就得修改,那怎么修改呢?经过一番查找,找出了这个类BufferingClientHttpRequestFactory,瞅瞅这个注释(我怀疑就是坑!!不然为啥正好有一个这样的包装类):
/**
 * Wrapper for a {@link ClientHttpRequestFactory} that buffers
 * all outgoing and incoming streams in memory.
 *
 * <p>Using this wrapper allows for multiple reads of the
 * {@linkplain ClientHttpResponse#getBody() response body}.
 */
public class BufferingClientHttpRequestFactory extends AbstractClientHttpRequestFactoryWrapper {

}
注释中清楚地写着,可以多次调用ClientHttpResponse#getBody()。现在我们知道怎么解决这个问题了,那么就根据它的使用方法,重新构建RestTemplate对象。代码如下(上方构建RestTemplate对象中的注释打开):
private RestTemplateWrapper buildHttpRestTemplate(CloseableHttpClient client) {
  RestTemplateWrapper restTemplate = new RestTemplateWrapper();
  HttpComponentsClientHttpRequestFactory clientHttpRequestFactory
    = new HttpComponentsClientHttpRequestFactory(client);
  // 连接超时
  clientHttpRequestFactory.setConnectTimeout(httpClientProperties.getConnectionTimeOut());
  // 数据读取超时时间
  clientHttpRequestFactory.setReadTimeout(httpClientProperties.getSocketTimeOut());
  // 连接不够用的等待时间
  clientHttpRequestFactory.setConnectionRequestTimeout(httpClientProperties.getConnectionRequestTimeout());
  //通过BufferingClientHttpRequestFactory对象包装现有的ResquestFactory,用来支持多次调用getBody()方法
  restTemplate.setRequestFactory(new BufferingClientHttpRequestFactory(clientHttpRequestFactory));
  // 打印记录
  restTemplate.setInterceptors(Collections.singletonList(new LoggingRequestInterceptor(httpClientProperties.getLogTimeoutMs())));
  return restTemplate;
}
至此,我们在开始运行,才发行可以走的通。
4 总结
阿~ 疏通了,舒服了,代码看着也舒服了,这样才是代码的正确打开方式。这样也让我们对代码设计有的更深的了解,在设计代码时,需要预留一些接口设置,用来拓展,或方便别人。
这只是Interceptor一次小小的使用,并不代表只能用来打印日志,我们可以根据拦截器设置cookie,header信息等,都是可以的。

 浙公网安备 33010602011771号