
GMTSAR6.5安装教程
0 ubuntu不能复制粘贴的问题
————————————————
1、打开终端(Terminal)。
2、运行以下命令以卸载旧版本的open-vm-tools:
sudo apt-get autoremove open-vm-tools
更新软件源:
sudo apt-get update
3、运行以下命令以安装open-vm-tools:
sudo apt-get install open-vm-tools
4、运行以下命令以安装open-vm-tools的桌面组件(可选):桌面组件提供了更好的集成体验,包括拖放文件和共享剪贴板。
sudo apt-get install open-vm-tools-desktop
5、安装完成后,重新启动Ubuntu虚拟机以使更改生效:
VMtools应该已成功安装并配置,应该能够在主机和Ubuntu虚拟机之间实现文本的复制和粘贴操作。
sudo reboot
————————————————
一. 设置目录
# 1. 创建目录(需要sudo权限)
sudo mkdir -p /usr/local/orbits
# 2. 设置权限,让普通用户也能读写(可选但推荐)
sudo chmod 777 /usr/local/orbits
# 或者更安全的权限设置:
sudo chmod 755 /usr/local/orbits
sudo chown $USER:$USER /usr/local/orbits
# 3. 验证
ls -ld /usr/local/orbits
图形界面方式查看/usr/local目录:
打开"文件"应用;按 Ctrl + L 或点击地址栏;输入:/usr/local,按回车;你会看到系统文件夹,在这里创建orbits文件夹。
(需要root权限:/usr/local/ 属于root用户;默认隐藏:文件管理器可能不显示系统目录;在Home目录下找不到该目录的,该目录在ubuntu目录下/usr/local/orbits)。
二. 下载ORBITS.tar(ENVISAT 卫星与ERS-1 和 ERS-2的轨道文件)
1. 下载到正确位置
cd /usr/local/orbits
sudo wget http://topex.ucsd.edu/gmtsar/tar/ORBITS.tar
2. 在本目录下解压文件
cd /usr/local/orbits sudo tar -xvf ORBITS.tar
删除源压缩包:sudo rm ORBITS.tar
三. 安装GMTSAR软件
1. 准备工作
sudo apt update
sudo apt install autoconf automake libtool(安装缺少的开发包)
./configure --prefix=/usr/local
2. gmtsar的安装:(不用预先安装GMT,命令中会安装GMT)(参考官网:https://github.com/gmtsar/gmtsar/wiki,官网没有这个清晰易懂)
预先需要安装的软件:
sudo apt update
sudo apt install make
sudo apt install gedit
sudo apt install git
sudo apt install vim
3. 正式开始安装:
第一步:
sudo apt-get install csh subversion autoconf libtiff5-dev libhdf5-dev wget
sudo apt-get install liblapack-dev
sudo apt-get install gfortran
sudo apt-get install g++
sudo apt-get install libgmt-dev
sudo apt-get install gmt-dcw gmt-gshhg
sudo apt-get install gmt
第二步:(创建轨道文件夹)
cd /usr/local
Sudo mkdir orbits
第三步:(国内镜像网站克隆)
cd /usr/local
sudo git clone --branch 6.5 https://gitcode.com/gh_mirrors/gmt/gmtsar GMTSAR
或者:git clone https://github.com/gmtsar/gmtsar GMTSAR
第四步:(更改克隆下来的GMTSAR的权限)
cd /usr/local
sudo chown -R $USER GMTSAR
第五步:(到达相应的文件夹,并配置文件)
cd /usr/local/GMTSAR
autoconf
autoupdate
./configure --with-orbits-dir=/usr/local/orbits CFLAGS='-z muldefs' LDFLAGS='-z muldefs'
第六步:(编译及安装)
make(这一步会出现大量的安装文件,还有紫色的文字,如果没有表示没有安装上GMTSAR)
sudo make install
第七步:(打开路径文件并配置路径并保存)
gedit ~/.bashrc(这个文本文件中的最后面加入以下命令:)
cd ~
# edit your .bashrc file and add the following lines
export GMTSAR=/usr/local/GMTSAR
export PATH=$GMTSAR/bin:"$PATH"
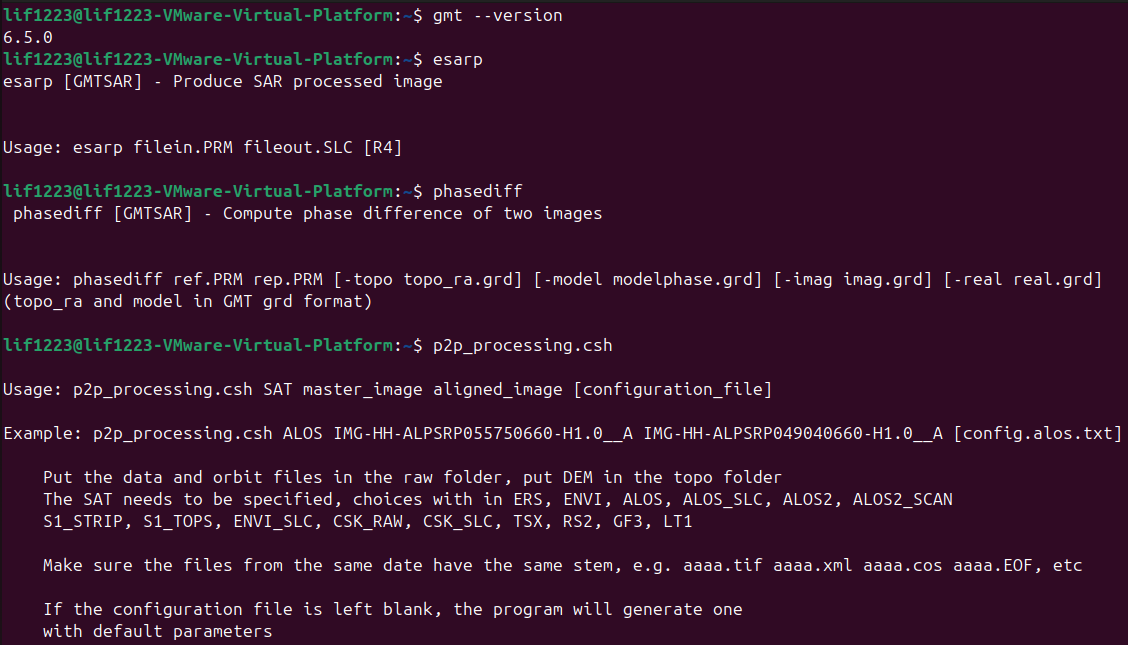
第八步:(检验是否安装成功)
关闭命令窗口;
重新打开命令窗口,
输入 esarp
出现类似命令:
esarp [GMTSAR] - Produce SAR processed image
Usage: esarp filein.PRM fileout.SLC [R4]
参考转载的blog:https://blog.csdn.net/2301_79258000/article/details/151117066

 浙公网安备 33010602011771号