消息队列RabbitMQ
https://www.cnblogs.com/pyedu/p/11866829.html
一. 什么是消息队列
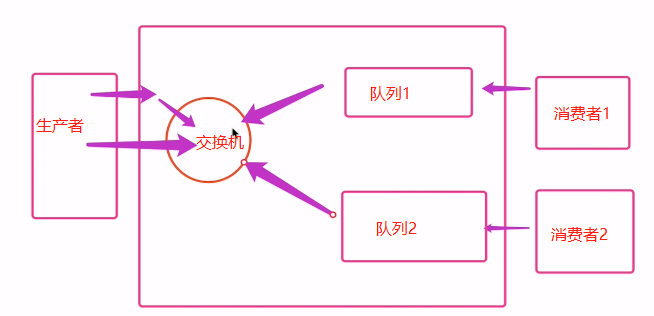
MQ全称为Message Queue 消息队列(MQ)是一种应用程序对应用程序的通信方法。MQ是消费-生产者模型的一个典型的代表,一端往消息队列中不断写入消息,而另一端则可以读取队列中的消息。这样发布者和使用者都不用知道对方的存在。
1. 队列回顾
import queue


q=queue.Queue(maxsize=10) # FIFO

q.put(111)
q.put(222)
q.put(333)

print(q.get())
print(q.get())
print(q.get())
print(q.get())

如果队列空了, 再取值, 则不会报错, 会阻塞住.

这种情况下, 如果队列空了再取值, 则会报错.
二. 为什么要用消息队列
消息队列中间件是分布式系统中重要的组件,主要解决应用解耦,异步消息,流量削锋等问题,实现高性能,高可用,可伸缩和最终一致性架构。目前使用较多的消息队列有ActiveMQ,RabbitMQ,ZeroMQ,Kafka,MetaMQ,RocketMQ。
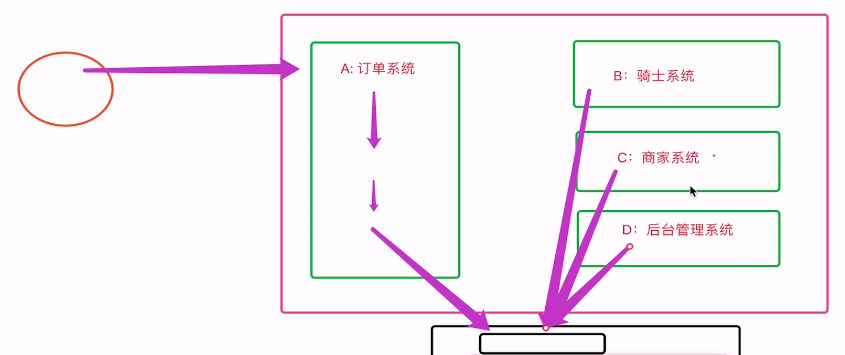
接下来利用一个外卖系统的消息推送给大家解释下MQ的意义。
消息队列图:
A将信息放到队列中, 如果B, C, D监听了队列, 则可以各取一份. 如果不想取信息了, 可以解绑.
三. RabbitMQ
rabbitMQ是一款基于AMQP协议的消息中间件,它能够在应用之间提供可靠的消息传输。在易用性,扩展性,高可用性上表现优秀。使用消息中间件利于应用之间的解耦,生产者(客户端)无需知道消费者(服务端)的存在。而且两端可以使用不同的语言编写,大大提供了灵活性。
3.1 安装
windows下安装需要下载erlang, 有点麻烦.
建议在linux下安装
3.2 工作模型
rabbitmq:


    一 简单模式(广泛应用)
        生产者:
            1 链接rabbitmq
            2 创建队列
            3 向指定的队列插入数据

        消费者
            1 链接rabbitmq
            2 监听模式
            3 确定回调函数

    二 参数使用

        1 应答参数
          channel.basic_consume(queue='hello',
                      auto_ack=False, # 默认应答改为手动应答
                      on_message_callback=callback)

          def callback(ch, method, properties, body):

               print(" [x] Received %r" % body)
               ch.basic_ack(delivery_tag=method.delivery_tag)

        2 持久化参数

           #声明queue
           channel.queue_declare(queue='hello2', durable=True)  # 若声明过,则换一个名字

           channel.basic_publish(exchange='',
                      routing_key='hello2',
                      body='Hello World!',
                      properties=pika.BasicProperties(
                          delivery_mode=2,  # make message persistent
                          )
                      )

    三 交换机模式
         --- 发布订阅

         --- 关键字模式

         --- 通配符模式
3.2.1 简单模式
生产者


import pika

# pika是python用于连接RabbitMQ的模块, 需要pip install下载, 且在连接之前需要启动rabbitmq(启动命令: rabbitmq-server, 终止命令: rabbitmqctl)
# 1 链接rabbitmq
connection = pika.BlockingConnection(pika.ConnectionParameters('127.0.0.1'))
channel = connection.channel()

# 2 创建队列
channel.queue_declare(queue='hello')

# 3 向指定队列插入数据
channel.basic_publish(exchange='', # 简单模式
                      routing_key='hello', # 指定队列
                      body='Hello Yuan!') # 数据

print(" [x] Sent 'Hello Yuan!'")

消费者
import pika


connection = pika.BlockingConnection(pika.ConnectionParameters('localhost'))
channel = connection.channel()

#  创建队列(如果生产者已创建则不会执行, 如果没有创建则会创建队列)
channel.queue_declare(queue='hello')


# 确定回调函数
def callback(ch, method, properties, body):
    print(" [x] Received %r" % body)

# 确定监听队列参数
channel.basic_consume(queue='hello', # 监听hello队列, 有数据就取出来, 没有数据就blocking
                      auto_ack=True, # 默认应答
                      on_message_callback=callback)


print(' [*] Waiting for messages. To exit press CTRL+C')
# 正式监听
channel.start_consuming()
3.2.2 参数
3.2.2.1 应答参数
场景: 生产者将数据放到队列中后, 消费者从队列中取出数据后, 消费者端出现了错误, 导致数据丢失.
生产者


import pika

# 1 链接rabbitmq
connection = pika.BlockingConnection(pika.ConnectionParameters('127.0.0.1'))
channel = connection.channel()

# 2 创建队列
channel.queue_declare(queue='hello')

# 3 向指定队列插入数据
channel.basic_publish(exchange='', # 简单模式
                      routing_key='hello', # 指定队列
                      body='Hello Yuan!')

print(" [x] Sent 'Hello Yuan!'")

消费者
import pika


connection = pika.BlockingConnection(pika.ConnectionParameters('localhost'))
channel = connection.channel()

#  创建队列
channel.queue_declare(queue='hello')


# 确定回调函数
def callback(ch, method, properties, body):

    print(" [x] Received %r" % body)
    ch.basic_ack(delivery_tag=method.delivery_tag) # 拿到确认信号, 让rabbitmq删除队列中的数据.

# 确定监听队列参数
channel.basic_consume(queue='hello',
                      auto_ack=False, # 默认应答改为手动应答, 防止消费者端出错, 造成数据丢失.
                      on_message_callback=callback)


print(' [*] Waiting for messages. To exit press CTRL+C')
# 正式监听
channel.start_consuming()

注意:
auto_ack=False
ch.basic_ack(delivery_tag=method.delivery_tag)
手动应答会降低效率, 如果追求数据安全则采用应答参数, 如果追求效率则采用自动应答.
3.2.2.2 持久化参数
场景: 生产者将数据放到队列中后, rabbitmq服务器崩掉了, 此时消费者还未获取到数据. 为防止数据丢失, 需要进行持久化存储, 就将数据存储在磁盘上.
生产者 import pika # 1 链接rabbitmq connection = pika.BlockingConnection(pika.ConnectionParameters('127.0.0.1')) channel = connection.channel() # 2 创可持久化队列 channel.queue_declare(queue='hello3',durable=True) # 3 向指定队列插入数据 channel.basic_publish(exchange='', # 简单模式 routing_key='hello3', # 指定队列 body='Hello ALEX!', properties=pika.BasicProperties( delivery_mode=2, # make message persistent ) ) print(" [x] Sent 'Hello ALEX!'") 消费者 import pika connection = pika.BlockingConnection(pika.ConnectionParameters('localhost')) channel = connection.channel() # 创建队列 channel.queue_declare(queue='hello3',durable=True) # 确定回调函数 def callback(ch, method, properties, body): print(" [x] Received %r" % body) ch.basic_ack(delivery_tag=method.delivery_tag) # 确定监听队列参数 channel.basic_consume(queue='hello3', auto_ack=False, # 默认应答改为手动应答 on_message_callback=callback) print(' [*] Waiting for messages. To exit press CTRL+C') # 正式监听 channel.start_consuming()
注意:#声明queue
channel.queue_declare(queue='hello2', durable=True) # 若声明过,则换一个名字channel.basic_publish(exchange='', routing_key='hello2', body='Hello World!', properties=pika.BasicProperties( delivery_mode=2, # make message persistent ) )
3.2.2.3 分发参数
producer.py

import pika

# 1 链接rabbitmq
connection = pika.BlockingConnection(pika.ConnectionParameters('127.0.0.1'))
channel = connection.channel()

# 2 创可持久化队列
channel.queue_declare(queue='hello4')

# 3 向指定队列插入数据
channel.basic_publish(exchange='', # 简单模式
                      routing_key='hello4', # 指定队列
                      body='Hello 999!',
                      )


customer.py

import pika


connection = pika.BlockingConnection(pika.ConnectionParameters('localhost'))
channel = connection.channel()

#  创建队列
channel.queue_declare(queue='hello4')


# 确定回调函数
def callback(ch, method, properties, body):
    import time
    time.sleep(5)
    print(" [x] Received %r" % body)
    ch.basic_ack(delivery_tag=method.delivery_tag)

#  公平分发(谁快谁接收, 而不是轮巡)
channel.basic_qos(prefetch_count=1)

# 确定监听队列参数
channel.basic_consume(queue='hello4',
                      auto_ack=False, # 默认应答改为手动应答
                      on_message_callback=callback)


print(' [*] Waiting for messages. To exit press CTRL+C')
# 正式监听
channel.start_consuming()
注意: 以上模式并不会为每个消费者各发一份, 而是按照顺序, 或者谁快就发给谁, 发完一个再发下一个, 同一份数据不会发给多个消费者.
3.2.3 交换机模式
3.2.3.1 发布订阅模式
生产者执行的步骤:
1. 连接rabbitmq
2. 创建交换机
3. 向交换机中插入数据
消费者执行的步骤:
1. 连接rabbitmq
2. 创建队列
3. 将队列绑定交换机
4. 回调函数等等
注意: 交换机接收到数据后, 会为每一个绑定的队列分发一份数据.
生产者(producer.py)

import pika

# 链接rabbitmq
connection = pika.BlockingConnection(pika.ConnectionParameters(
        host='localhost'))
channel = connection.channel()


# 声明一个名为logs类型为fanout的交换机
channel.exchange_declare(exchange='logs', # 创建交换机
                         exchange_type='fanout') # fanout:发布订阅模式参数

# 向logs交换机插入数据"info: Hello World!"
message = "info: Hello World!"
channel.basic_publish(exchange='logs',
                      routing_key='',
                      body=message)
print(" [x] Sent %r" % message)
connection.close()

消费者(customer.py)

import pika

# 链接rabbitmq
connection = pika.BlockingConnection(pika.ConnectionParameters(host='localhost'))
channel = connection.channel()

# 声明一个名为logs类型为fanout的交换机, 生产者声明了则不执行, 如果生产者没有声明则执行.
channel.exchange_declare(exchange='logs',
                         exchange_type='fanout')

# 创建队列
result = channel.queue_declare("",exclusive=True) # 让系统自动起名字
queue_name = result.method.queue # 拿到队列的名字
print(queue_name)

# 将指定队列绑定到交换机上
channel.queue_bind(exchange='logs',
                   queue=queue_name)

print(' [*] Waiting for logs. To exit press CTRL+C')

def callback(ch, method, properties, body):
    print(" [x] %r" % body)


channel.basic_consume(queue=queue_name,
                      auto_ack=True,
                      on_message_callback=callback)

channel.start_consuming()
3.2.3.2 关键字模式
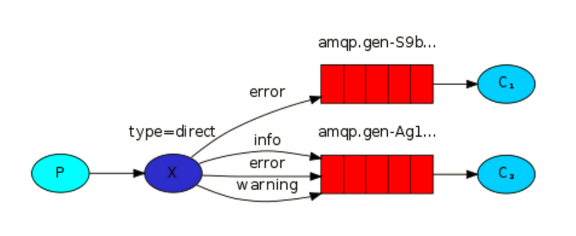
producer.py

import pika

# 链接rabbitmq
connection = pika.BlockingConnection(pika.ConnectionParameters(
        host='localhost'))
channel = connection.channel()


# 声明一个名为logs类型为fanout的交换机
channel.exchange_declare(exchange='logs2',
                         exchange_type='direct') # direct:关键字模式参数

# 向logs交换机插入数据"info: Hello World!"
message = "error: Hello World!"
channel.basic_publish(exchange='logs2',
                      routing_key='error',
                      body=message)
print(" [x] Sent %r" % message)
connection.close()

customer.py

import pika

# 链接rabbitmq
connection = pika.BlockingConnection(pika.ConnectionParameters(host='localhost'))
channel = connection.channel()

# 声明一个名为logs类型为fanout的交换机
channel.exchange_declare(exchange='logs2',
                         exchange_type='direct')

# 创建队列
result = channel.queue_declare("",exclusive=True)
queue_name = result.method.queue
print(queue_name)

# 将指定队列绑定到交换机上
channel.queue_bind(exchange='logs2',
                   queue=queue_name,
                   routing_key="info"
                   )
channel.queue_bind(exchange='logs2',
                   queue=queue_name,
                   routing_key="error"
                   )

print(' [*] Waiting for logs. To exit press CTRL+C')

def callback(ch, method, properties, body):
    print(" [x] %r" % body)


channel.basic_consume(queue=queue_name,
                      auto_ack=True,
                      on_message_callback=callback)

channel.start_consuming()
3.2.3.3 通配符
"通配符交换机"与之前的路由模式相比,它将信息的传输类型的key更加细化,以“key1.key2.keyN....”的模式来指定信息传输的key的大类型和大类型下面的小类型,让消费者可以更加精细的确认自己想要获取的信息类型。而在消费者一段,不用精确的指定具体到哪一个大类型下的小类型的key,而是可以使用类似正则表达式(但与正则表达式规则完全不同)的通配符在指定一定范围或符合某一个字符串匹配规则的key,来获取想要的信息。
“通配符交换机”(Topic Exchange)将路由键和某模式进行匹配。此时队列需要绑定在一个模式上。符号“#”匹配一个或多个词,符号“*”仅匹配一个词。因此“audit.#”能够匹配到“audit.irs.corporate”,但是“audit.*”只会匹配到“audit.irs”。(这里与我们一般的正则表达式的“*”和“#”刚好相反,这里我们需要注意一下。)
下面是一个解释通配符模式交换机工作的一个样例
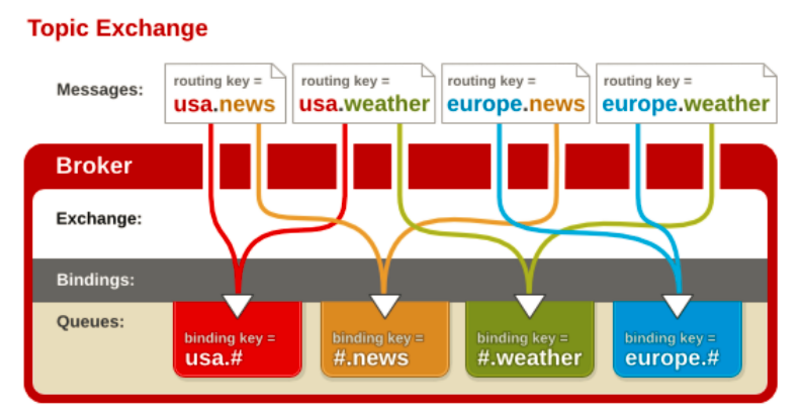
producer.py

import pika

# 链接rabbitmq
connection = pika.BlockingConnection(pika.ConnectionParameters(
        host='localhost'))
channel = connection.channel()


# 声明一个名为logs类型为fanout的交换机
channel.exchange_declare(exchange='logs3',
                         exchange_type='topic') # fanout:发布订阅模式参数

# 向logs交换机插入数据"info: Hello World!"
message = "usa.weather......."
channel.basic_publish(exchange='logs3',
                      routing_key='usa.weather',
                      body=message)
print(" [x] Sent %r" % message)
connection.close()

customer.py

import pika

# 链接rabbitmq
connection = pika.BlockingConnection(pika.ConnectionParameters(host='localhost'))
channel = connection.channel()

# 声明一个名为logs类型为fanout的交换机
channel.exchange_declare(exchange='logs3',
                         exchange_type='topic')

# 创建队列
result = channel.queue_declare("",exclusive=True)
queue_name = result.method.queue
print(queue_name)

# 将指定队列绑定到交换机上
channel.queue_bind(exchange='logs3',
                   queue=queue_name,
                   routing_key="#.weather"
                   )


print(' [*] Waiting for logs. To exit press CTRL+C')

def callback(ch, method, properties, body):
    print(" [x] %r" % body)


channel.basic_consume(queue=queue_name,
                      auto_ack=True,
                      on_message_callback=callback)

channel.start_consuming()

 浙公网安备 33010602011771号