
2.GitLab+Jenkins+Ansible
1.Gitlab简介
开发语言:Ruby
1.1.GitLab与GitHub不同:
GitHub:分布式在线代码托管仓库,个人版直接在线使用,企业版收费且服务器安装
GitLab:分布式在线代码仓库托管软件,社区版、企业版,服务器安装。
GitLab优势:开源免费;差异化版本管理,离线同步及强大分支管理;GUI操作,账号权限管理;支持内置HA。
1.2.GitLab主要服务构成:
Nginx 静态web;
GitLab-workhorse轻量级的反向代理服务器;
GitLab-shell处理Git命令和修改、存放ssh key authorized keys列表;
Logrotate日志文件管理工具;
Postgresql;
Redis缓存;
1.3.GitLab的工作流程
创建并克隆项目(用git-client命令行工具)------>创建项目Feature分支----->编写代码并提交至该分支------>推送该项目分支至Gitlab服务器----->进行代码检查并提交Master主分支合并申请----->项目领导审查代码并确认合并申请
2.Gitlab安装配置管理
a.安装Omnibus Gitlab-ce package ##Omnibus 一键安装Gitlab-ce及其各种组件,比源码安装简易太多。
#yum install curl policycoreutils openssh-server openssh-clients postfix -y
#curl -sS https://packages.gitlab.com/install/repositories/gitlab/gitlab-ce/script.rpm.sh|bash
#systemctl start postfix
#systemctl enable postfix
#yum install gitlab-ce -y
b.创建证书
#mkdir -p /etc/gitlab/ssl   ##存放证书的目录
#openssl genrsa -out "/etc/gitlab/ssl/gitlab.example.com.key" 2048  ##生成一个本地私钥
#openssl req -new -key "/etc/gitlab/ssl/gitlab.example.com.key" -out "/etc/gitlab/ssl/gitlab.example.com.csr"    ##用上面生成的私钥生成一个csr证书
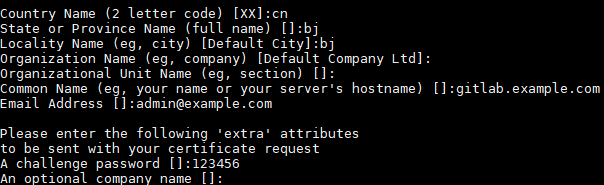
# openssl x509 -req -days 3650 -in "/etc/gitlab/ssl/gitlab.example.com.csr" -signkey "/etc/gitlab/ssl/gitlab.example.com.key" -out "/etc/gitlab/ssl/gitlab.example.com.crt"
##用私钥及csr证书签署crt证书
#openssl dhparam -out /etc/gitlab/ssl/dhparams.pem 2048 ##生成pem证书
#chmod 600 * #修改证书权限
c.把证书导入到gitlab配置中
external_url 'https://gitlab.example.com'  ##http改为https
nginx['redirect_http_to_https'] = true  ##false所改为true

#nginx['ssl_certificate'] = "/etc/gitlab/ssl/#{node['fqdn']}.crt"
改为
nginx['ssl_certificate'] = "/etc/gitlab/ssl/gitlab.example.com.crt"


# nginx['ssl_certificate_key'] = "/etc/gitlab/ssl/#{node['fqdn']}.key"
改为
nginx['ssl_certificate_key'] = "/etc/gitlab/ssl/gitlab.example.com.key"


# nginx['ssl_dhparam'] = nil # Path to dhparams.pem, eg. /etc/gitlab/ssl/dhparams.pem
改为
nginx['ssl_dhparam'] = /etc/gitlab/ssl/dhparams.pem # Path to dhparams.pem, eg. /etc/gitlab/ssl/dhparams.pem
d.初始化gitlab配置
#gitlab-ctl reconfigure
e.修改nginx配置
#vim /var/opt/gitlab/nginx/conf/gitlab-http.conf
rewrite ^(.*)$ https://$host$1 permanent;

#gitlab-ctl restart    ##使nginx配置生效
登录 gitlab.example.com
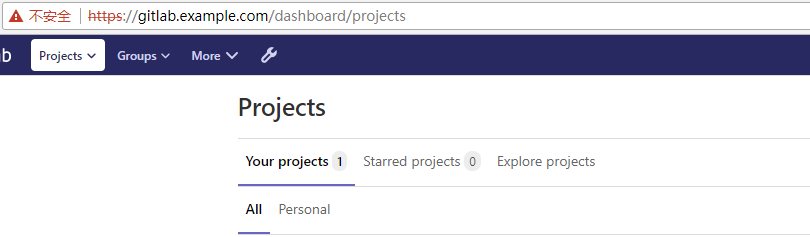
gitlab使用流程
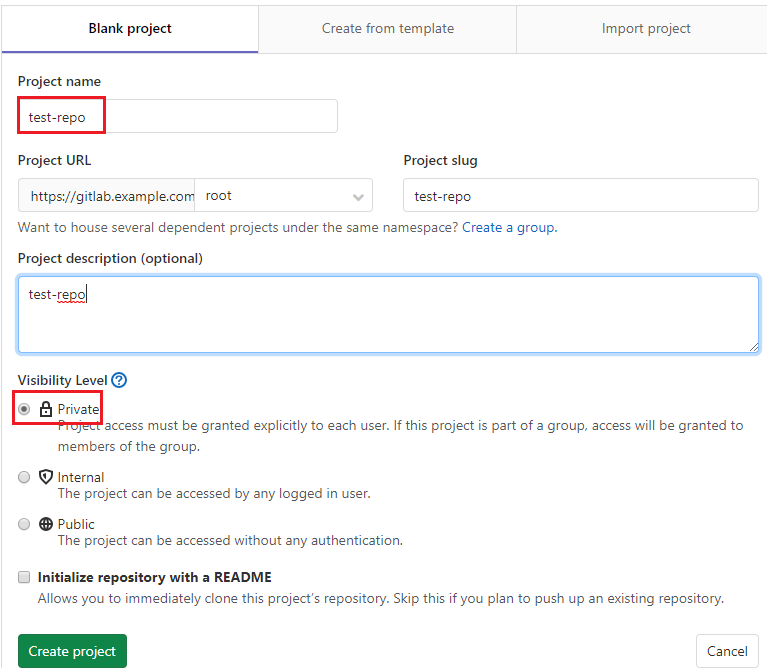
New project----->

客户端使用git
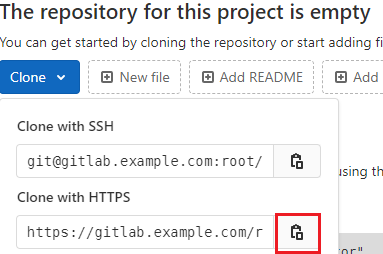
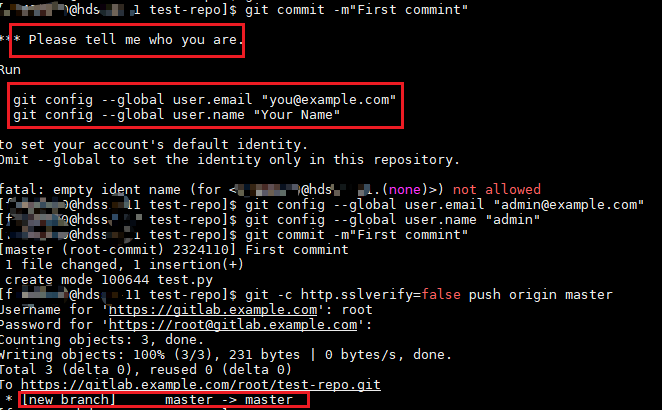
#su - user1
#mkdir repo  ##创建一个本地目录保存代码
#cd repo
#git -c http.sslverify=false clone https://gitlab.example.com/root/test-repo.git  ##克隆gitlab上的一个项目;链接从gitlab上复制而来

#cd test-repo
#vim test.py   ##创建一个测试文档
#git add .  ##添加test.py到本地仓库
#git commit -m"First commint"  ##提交到gitlab,及输入提交信息
#git config --global user.email "admin@example.com"      ##会要求添加本地全局邮箱及用户名
#git config --global user.name "admin"
#git commit -m"First commint"  ##再次提交到gitlab的master分枝
#git -c http.sslVerify=false push origin master   ##推送到gitlab上。
3.GitLab的应用
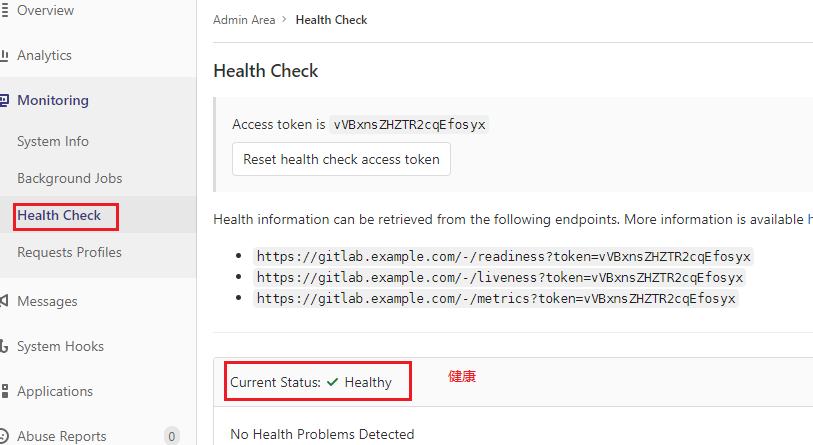
3.1.检查gitlab状态
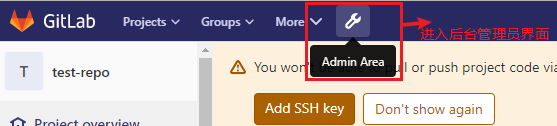
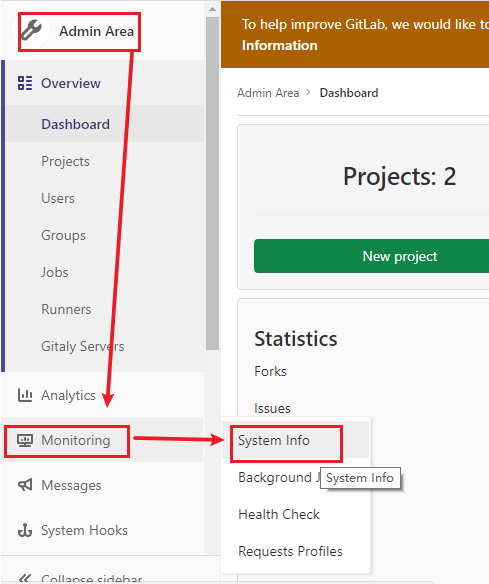
进入后台管理界面
进入gitlab系统状态界面
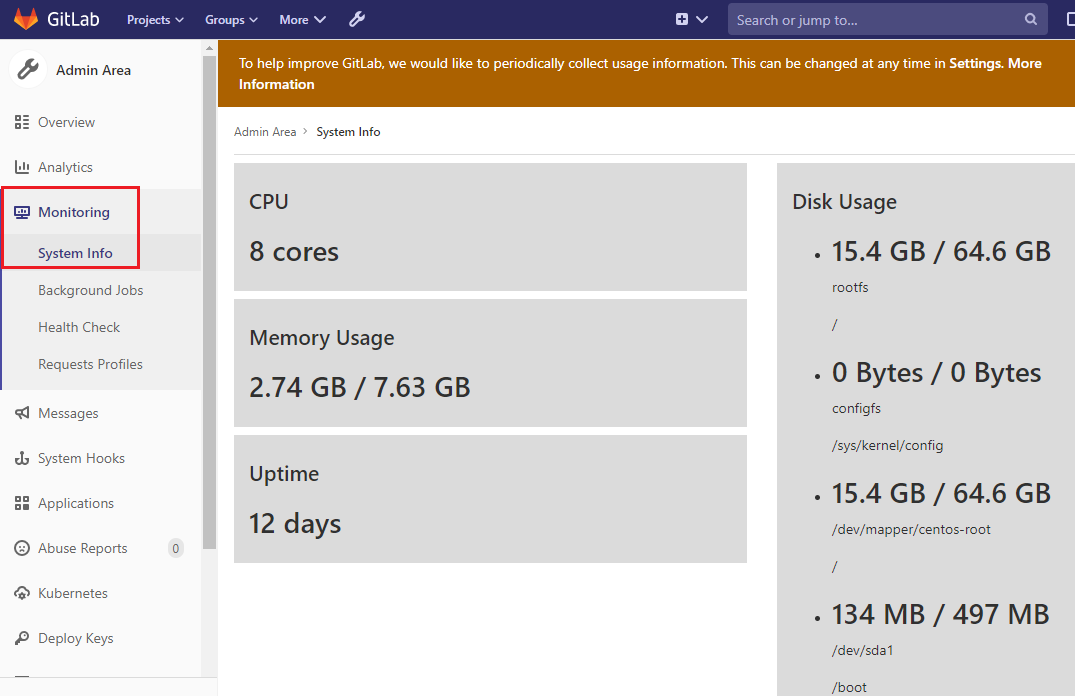
健康状态
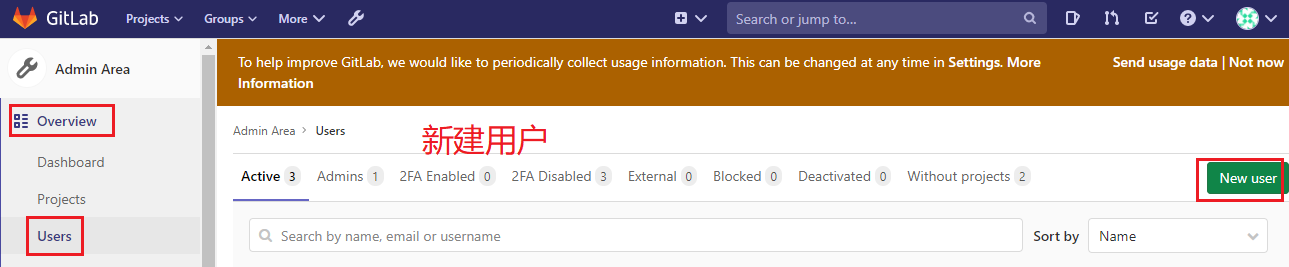
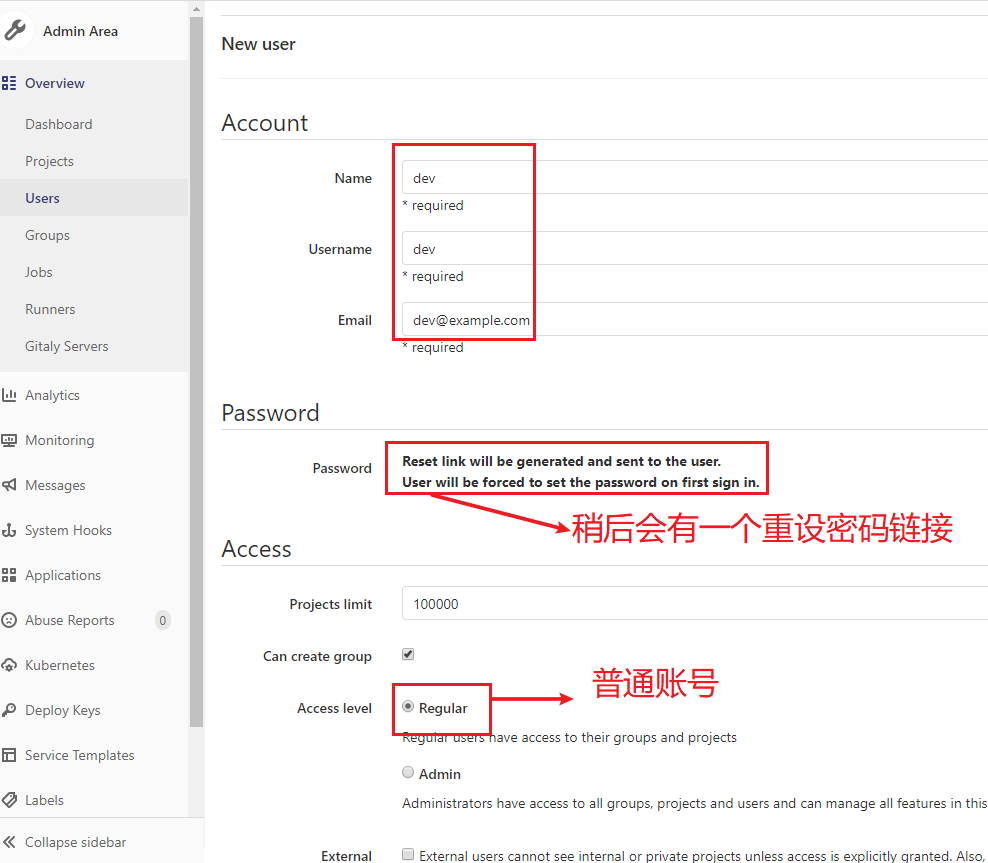
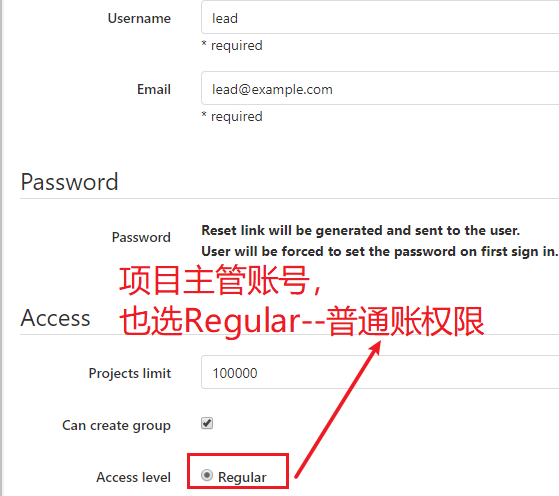
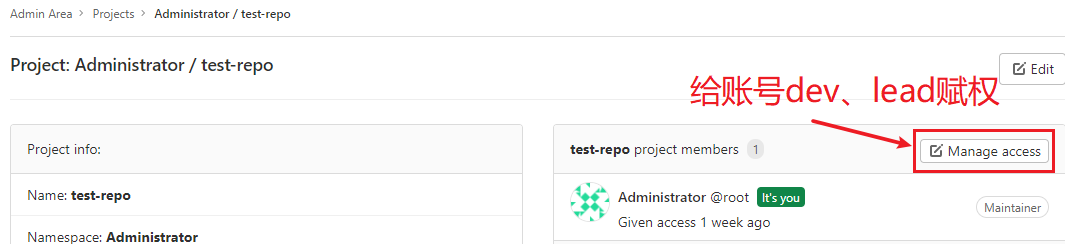
3.2.创建开发人员及项目主管的账号并赋予相应权限
创建普通用户账号---dev,创建项目主管账号---lead
lead账号
给账号赋权
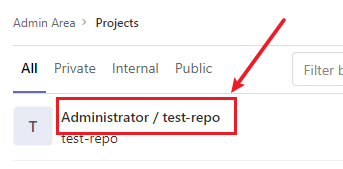
进入之前创建的Projects:test-repo

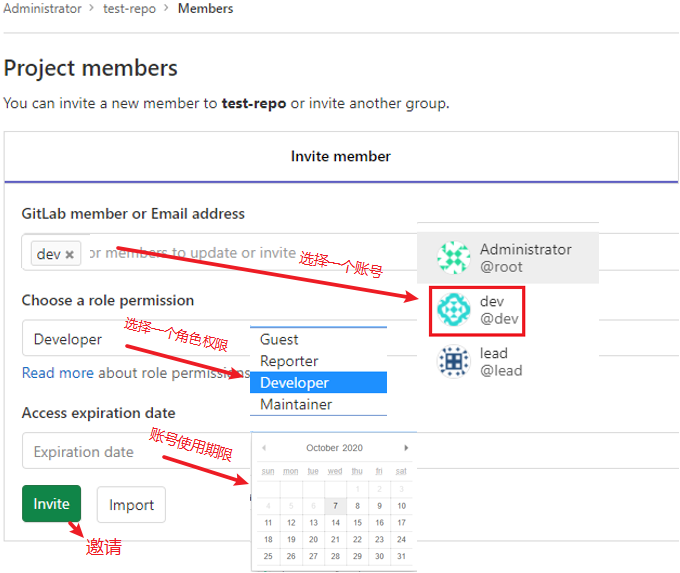
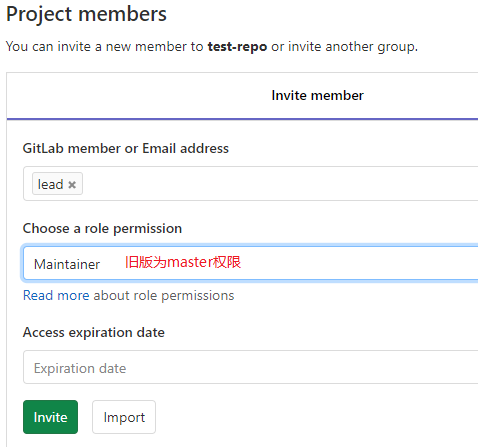
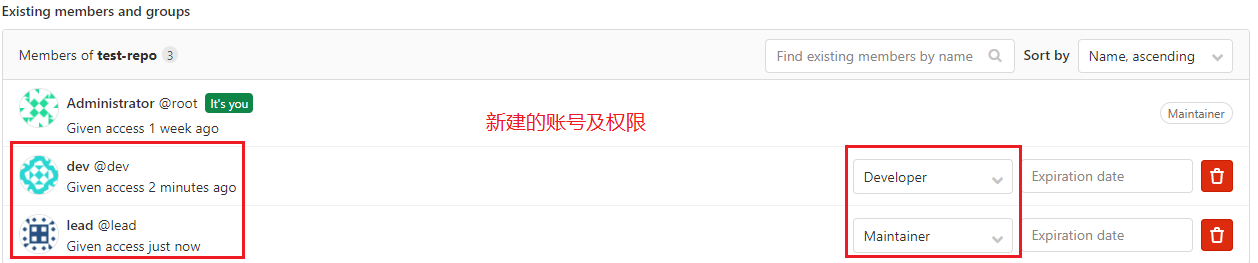
maintainer具有控制该项目的所以权限。
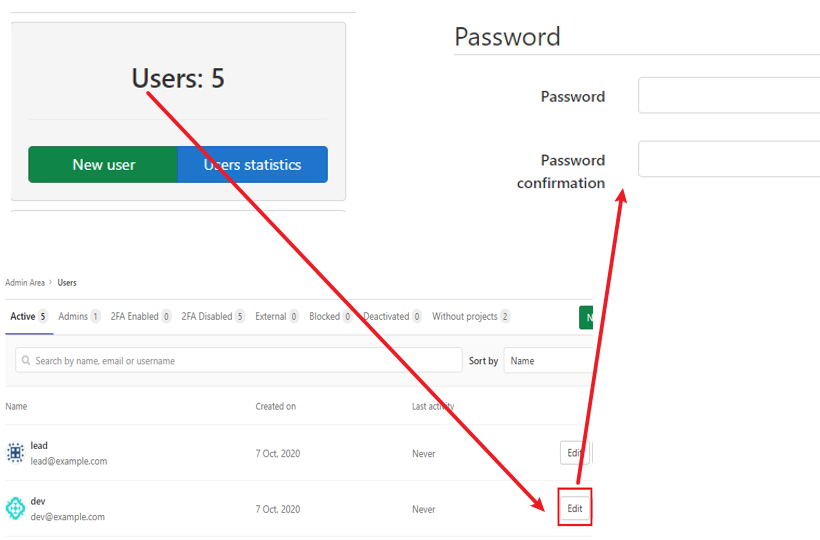
修改它们的密码,这里都设为12345678
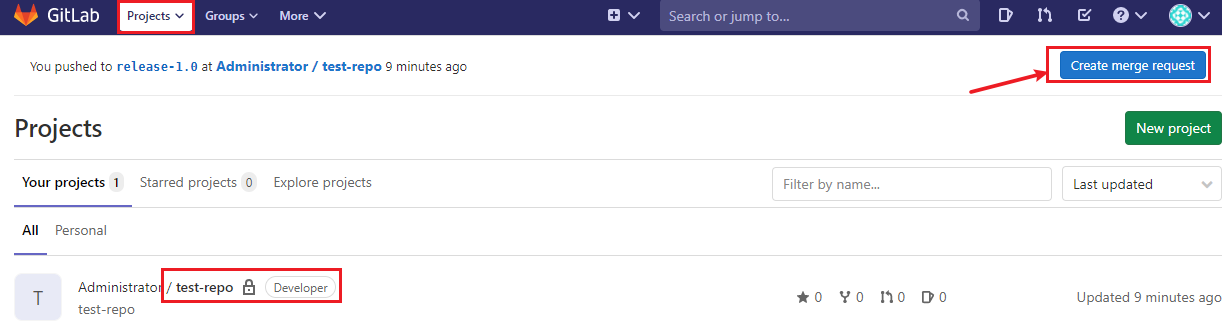
3.3.开发人员上传代码到项目的一个分支下,并发出合并到master分枝的申请
1.在开发主机207上删除之前创建的test-repo目录
2.在207上clone gitlab上的test-repo项目
git -c http.sslVerify=false clone https://gitlab.example.com/root/test-repo.git
3.创建一个release-1.0分支
[f7400000@host2-11 test-repo]$ git checkout -b release-1.0
Switched to a new branch 'release-1.0'
[f741@host2-11 test-repo]$ ls
test.py        ##可以看到release-1.0分支下仍有test.py代码文件
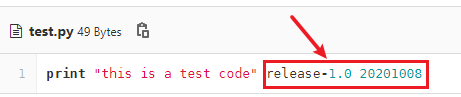
4.编辑此代码test.py,并提交到gitlab
$vim test.py
    print "this is a test code" release-1.0 20201008
$ git add README.md   ##可以先提交一个修改说明

$ git add .   ##本地添加修改过的变更
$ git commit -m"release-1.0"    ##本地提交
  [release-1.0 dc3cbff] release-1.0
   1 file changed, 1 insertion(+), 1 deletion(-)
[f7400000@hdss2-11 test-repo]$ git -c http.sslVerify=false push origin release-1.0    ##提交到gitlab上。
  Username for 'https://gitlab.example.com': dev
  Password for 'https://dev@gitlab.example.com':
  Counting objects: 5, done.
  Writing objects: 100% (3/3), 281 bytes | 0 bytes/s, done.
  Total 3 (delta 0), reused 0 (delta 0)
  remote:
  remote: To create a merge request for release-1.0, visit:
  remote:   https://gitlab.example.com/root/test-repo/-/merge_requests/new?merge_request%5Bsource_branch%5D=release-1.0
  remote:
  To https://gitlab.example.com/root/test-repo.git
   * [new branch]      release-1.0 -> release-1.0
5.到gitlab上创建合并到master分支上
提交合并请求成功。
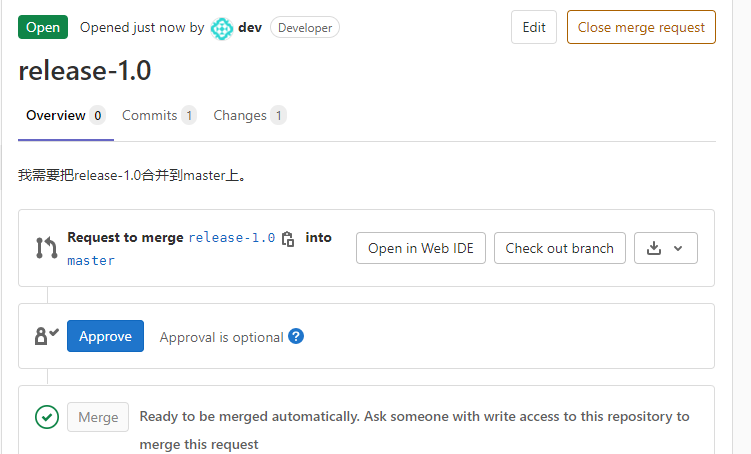
用lead账号登录,审批合并


查看主分支上的test.py文件,发现已经有修改的内容了
3.4.gitlab的日志
主要application.log、porduction.log
默认位置/var/log/gitlab/gitlab-rails
application.log:存放了gitlab的所有的操作记录
production.log:记录的所有的访问记录
4.Jenkins介绍
开源持续集成工具。Jenkins通过集群,实现负载均衡功能。
4.1.Jenkins安装配置
配置yum仓库源
#curl -o /etc/yum.repos.d/jenkins.repo https://pkg.jenkins.io/redhat-stable/jenkins.repo
#rpm --import https://pkg.jenkins.io/redhat-stable/jenkins.io.key
安装JAVA8.0以上版本
#yum install java -y
#java -version
安装配置Jenkins
##安装jenkins
#yum install jenkins
#useradd deploy    ##作为jenkins的系统启动用户

#vim /etc/sysconfig/jenkins
JENKINS_USER="deploy"    #修改jenkins用户为deploy
JENKINS_PORT="8088"      ##修改默认端口

##修改jenkins家目录及日志目录权限
#chown -R deploy:deploy /var/lib/jenkins
#chown -R deploy:deploy /var/log/jenkins

##启动jenkins
#systemctl start jenkins

#lsof -i:8080
登录网页jenkins.example.com:8088进行初始配置
设置账号密码admin Foxconn8899
插件安装
修改为清华大学源
设置一个nginx反代
server
    {
        listen 80;
        server_name mirrors.jenkins-ci.org;

        location / {
            proxy_redirect off;
            proxy_pass https://mirrors.tuna.tsinghua.edu.cn/jenkins/;
            proxy_set_header X-Real-IP $remote_addr;
            proxy_set_header X-Forwarded-For $proxy_add_x_forwarded_for;
            proxy_set_header Accept-Encoding "";
            proxy_set_header Accept-Language "zh-CN";
        }
        index index.html index.htm index.php;
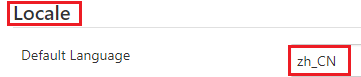
中文显示
安装插件Locale、Localization: Chinese (Simplified)
4.2.Job任务类型:
Freestyle Job
自由风格
在页面添加模块配置项与参数完成配置;每个Job只能实现一个开发功能;无法将配置代码化,不利于Job配置迁移与版本控制。
Pipeline Job
流水线
匹配持续集成与持续交付的概念;所有模块,参数配置都可以体现为一个pipeline脚本;可以定义多个stage构建一个管理工作集;所有配置代码化,方便迁移;需要pipeline脚本语法基础。
5.Jenkins Job构建配置环境准备
- 配置jenkins server本地gitlab DNS
- 安装git client,curl工具依赖
- 关闭系统git http.sslVerify安全认证
- 添加jenkins后台git client user与email
- 添加jenkins后台git Credential凭据
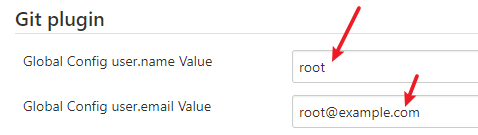
1.添加jenkins后台git client user与email:系统管理---系统设置---git plugin
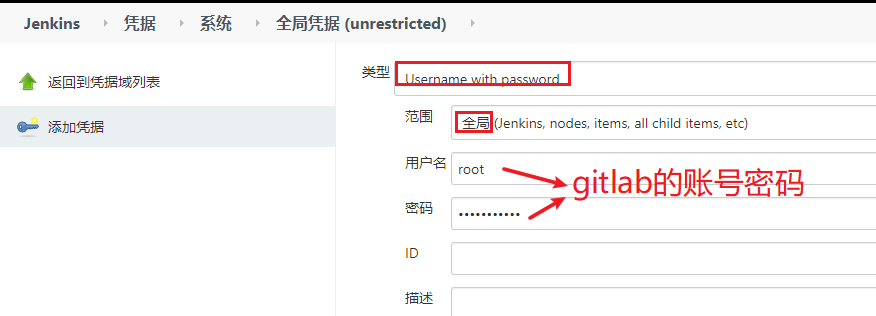
2.添加jenkins后台git Credential凭据:Manage Credential---Jenkins---全局凭据 (unrestricted)---添加凭据
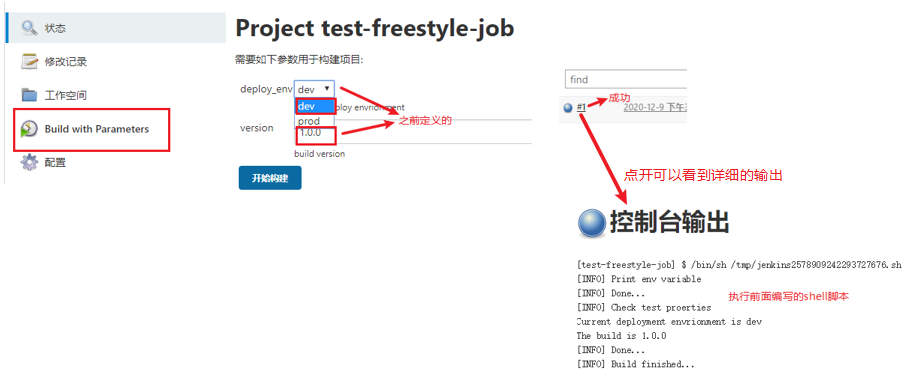
5.1.Freestyle Job的构建与配置
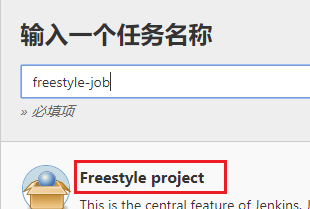
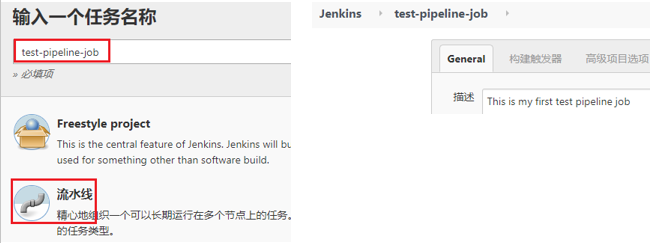
1.创建一个Freestyle project
新建任务---输入一个任务名称
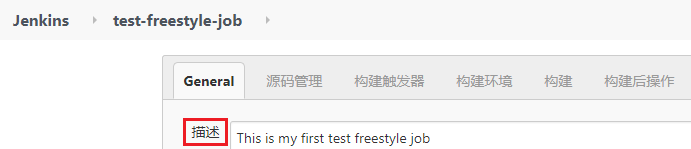
2.编辑描述信息
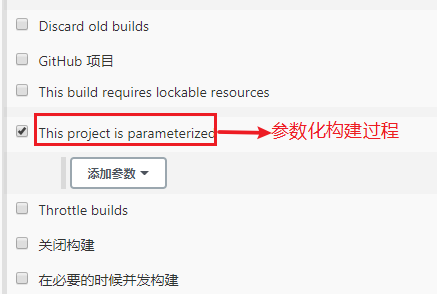
3.参数配置

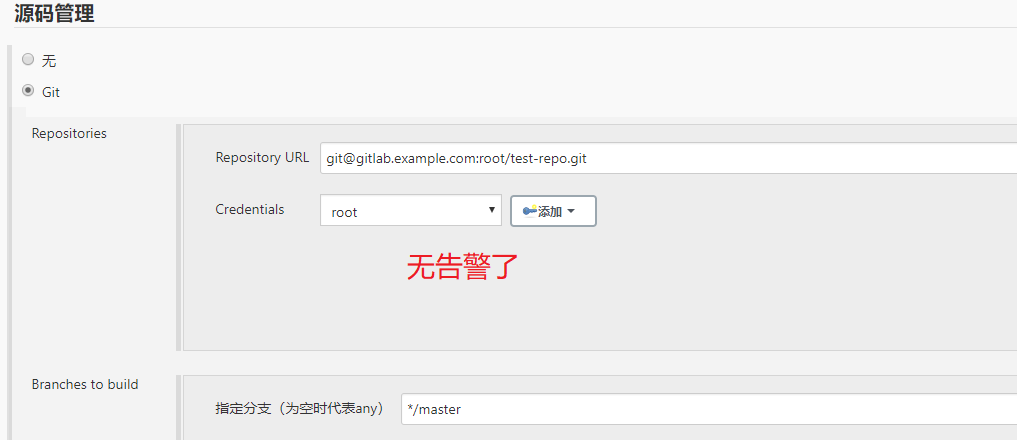
4.源码管理
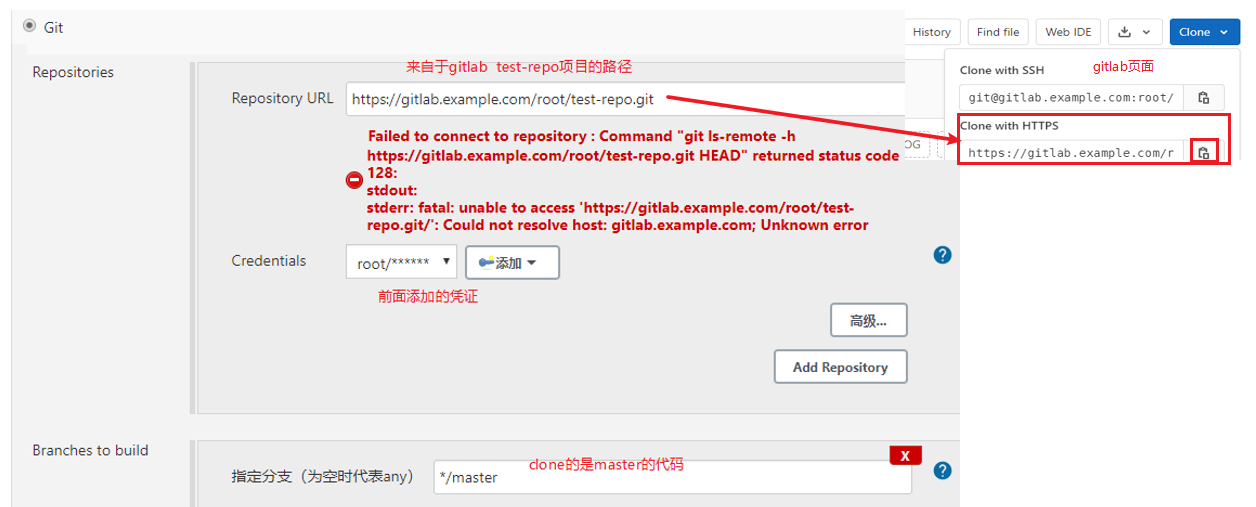
报错,用网上方法在jenkins服务器上安装git;并执行git config --global http.sslVerify false 也没用。
改用ssh-key验证
a.在jenkins服务器上安装插件 SSH Agent
b.在jenkins服务器上生成ssh key
ssh-keygen -o
c.在jenkins上添加Credentials,把私钥id_rsa的内容copy到任证中
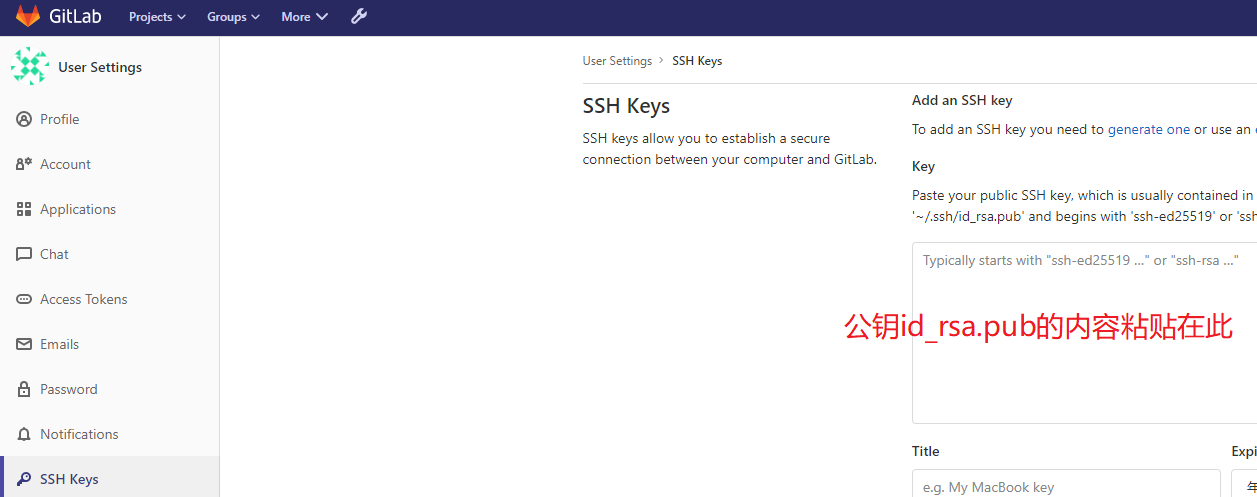
d.在gitlab设置ssh key

5.Build配置
5.2.Jenkins Pipeline Job构建配置
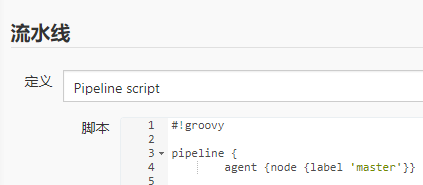
5.2.1.pipeline基础语法架构:
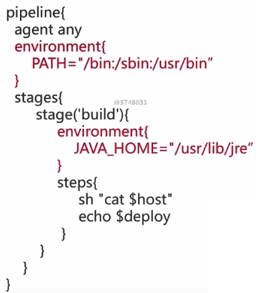
所有代码包裹在pipeline{}层内
stages{}层用来包含该pipeline所有stage子层
stage{}层用来包含具体我们需要编写任务的steps{}子层
steps{}层用来添加我们具体需要调用的模块语句
例:
pipeline{
  agent any
  environment{
    host='test.example.com'
    user='deploy'
  }
  stages{
      stage('build'){
         steps{
              sh "cat $host"
              echo $user
         }
      }
    }
}
agent区域定义pipeline在哪里运行
可以用any,none,或具体的Jenkins node主机名等; any随机在一台jenkins主机上执行
例:如果我们要特指在node1上执行,可以写成:agent{node {label 'node1'}}
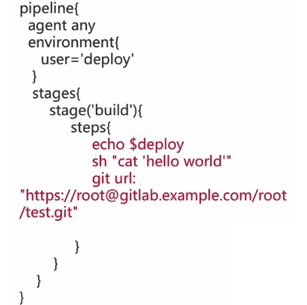
environment区域
“变量名称=变量值”定义我们的环境变量
可以定义全局环境变更,应用所有stages任务
可以定义stage环境变量,应用单独的stage任务
script区域(可选)
在steps内定义script{}
groovy脚本语言
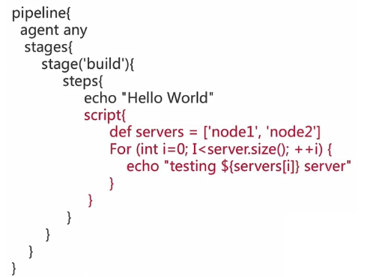
steps区域
echo:打印输出
sh:调用linux系统shell命令
git url:调用git模块进行不行相关操作
5.2.2.构建Pipeline Job
1.创建一个pipline job
2.Pipeline脚本配置

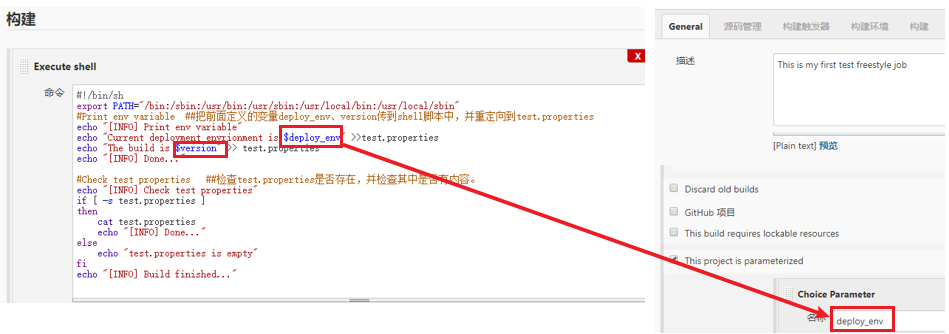
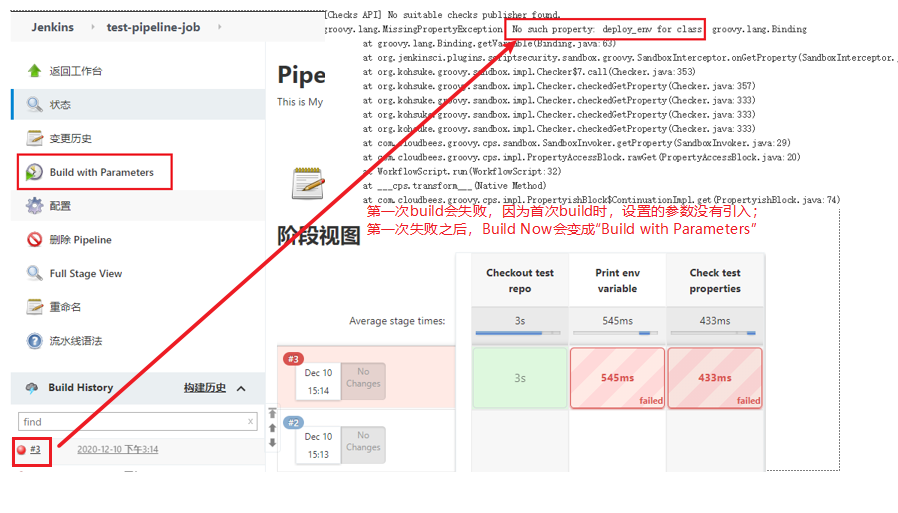
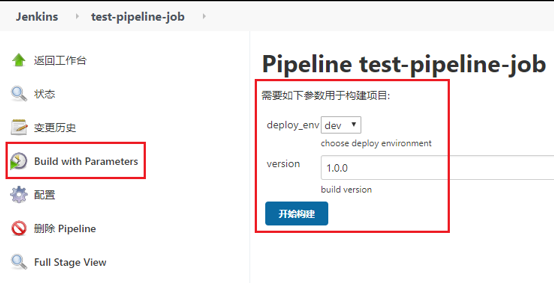
#!groovy
pipeline{
    agent{node {label 'master'}}

    environment {
        PATH="/bin:/sbin:/usr/bin:/usr/sbin:/usr/local/bin"
    }

    parameters {
       choice(
           choices:'dev\nprod',
           description:'choose deploy environment',
           name:'deploy_env'
           )
        string(name:'version',defaultValue:'1.0.0',description:'build version')
    }

    stages {
        stage("Checkout test repo") {
            steps{
                sh 'git config --global http.sslVerify false'
                dir ("${env.WORKSPACE}") {
                    git branch: 'master',credentialsId:"ecc8fa55-78e5-4d2a-8669-12282d946b60",url: 'https://root@gitlab.example.com/root/test-repo.git'
                }
            }
        }
        stage("Print env variable") {
            steps {
                dir ("${env.WORKSPACE}"){
                    sh"""
                    echo "[INFO] Print env variable"
                    echo "Current deployment environmet is $deploy_env" >> test.properties
                    echo "The build is $version" >> test.properties
                    echo "[INFO] Done..."
                    """
                }
            }
        }
        stage("Check test properties") {
            steps{
                dir ("${env.WORKSPACE}") {
                    sh"""
                    echo "[INFO] Check test properties"
                    if [ -s test.properties ]
                    then
                        cat test.properties
                        echo "[INFO] Done..."
                    else
                        echo "test.properties is empty"
                    fi
                    """

                    echo "[INFO] Build finished..."
                }
            }
        }
    }

}
3.开始Build
6.Jenkins简单应用示例
6.1.Jenkins Linux Shell集成
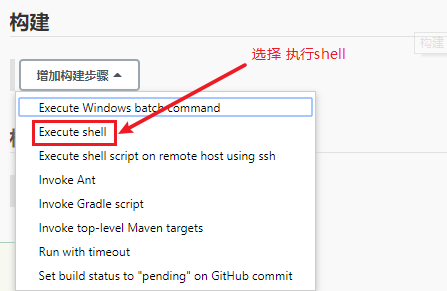
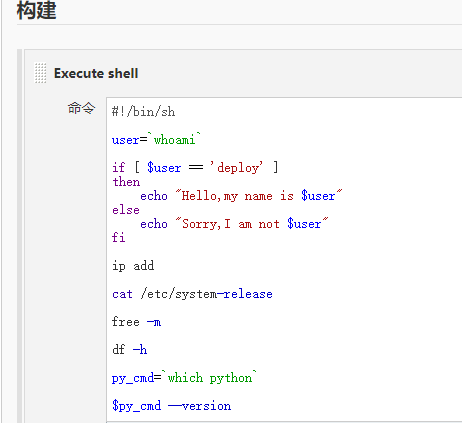
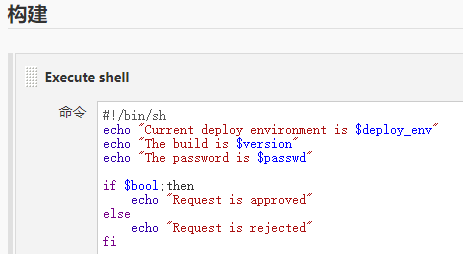
创建一个freestyle job,然后直接到---构建中去编写shell,这样就会在当前Jenkins服务上执行下面shell
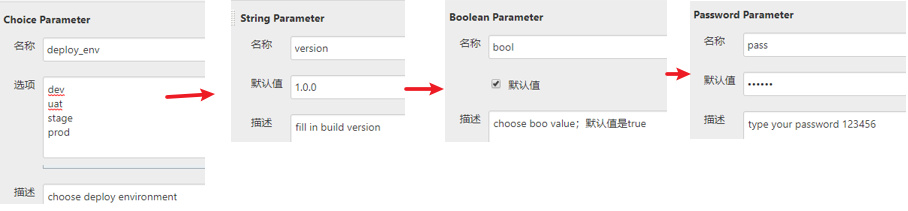
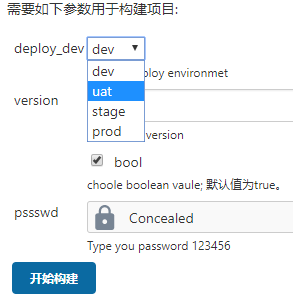
6.2.Jenkins集成参数
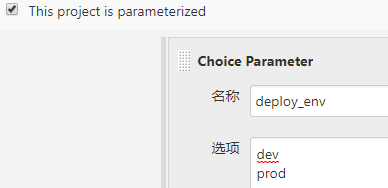
新建一个freestyle job;然后选择“参数化构建过程--this project is parameterized”
分别添加choice parameter 、string parameter 、boolean parameter、password parameter

构建
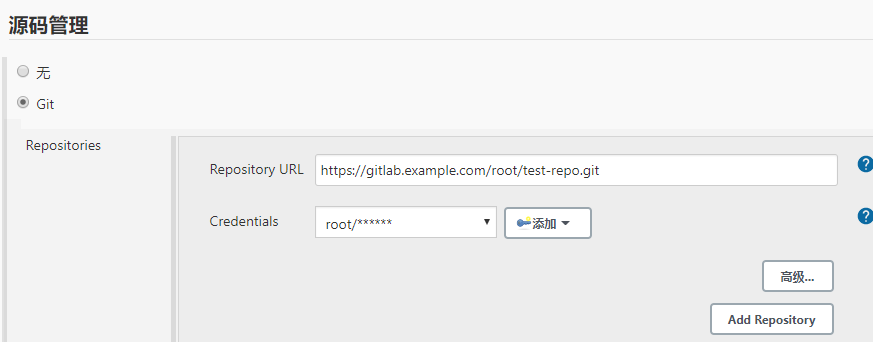
6.3.Jenkins与git集成
创建一个freestyle job,----源码管理---添加git地址
6.4.Jenkins与maven集成
利用jenkins的内置插件,把从git clone下来的java源码编译成jar/war包
在jenkins主机上下载maven。
https://maven.apache.org/download.cgi
https://archive.apache.org/dist/maven/maven-3/3.5.4/binaries/apache-maven-3.5.4-bin.tar.gz
安装maven
tar -zxvf apacje-maven-3.5.4-bin.tar.gz -c /opt
cd /opt/apache-maven-3.5.4/bin/
./mvn --version

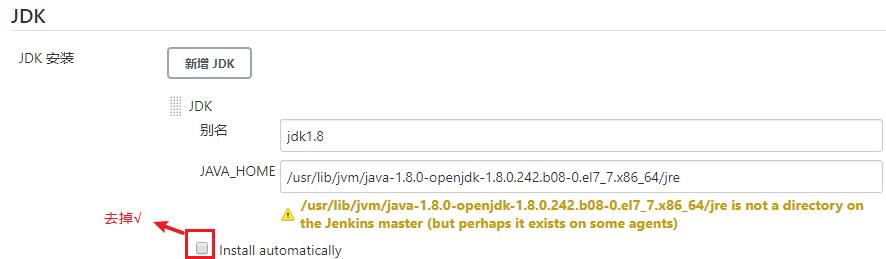
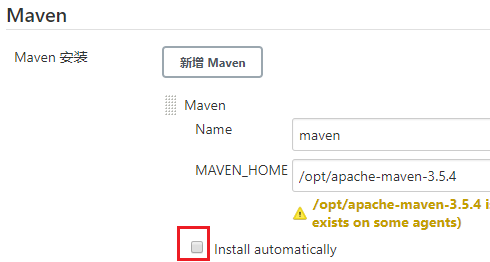
添加jave home及maven home路径到Jenkins
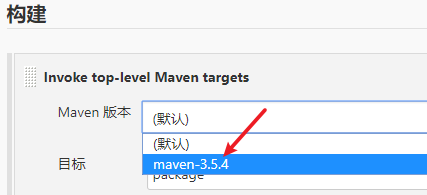
新建一个maven-freestyles-job,设置git;构建选择“”
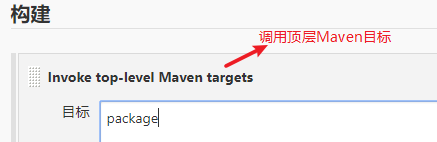
在全局配置中设置jave home及maven home
返回maven-freestyles-job修改配置,选择版本(配置完成前面的home之后应该自动出现)
build之后可以在 控制台输出的日志中查看到打包好的文件存放在哪里了
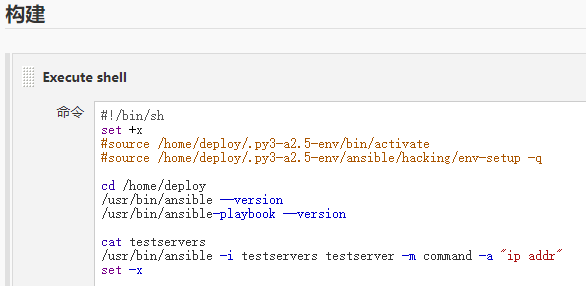
6.5.Jenkins ansible集成
新建一个freestyle job---构建--“execute shell”
预先设置好ssh免passwd登录
7.Jenkins、Ansible、Gitlab集成
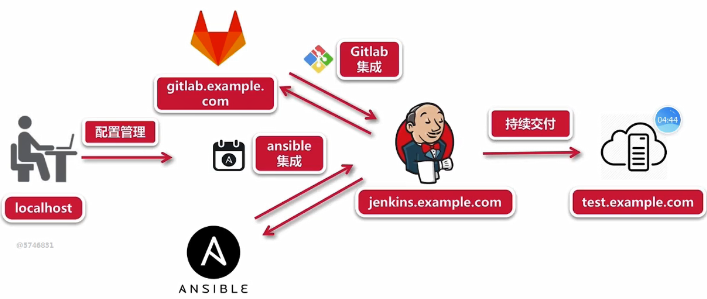
7.1.实验环境配置
先编写好playbook脚本,并上传到gitlab的项目
7.2.Freestyle任务构建和自动化部署
先新建一个freestyle任务--nginx-freestyle-job;设置好源码管理

shell中的变量是在Jenkins“参数化构建过程”中设置的各种参数

执行构建

在控制台中查看日志

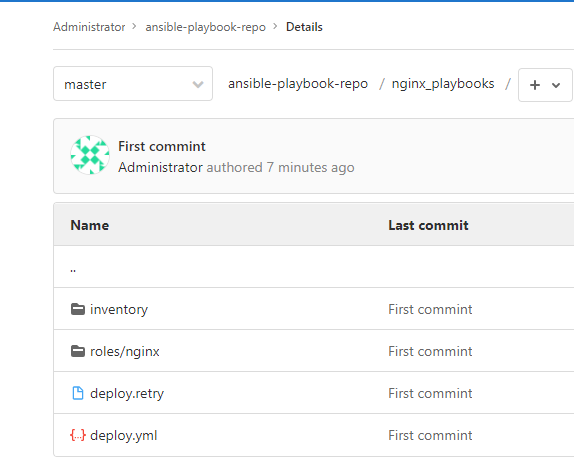
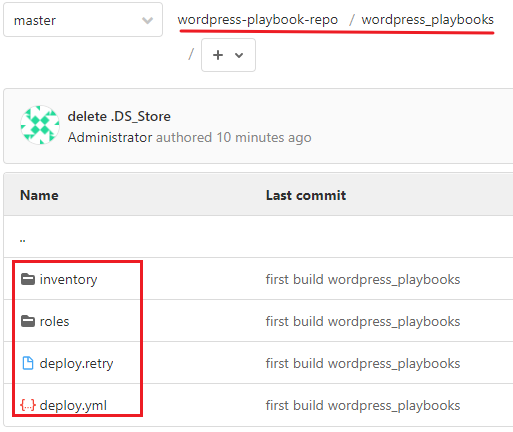
附:gitlab上ansible-playbook-repo项目详细内容
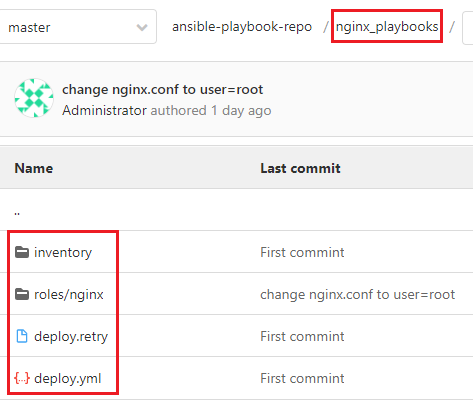
nginx_plybooks/deploy.retry内容:
test.example.com
nginx_plybooks/deploy.yml
- hosts: "nginx"
  gather_facts: true
  remote_user: root
  roles:
    - nginx
nginx_plybooks/inventory/dev
[nginx]
test.example.com

[nginx:vars]
server_name=test.example.com
port=80
user=deploy
worker_processes=4
max_open_file=65505
root=/www
nginx_plybooks/inventory/prod
[nginx]
test.example.com

[nginx:vars]
server_name=test.example.com
port=80
user=deploy
worker_processes=4
max_open_file=65505
root=/www
nginx下有3个目录

nginx_plybooks/roles/nginx/files/health_check.sh
#!/bin/sh

URL=$1

curl -Is http://$URL > /dev/null && echo "The remote side is healthy" || echo "The remote side is failed, please check"
nginx_plybooks/roles/nginx/files/health_check.sh
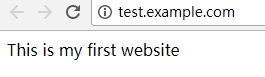
This is my first website
nginx_plybooks/roles/nginx/task/main.yml
- name: Disable system firewall
  service: name=firewalld state=stopped

- name: Disable SELINUX
  selinux: state=disabled

- name: setup nginx yum source
#  yum: pkg=epel-release state=latest
  copy: src=/etc/yum.repos.d/epel.repo dest=/etc/yum.repos.d/epel.repo force=no

- name: install nginx
  yum: name=nginx state=present

- name: write then nginx config file
  template: src=roles/nginx/templates/nginx.conf.j2 dest=/etc/nginx/nginx.conf

- name: create nginx root folder
#  file: 'path={{ root }} state=directory owner={{ user }} group={{ user }} mode=0755'
  file: 'path={{ root }} state=directory owner=root group=root mode=0755'

- name: copy index.html to remote
  copy: 'remote_src=no src=roles/nginx/files/index.html dest=/www/index.html mode=0755'

- name: restart nginx service
  service: name=nginx state=restarted

- name: run the health check locally
  shell: "sh roles/nginx/files/health_check.sh {{ server_name }}"
  delegate_to: localhost
  register: health_status

- debug: msg="{{ health_status.stdout }}"
nginx_plybooks/roles/nginx/templates/nginx.conf.j2
# For more information on configuration, see:
#user              {{ user }};    ##报个小错直接改成下面root的了。
user              root;
worker_processes  {{ worker_processes }};

error_log  /var/log/nginx/error.log;

pid        /var/run/nginx.pid;

events {
    worker_connections  {{ max_open_file }};
}


http {
    include       /etc/nginx/mime.types;
    default_type  application/octet-stream;

    log_format  main  '$remote_addr - $remote_user [$time_local] "$request" '
                      '$status $body_bytes_sent "$http_referer" '
                      '"$http_user_agent" "$http_x_forwarded_for"';

    access_log  /var/log/nginx/access.log  main;

    sendfile        on;
    #tcp_nopush     on;

    #keepalive_timeout  0;
    keepalive_timeout  65;

    #gzip  on;

    # Load config files from the /etc/nginx/conf.d directory
    # The default server is in conf.d/default.conf
    #include /etc/nginx/conf.d/*.conf;
    server {
        listen       {{ port }} default_server;
        server_name  {{ server_name }};

        #charset koi8-r;
        #access_log  logs/host.access.log  main;

        location / {
            root   {{ root }};
            index  index.html index.htm;
        }

        error_page  404              /404.html;
        location = /404.html {
            root   /usr/share/nginx/html;
        }

        # redirect server error pages to the static page /50x.html
        #
        error_page   500 502 503 504  /50x.html;
        location = /50x.html {
            root   /usr/share/nginx/html;
        }

    }

}
完成这后,可以访问这个部署的网站
8.Pipeline Job实现 Nginx+Mysql+PHP+Wordpress自动化部署交付
平台初始环境配置
ansible playbook脚本实现WordPress远程部署
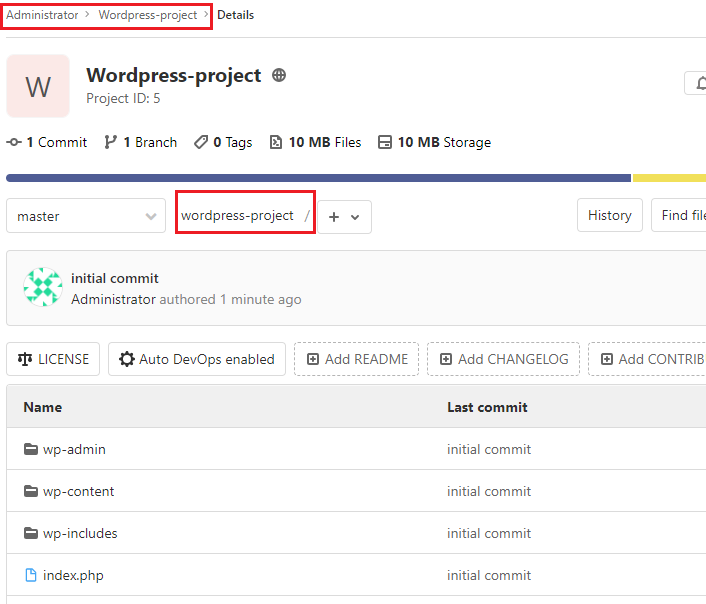
WordPress源码与playbook部署脚本提交到GigLab仓库
Pipeline Job脚本实现Jenkins流水线持续交付流程
Jenkins集成Anisble与GitLab实现Wordpress的自动化部署
8.1.建立一个Jenkins pipeline Job
编写Pipeline Script
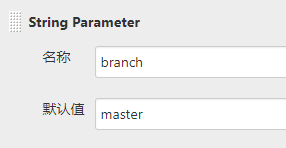
#!groovy

pipeline {
        agent {node {label 'master'}}

        environment {
                PATH="/bin:/sbin:/usr/bin:/usr/sbin:/usr/local/bin"
        }

        parameters {
                choice(
                        choices: 'dev\nrprod',
                        description: 'Choose deploy environment',
                        name: 'deploy_env'
                )
                string (name: 'branch', defaultValue: 'master', description: 'Fill in your ansible repo branch')
        }

        stages {
                stage ("Pull deploy code") {
                        steps{
                                sh 'git config --global http.sslVerify false'
                                dir ("${env.WORKSPACE}"){
                                        git branch: 'master', credentialsId: 'ecc8fa55-78e5-4d2a-8669-12282d946b60', url: 'https://gitlab.example.com/root/wordpress-playbook-repo.git'
                                }
                        }

                }

                stage ("Check env") {
                        steps {
                                sh """
                                set +x
                                user=`whoami`
                                if [ $user == deploy ]
                                then
                                        echo "[INFO] Current deployment user is $user"
#                                        source /home/deploy/.py3-a2.5-env/bin/activate
#                                        source /home/deploy/.py3-a2.5-env/ansible/hacking/env-setup -q
                                        echo "[INFO] Current python version"
                                        python --version
                                        echo "[INFO] Current ansible version"
                                        ansible-playbook --version
                                        echo "[INFO] Remote system disk space"
                                        ssh root@test.example.com df -h
                                        echo "[INFO] Rmote system RAM"
                                        ssh root@test.example.com free -m
                                else
                                        echo "Deployment user is incorrect, please check"
                                fi

                                set -x
                                """
                        }
                }

                stage ("Anisble deployment") {
                        steps {
                                input "Do you approve the deployment?"
                                dir("${env.WORKSPACE}/wordpress_playbooks"){
                                        echo "[INFO] Start deployment"
                                        sh """
                                        set +x
#                                        source /home/deploy/.py3-a2.5-env/bin/activate
#                                        source /home/deploy/.py3-a2.5-env/ansible/hacking/env-setup -q
                                        ansible-playbook -i inventory/$deploy_env ./deploy.yml -e project=wordpress -e branch=$branch -e env=$deploy_env
                                        set -x
                                        """
                                        echo "[INFO] Deployment finished..."
                                }
                        }
                }

        }

}
credentialsId:的Jenkins中的凭据中查找

8.2.Nginx+Mysql+PHP+Wordpress的ansible自动部署playbook:
各文件目录内容如下
deploy.retry

deploy.yml
- hosts: wordpress
  gather_facts: true
  remote_user: root
  vars:
      backup_to: "{{root}}_{{branch}}_{{ansible_date_time.epoch}}"
  roles:
    - wordpress
inventory/dev
[wordpress]
test.example.com

[wordpress:vars]
server_name=test.example.com
port=8080
user=deploy
worker_processes=2
max_open_file=30000
root=/data/www
gitlab_user='root'
gitlab_pass='Foxconn8899'
inventory/prod
[wordpress]
test.example.com

[wordpress:vars]
server_name=test.example.com
port=80
user=deploy
worker_processes=4
max_open_file=65505
root=/data/www
gitlab_user='root'
gitlab_pass='Foxconn8899'
roles/wordpress/files/health_check.sh
#!/bin/sh

URL=$1
PORT=$2

curl -Is http://$URL:$PORT/info.php > /dev/null && echo "The remote side is healthy" || echo "The remote side is failed, please check"
roles/wordpress/files/info.php
<?php phpinfo(); ?>
roles/wordpress/files/www.conf
[www]
user = deploy
group = deploy
listen = /var/run/php-fpm/php-fpm.sock
listen.owner = deploy
listen.group = deploy
listen.allowed_clients = 127.0.0.1
pm = dynamic
pm.max_children = 50
pm.start_servers = 5
pm.min_spare_servers = 5
pm.max_spare_servers = 35
slowlog = /var/log/php-fpm/www-slow.log
php_admin_value[error_log] = /var/log/php-fpm/www-error.log
php_admin_flag[log_errors] = on
php_value[session.save_handler] = files
php_value[session.save_path]    = /var/lib/php/session
php_value[soap.wsdl_cache_dir]  = /var/lib/php/wsdlcache
roles/wordpress/tasks/main.yml
- name: Update yum dependency
  shell: 'yum update -y warn=False'

- name: Disable system firewall
  service: name=firewalld state=stopped

- name: Disable SELINX
  selinux: state=disabled

- name: Setup epel yum source for nginx and mariadb(mysql)
  yum: pkg=epel-release state=latest

- name: Setup webtatic yum source for php-fpm
  yum: name=https://mirror.webtatic.com/yum/el7/webtatic-release.rpm

- name: Ensure nginx is at the latest version
  yum: pkg=nginx state=latest

- name: Write the nginx config file
  template: src=roles/wordpress/templates/nginx.conf.j2 dest=/etc/nginx/nginx.conf

- name: Create nginx root folder
  file: 'path={{ root }} state=directory owner={{ user }} group={{ user }} mode=0755'

- name: Copy info.php to remote
  copy: 'remote_src=no src=roles/wordpress/files/info.php dest=/data/www/info.php mode=0755'

- name: Restart nginx service
  service: name=nginx state=restarted

- name: Setup php-fpm
  command: 'yum install -y php70w php70w-fpm php70w-common php70w-mysql php70w-gd php70w-xml php70w-mbstring php70w-mcrypt warn=False'

- name: Restart php-fpm service
  service: name=php-fpm state=restarted

- name: Copy php-fpm config file to remote
  copy: 'remote_src=no src=roles/wordpress/files/www.conf dest=/etc/php-fpm.d/www.conf mode=0755 owner={{ user }} group={{ user }} force=yes'

- name: Restart php-fpm service
  service: name=php-fpm state=restarted

- name: Run the health check locally
  shell: "sh roles/wordpress/files/health_check.sh {{ server_name }} {{ port }}"
  delegate_to: localhost
  register: health_status

- debug: msg="{{ health_status.stdout }}"

- name: Setup mariadb(mysql)
  command: "yum install -y mariadb mariadb-server warn=False"

- name: Backup current www folder
  shell: 'mv {{ root }} {{ backup_to }}'

- name: Close git ssl verification
  shell: 'git config --global http.sslVerify false'

- name: Clone WordPress repo to remote
  git: "repo=https://{{ gitlab_user | urlencode }}:{{ gitlab_pass | urlencode }}@gitlab.example.com/root/wordpress-project.git dest=/data/www version={{ branch }}"
  when: project == 'wordpress'

- name: Change www folder permission
  file: "path=/data/www mode=0755 owner={{ user }} group={{ user }}"
roles/wordpress/templates/nginx.conf.j2
user              {{ user }};
worker_processes  {{ worker_processes }};
error_log  /var/log/nginx/error.log;
pid        /var/run/nginx.pid;
events {
    worker_connections  {{ max_open_file }};
}
http {
    include       /etc/nginx/mime.types;
    default_type  application/octet-stream;
    log_format  main  '$remote_addr - $remote_user [$time_local] "$request" '
                      '$status $body_bytes_sent "$http_referer" '
                      '"$http_user_agent" "$http_x_forwarded_for"';
    access_log  /var/log/nginx/access.log  main;
    sendfile        on;
    keepalive_timeout  65;
    server {
        listen       {{ port }} default_server;
        server_name  {{ server_name }};
        root         {{ root }};
        location / {
            index  index.html index.htm index.php;
        }
        location ~ \.php$ {
            try_files $uri =404;
            fastcgi_pass unix:/var/run/php-fpm/php-fpm.sock;
            fastcgi_index index.php;
            fastcgi_param SCRIPT_FILENAME $document_root$fastcgi_script_name;
            include fastcgi_params;
        }
    }
}
在gitlat上传一个wordpress网站代码
在目的主机上启动mariadb
systemctl start mariadb
mysql_secure_installation    ##初始化db
初始密码设为123456

登录mariadb
mysql -uroot -p123456
MariaDB [(none)]> create database wordpress character set utf8;
 ##创建wordpress DB并设置编码utf8
登录网站 http://test.example.com:8080

完成。

 浙公网安备 33010602011771号