6.LNMP
1.LNMP工作流程
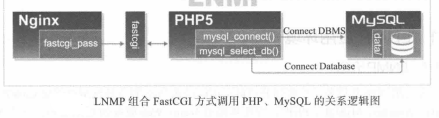
当MySQL与Nginx安装在不同server上时,Nginx服务器上的MySQL数据库软件包只要解压移动到/application目录,改名为mysql即可,不需要进行后面的初始化配置。
在非一体的LNMP环境上,编译PHP环境时,也需要MySQL数据库环境支持,但PHP5.3版本以上,内置PHP需要的MySQL程序,可以不安装MySQL,只需编译时指定参数--with-mysql=mysqlnd来调用内置的MySQL库。
一般先安装mysql。
2.MySQL
2.1.安装
官方安装方法:https://dev.mysql.com/doc/mysql-linuxunix-excerpt/5.5/en/binary-installation.html
#groupadd mysql
#useradd -s /sbin/nologin -g mysql -M mysql
# tar -zxvf mysql-5.5.32-linux2.6-x86_64.tar.gz
#mv tar -zxvf mysql-5.5.32-linux2.6-x86_64 /application/mysql-5.5.32
#ln -s /application/mysql-5.5.32 /application/mysql
#cd /application/mysql
# cp support-files/my-small.cnf /etc/my.cnf        ##有各种默认my.cnf配置
#mkdir -p /application/mysql/data
#chown -R mysql.mysql /application/mysql/
#scripts/mysql_install_db --help
#scripts/mysql_install_db --basedir=/application/mysql --datadir=/application/mysql/data --user=mysql    ##初始化mysql数据库
2.2.配置并启动mysql
#cp /application/mysql/support-files/mysql.server /etc/init.d/mysqld
#chmod +x /etc/init.d/mysqld
#sed -i 's#/usr/local/mysql#/application/mysql#g' /application/mysql/bin/mysqld_safe /etc/init.d/mysqld
#/etc/init.d/mysqld start
#netstat -lntup | grep 3306
#chkconfig --add mysqld
#chkconfig mysqld on
#echo 'export PATH=/application/mysql/bin/:$PATH' >>/etc/profile
#source /etc/profile
2.3.mysql安全配置
1.为root账号设置密码
#mysqladmin -u root passwd 'Foxconn99'
2.清理无用的mysql用户
mysql>select user,host from mysql.user;
mysql>drop user "root"@"::1";
mysql> drop user ""@"localhost";
mysql> drop user "root"@"t-node3";
mysql> drop user ""@"t-node3";
mysql> flush privileges;
mysql>delete from mysql.user where user='' and host='MySQL';        ##主机名有特殊字符/大小写删时删除方法
3.删除无用的库
mysql> drop database test;
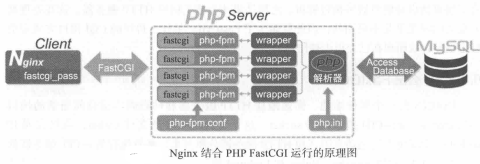
3.FastCGI
CGI:通用网关接口--common gateway interface。为HTTP服务器与其他机器上的程序服务通信交流的一种工具。CGI程序须运行在网络服务器。
FastCGI接口即为socket,这个socket可以是文件socket,也可以是IP socket。FastCGI接口采用C/S架构。它可以把HTTP服务器和脚本解析服务器分开,同时还能在脚本解析服务器上启动一个或多个脚本来解析守护进程。PHP动态语言服务器端可以启动多个FastCGI的守护进程。HTTP服务器通过FastCGI客户端和动态语言FastCGI服务器端通信。
Nginx +FastCGI动作过程
4.PHP(FastCGI)服务依赖库安装
4.1.确认nginx及mysql均正常
4.2.php需要的lib库
#yum install freetype-devel libpng-devel gd-devel libcurl-devel libxslt-devel -y
#yum install zlib-devel libxml2-devel libjpeg-devel libjpeg-turbo-devel libiconv-devel -y
没有yum源的,可以编译安装
#cd /home/oldboy/tools
# tar zxvf libiconv-1.14.tar.gz
# cd libiconv-1.14
# ./configure --prefix=/usr/local/libiconv
#make
#make install
4.3.安装libmcrypt库
它对程序在运行时添加/移除算法时有用。它不是必须包。
下载地址
http://rpmfind.net/linux/rpm2html/search.php?query=libmcrypt-devel
yum不管用,手动下载安装
http://mirrors.yun-idc.com/epel/6/x86_64/
libmcrypt-2.5.8-9.el6.x86_64.rpm及libmcrypt-devel-2.5.8-9.el6.x86_64.rpm
#yum localinstall libmcrypt-2.5.8-9.el6.x86_64.rpm libmcrypt-devel-2.5.8-9.el6.x86_64.rpm
4.4.安装mhash加密扩展库
mhash是基于离散数学原理不可逆的PHP加密方式扩展库,默认不会开启。
下載:http://mirrors.yun-idc.com/epel/6/x86_64/
#yum localinstall mhash mhash-devel
4.5.安装mcrypt加密扩展库
下載:http://mirrors.yun-idc.com/epel/6/x86_64/
#yum localinstall mcrypt-2.6.8-10.el6.x86_64.rpm
5.PHP服务安装配置
5.1.安装PHP服务
wget http://cn.php.net/get/php-5.3.27.tar.gz/from/cn2.php.net/mirror
#tar zxvf php-5.3.27.tar.gz
#cd php-5.3.27
# ./configure --prefix=/application/php5.3.27 --with-mysql=/application/mysql --with-iconv-dir=/usr/local/libiconv -with-freetype-dir --with-jpeg-dir --with-png-dir --with-zlib --with-libxml-dir=/usr --enable-xml --disable-rpath --enable-safe-mode --enable-bcmath --enable-shmop --enable-sysvsem --enable-inline-optimization --with-curl --with-curlwrappers --enable-mbregex --enable-fpm --enable-mbstring --with-mcrypt --with-gd --enable-gd-native-ttf --with-openssl --with-mhash --enable-pcntl --enable-sockets --with-xmlrpc --enable-zip --enable-soap --enable-short-tags --enable-zend-multibyte --enable-static --with-xsl --with-fpm-user=nginx --with-fpm-group=nginx --enable-ftp
#ln -s /application/mysql/lib/libmysqlclient.so.18 /usr/lib64/
#touch ext/phar/phar.phar
#make
#make inatall
注:PHP FastCGI模式设置:PHP5.3以上版本,编译参数为--enable-fpm;PHP5.2版本,编译参数为--enable-fastcgi --enable-fpm --enable-force-cgi
--with-mysql=/application/mysql:表示需要指定MySQL的安装路径,安装PHP需要的MySQL相关内容。如果没有MySQL软件包,也可以不单独安装,这样可以用--with-mysql=mysqlnd替代--with-mysql=/application/mysql,因为PHP软件里已经自带了连接MySQL的客户端工具。
--with-fpm-user=nginx:nginx表示指定PHP-FPM进程管理的用户为Nginx,此处最好和Nginx服务用户统一。
--enable-fpm:激活PHP-FPM方式服务,即以FastCGI方式运行PHP服务。
5.2. 配置PHP引擎--php.ini
#ln -s /application/php5.3.27 /application/php
# cp php.ini-production /application/php/lib/php.ini
5.3.配置PHP服务(FastCGI方式)
# cd /application/php/etc/
#cp php-fpm.conf.default php-fpm.conf
#/application/php/sbin/php-fpm  ##启动PHP服务(FastCGI方式)
#ps -ef | grep php-fpm
# lsof -i :9000
# netstat -an | grep 9000
6.配置Nginx支持PHP程序请求访问
6.1.配置PHP解析
#cd /application/nginx/conf
#vi extra/blog.conf
        server {
        listen       80;
        server_name     blog.fox.org;
        location / {
                root   html/blog;
                index   index.html index.htm;
        }
        location ~ .*\.(php|php5)?$ {
                root html/blog;
                fastcgi_pass    127.0.0.1:9000;
                fastcgi_index   index.php;
                include fastcgi.conf;
        }
#cd /application/nginx/html/blog
# echo "<?php phpinfo(); ?>" >test_info.php
#nginx -t
#nginx -s reload
http://blog.fox.org/test_info.php
6.2.配置PHP连接mysql
针对Nginx请求访问PHP,然后对PHP连接MySQL的情况进行测试
#vi /application/nginx/html/blog/test_mysql.php
<?php
    //$link_id=mysql_connect('主机名','用户','密码');
      $link_id=mysql_connect('localhost','root','Foxconn99') or mysql_error();
   //$link_id=mysql_connect('localhost','test','');
      if($link_id){
          echo "mysql successful by hahadb !";
      }else{
          echo mysql_error();
      }
    ?>
http://blog.fox.org/test_mysql.php

OK!以上,LNMP环境安装完成。
7.部署一个blog
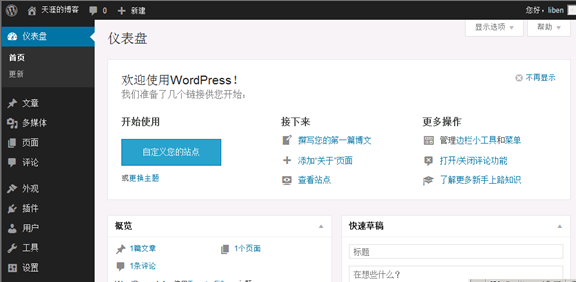
WordPress,单用户个人博客。
7.1.配置Nginx、Mysql、PHP
1.mysql配置
mysql> create database wordpress;        ##创建专用数据库wordpress。
mysql>grant all on wordpress.* to wordpress@'localhost' identified by 'Foxconn99';   ##创建一个专用的wordpress blog管理用户
#mysql>grant all on wordpress.* to wordpress@'19.146.210.%' identified by 'Foxconn99'; ##DB与PHP服务不在同一台服务器器上。
mysql>flush privileges;
mysql> show grant for wordpress@'localhost';
mysql> select user,host from mysql.user;
2.Nginx及PHP配置
#cd /application/nginx/conf/extra/
#vi blog.conf
    server {
        listen       80;
        server_name     blog.fox.org;
        location / {
                root   html/blog;
                index   index.php index.html index.htm;
        }
        location ~ .*\.(php|php5)?$ {
                root html/blog;
                fastcgi_pass    127.0.0.1:9000;
                fastcgi_index   index.php;
                include fastcgi.conf;
        }
7.2.发布WordPress程序
下载:http://cn.wordpress.org/wordpress-4.1-zh_CN.tar.gz
#cd ../../html/blog
#tar zxvf wordpress-4.1-zh_CN.tar.gz
#rm index.html test_mysql.php    ##删除之前建的无用文件
#mv wordpress/* .      ##把wordpress目录的内容移到blog根目录
#chown -R nginx.nginx ../blog/    ##授权nginx及php服务访问blog站点目录,此授权不是非常安全,是临时的办法,更安全规范见LNMP优化部分.
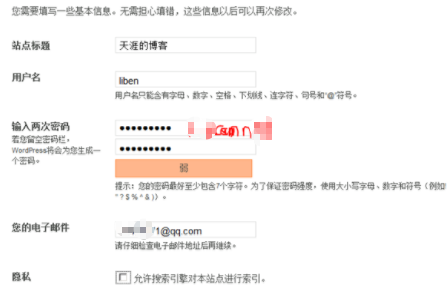
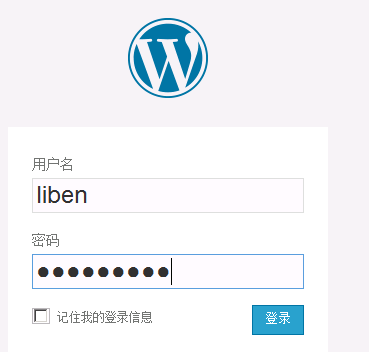
7.3.初始化安装blog
http://blog.fox.org/

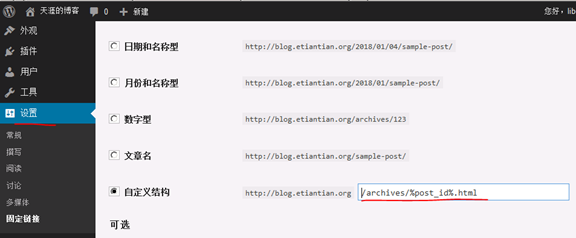
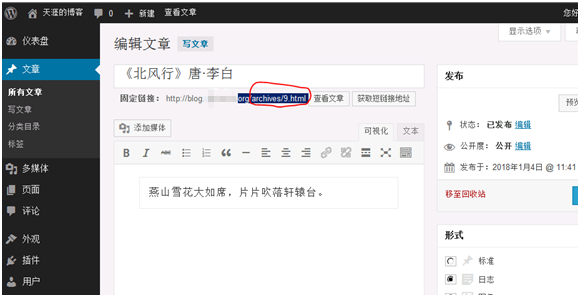
7.4.实现wordpress博客程序URL静态化
- 实现此功能时,首先要在wordpress后台依次单击设置--->固定链接-->自定义结构,然后输入下面的代码,并保存更改
/archives/%post_id%.html ##%post_id%是数据库对应博文内容的唯一ID.
2.修改Nginx配置
#vi blog.conf
server {
        listen       80;
        server_name     blog.etiantian.org;
        root   html/blog;
        index   index.php index.html index.htm;
        localtion / {
        if (-f $request_filename/index.html){
                rewrite (.*) $1/index.html break;
         }
        if (-f $request_filename/index.php){
                rewrite (.*) $1/index.php;
         }
        if (! -f $request_filename){
                rewrite (.*) /index.php;
         }
        }

        location ~ .*\.(php|php5)?$ {
                root html/blog;
                fastcgi_pass    127.0.0.1:9000;
                fastcgi_index   index.php;
                include fastcgi.conf;
            }
            }
./configure --prefix=/application/php5.3.27
 --with-mysql=/application/mysql
 --with-pdo-mysql=mysqlnd
 --with-iconv-dir=/usr/local/libiconv
 -with-freetype-dir
 --with-jpeg-dir
 --with-png-dir
 --with-zlib
 --with-libxml-dir=/usr
 --enable-xml
 --disable-rpath
 --enable-shmop
 --enable-sysvsem
 --enable-inline-optimization
 --with-curl
 --enable-mbregex
 --enable-fpm
 --enable-mbstring
 --with-mcrypt
 --with-gd
 --enable-gd-native-ttf
 --with-openssl
 --with-mhash
 --enable-pcntl
 --enable-sockets
 --with-xmlrpc
 --enable-soap
 --enable-short-tags
 --enable-static
 --with-xsl
 --with-fpm-user=nginx
 --with-fpm-group=nginx
 --enable-ftp
 --enable-opcache=no
附:
FAQ
1.启动mysql时报错#/etc/init.d/mysqld start
Starting MySQL..The server quit without updating PID file ([FAILED]/mysql/t-node3.pid).
答:#vi /etc/my.cnf
datadir=/application/mysql/data ##把默认的改成实际路径。
2.ERROR 2002 (HY000): Can't connect to local MySQL server through socket '/tmp/mysql.sock'
答:#vi /etc/my.cnf
socket=/tmp/mysql.sock
3.kill mysql后启动时错误
171225 17:43:55 [ERROR] Can't find messagefile '/usr/local/mysql/share/errmsg.sys'
171225 17:43:55 [Note] Plugin 'FEDERATED' is disabled.
171225 17:43:56 [ERROR] Aborting
171225 17:43:56 InnoDB: Starting shutdown...
171225 17:43:57 InnoDB: Shutdown completed; log sequence number 1595675
答:删除pid文件
#rm /application/mysql/data/t-node3.pid
#rm /application/mysql/data/mysql/t-node3.pid
4.编译PHP错误
4.1.Generation phar.php, .....libmysqlclient.so.18:cannot open shared object file:No such...
答:PHP找不到指定的库,可能是相应库路径不对ln -s /application/mysql/lib/libmysqlclient.so.18 /usr/lib64/
4.2.chmod:cannot access 'ext/phar/phar.phar':No such file or directory make:[ext/phar/phar.phar]Error 1(ignored)
答:
编译时使用--with-mysql=mysqlnd替代--with-mysql=/application/mysql

 浙公网安备 33010602011771号