
4.Nginx Web服务器及优化
1.基本安全优化
1.1.调整参数隐藏Nginx软件版本号信息
在http{}标签段中配置
http{
.....
    server_tokens off;        ##默认为on;
    .....
    }
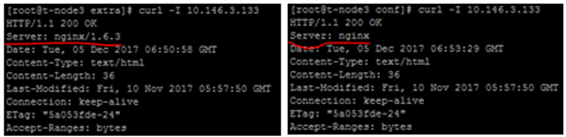
1.2.更改源码隐藏nginx软件名及版本号
三个地方修改源码文件
vim /root/nginx-1.6.3/src/core/nginx.h
修改#define NGINX_VERSION      "1.6.3"        ##把版本号修改为2.2.23等
#define NGINX_VER          "nginx/" NGINX_VERSION        ##修改为任意值
#define NGINX_VAR          "NGINX"        ##修改为任意值
vim /root/nginx-1.6.3/src/http/ngx_http_header_filter_module.c
    static char ngx_http_server_string[] = "Server: nginx" CRLF;修改为其它值
vim /root/nginx-1.6.3/src/http/ngx_http_special_response.c
static u_char ngx_http_error_full_tail[] =
 "<hr><center>" NGINX_VER "(http://www.haha.com)</center>" CRLF        ##加入篮色字体部分,定义对外展示的内容
  "</body>" CRLF
  "</html>" CRLF
  ;


  static u_char ngx_http_error_tail[] =
  "<hr><center>OWS</center>" CRLF        ##对外展示时nginx改为OWS
  "</body>" CRLF
再次编译安装文件
1.3.更改nginx服务的默认用户
默认用户是nobody
两种方法:
-
- 直接修改配置文件nginx.conf,把#user nobody改为 user nginx nginx;
- 编译时指定用户及组 ./configure --user=nginx --group=nginx .......
2.优化nginx服务器参数
2.1.worker进程个数
vim nginx.conf
        worker_processes 1;        ##指定要开启的进程数.
2.2.绑定不同nginx进程到不同cpu上
vim nginx.conf
    worker_processes 4;
    worker_cpu_affinity 0001 0010 0100 1000;
说明:0001等是cpu掩码.8核参数00000001......,不绑定CPU负载也比较平均
2.3.单进程允许的客户端最大连接数
vim nginx.conf
    events {
    worker_connections  1024;
}

注:受系统进程的最大打开文件数限制修改配置文件或#ulimit -HSn 65535
2.4.worker进程最大打开文件数
vim nginx.conf
worker_rlimit_nofile 65535; ##main标签段.
2.5.cpu缓存大小
cat /sys/devices/system/cpu/cpu0/cache/index0/size
2.6.开启高效文件传输模式
sendfile on

同時將tcp_nopush和tcp_nodelay兩個指定設置為on。可防止網絡及磁盤I/O阻塞。
設置標簽段http、server、localtion 、if in location

tcp_nopush on
tcp_nodelay on
2.7.调整连接超时时间
-
- keepalive_timeout 60
调置标签段:http,server,location
-
- tcp_nodelay on;提高I/O性能
默认当数据发送时,内核并不会马上发送,会等待更多的字节组成一个数据包,这样可以提高I/O性能。但是,在每次只发送很少字节的业务场景中,使用tcp_nodelay功能,等待时间会比较长。调置标签段:http,server,location。当一个连接进入keepalive状态时生效。
-
- client_header_timeout 15
设置读取客户端请求头数据的超时时间,如果超过这个时间,客户端还没有发送完整的header数据,服务器端返回request time out(408)错误。调置标签段:http,server
-
- client_body_timeout 15
默认60秒,设置读取客户端请求主体的超时时间,仅为两次成功的读取操作之间的超时。调置标签段:http,server,location
-
- send_timeout 25
指定响应客户端的超时时间。默认60秒。此超时仅限两个连接活动之间的时间,如果超过这个时间,客户没有任何活动,nginx将会关闭连接。调置标签段:http,server,location
2.8.上传文件大小限制
client_max_body_size 8m;
超过此值客户端收到413错误。设置为0为不检查上传大小。
2.9.压缩
ngx_http_gzip_module模块
图片、视频尽量不压缩;被压缩的纯文本必须大于1KB.
gzip on;        ##开启gzip压缩功能
gzip_min_length    1k;    ##允许压缩的页面最小字节数。
gzip_buffers    4 16k;    ##压缩缓冲区大小。申请4个单位为16K的内存作为压缩结果流缓存。
gzip_http_version    1.1;    ##压缩版本。用于识别http协议版本。squid2.5时设为1.0
gzip_comp_level    2;    ##压缩比,1压缩比最小,最快;9压缩比最大,最慢。
gzip_types    ext/plain application/x-javascript text/css application/xml; ##指定压缩的类型。版本不同配置可能不同。
gzip_vary on;    ##vary header支持。让前端缓存服务器缓存经过gzip压缩的页面。
  检验压缩效果:
    firefox+yslow插件查看gzip压缩及expires缓存结果。
2.10.调整缓存expires时间
vim /application/nginx/conf/extra/www.conf
    server {
        listen  80;
        server_name     www.fox.org fox.org;
        location / {
                root html/www;
                index   index.html index.htm;
        }
        location ~ .*\.(gif|jpg|jpeg|png|bmp|swf)$
        {
                expires 3650d;
                root html/www;
        }

        location ~ .*\.(js|css)?$
        {
                expiress 30d;
                root html/www;
        }
        access_log logs/access_www.log main gzip buffer=32k flush=5s;
  }
根据URI中的路径或目录进行判断
location ~ ^/(images|javascript|js|css|flash|media|static)/ {
    expires 360d;
}
为单个文件添加expiress功能
local ~(robots.txt) {
    expires 7d;        ##为robots.txt人文件设置过期时间,在这7天并不记录404。
    break;
}
检查效果
用curl -I http://www.fox.com/133.jpg

4.日志优化
4.1.日志切割
#mkdir /server/scripts/ -p
#cd /server/scripts/
#vim cut_nginx_log.sh
    cd /application/nginx/logs
    /bin/mv access_www.log access_www_$(date +%F -d 1day).log
    /application/nginx/sbin/nginx -s reload


#crontab -e
    00 00 * * * /bin/sh /server/scripts/cut_nginx_log.sh > /dev/null 2>&1
4.2.不记录不需要的访问日志
负载器健康节点检查或特定文件(如图片、JS、CSS)的日志,一般不记录。
location ~ .*\.(js|jpg|JPG|jpeg|JPEG|css|bmp|gif|GIF)$ {
        access_log off;
        }
4.3.清除日志中的健康检查日志
#!/bin/bash
#made by cheng
#blog:myhat.blog.51cto.com
#last_time=2011/08/16
#your logs store
log_path=/data1/backup_log
nginx_pid=/usr/local/webserver/nginx/nginx.pid
nginx_log=/data1/logs
yesterday=`date -d "yesterday" +%Y%m%d`
host=`ls -l $nginx_log/*.access.log | awk -F " " '{print $9}' | awk -F ".access" '{print $1}' | awk -F "$nginx_log/" '{print $2}'`
for i in $host
do
        if [ ! -d $log_path/$i/$yesterday ];then
                mkdir -p $log_path/$i/$yesterday
        fi
        if [ ! -f  $log_path/$i/$yesterday/$yesterday.access.log ];then
               mv $nginx_log/$i.access.log  $log_path/$i/$yesterday/$yesterday.access.log
               kill -USR1 `cat $nginx_pid`
        else
               mv  -bf  $nginx_log/$i.access.log $log_path/$i/$yesterday/
               sed -i '/^10.1.1/d' $log_path/$i/$yesterday/$i.access.log
               sed -i '/^$/d' $log_path/$i/$yesterday/$i.access.log
               kill -USR1 `cat $nginx_pid`
        fi
done
5.站点目录及文件URL访问控制
5.1.根据扩展名限制程序和文件访问
禁止访问上传目录下的PHP、shell、Perl、Python程序,这样即使上传了木马也没法执行。
5.1.1.禁止解析指定目录下的指定程序
下面的代码必须写在nginx处理php服务配置的前面。
location ~ ^/images/.*\.(php|php5|sh|pl|py)$
    {
        deny all;
    }
location ~ ^/static/.*\.(php|php5|sh|pl|py)$
    {
        deny all;
        }
location ~ ^/data/(attachment|avater)/.*\.(php|php5)$
    {
        deny all;
        }
5.1.2.禁止访问*.txt和*.doc文件
location ~ .*\.(txt|doc)${
        if (-f $request_filename) {
        root /data/www/www;
        #rewrite 某个URL;
        break;
        }
    }
    location ~ .*\.(txt|doc)${
        root /data/www/www;
        deny all;
    }
5.2.禁止访问指定目录下的所有文件和目录
#禁止访问指定的单个或多个目录
location ~ ^/(static)/ {
    deny all;
}

    location ~ ^/static {
        deny all;
    }
#禁止访问多个目录
location ~ ^/(static|js)  {
        deny all;
    }
#禁止访问目录并返回指定的HTTP状态码
    server {
        listen 80;
        server_name www.fox.org tiantian.org;
            root        /data/www/www
            index    index.html index.htm;
            access_log    /app/logs/www_access.log commonlog;
            location /admin/ { return 404;}
            location /templates/ { return 403;}
    }
5.3.限制来源IP访问
ngx_http_access_module
#禁止某目录让外界访问,但允许某IP访问目录,
    location ~ ^/hello/ {
        allow 202.111.12.211;
        deny all;
    }
#限制指定IP或IP段访问
    location / {
        deny 192.168.1.1;
        allow 192.168.1.0/24;
        allow 10.1.1.0/16;
        deny all;
    }
5.3.2.做反向代理时限制客户端IP
#做反向代理时限制客户端IP
#方法1:用if来控制
    if ( $remote_addr = 10.0.0.1) {
        return 403;
    }
    if ( $remote_addr = 218.247.17.130) {
        set $allow_access_root 'true';
    }
#方法2:用deny和allow只允许IP访问
            location / {
                root html/blog;
                index index.php index.html index.htm;
                allow 10.0.0.7;        ##只允许它
                deny all;
            }
#方法3:只拒绝某些IP
            location / {
                root html/blog;
                index index.php index.html index.htm;
                deny 10.0.0.7;        ##只deny它
                allow all;
            }
5.4.禁止非法域名解析/直接用IP访问网站
方法一:让使用IP访问网站的用户,或者恶意解析域名的用户,收到501错误。
单独取一个server段
server {
        listen 80 default_server;
        server_name _;
        return 501;
    }
方法二:通过301跳转到主页
server {
        listen 80 default_server;
        server_name _;
        return ^(.*) http://bbs.fox.org/$1 permanent;
    }
方法三:发现某域名恶意解析到公司的服务器IP,在server标签里添加以下代码即可,若有多个server则要多处添加。
if ($host !~ ^www\.fox\.com$) {
        rewrite ^(.*) http://bbs.fox.org$1 permanent;
    }
 输入错误域名会自动跳转到bbs.fox.org
输入正确域名www.etianetian.org
6.图片及目录防盗链
6.1.常见防盗链解决方案的基本原理:
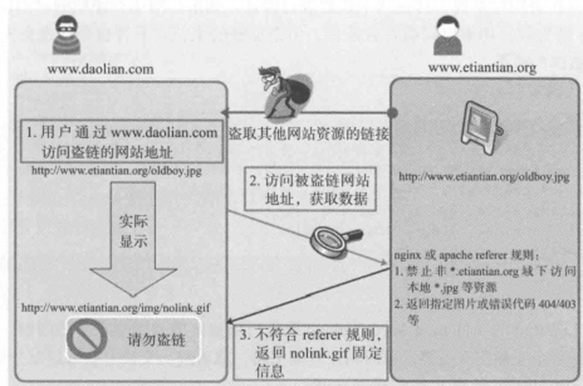
6.2. 根据HTTP referer实现防盗链
referer是网站图片、附件、html等最常用的防盗链手段。
在HTTP协议中,有一个表头字段叫referer,使用URL格式来表示是哪里的链接用了当前网页的资源。通过referer可以检测访问的来源网页,如果是资源文件,可以跟踪到显示它的网页地址,
6.3.根据cookie防盗链
对于一些特殊的业务数据,例如流媒体应用通过ActiveX显示的内容(如Flash、Windows Media视频、流媒体的RTSP协议等),因为它们不向服务器提供referer header,所以有referer防盗链手段达不到想要的效果。
ActiveX插件不传递referer,但会传递Cookie,可以在显示ActiveX的页面的<head></head>标签内嵌入一段JavaScript代码,设置“Cookie:Cache=av”如下:
<script>document.cookie="Cache=av;domain=doamin.com;path=/*;"</script>
6.4.通过加密变换访问路径实现防盗链
它适合视频及下载类业务数据的网站。例如:Lighttpd有类似的插件mod_secdownload来实现此功能。先在服务器端配置此模块,设置一个固定用于加密的字符串,如hello,然后设置一个url前缀,比如/mp4/,再设置一个过期时间,比如1小时,然后写一段PHP代码,利用加密字符串和系统时间等通过md5算法生成一个加密字符串。最终获取到的文件的URL链接中会带有一个时间戳和一个加密字符的md5数值,在访问时系统会对这两个数据进行验证。时间在预期的时间段内,加密的字符串不符合条件也会失效,从而达到防盗链的效果。
Nginx Web服务实现防盗链
6.5.利用referer,并且针对扩展名rewrite重定向
例:
在源站上:
server {

        listen  80;

        server_name     www.fox.org fox.org;

        location / {

                root html/www;

                index   index.html index.htm;

        }

        location ~* \.(gif|jpg|png|swf|flv|wma|wmv|asf|mp3|mmf|zip|rar)$ {

            root html/www;

            valid_referers none blocked fox.org *.fox.org;

            if ($invalid_referer) {

                rewrite ^/ http://bbs.fox.org/img/nolink.jpg;

            }

                             access_log off;

                             root html/www;

                             expires 1d;

                             break;

        }
模拟一個非法站点:
#vim index.html
<html>
<head>
<title>
bbs.fox.org 134
</title>
</head>
<body bgcolor=green>
bb!<br>my blog is <a href="http://hello.blog.51cto.com" target="_blank">blog address </a>
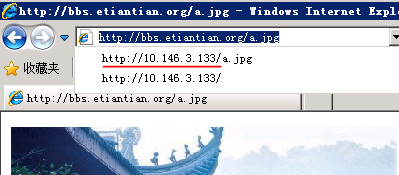
<img src="http://www.fox.org/a.jpg">
</body>
</html>
在IE浏览器打开模拟的非法站点,得到的是源站nolik.jpg的图片,而不是a.jpg的图片。
盗链网站10.146.3.134访问我们的站点时,记录日志如下:

多了一个http_referer的信息,即http://10.146.3.134,表示使用我们网站资源的用户来自该站,也就是该站盗链了网站www.fox.org资源。
正常访问资源日志:

6.6.利用referer,并且针对站点目录过滤返回错误码
location /images {

       root /data0/www/www;

       valid_referers none blocked *.fox.org fox.org;

  if ($invalid_referer) {

       return 403;

       }

}
说明:在上面这段防盗链设置中,分别针对文件类型和不同的目录进行了设置。
- 以gif|jpg为后缀的文件实行防盗链处理。
- *.fox.org fox.org :表示这个请求可以正常访问上面指定的文件资源。
- if{}中内容的意思是如果地址不是上面指定的地址就跳转到通过rewrite指定的地址,也可以直接通过return返回403错误。
- return403为自定义的http返回状态码
- rewrite ^/http://www.fox.org/img/nolink.jpg;表示显示一张防盗链图片
- access_log off;表示不记录访问日志,减轻压力。
- expires 3d:表示所有文件设置3天的浏览器缓存。
- 给盗链网站显示的图片域名不要和被盗链的网站域名一样。也就是http:// bbs.fox.org/img/nolink.jpg里面的bbs.fox.org不能是www.fox.org
6.7.在图片上加上水印防盗链。
7.错误页面显示
7.1. 403、404错误页面显示
#vim www.conf
    server {
        listen  80;
        server_name     www.fox.org fox.org;
        location / {
                root html/www;
                index   index.html index.htm;
                error_page 403 403.html;
                error_page 404 error.html;        ##注意error.html前没有/
        }
7.2. 50x页面放到一个本地单独目录
error_page 500 502 503 504 /50x.html;
    location = /50x.html {
        root /data0/www/html;
    }
7.3. 改变状态码为新的状态码
error_page 404 =200 /empty.gif;
    server {
        listen    80;
        server_name www.fox.org;
        location / {
            root /data0/www/bbs;
            index  index.html  index.htm;
            fastcgi_intercept_errors  on;
            error_page    404=200        /ta.jpg;
            }
    }
7.4. 错误状态码URL重定向
server {
    listen    80;
    server_name www.fox.org;
    location / {
        root     html/www;
        index    index.html    index.htm;
        error_page    404        http://fox.blog.51cto.com;
        access_log  /app/logs/bbs_access.log        commonlog;
        }
    }
当出现404错误时,会跳转到指定的URL http://fox.blog.51cto.com给用户,这个URL一般是企业另外的可用地址。
7.5. 将状态码重定向到一个localtion
location / {
    error_page 404 = @fallback;
}
location @fallback {
    proxy_pass http://backend;
}
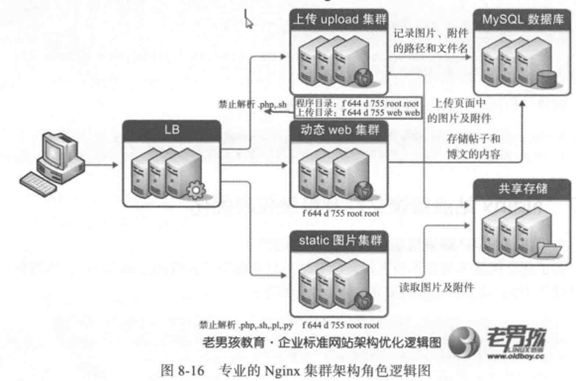
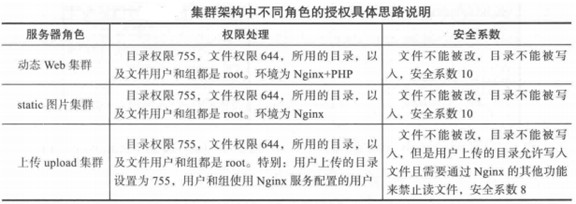
8. 网站目录权限
如果把所有站点目录的用户和组都应该为root,所有的目录权限是755;所有的文件权限是644.例:-rw-r--r-- .....wp-mail.php,这样的话合理的网站用户上传的内容也会被拒。
单机LNMP环境,先把所有的目录权限设置为755,所有的文件权限设置为644,所有的目录及文件用户及组都是root,再把上传资源的目录权限设置为755,用户和组设置为Nginx服务的用户;较好的架构中,应把资源文件,包括用户上传的图片、附件等服务和程序服务分离,最好把上传程序服务也分离出来。
9.阻止下载协议代理
if ($http_user_agent ~* (Wget|ab) ) {

   return 403;

}

if ($http_user_agent ~* LWP::Simple|BBBike|wget) {

    return 403;
10.防止爬虫代理访问网站
if ($http_user_agent ~* "qihoobot|Baiduspider|Googlebot|Sogou web spider|MSNBot")
{
    return 403;
}
11.禁止某个浏览器软件
if ($http_user_agent ~* "Firefox|MSIE")
{
    rewrite ^(.*)        http://blog.fox.org/$1 permanent;
}
11.1.有效屏蔽UA(也就是浏览器), 帮助服务器减轻负荷
if ($http_user_agent ~ (Alexa\ Toolbar|Sogou\ web|Semrushbot|Scrapy|Curl|HttpClient)) {

    return 404;
}
注意, 如果用户UA工具里添加参数, 冒充搜狗搜索引擎之类的爬虫UA, 此时, 如果你想封掉这个UA, 中间需要输入空格, 怎么办? 用转义符反斜杠"\"加在空格前面, 便于nginx识别到。其他类似括号、横杠也是一样加上这个反斜线转义符"\"。
11.2.分析频繁访问主机的UA排行
tail -n 10000 /usr/local/nginx/logs/access.log | awk -F\" '{A[$(NF-1)]++}END{for(k in A)print A[k],k}' | sort -n | tail
将拦截配置脚本引入nginx配置文件
include bad_ua.conf
12.限制HTTP请求方法
if ($request_method !~ ^(GET|HEAD|POST)$ ) {
    return 501;
}
13.使用CDN做网站内容加速
使用CDN基本要求:
不是所有网站都可以一上来就能用CDN的,要加速的业务数据应该存在独立的域名,如img1-4.etiantian.org、video1-4.etiantian。org,业务内容图片、附件、JS、CSS等静态元素,这样的静态网站域名才可以使用CDN。
范例:
DNS服务器加速前的A记录
img.etiantian.org IN A 124.106.0.21(企业服务器IP)
DNS服务器加速后的A记录
img1.etiantian.org    IN    CNAME    bbs
img.etiantian.org        3M    IN    CNAME    img.etiantian.org.cachecn.com
img.etiantian.org.cachecn.com必须先由CDN公司配置好的CDN公司的域名。
14.普通用户管理启劝Nginx
1.添加用户并创建相关目录和文件
#useradd inca
#su - inca
$mkdir conf logs www
$cp /application/nginx/conf/mime.types ~/conf/
$echo inca > www/index.html
2.nginx配置修改
cat conf/nginx.conf
        .....
        error_log /home/inca/logs/error.log;
        user inca inca;
        pid    /home/inca/logs/nginx.pid;
        server {
            ......
            listen    8080;        ##80端口必须使用root使用。
            root /home/inca/www;
            access_log    /home/inca/logs/web_blog_access.log     main;
            }
3.启动nginx
$/application/nginx/sbin/nginx -c /home/inca/conf/nginx.conf &>/dev/null &
15.控制Nginx并发连接数
超过的返回状态码都是503
ngx_http_limit_conn_module模块用于限制每个定义的key值的连接数,特别是单IP的连接数。只有整个请求头已经被读取的连接才会被计数。
参数说明:
limit_conn_zone:
语法:limit_conn_zone key zone=name:size;上下文:http,要添加在http段的第一行。
用于设置共享内存区域,key可以是字符串、nginx自带变量或前两组合,如$binary_remote_addr、$server_name。name为内存区域的名称,size为内存区域的大小。
limit_conn:
语法:limit_conn zone number;上下文件:http、server、localtion
用于指定key设置最大连接数。当超过最大连接数时,返回503.
例1:限制制单IP并发连接数 ------可以用于限访问download下载目录的连接数
#vim nginx.conf
                worker_processes  2;
events {
    worker_connections  1024;
}
http {
limit_conn_zone $binary_remote_addr zone=addr:10m;
    include       mime.types;
    default_type  application/octet-stream;
    log_format  main  '$remote_addr - $remote_user [$time_local] "$request" '
                      '$status $body_bytes_sent "$http_referer" '
                      '"$http_user_agent" "$http_x_forwarded_for"';
    sendfile        on;
    keepalive_timeout  65;
    include extra/www.conf;
    include extra/status.conf;
    include extra/bbs.conf;
server_tokens off;
}
#vim extra/www.conf
    server {
        listen  80;
        server_name     www.etiantian.org etiantian.org;
        location / {
                root html/www;
                index   index.html index.htm;
                error_page 403 /403.html;
                error_page 404 error.html;
                limit_conn addr 1;
        }
在另一台服务器上用ab测试
#ab -c 1 -n 10 http://10.146.3.133/
#ab -c 3 -n 10 http://10.146.3.133/
例2.限制虚拟主机总连接数
#vim nginx.conf
    worker_processes  2;
events {
    worker_connections  1024;
}
http {
limit_conn_zone $binary_remote_addr zone=addr:10m;    ##添加在http第一行,否则可能会报错,nginx: [emerg] the size 5242880 of shared memory zone "addr" conflicts with already declared size 0 in /application/nginx-1.6.3/conf/nginx.conf:17
limit_conn_zone $server_name zone=perserver:10m;
    include       mime.types;
    default_type  application/octet-stream;
    log_format  main  '$remote_addr - $remote_user [$time_local] "$request" '
                      '$status $body_bytes_sent "$http_referer" '
                      '"$http_user_agent" "$http_x_forwarded_for"';
    sendfile        on;
    keepalive_timeout  65;
    include extra/www.conf;
    include extra/status.conf;
    include extra/bbs.conf;
server_tokens off;
}

    #vim extra/www.conf
        server {
        listen  80;
        server_name     www.etiantian.org etiantian.org;
        location / {
                root html/www;
                index   index.html index.htm;
                error_page 403 /403.html;
                error_page 404 error.html;
                #limit_conn addr 1;
                limit_conn perserver 2;
        }
16.控制客户端请求nginx的速率
ngx_http_limit_req_module模塊用于限制每個IP訪問每个定义key的请求速率。
limit_req_zone参数说明:
语法:limit_req_zone key zone=name:size rate=rate;
上下文:http
用于设置共享内存区域,key可以是字符串、nginx自带变量或前两个组合,如$binary_remote_addr。name为内存区域的名称,size为内存区域的大小,rate为速率,单位为r/s,每秒个请求。
limit_req参数说明:
语法:limit_req zone=name [burst=number][nodelay];
上下文:http、server、location
用令牌桶原理,burst=num,一共有num块令牌,令牌发完后,多出来的请求返回503。
nodelay:默认在不超过burst值的前提下会排除等待处理,如果使用此参数,会在处理完num+1次请求,剩余的请求都视为超时,返回503。
例:
#vim nginx.conf
worker_processes  2;
events {
    worker_connections  1024;
}
http {
limit_req_zone $binary_remote_addr zone=one:10m rate=1r/s;
    ##以请求的客户端IP为key值,内存区域命名为one,分配10m内存空间,访问速率限制为1秒1次请求-request。
    include       mime.types;
    default_type  application/octet-stream;
    log_format  main  '$remote_addr - $remote_user [$time_local] "$request" '
                      '$status $body_bytes_sent "$http_referer" '
                      '"$http_user_agent" "$http_x_forwarded_for"';
    sendfile        on;
    keepalive_timeout  65;
    include extra/www.conf;
    include extra/status.conf;
    include extra/bbs.conf;
server_tokens off;
}
#vim extra/www.conf
    server {
        listen  80;
        server_name     www.etiantian.org etiantian.org;
        location / {
                root html/www;
                index   index.html index.htm;
                error_page 403 /403.html;
                error_page 404 error.html;
                #limit_conn addr 1;
                limit_req zone=one burst=5;
          ##使用前面定义的名为one的内存空间,队列值为5,即可以有5个排除等待。
        }
测试
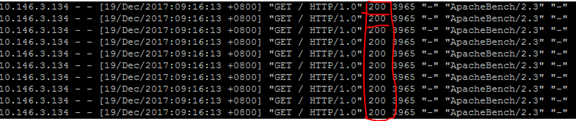
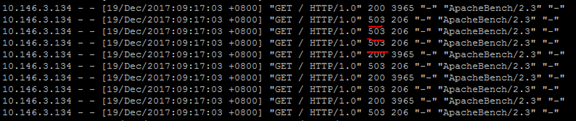
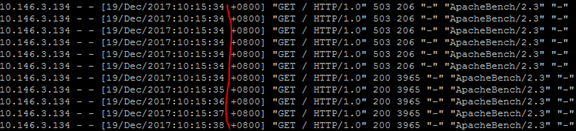
#ab -c 6 -n 10 http://10.146.3.133/
设置前ab 测试结果

设置后ab 测试结果
17.添加第三方模块----在线添加模块
以ngx_http_google_filter_module模块为例
查看已编译安装了的模块
# nginx -V
nginx version: nginx/1.8.0
built by gcc 4.4.7 20120313 (Red Hat 4.4.7-11) (GCC)
built with OpenSSL 1.0.1e-fips 11 Feb 2013
TLS SNI support enabled
configure arguments: --prefix=/usr/local/nginx --with-http_ssl_module --with-http_sub_module --with-http_gzip_static_module --with-http_stub_status_module --add-module=/data/software/ngx_http_substitutions_filter_module
加入需要安装的模块,重新编译
# ./configure --prefix=/usr/local/nginx --with-http_ssl_module --with-http_sub_module --with-http_gzip_static_module --with-http_stub_status_module --add-module=/data/software/ngx_http_substitutions_filter_module --add-module=/data/software/ngx_http_google_filter_module
# make #####注意:千万不要make install,不然就覆盖安装了。
替换nginx二进制文件
# cp /usr/local/nginx/sbin/nginx /usr/local/nginx/sbin/nginx.bak
# cp ./objs/nginx /usr/local/nginx/sbin/

 浙公网安备 33010602011771号