
gitlab升级和迁移
由于近期公司gitlab服务器老是卡顿和出现其他问题,然后也很久没有升级过了,现在版本还是8.10.5,而官网最新版本已经是11.2了。另一个原因是gitlab所在的这台服务器快到期了,想换一台配置更好些的服务器,故对此进行升级和迁移。
升级思路:先在新服务器上安装一个和原版本相同版本的gitlab,然后备份原版本gitlab数据,备份完在新服务器恢复,恢复完在进行升级。
本文参照:https://github.com/gitlabhq/gitlab-recipes/tree/master/install/centos
安装环境:
操作系统CentOS 6.10
#Distribution : CentOS 6.10
#GitLab version : 8.10.5
#GitLab-shell : 3.2.1
#Ruby version : ruby 2.2.2p95 (2015-04-13 revision 50295) [x86_64-linux]
#Gem version : 2.4.5
#Redis-server : Redis server version3.2.11
#Web Server : Nginx/1.10.2
#Database : mysql 5.7
1、添加epel库
#wget -O /etc/pki/rpm-gpg/RPM-GPG-KEY-EPEL-6 https://getfedora.org/static/0608B895.txt #rpm --import /etc/pki/rpm-gpg/RPM-GPG-KEY-EPEL-6
验证密钥是否已成功安装:#rpm -qa gpg*gpg-pubkey-0608b895-4bd22942
2、安装epel-release-6-8.noarch包,它将在您的系统上启用EPEL存储库:(这里虽然我们是6.10的系统,但装这个也能用)
#rpm -Uvh http://dl.fedoraproject.org/pub/epel/6/x86_64/epel-release-6-8.noarch.rpm
验证是否已启用EPEL和remi-safe存储库:

如果看不到它们,请使用下面的命令(从yum-utils包中)启用它们:
#yum-config-manager --enable epel --enable remi-safe
3、安装gitlab所需的工具:
#yum -y update
#yum -y groupinstall 'Development Tools'
#yum -y install readline readline-devel ncurses-devel gdbm-devel glibc-devel tcl-devel openssl-devel curl-devel expat-devel db4-devel byacc sqlite-devel libyaml libyaml-devel libffi libffi-devel libxml2 libxml2-devel libxslt libxslt-devel libicu libicu-devel system-config-firewall-tui redis sudo wget crontabs logwatch logrotate perl-Time-HiRes git cmake libcom_err-devel.i686 libcom_err-devel.x86_64 nodejs

# For reStructuredText markup language support, install required package:
#yum -y install python-docutils
RHEL备注
如果未安装某些软件包(例如gdbm-devel,libffi-devel和libicu-devel),请将rhel6可选软件包repo添加到服务器以获取这些软件包:
#yum-config-manager --enable rhel-6-server-optional-rpms
4、安装邮件服务器:
#yum -y install postfix
#chkconfig postfix on
5、安装git(这里我们用源码包安装方式)
1)先移除系统中原有的低版本git:
#yum -y remove git
备注:默认centos的git版本是1.7.10,必须删除后,再下载源码进行安装
2)安装git的相关依赖包:
#yum install zlib-devel perl-CPAN gettext curl-devel expat-devel gettext-devel openssl-devel
3)编译安装git:
#mkdir /tmp/git && cd /tmp/git
#curl --progress https://www.kernel.org/pub/software/scm/git/git-2.9.0.tar.gz | tar xz
#cd git-2.9.0
#./configure --prefix=/usr/local/git
#make  && make install
4)配置环境变量:
在/etc/profile最后面加上下面这行,然后source /etc/profile使之生效
export PATH=/usr/local/git/bin:$PATH
5)验证一下是否成功:
![]()
6、安装ruby:
1)移除已有的ruby(如果存在)
yum -y remove ruby
注:如果是源码包安装的:
#cd <your-ruby-source-path> && make uninstall
2)编译安装ruby:
#mkdir /tmp/ruby && cd /tmp/ruby
#curl --progress https://cache.ruby-lang.org/pub/ruby/2.2/ruby-2.2.2.tar.gz |tar xz
#cd ruby-2.2.2 && ./configure --prefix=/usr/local/ruby --disable-install-rdoc && make && make install
3)配置环境变量:
同理在/etc/profile文件最后加上下面一句,并且执行source /etc/profile使之生效。
export PATH=/usr/local/ruby/bin:$PATH
4)验证是否成功:
![]()
5)安装bundler:
#gem install bundler --no-rdoc
#gem install charlock_holmes
7、安装go编译器:
从GitLab 8.0开始,Git HTTP请求由gitlab-workhorse(以前的gitlab-git-http-server)处理。这是一个用Go编写的小守护进程。要安装gitlab-workhorse,我们需要一个Go编译器
#yum -y install golang golang-bin golang-src
8、为gitlab创建系统用户:
#adduser --system --shell /bin/bash --comment 'GitLab' --create-home --home-dir /data/gitlab/ git
9、数据库安装和相关库的创建:
这里由于我们之前版本gitlab使用的是腾讯云的数据库,这里就不在另外安装数据库了,直接在数据库相关配置文件里配置之前数据库的信息即可。
10、安装配置redis:
1)同样先删除旧的redis
#yum -y remove redis
2)重新安装redis:
#yum -y install redis
装完后查看下版本:
![]()
3)修改redis配置文件:
a、备份配置文件
#cp /etc/redis.conf /etc/redis.conf.bak
#mkdir /var/run/redis
b、修改/tmp/redis.sock为/var/run/redis/redis.sock

c、修改/var/run/redis/redis.sock的权限为755
#chown redis:redis /var/run/redis
#chmod 755 /var/run/redis
d、配置redis自启动
#chkconfig --level 35 redis on
e、启动redis并验证

f、附加git到redis组
#usermod -aG redis git
11、安装gitlab
1)取gitlab源代码
#su - git
$cd /data/gitlab
$git clone https://gitlab.com/gitlab-org/gitlab-ce.git gitlab
$cd /gitlab
$git branch -a  #查看远程分支
$git checkout -b v8.10.5  #切换到8.10.5版本分支上
$cat VERSION
8.10.5
2)修改配置文件
$cp config/gitlab.yml.example config/gitlab.yml
$vim config/gitlab.yml
这里host我随便配置的一个域名,以自身情况进行配置


$cp config/secrets.yml.example config/secrets.yml
$chmod 0600 config/secrets.yml
$chmod -R u+rwX,go-w log
$chmod -R u+rwX tmp
$chmod -R u+rwX tmp/pids/
$chmod -R u+rwX tmp/sockets/
$mkdir public/uploads/
$chmod 0700 public/uploads
$chmod -R u+rwX builds
$chmod -R u+rwX shared/artifacts
$cp config/unicorn.rb.example config/unicorn.rb
#查看系统核心数
$nproc
4
$vim config/unicorn.rb      #下面的worker_processes就是配置成上面nproc的值

$cp config/resque.yml.example config/resque.yml
$vim config/resque.yml (redis配置文件)

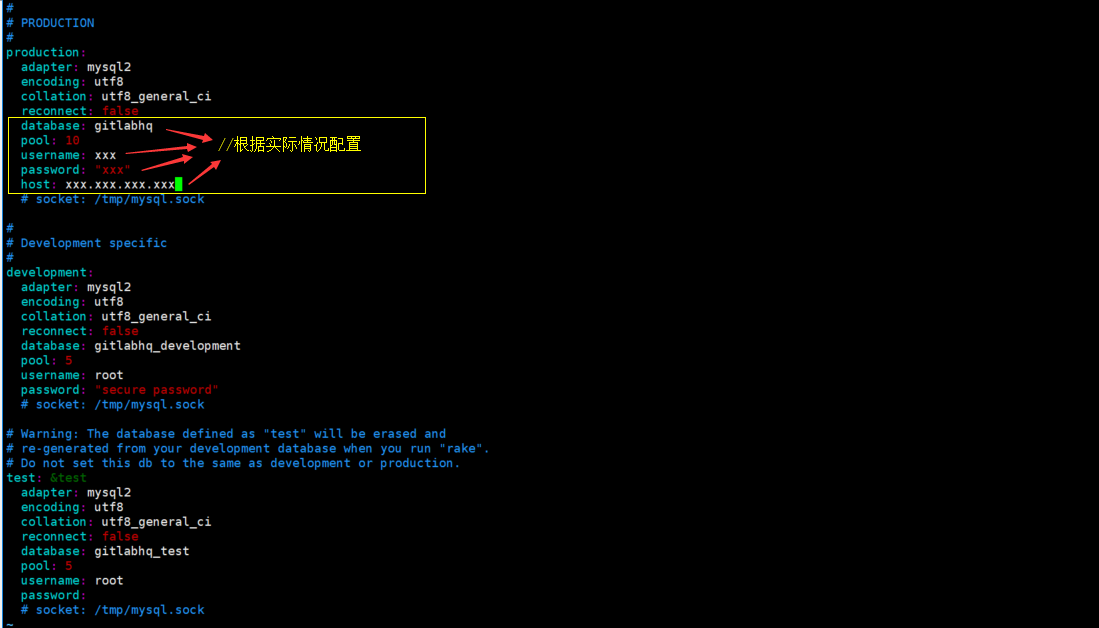
配置mysql:
$cp config/database.yml.mysql config/database.yml
$vim config/database.yml
12、安装gem --网上都说换成淘宝源,但我装的时候用官网源也不卡,所以就没换
$bundle install --deployment --without development test postgres aws
13、安装gitlab-shell
$cat /data/gitlab/gitlab/GITLAB_SHELL_VERSION --先查看此版本的gitlab需安装什么版本的gitlab-shell
3.2.1
$su - git
$sudo -u git -H bundle exec rake gitlab:shell:install[v3.2.1] REDIS_URL=unix:/var/run/redis/redis.sock RAILS_ENV=production
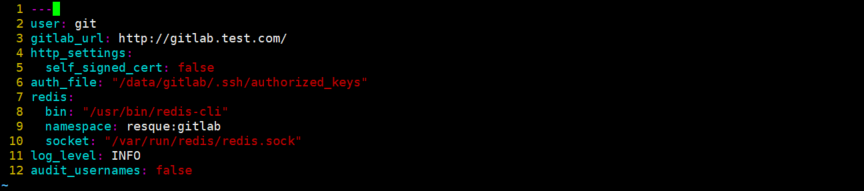
配置config.yml文件
$cp gitlab-shell/config.yml.example gitlab-shell/config.yml
$vim gitlab-shell/config.yml
执行安装命令,创建对应目录和文件
$cd gitlab-shell
$./bin/install
14、安装gitlab-workhorse
$cd /data/gitlab
$git clone https://gitlab.com/gitlab-org/gitlab-workhorse.git
$cat gitlab/GITLAB_WORKHORSE_VERSION  --查看需要安装哪个版本的gitlab-workhorse
0.7.8
$cd gitlab-workhorse/
$git checkout v0.7.8
$cat gitlab-workhorse/VERSION
0.7.8
$make
15、设置启动脚本
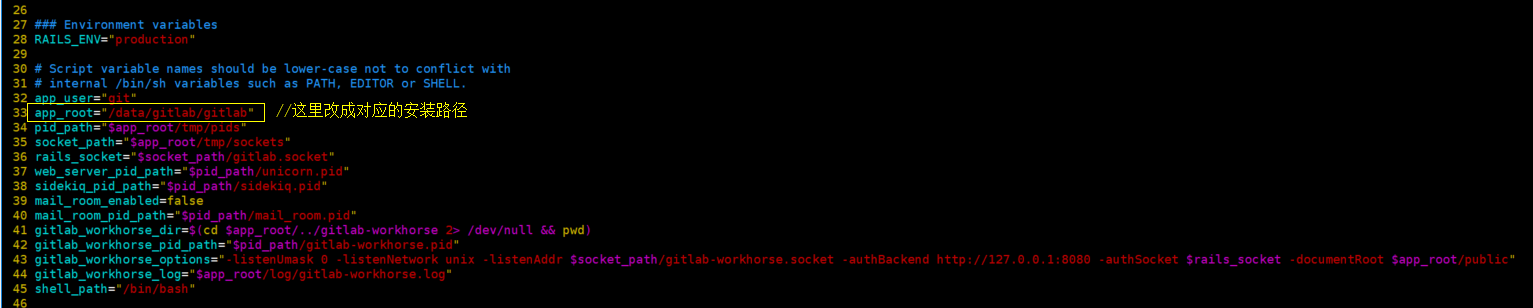
$cp lib/support/init.d/gitlab /etc/init.d/gitlab
$chkconfig gitlab on
$vim /etc/init.d/gitlab
16、设置logrotate日志切割(可选操作)
$cp lib/support/logrotate/gitlab /etc/logrotate.d/gitlab
17、配置web服务器:
这里我们配置nginx为例:
1)安装nginx:
#yum -y update
#yum -y install nginx
#chkconfig nginx on
2)配置gitlab
#cp /data/gitlab/gitlab/lib/support/nginx/gitlab /etc/nginx/conf.d/gitlab.conf
#vim /etc/nginx/conf.d/gitlab.conf

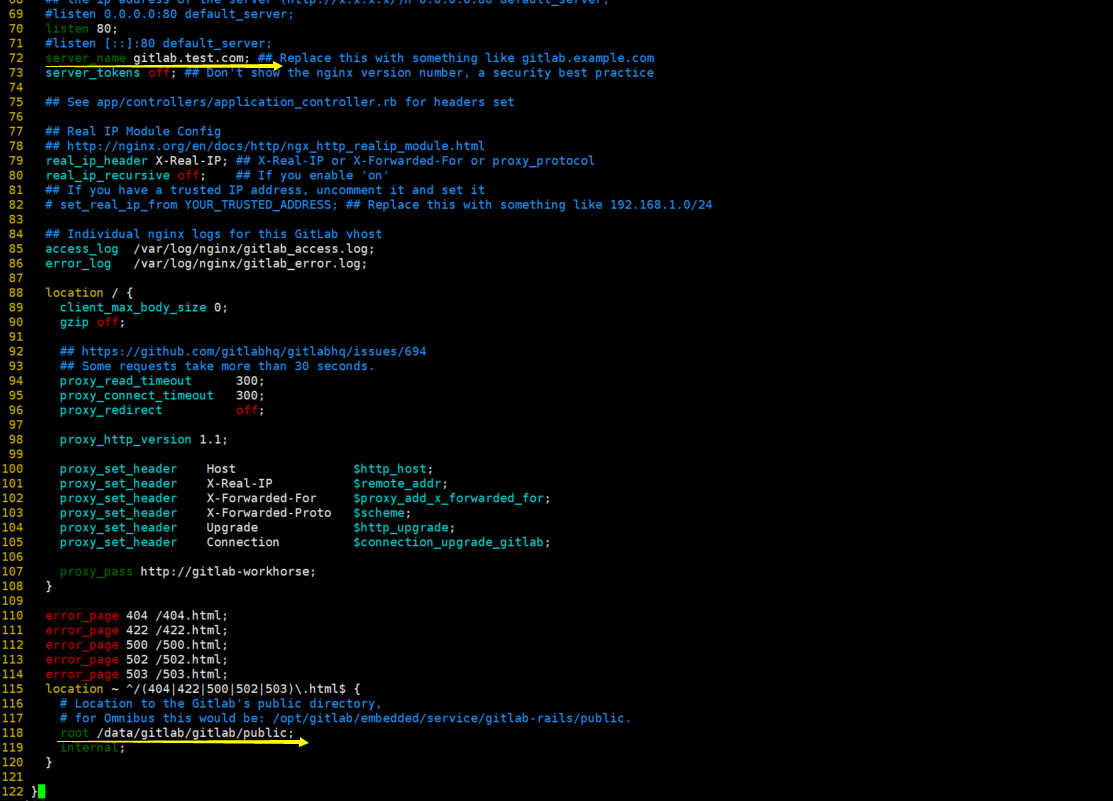
修改完用nginx -t 检测下语法有没有错误,没有错误的话就可以启动nginx了.
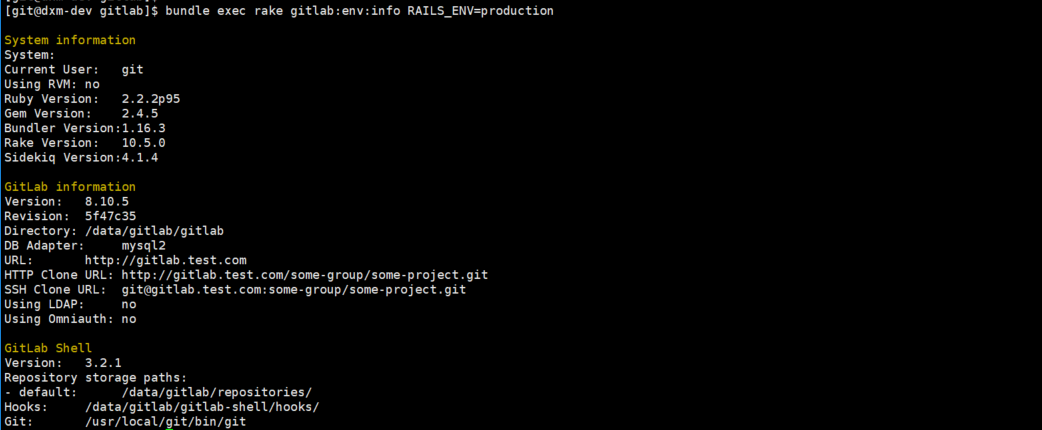
18、检查gitlab环境基础:
$bundle exec rake gitlab:env:info RAILS_ENV=production
为了没有遗漏任何内容,进行更彻底的检查:
$bundle exec rake gitlab:check RAILS_ENV=production
如果检测出来都是绿色的,那么说明没有问题,可以启动gitlab了。
#service gitlab start

至此,gitlab就安装完成了,接下来进行备份迁移。
这里我们把旧版本那台服务器称为A服务器,上面新装的服务器称为B服务器,以便下文书写方便:
1、备份数据:
1)升级迁移前先对A服务器上的gitlab作备份:
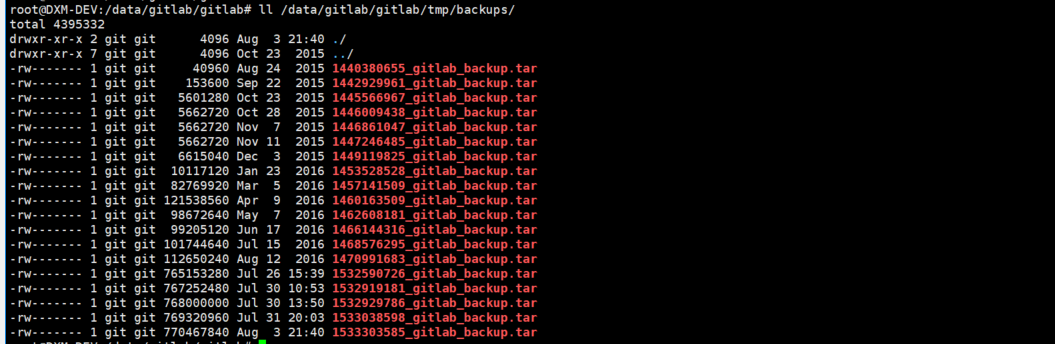
#su - git
$cd /data/gitlab/gitlab
$bundle exec rake gitlab:backup:create RAILS_ENV=production
备份的文件在/data/gitlab/gitlab/tmp/backups目录下:
2)备份数据库:这里由于使用的是第三方数据库(腾讯云数据库),上面数据库配置这块已经配了那个数据库地址,这里就不在进行备份了。
3)备份keys
$cp /data/gitlab/.ssh/authorized_keys /tmp/authorized_keys
4)备份repositories目录
$cd /data/gitlab
$tar zxvf repositories.tar.gz ./repositories
把A服务器上备份的数据拷贝到B服务器:
#scp -P 36022 xxx_gitlab_backup.tar authorized_keys repositories.tar.gz xxx@xxx.xxx.xxx.xxx:/.......
2、恢复数据
1)导入仓库,检查权限
$cd /data/gitlab
$tar xvf repositories.tar.gz --A服务器拷贝过来的包
$chmod -R git. /data/gitlab/repositories
2)导入keys
$cat authorized_keys >>/data/gitlab/.ssh/authorized_keys
3)导入repos
$cd /data/gitlab/gitlab
$bundle exec rake gitlab:import:repos RAILS_ENV=production
3、检测
$cd /data/gitlab/gitlab
$bundle exec rake gitlab:check RAILS_ENV=production
检测没有问题就可以重启gitlab了
#service gitlab restart
重启完登入web客户端检查下数据一致性,没有问题的话,接着就可以进行升级了。
1、首先停掉B服务器的gitlab服务,在进行升级
#service gitlab stop
2、获取最新版本分支
$su -git
$cd /data/gitlab/gitlab
$git fetch --all
$git checkout -- Gemfile.lock db/schema.rb
$git checkout v10.8 -b v10.8 --切换到要升级到的版本分支
$cat VERSION
3、升级gitlab-shell
$ cd /data/gitlab/gitlab-shell
$ git fetch
$ git checkout v`cat /data/gitlab/gitlab/GITLAB_SHELL_VERSION` -b v`cat /data/gitlab/gitlab/GITLAB_SHELL_VERSION`
4、升级gitlab-workhorse
$ cd /data/gitlab/gitlab-workhorse
$ git fetch
$ git checkout v`cat /data/gitlab/gitlab/GITLAB_WORKHORSE_VERSION` -b v`cat /data/gitlab/gitlab/GITLAB_WORKHORSE_VERSION`
$make
5、安装库环境
$cd /data/gitlab/gitlab
# PostgreSQL
    $bundle install --without development test mysql --deployment
# MySQL
    $bundle install --without development test postgres --deployment
# Optional:
  clean up old gems $bundle clean
# Run database migrations
  $bundle exec rake db:migrate RAILS_ENV=production
# Clean up assets and cache
  $bundle exec rake assets:clean assets:precompile cache:clear RAILS_ENV=production
6、启动gitlab
#service gitlab restart
#service nginx restart
7、检查程序状态
检查GitLab及其环境是否配置正确:
$ bundle exec rake gitlab:env:info RAILS_ENV=production
确保没有报错,运行一次更彻底的检查:
$bundle exec rake gitlab:check RAILS_ENV=production
如果所有项目是绿色的,那么恭喜你升级完成!
gitlab从8.10.5升级到10.8到此结束。

 浙公网安备 33010602011771号