spring boot整合mybatis+mybatis-plus
Spring boot对于我来说是一个刚接触的新东西,学习过程中,发现这东西还是很容易上手的,Spring boot没配置时会默认使用Spring data jpa,这东西可以说一个极简洁的工具,可是我还是比较喜欢用mybatis,工具是没有最好的,只有这合适自己的。
说到mybatis,最近有一个很好用的工具--------mybatis-Plus(官网),现在更新的版本是2.1.2,这里使用的也是这个版本。我比较喜欢的功能是代码生成器,条件构造器,这样就可以更容易的去开发了。
mybatisPlus官网上是有Spring boot整个的例子的,我也跟着它走了一篇,结果,程序没跑起来,后来才知道demo用的H2 database,和mysql根本不是同一样东西,所以各位想要整合mybatisPlus,可以不看官网的,可以少走弯路。
下面就是整合的过程
1、首先要把需要的jar文件都弄过来,pom.xml需要的东西如下
pom.xml(不完整)
<!-- mybatis-plus begin -->
<dependency>
    <groupId>com.baomidou</groupId>
    <artifactId>mybatisplus-spring-boot-starter</artifactId>
    <version>1.0.5</version>
</dependency>
<dependency>
    <groupId>com.baomidou</groupId>
    <artifactId>mybatis-plus</artifactId>
    <version>2.1.8</version>
</dependency>
<dependency>
    <groupId>org.springframework.boot</groupId>
    <artifactId>spring-boot-starter-jdbc</artifactId>
</dependency>
<!-- mybatis-plus end -->

<!-- druid阿里巴巴数据库连接池 -->
<dependency>
    <groupId>com.alibaba</groupId>
    <artifactId>druid</artifactId>
    <version>1.1.6</version>
</dependency>
<!--mysql-->
<dependency>
   <groupId>mysql</groupId>
   <artifactId>mysql-connector-java</artifactId>
   <scope>runtime</scope>
</dependency>
<dependency>
   <groupId>org.mybatis.spring.boot</groupId>
   <artifactId>mybatis-spring-boot-starter</artifactId>
   <version>1.3.1</version>
</dependency>
2、添加mybatis相关的配置,如账号、密码等。这里我使用了application.yml来配。
application.yml
server:
    port: 8080
#spring
spring:
  aop:
    proxy-target-class: true

  #DATABASE CONFIG 注意这里连得是sql server
  datasource:
    druid:
      driver-class-name: com.microsoft.sqlserver.jdbc.SQLServerDriver
      username: tdxuser
      password: ${MSSQL_PASSWORD:tdxgps}
      url: jdbc:sqlserver://${MSSQL_HOST:192.168.2.77:5609};databaseName=TDXDB
      initial-size: 1
      max-active: 20
      min-idle: 1
      max-wait: 60000
      validation-query: select 'x'
      validationQueryTimeout: 5
      test-on-borrow: false
      test-on-return: false
      test-while-idle: true
      time-between-eviction-runs-millis: 60000
      min-evictable-idle-time-millis: 300000
      filters: log4j
      filter:
        stat:
          enabled: true
          log-slow-sql: true
          slow-sql-millis: 1000
          merge-sql: true
          #db-type: sqlserver
        slf4j:
          enabled: true
          connection-log-enabled: true
          connection-close-after-log-enabled: true
          connection-commit-after-log-enabled: true
          connection-connect-after-log-enabled: true
          connection-connect-before-log-enabled: true
          connection-log-error-enabled: true
          data-source-log-enabled: true
          result-set-log-enabled: true
          statement-log-enabled: true
        wall:
          enabled: true
          config:
            alter-table-allow: false
            truncate-allow: false
            drop-table-allow: false
            #是否允许非以上基本语句的其他语句,缺省关闭,通过这个选项就能够屏蔽DDL
            none-base-statement-allow: false
            #检查UPDATE语句是否无where条件,这是有风险的,但不是SQL注入类型的风险
            update-where-none-check: true
            #SELECT ... INTO OUTFILE 是否允许,这个是mysql注入攻击的常见手段,缺省是禁止的
            select-into-outfile-allow: false
            #是否允许调用Connection.getMetadata方法,这个方法调用会暴露数据库的表信息
            metadata-allow: true
            #允许多条sql一起执行
            multiStatementAllow: true
          #对被认为是攻击的SQL进行LOG.error输出
          log-violation: true
          #对被认为是攻击的SQL抛出SQLExcepton
          throw-exception: true
          #db-type: mysql
      web-stat-filter:
        enabled: true
        url-pattern: /*
        exclusions: '*.js,*.gif,*.jpg,*.png,*.css,*.ico,/druid/*'
        #你可以配置principalSessionName,使得druid能够知道当前的cookie的用户是谁
        #principal-cookie-name: admin
        #你可以配置principalSessionName,使得druid能够知道当前的session的用户是谁
        #principal-session-name: admin
        #设置profileEnable能够监控单个url调用的sql列表。
        profile-enable: true
        #session统计功能
        session-stat-enable: false
        #最大session数
        session-stat-max-count: 100000
      stat-view-servlet:
        #allow: ${GATEWAY_HOST:172.26.114.241}
        enabled: true
        login-username: ${DRUID_USER:admin}
        login-password: ${DRUID_PWD:admin}
        url-pattern: /druid/*
        #允许清除记录
        reset-enable: false
      aop-patterns: com.tdx.account_service.service.*

  # Redis配置
  redis:
    #集群模式
    #cluster:
    #  nodes:
    #    - 39.XXX.XX.69:6661
    #    - 39.XXX.XX.69:6662
    #    - 39.XXX.XX.69:6663
    #    - 39.XXX.XX.69:6664
    #    - 39.XXX.XX.69:6665
    #    - 39.XXX.XX.69:6666
    #单机模式
    host: ${REDIS_HOST:192.168.2.18}
    port: ${REDIS_PORT:7006}
    password: ${REDIS_PASSWORD:root}
     #连接超时时间(毫秒)
    timeout: 10000
    pool:
     max-idle: 20
     min-idle: 5
     max-active: 20
     max-wait: 2

#mybatis
mybatis-plus:
  mapper-locations: classpath*:/mapper/**Mapper.xml
  #实体扫描,多个package用逗号或者分号分隔
  typeAliasesPackage: com.tdx.account_service.entity
  global-config:
    #主键类型  0:"数据库ID自增", 1:"用户输入ID",2:"全局唯一ID (数字类型唯一ID)", 3:"全局唯一ID UUID";
    id-type: 2
    #字段策略 0:"忽略判断",1:"非 NULL 判断"),2:"非空判断"
    field-strategy: 2
    #驼峰下划线转换
    db-column-underline: true
    #刷新mapper 调试神器
    refresh-mapper: true
    #数据库大写下划线转换
    #capital-mode: true
    #序列接口实现类配置
    #key-generator: com.baomidou.springboot.xxx
    #逻辑删除配置(下面3个配置)
    logic-delete-value: 0
    logic-not-delete-value: 1
    #自定义SQL注入器
    #sql-injector: com.baomidou.mybatisplus.mapper.LogicSqlInjector
    #自定义填充策略接口实现
    #meta-object-handler: com.baomidou.springboot.xxx
  configuration:
    map-underscore-to-camel-case: true
    cache-enabled: false

#logging
logging:
  level: warn
配置的东西和我们以前用mybatis配置可以说差不多,但spring boot是没有xml配置文件的。注意一下红字的内容,基本没问题了。
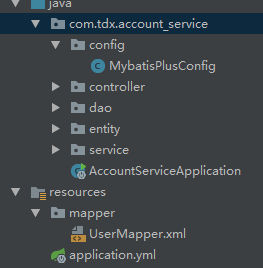
3、mybatis-Plus配置文件------MybatisPlusConfig,首先上图说明一下文件路径。其中MybatisPlusConfig是放在config文件夹内,而xml文件是放在resouces下mapper中。
接着就是MybatisPlusConfig内容部分了
MybatisPlusProperties.java
package com.tdx.account_service.config;
import com.alibaba.druid.pool.DruidDataSource;
import com.alibaba.druid.spring.boot.autoconfigure.DruidDataSourceBuilder;
import com.alibaba.druid.support.http.StatViewServlet;
import com.alibaba.druid.support.http.WebStatFilter;
import com.baomidou.mybatisplus.MybatisConfiguration;
import com.baomidou.mybatisplus.MybatisXMLLanguageDriver;
import com.baomidou.mybatisplus.entity.GlobalConfiguration;
import com.baomidou.mybatisplus.enums.DBType;
import com.baomidou.mybatisplus.plugins.PaginationInterceptor;
import com.baomidou.mybatisplus.plugins.PerformanceInterceptor;
import com.baomidou.mybatisplus.spring.MybatisSqlSessionFactoryBean;
import com.baomidou.mybatisplus.spring.boot.starter.SpringBootVFS;
import org.apache.ibatis.mapping.DatabaseIdProvider;
import org.apache.ibatis.plugin.Interceptor;
import org.mybatis.spring.boot.autoconfigure.MybatisProperties;
import org.springframework.beans.factory.annotation.Autowired;
import org.springframework.boot.bind.RelaxedPropertyResolver;
import org.springframework.boot.context.properties.ConfigurationProperties;
import org.springframework.boot.context.properties.EnableConfigurationProperties;
import org.springframework.boot.web.servlet.FilterRegistrationBean;
import org.springframework.boot.web.servlet.ServletRegistrationBean;
import org.springframework.context.annotation.Bean;
import org.springframework.context.annotation.Configuration;
import org.springframework.core.env.Environment;
import org.springframework.core.io.DefaultResourceLoader;
import org.springframework.core.io.ResourceLoader;
import org.springframework.util.ObjectUtils;
import org.springframework.util.StringUtils;

import javax.sql.DataSource;
import java.sql.SQLException;

/**
 * code is far away from bug with the animal protecting
 * ┏┓   ┏┓
 * ┏┛┻━━━┛┻┓
 * ┃       ┃
 * ┃   ━   ┃
 * ┃ ┳┛ ┗┳ ┃
 * ┃       ┃
 * ┃   ┻   ┃
 * ┃       ┃
 * ┗━┓   ┏━┛
 *   ┃   ┃神兽保佑
 *   ┃   ┃代码无BUG!
 *   ┃   ┗━━━┓
 *   ┃       ┣┓
 *   ┃       ┏┛
 *   ┗┓┓┏━┳┓┏┛
 *    ┃┫┫ ┃┫┫
 *    ┗┻┛ ┗┻┛
 *
 * @Description : MybatisPlus配置
 * ---------------------------------
 * @Author : Liang.Guangqing
 * @Date : Create in 2017/9/19 13:54
 */
@Configuration
public class MybatisPlusConfig {

    /***
     * plus 的性能优化
     * @return
     */
    @Bean
    public PerformanceInterceptor performanceInterceptor() {
        PerformanceInterceptor performanceInterceptor = new PerformanceInterceptor();
        /*<!-- SQL 执行性能分析,开发环境使用,线上不推荐。 maxTime 指的是 sql 最大执行时长 -->*/
        performanceInterceptor.setMaxTime(1000);
        /*<!--SQL是否格式化 默认false-->*/
        performanceInterceptor.setFormat(true);
        return performanceInterceptor;
    }

    /**
     * @Description : mybatis-plus分页插件
     * ---------------------------------
     * @Author : Liang.Guangqing
     * @Date : Create in 2017/9/19 13:59
     */
    @Bean
    public PaginationInterceptor paginationInterceptor() {
        return new PaginationInterceptor();
    }


    /**
     * @Description : druid注入
     * ---------------------------------
     * @Author : Liang.Guangqing
     * @Date : Create in 2018/1/3 17:38
     */
    @Bean
    @ConfigurationProperties("spring.datasource.druid." )
    public DataSource dataSource() {
        return DruidDataSourceBuilder
                .create()
                .build();
    }

}
这里是完整的配置文件,需要注意的是引入的包,别引错了!
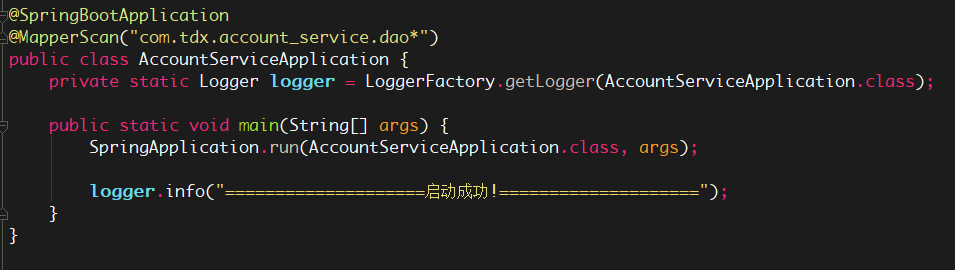
4、还要开启dao的扫描,很简单,就是在启动文件中添加@MapperScan("com.tdx.account_service.dao*"),如下是完整的
到这里,配置算是完成了,运行一下项目是可以运行起来的。
我觉得Mybatis-Plus最好玩得应该是代码生成器这部分内容,下面是代码生成器的使用过程
pom.xml上要加点东西
<dependency>
    <groupId>org.apache.velocity</groupId>
    <artifactId>velocity-engine-core</artifactId>
    <version>2.0</version>
</dependency>
1、代码生成器的配置文件
MysqlGenerator.java
/**
 * Copyright (c) 2011-2016, hubin (jobob@qq.com).
 * <p>
 * Licensed under the Apache License, Version 2.0 (the "License"); you may not
 * use this file except in compliance with the License. You may obtain a copy of
 * the License at
 * <p>
 * http://www.apache.org/licenses/LICENSE-2.0
 * <p>
 * Unless required by applicable law or agreed to in writing, software
 * distributed under the License is distributed on an "AS IS" BASIS, WITHOUT
 * WARRANTIES OR CONDITIONS OF ANY KIND, either express or implied. See the
 * License for the specific language governing permissions and limitations under
 * the License.
 */
package com.tdx.account_service.generator;

import java.io.File;
import java.util.ArrayList;
import java.util.Collections;
import java.util.HashMap;
import java.util.List;
import java.util.Map;

import com.baomidou.mybatisplus.enums.FieldFill;
import com.baomidou.mybatisplus.generator.AutoGenerator;
import com.baomidou.mybatisplus.generator.InjectionConfig;
import com.baomidou.mybatisplus.generator.config.DataSourceConfig;
import com.baomidou.mybatisplus.generator.config.FileOutConfig;
import com.baomidou.mybatisplus.generator.config.GlobalConfig;
import com.baomidou.mybatisplus.generator.config.PackageConfig;
import com.baomidou.mybatisplus.generator.config.StrategyConfig;
import com.baomidou.mybatisplus.generator.config.TemplateConfig;
import com.baomidou.mybatisplus.generator.config.converts.MySqlTypeConvert;
import com.baomidou.mybatisplus.generator.config.po.TableFill;
import com.baomidou.mybatisplus.generator.config.po.TableInfo;
import com.baomidou.mybatisplus.generator.config.rules.DbColumnType;
import com.baomidou.mybatisplus.generator.config.rules.DbType;
import com.baomidou.mybatisplus.generator.config.rules.NamingStrategy;

/**
 *code is far away from bug with the animal protecting
 *  ┏┓   ┏┓
 *┏┛┻━━━┛┻┓
 *┃       ┃
 *┃   ━   ┃
 *┃ ┳┛ ┗┳ ┃
 *┃       ┃
 *┃   ┻   ┃
 *┃       ┃
 *┗━┓   ┏━┛
 *  ┃   ┃神兽保佑
 *  ┃   ┃代码无BUG!
 *  ┃   ┗━━━┓
 *  ┃       ┣┓
 *  ┃       ┏┛
 *  ┗┓┓┏━┳┓┏┛
 *   ┃┫┫ ┃┫┫
 *   ┗┻┛ ┗┻┛
 *
 *   @Description : MybatisPlus代码生成器
 *   ---------------------------------
 *   @Author : Liang.Guangqing
 *   @Date : Create in 2017/9/19 14:48
 */
public class MysqlGenerator {

    private static String packageName="account_service";    //文件路径
    private static String authorName="Liang.Guangqing";     //作者
    private static String table="sc_user";                  //table名字
    private static String prefix="sc_";                     //table前缀
    private static File file = new File(packageName);
    private static String path = file.getAbsolutePath();

    public static void main(String[] args) {
        // 自定义需要填充的字段
        List<TableFill> tableFillList = new ArrayList<>();
        tableFillList.add(new TableFill("ASDD_SS", FieldFill.INSERT_UPDATE));
        // 代码生成器
        AutoGenerator mpg = new AutoGenerator().setGlobalConfig(
                // 全局配置
                new GlobalConfig()
                        .setOutputDir(path+"/src/main/java")//输出目录
                        .setFileOverride(true)// 是否覆盖文件
                        .setActiveRecord(true)// 开启 activeRecord 模式
                        .setEnableCache(false)// XML 二级缓存
                        .setBaseResultMap(true)// XML ResultMap
                        .setBaseColumnList(true)// XML columList
                        .setOpen(false)//生成后打开文件夹
                        .setAuthor(authorName)
                // 自定义文件命名,注意 %s 会自动填充表实体属性!
                 .setMapperName("%sMapper")
                 .setXmlName("%sMapper")
                 .setServiceName("%sService")
                 .setServiceImplName("%sServiceImpl")
                 .setControllerName("%sController")
        ).setDataSource(
                // 数据源配置
                new DataSourceConfig()
                        .setDbType(DbType.MYSQL)// 数据库类型
                        .setTypeConvert(new MySqlTypeConvert() {
                            // 自定义数据库表字段类型转换【可选】
                            @Override
                            public DbColumnType processTypeConvert(String fieldType) {
                                System.out.println("转换类型:" + fieldType);
                                // if ( fieldType.toLowerCase().contains( "tinyint" ) ) {
                                //    return DbColumnType.BOOLEAN;
                                // }
                                return super.processTypeConvert(fieldType);
                            }
                        })
                        .setDriverName("com.mysql.jdbc.Driver")
                        .setUsername("root")
                        .setPassword("root")
                        .setUrl("jdbc:mysql://127.0.0.1:3306/tdx_shop?characterEncoding=utf8")
        ).setStrategy(
                // 策略配置
                new StrategyConfig()
                        // .setCapitalMode(true)// 全局大写命名
                        //.setDbColumnUnderline(true)//全局下划线命名
                        .setTablePrefix(new String[]{prefix})// 此处可以修改为您的表前缀
                        .setNaming(NamingStrategy.underline_to_camel)// 表名生成策略
                        .setInclude(new String[] { table }) // 需要生成的表
                        .setRestControllerStyle(true)
                        //.setExclude(new String[]{"test"}) // 排除生成的表
                        // 自定义实体父类
                        // .setSuperEntityClass("com.baomidou.demo.TestEntity")
                        // 自定义实体,公共字段
                        //.setSuperEntityColumns(new String[]{"test_id"})
                        .setTableFillList(tableFillList)
                // 自定义 mapper 父类
                // .setSuperMapperClass("com.baomidou.demo.TestMapper")
                // 自定义 service 父类
                // .setSuperServiceClass("com.baomidou.demo.TestService")
                // 自定义 service 实现类父类
                // .setSuperServiceImplClass("com.baomidou.demo.TestServiceImpl")
                // 自定义 controller 父类
                .setSuperControllerClass("com.tdx."+packageName+".controller.AbstractController")
                // 【实体】是否生成字段常量(默认 false)
                // public static final String ID = "test_id";
                // .setEntityColumnConstant(true)
                // 【实体】是否为构建者模型(默认 false)
                // public User setName(String name) {this.name = name; return this;}
                // .setEntityBuilderModel(true)
                // 【实体】是否为lombok模型(默认 false)<a href="https://projectlombok.org/">document</a>
                // .setEntityLombokModel(true)
                // Boolean类型字段是否移除is前缀处理
                // .setEntityBooleanColumnRemoveIsPrefix(true)
                // .setRestControllerStyle(true)
                // .setControllerMappingHyphenStyle(true)
        ).setPackageInfo(
                // 包配置
                new PackageConfig()
                        //.setModuleName("User")
                        .setParent("com.tdx."+packageName)// 自定义包路径
                        .setController("controller")// 这里是控制器包名,默认 web
                        .setEntity("entity")
                        .setMapper("dao")
                        .setService("service")
                        .setServiceImpl("service.impl")
                        //.setXml("mapper")
        ).setCfg(
                // 注入自定义配置,可以在 VM 中使用 cfg.abc 设置的值
                new InjectionConfig() {
                    @Override
                    public void initMap() {
                        Map<String, Object> map = new HashMap<>();
                        map.put("abc", this.getConfig().getGlobalConfig().getAuthor() + "-mp");
                        this.setMap(map);
                    }
                }.setFileOutConfigList(Collections.<FileOutConfig>singletonList(new FileOutConfig("/templates/mapper.xml.vm") {
                    // 自定义输出文件目录
                    @Override
                    public String outputFile(TableInfo tableInfo) {
                        return path+"/src/main/resources/mapper/" + tableInfo.getEntityName() + "Mapper.xml";
                    }
                }))
        ).setTemplate(
                // 关闭默认 xml 生成,调整生成 至 根目录
                new TemplateConfig().setXml(null)
                // 自定义模板配置,模板可以参考源码 /mybatis-plus/src/main/resources/template 使用 copy
                // 至您项目 src/main/resources/template 目录下,模板名称也可自定义如下配置:
                // .setController("...");
                // .setEntity("...");
                // .setMapper("...");
                // .setXml("...");
                // .setService("...");
                // .setServiceImpl("...");
        );

        // 执行生成
        mpg.execute();

        // 打印注入设置,这里演示模板里面怎么获取注入内容【可无】
        System.err.println(mpg.getCfg().getMap().get("abc"));
    }

}
文件中修改的内容还是很多的,最主要的还是mysql的连接信息,没理由你账号,密码都错了还能连得上吧,其次设置一下你生成的模板文件路径,我这里生成的路径在上面图可以看得到,是在com.tdx.account_service下的,注意,xml文件要放在resources下,不然是识别的,说找不到这个方法
按照官网的代码模板生成的文件基本是白白的,主要是mybatis-Plus集成了公共方法,很多常用的工具都可以引用了。在这里我提供一下我修改后Controller.java.vm文件,主要还是按照我自己的习惯去弄的
controller.java.vm
package ${package.Controller};


import org.springframework.web.bind.annotation.RequestMapping;
import org.springframework.web.bind.annotation.RequestParam;

#if(${restControllerStyle})
import org.springframework.web.bind.annotation.RequestMethod;
import org.springframework.web.bind.annotation.RestController;
#else
import org.springframework.stereotype.Controller;
#end
#if(${superControllerClassPackage})
import ${superControllerClassPackage};
#end
import org.springframework.beans.factory.annotation.Autowired;
import com.baomidou.mybatisplus.mapper.EntityWrapper;
import com.baomidou.mybatisplus.plugins.Page;
import ${package.Service}.${table.serviceName};
import ${package.Entity}.common.DatatablesJSON;
import ${package.Entity}.common.JSONResult;
import ${package.Entity}.${entity};
import org.slf4j.Logger;
import org.slf4j.LoggerFactory;

/**
 *code is far away from bug with the animal protecting
 *  ┏┓   ┏┓
 *┏┛┻━━━┛┻┓
 *┃       ┃
 *┃   ━   ┃
 *┃ ┳┛ ┗┳ ┃
 *┃       ┃
 *┃   ┻   ┃
 *┃       ┃
 *┗━┓   ┏━┛
 *  ┃   ┃神兽保佑
 *  ┃   ┃代码无BUG!
 *  ┃   ┗━━━┓
 *  ┃       ┣┓
 *  ┃       ┏┛
 *  ┗┓┓┏━┳┓┏┛
 *   ┃┫┫ ┃┫┫
 *   ┗┻┛ ┗┻┛
 *
 *   @description : ${entity} 控制器
 *   ---------------------------------
 *      @author ${author}
 *   @since ${date}
 */
#if(${restControllerStyle})
@RestController
#else
@Controller
#end
@RequestMapping("#if(${package.ModuleName})/${package.ModuleName}#end/#if(${controllerMappingHyphenStyle})${controllerMappingHyphen}#else${table.entityPath}#end")
#if(${superControllerClass})
public class ${table.controllerName} extends ${superControllerClass} {
#else
public class ${table.controllerName} {
#end
    private final Logger logger = LoggerFactory.getLogger(${table.controllerName}.class);

    @Autowired
    public ${table.serviceName} ${table.entityPath}Service;

    /**
     * @description : 获取分页列表
     * ---------------------------------
     * @author : ${author}
     * @since : Create in ${date}
     */
    @RequestMapping(value = "/get${entity}List",method = RequestMethod.POST)
    public Object get${entity}List(${entity} param , @RequestParam(value = "draw",defaultValue = "0") Integer draw,
                                        @RequestParam(value = "length") Integer length,
                                        @RequestParam(value = "start") Integer start) {
            DatatablesJSON<${entity}> resJson=new DatatablesJSON<>();
            try {
                Integer pageNo=getPageNo(start,length);
                Page<${entity}> page=new Page<${entity}>(pageNo,length);
                ${table.entityPath}Service.selectPage(page,new EntityWrapper<${entity}>(param));
                resJson.setDraw(draw++);
                resJson.setRecordsTotal(page.getTotal());
                resJson.setRecordsFiltered(page.getTotal());
                resJson.setData(page.getRecords());
                resJson.setSuccess(true);
            }catch (Exception e){
                resJson.setSuccess(false);
                resJson.setError("异常信息:{"+e.getClass().getName()+"}");
                logger.info("异常信息:{}"+e.getMessage());
            }
            return resJson;
    }

    /**
     * @description : 通过id获取${entity}
     * ---------------------------------
     * @author : ${author}
     * @since : Create in ${date}
     */
    @RequestMapping(value = "/get${entity}ById",method = RequestMethod.GET)
    public Object get${entity}ById(String id) {
            JSONResult<${entity}> resJson = new JSONResult<>();
            try {
                ${entity} param= ${table.entityPath}Service.selectById(id);
                resJson.setData(param);
                resJson.setSuccess(true);
            }catch (Exception e) {
                resJson.setSuccess(false);
                resJson.setMessage("异常信息:{"+e.getClass().getName()+"}");
                logger.info("异常信息:{}"+e.getMessage());
            }
            return resJson;
    }

    /**
     * @description : 通过id删除${entity}
     * ---------------------------------
     * @author : ${author}
     * @since : Create in ${date}
     */
    @RequestMapping(value = "/delete${entity}ById",method = RequestMethod.GET)
    public Object delete${entity}ById(String id) {
            JSONResult<${entity}> resJson = new JSONResult<>();
            try{
                resJson.setSuccess(${table.entityPath}Service.deleteById(id));
            }catch (Exception e) {
                resJson.setSuccess(false);
                resJson.setMessage("异常信息:{"+e.getClass().getName()+"}");
                logger.info("异常信息:{}"+e.getMessage());
            }
            return resJson;
    }

    /**
     * @description : 通过id更新${entity}
     * ---------------------------------
     * @author : ${author}
     * @since : Create in ${date}
     */
    @RequestMapping(value = "/update${entity}ById",method = RequestMethod.POST)
    public Object update${entity}ById(${entity} param) {
            JSONResult<${entity}> resJson = new JSONResult<>();
            try{
                resJson.setSuccess(${table.entityPath}Service.updateById(param));
            }catch (Exception e) {
                resJson.setSuccess(false);
                resJson.setMessage("异常信息:{"+e.getClass().getName()+"}");
                logger.info("异常信息:{}"+e.getMessage());
            }
            return resJson;
    }

    /**
     * @description : 添加${entity}
     * ---------------------------------
     * @author : ${author}
     * @since : Create in ${date}
     */
    @RequestMapping(value = "/add${entity}",method = RequestMethod.POST)
    public Object add${entity}(${entity} param) {
            JSONResult<${entity}> resJson = new JSONResult<>();
            try{
                resJson.setSuccess(${table.entityPath}Service.insert(param));
            }catch (Exception e) {
                resJson.setSuccess(false);
                resJson.setMessage("异常信息:{"+e.getClass().getName()+"}");
                logger.info("异常信息:{}"+e.getMessage());
            }
            return resJson;
    }
}
除了这个文件,其他代码模板我都是按照官网那样的,这里引用3个外部的文件,有AbstractController.java(控制器基类)、DatatablesJSON.java和JSONResult.java,然后这些文件又引用了其他文件,我懵逼了,怎么文件这么多啊,看来如果全部都贴上来得多占地方啊,所以我选择相信码云,如果需要请在码云上按照少的文件下载,码云地址。需要注意的是,我的模板是直接代替了mybatis-plus.jar中的templates目录。
最后就到了测试过程
下面的代码段都是放在Controller文件里面,然后启动程序,对应端口,请求方法。测试的话是需要按照自己的实体类操作的,所以仅供参考。
/** * 分页 PAGE */ @GetMapping("/test") public Page<User> test() { return userService.selectPage(new Page<User>(0, 12)); } /** * AR 部分测试 */ @GetMapping("/test1") public Page<User> test1() { User user = new User(); System.err.println("删除所有:" + user.delete(null)); //user.setId(2017091801L); user.setAccout("test"+num++); user.setType("test"); user.setCreateTime(new Date()); user.setPhone("13111110000"); user.setPassword("123456"); user.setNickname("guangqing"+2*num++); user.insert(); System.err.println("查询插入结果:" + user.selectById().toString()); //user.setNickname("mybatis-plus-ar"); System.err.println("更新:" + user.updateById()); return user.selectPage(new Page<User>(0, 12), null); } /** * 增删改查 CRUD */ @GetMapping("/test2") public User test2() { User user = new User(); user.setId(123456L); user.setAccout("test"); user.setType("test"); user.setCreateTime(new Date()); user.setPhone("13111110000"); user.setPassword("123456"); user.setNickname("guangqing"); System.err.println("删除一条数据:" + userService.deleteById(1L)); System.err.println("插入一条数据:" + userService.insert(user)); User user2 = new User(); user.setId(223456L); user.setAccout("test2"); user.setType("test"); user.setCreateTime(new Date()); user.setPhone("13111110000"); user.setPassword("123456"); user.setNickname("guangqing"); boolean result = userService.insert(user); // 自动回写的ID Long id = user.getId(); System.err.println("插入一条数据:" + result + ", 插入信息:" + user.toString()); System.err.println("查询:" + userService.selectById(id).toString()); Page<User> userListPage = userService.selectPage(new Page<User>(1, 5), new EntityWrapper<>(new User())); System.err.println("total=" + userListPage.getTotal() + ", current list size=" + userListPage.getRecords().size()); return userService.selectById(1L); } @GetMapping("testSelect") public Object testSelect() { Integer start = 0; Integer length =10; User param = new User(); //param.setNickname("guangqing2"); Integer pageNo=getPageNo(start,length); Page<User> page =new Page<User>(pageNo,length); EntityWrapper<User> ew = new EntityWrapper<User>(); ew.setEntity(param); ew.where("password={0}","123456") .like("nickname","guangqing") .ge("create_time","2017-09-21 15:50:00"); userService.selectPage(page, ew); DatatablesJSON<User> resJson= new DatatablesJSON<>(); //resJson.setDraw(draw++); resJson.setRecordsTotal(page.getTotal()); resJson.setRecordsFiltered(page.getTotal()); resJson.setData(page.getRecords()); return resJson; } @GetMapping("/selectsql") public Object getUserBySql() { JSONObject result = new JSONObject(); result.put("records", userService.selectListBySQL()); return result; } /** * 7、分页 size 一页显示数量 current 当前页码 * 方式一:http://localhost:8080/user/page?size=1¤t=1<br> * 方式二:http://localhost:8080/user/pagehelper?size=1¤t=1<br> */ // 参数模式分页 @GetMapping("/page") public Object page(Page page) { return userService.selectPage(page); } // ThreadLocal 模式分页 @GetMapping("/pagehelper") public Object pagehelper(Page page) { PageHelper.setPagination(page); page.setRecords(userService.selectList(null)); page.setTotal(PageHelper.freeTotal());//获取总数并释放资源 也可以 PageHelper.getTotal() return page; } /** * 测试事物 * http://localhost:8080/user/test_transactional<br> * 访问如下并未发现插入数据说明事物可靠!!<br> * http://localhost:8080/user/test<br> * <br> * 启动 Application 加上 @EnableTransactionManagement 注解其实可无默认貌似就开启了<br> * 需要事物的方法加上 @Transactional 必须的哦!! */ @Transactional @GetMapping("/test_transactional") public void testTransactional() { //userService.insert(new User(1000L, "测试事物", 16, 3)); System.out.println(" 这里手动抛出异常,自动回滚数据"); throw new RuntimeException(); }
这么多的测试,我觉得最有趣的是条件构造器,在官网上有更齐全的,而我这里是按照我自己的需求写的。
最后谢谢大家的观看,写博客经验不足,写得不好请见谅,如果能给你带来帮助请点个赞,若遇到不明白的,或者我有写错的地方请提出,谢谢!

 浙公网安备 33010602011771号