

Eclipse利用Maven2搭建SpringMVC框架的Web工程
一、准备工作:
下载apache-maven--> 配置Maven_home -->下载Eclipse Maven插件
二、新建工程:
选择新建Maven Project archetype选择webapp-->输入group ID (src下包名)和Artifact ID (工程名)
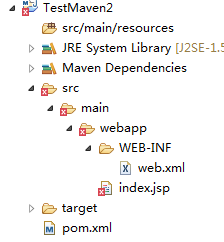
新建Maven工程目录如上图
三、补齐缺失的文件夹:
添加Server支持和缺失的源文件夹

四、添加springMvc支持和web容器支持(若没有,打包时会报错)
<project xmlns="http://maven.apache.org/POM/4.0.0" xmlns:xsi="http://www.w3.org/2001/XMLSchema-instance"
  xsi:schemaLocation="http://maven.apache.org/POM/4.0.0 http://maven.apache.org/maven-v4_0_0.xsd">
  <modelVersion>4.0.0</modelVersion>
  <groupId>com.maven.my</groupId>
  <artifactId>TestMaven2</artifactId>
  <packaging>war</packaging>
  <version>0.0.1-SNAPSHOT</version>
  <name>TestMaven2 Maven Webapp</name>
  <url>http://maven.apache.org</url>
<properties>
<spring.version>4.1.5.RELEASE</spring.version>
</properties>
  <dependencies>
    <dependency>
      <groupId>junit</groupId>
      <artifactId>junit</artifactId>
      <version>3.8.1</version>
      <scope>test</scope>
    </dependency>
     <dependency>
        <groupId>org.springframework</groupId>
        <artifactId>spring-webmvc</artifactId>
        <version>${spring.version}</version>
    </dependency>
    <dependency>
        <groupId>javax.servlet</groupId>
        <artifactId>javax.servlet-api</artifactId>
        <version>3.1.0</version>
    </dependency>
  </dependencies>
  <build>
    <finalName>TestMaven2</finalName>
  </build>
</project>
(五)修改工程配置:
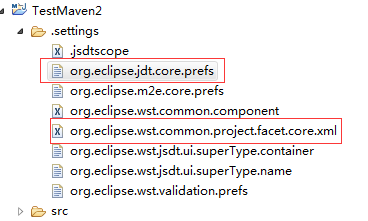
在以上两个文件中修改jdk版本为1.7以上 web为3.0
六:添加springMvc配置:
web.xml
<?xml version="1.0" encoding="UTF-8"?>

<web-app xmlns:xsi="http://www.w3.org/2001/XMLSchema-instance"

         xmlns="http://java.sun.com/xml/ns/javaee" xmlns:web="http://java.sun.com/xml/ns/javaee/web-app_3_0.xsd"

         xsi:schemaLocation="http://java.sun.com/xml/ns/javaee http://java.sun.com/xml/ns/javaee/web-app_3_0.xsd"

         id="study" version="3.0">

         <display-name>Archetype Created Web Application</display-name>

         <description>sprintMVC环境搭建</description>

         <!-- 加载Spring配置文件 -->

         <context-param>

                   <param-name>contextConfigLocation</param-name>

                   <param-value>classpath:configs/beans.xml</param-value>

         </context-param>

         <!-- Spring监听 -->

         <listener>

                   <listener-class>org.springframework.web.context.ContextLoaderListener</listener-class>

         </listener>

         <!-- Spring MVC配置 -->

         <servlet>

                   <servlet-name>Dispatcher</servlet-name>

                   <servlet-class>org.springframework.web.servlet.DispatcherServlet</servlet-class>

                   <!-- 自定义spring mvc的配置文件名称和路径 -->

                   <init-param>

                            <param-name>contextConfigLocation</param-name>

                            <param-value>classpath:configs/beans-mvc.xml</param-value>

                   </init-param>

                   <load-on-startup>1</load-on-startup>

         </servlet>

         <!-- spring mvc 请求后缀 -->

         <servlet-mapping>

                   <servlet-name>Dispatcher</servlet-name>

                   <url-pattern>/</url-pattern>

         </servlet-mapping>

         <welcome-file-list>

                   <welcome-file>index.jsp</welcome-file>

         </welcome-file-list>

</web-app>
src/com/main/resources文件夹下的beans.xml和beans-mvc.xml
beans.xml:
<?xml version="1.0" encoding="UTF-8"?>
<beans xmlns="http://www.springframework.org/schema/beans"
    xmlns:context="http://www.springframework.org/schema/context"
    xmlns:xsi="http://www.w3.org/2001/XMLSchema-instance"
    xsi:schemaLocation="http://www.springframework.org/schema/beans
    http://www.springframework.org/schema/beans/spring-beans-3.0.xsd
    http://www.springframework.org/schema/context
    http://www.springframework.org/schema/context/spring-context-3.0.xsd" >

    <context:property-placeholder />

    <context:annotation-config />


</beans>
<?xml version="1.0" encoding="UTF-8"?>
<beans xmlns="http://www.springframework.org/schema/beans"
    xmlns:xsi="http://www.w3.org/2001/XMLSchema-instance" xmlns:aop="http://www.springframework.org/schema/aop"
    xmlns:util="http://www.springframework.org/schema/util" xmlns:context="http://www.springframework.org/schema/context"
    xmlns:p="http://www.springframework.org/schema/p" xmlns:mvc="http://www.springframework.org/schema/mvc"
    xmlns:task="http://www.springframework.org/schema/task"
    xsi:schemaLocation="
            http://www.springframework.org/schema/beans http://www.springframework.org/schema/beans/spring-beans.xsd
            http://www.springframework.org/schema/aop http://www.springframework.org/schema/aop/spring-aop.xsd
            http://www.springframework.org/schema/context http://www.springframework.org/schema/context/spring-context.xsd
            http://www.springframework.org/schema/util  http://www.springframework.org/schema/util/spring-util.xsd
            http://www.springframework.org/schema/cache http://www.springframework.org/schema/cache/spring-cache.xsd
            http://www.springframework.org/schema/jdbc http://www.springframework.org/schema/jdbc/spring-jdbc.xsd
            http://www.springframework.org/schema/mvc http://www.springframework.org/schema/mvc/spring-mvc.xsd
            ">

    <context:property-placeholder />
    <!-- MVC控制类扫描 -->
    <context:component-scan base-package="com.my.controller" />

    <mvc:annotation-driven />

    <!-- 视图解析器:定义跳转的文件的前后缀 -->
    <bean id="viewResolver" class="org.springframework.web.servlet.view.InternalResourceViewResolver">
        <property name="prefix" value="/view/" />
        <property name="suffix" value=".html" />  <!--可为空,方便实现自已的依据扩展名来选择视图解释类的逻辑  -->
    </bean>

    <mvc:default-servlet-handler />

</beans>
七:补齐自己的controller
package com.my.controller;

import javax.servlet.http.HttpServletRequest;

import org.springframework.stereotype.Controller;
import org.springframework.web.bind.annotation.RequestMapping;

@Controller
@RequestMapping("/user")
public class UserController {
    @RequestMapping(value="/getUserInfo")
    public String getUserInfo(HttpServletRequest request){
        System.out.println("==========");
        return "user";
    }
}
八:部署运行,输入http://localhost:8180/TestMaven2/user/getUserInfo访问。
------------------------------------------------------------------------------------------------------------------------------
一段可能会用到代码:maven依赖无法加入到工程时,在.classpath添加,很有用
<classpathentry kind="con" path="org.eclipse.m2e.MAVEN2_CLASSPATH_CONTAINER">
        <attributes>
            <attribute name="maven.pomderived" value="true"/>
            <attribute name="org.eclipse.jst.component.nondependency" value=""/>
        </attributes>
    </classpathentry>

 浙公网安备 33010602011771号