

rabbitmq的java客户端(使用Spring AMQP)
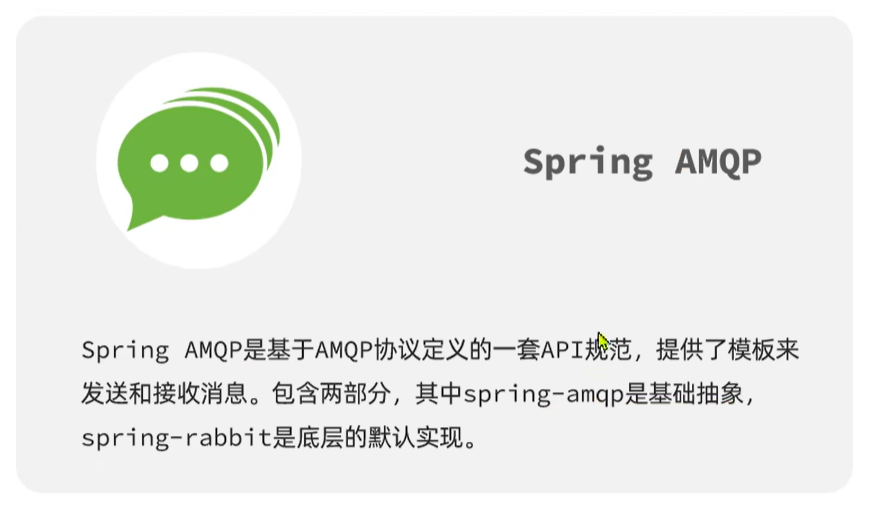
(1)Spring AMQP介绍
(2)快速入门
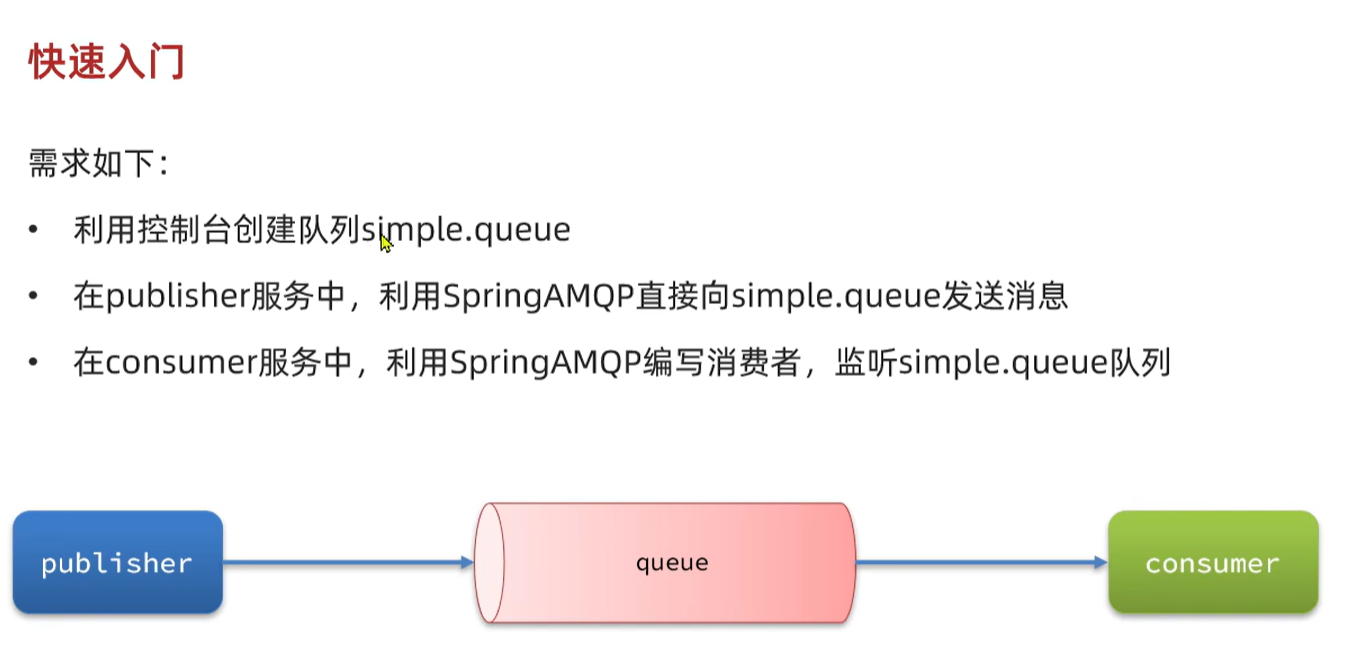
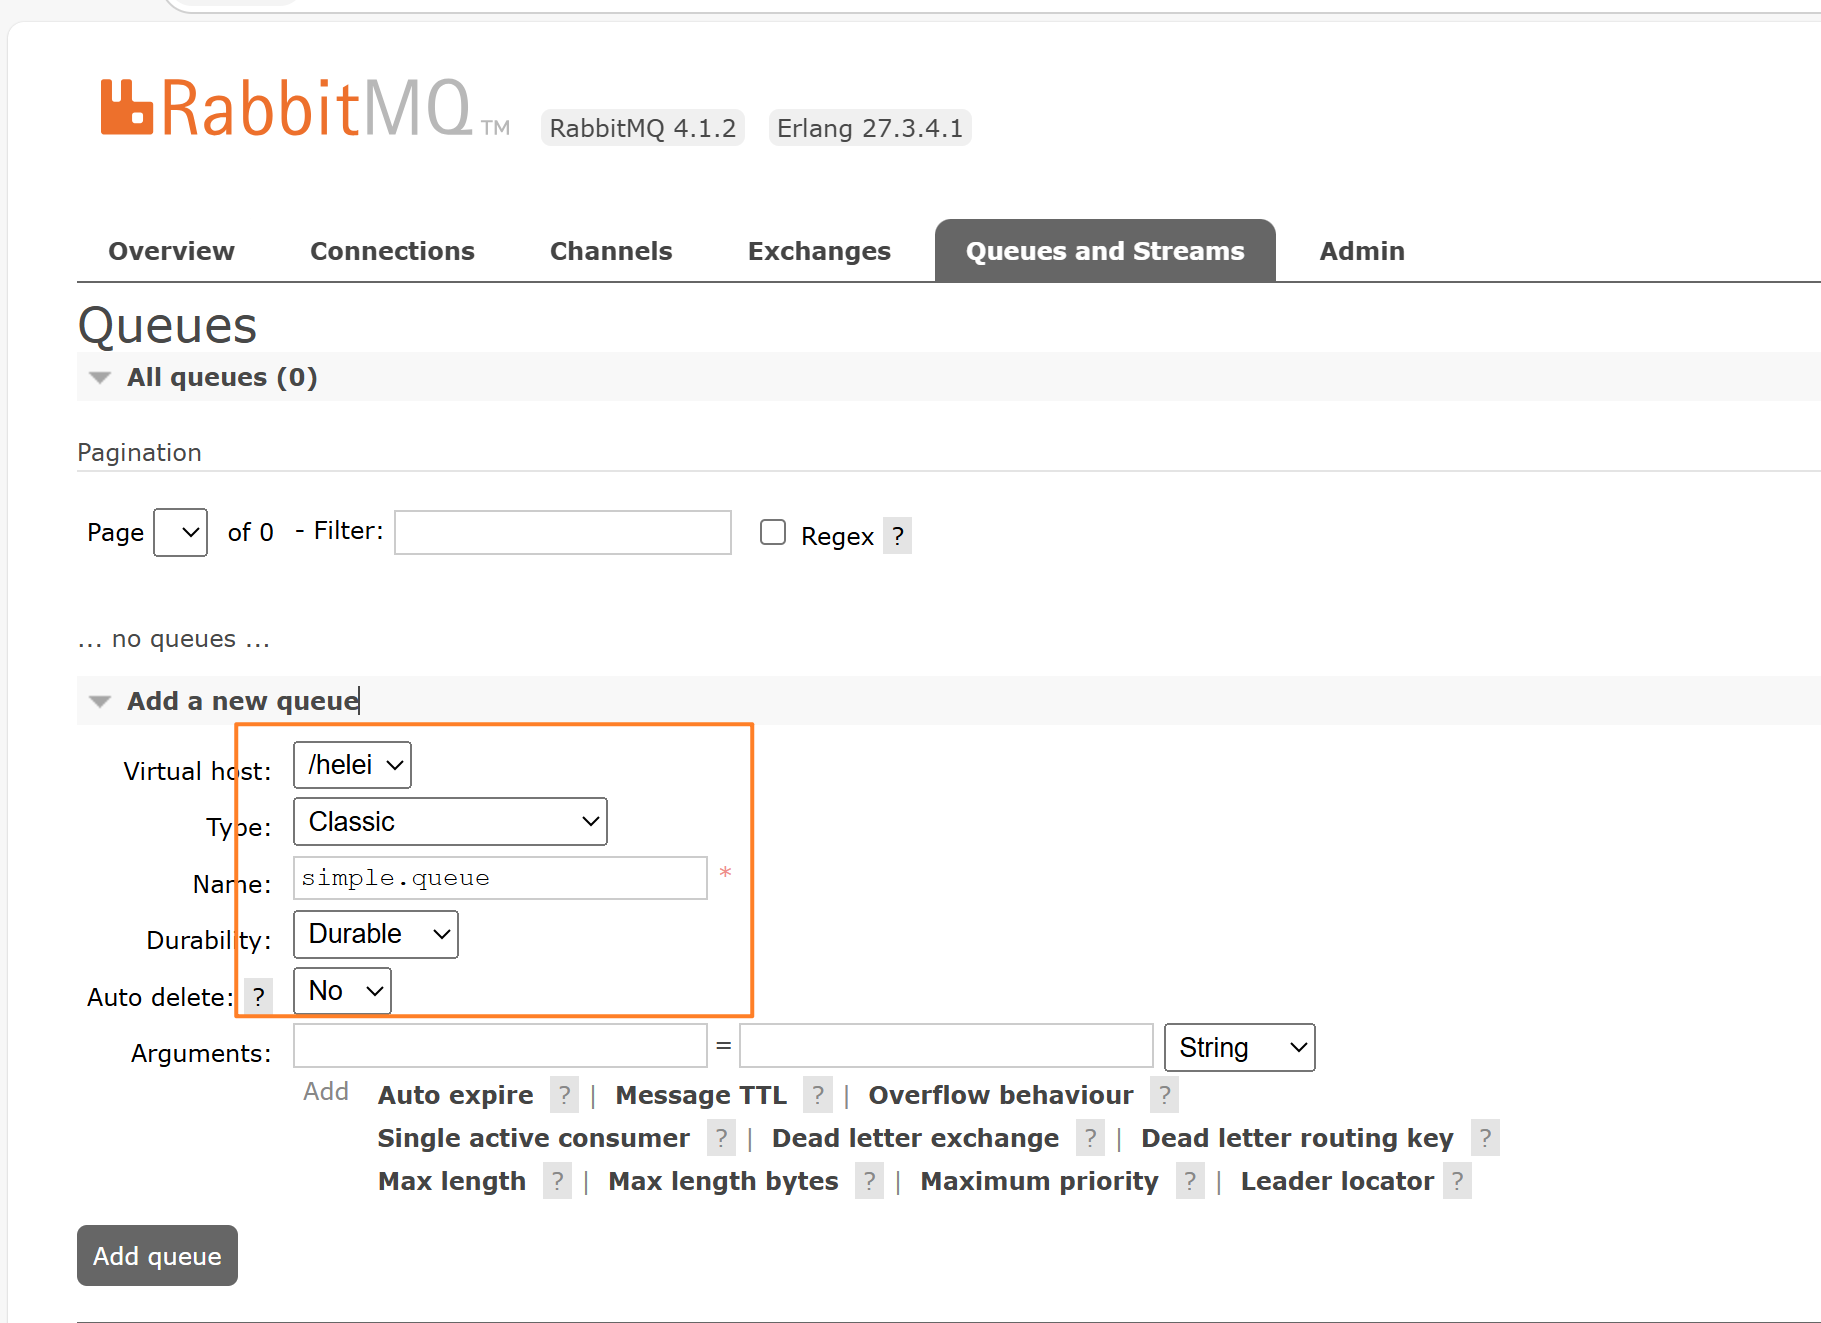
①创建一个队列simple.queue
②使用步骤
1.引入依赖
        <!--AMQP依赖,包含RabbitMQ-->
        <dependency>
            <groupId>org.springframework.boot</groupId>
            <artifactId>spring-boot-starter-amqp</artifactId>
        </dependency>
2.在生产者的yml配置rabbitmq地址 (生产者,也就是发送消息的人)
在yml文件中配置
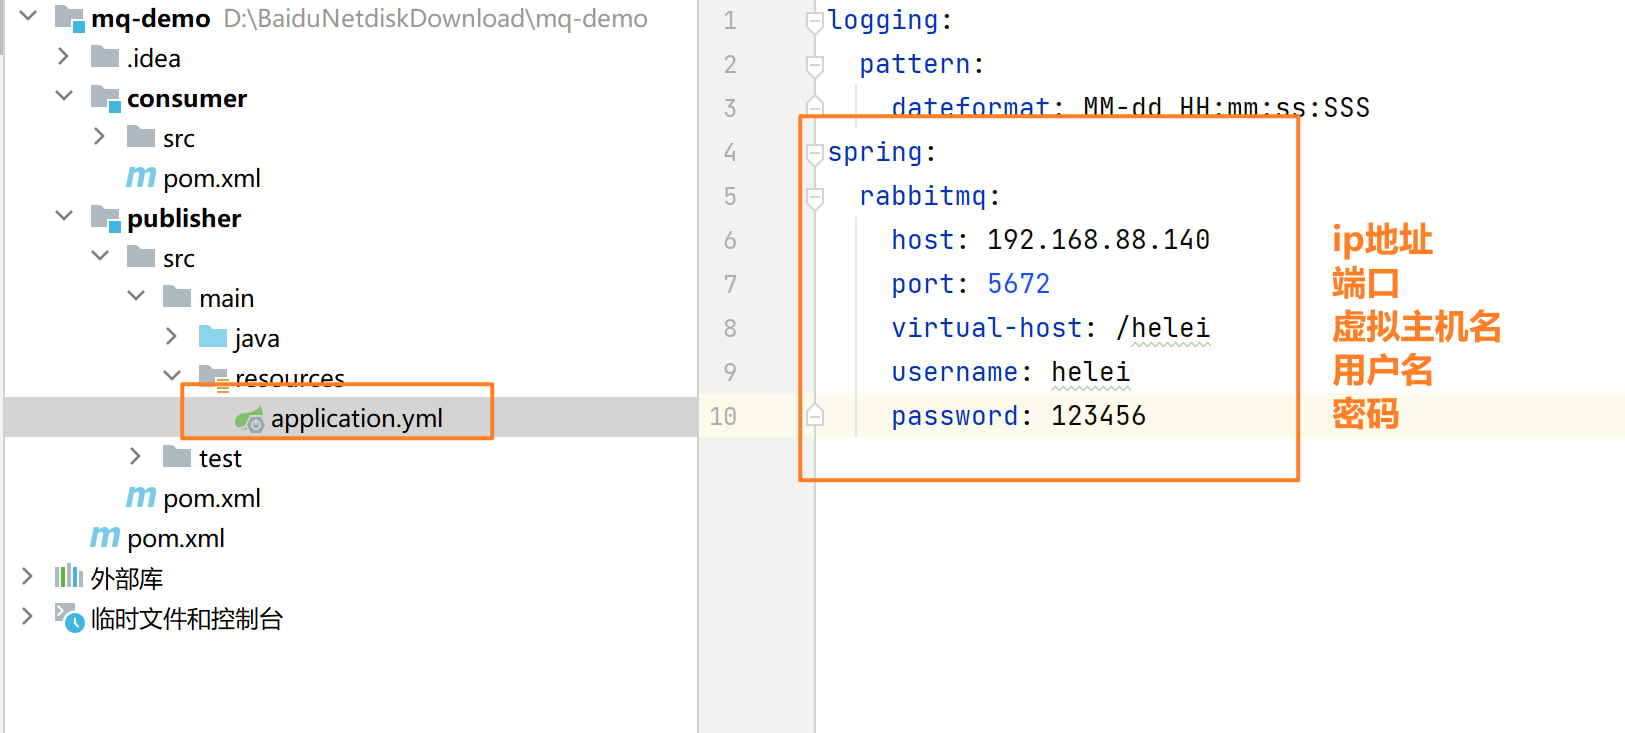
spring:
  rabbitmq:
    host: 192.168.88.140
    port: 5672
    virtual-host: /helei
    username: helei
    password: 123456
③消息发送的Test代码
package com.itheima.publisher;

import org.junit.jupiter.api.Test;
import org.springframework.amqp.rabbit.core.RabbitTemplate;
import org.springframework.beans.factory.annotation.Autowired;
import org.springframework.boot.test.context.SpringBootTest;

@SpringBootTest
public class SpringAmqpTest {
    @Autowired
    private RabbitTemplate rabbitTemplate;
    @Test
    public void testSendMessage() {
        String queueName = "simple.queue";   //队列名称
        String msg="hello amqp";             //消息的内容
        rabbitTemplate.convertAndSend( queueName, msg);    //发送消息
    }
}
④在消费者端监听消息队列,并查看得到的消息
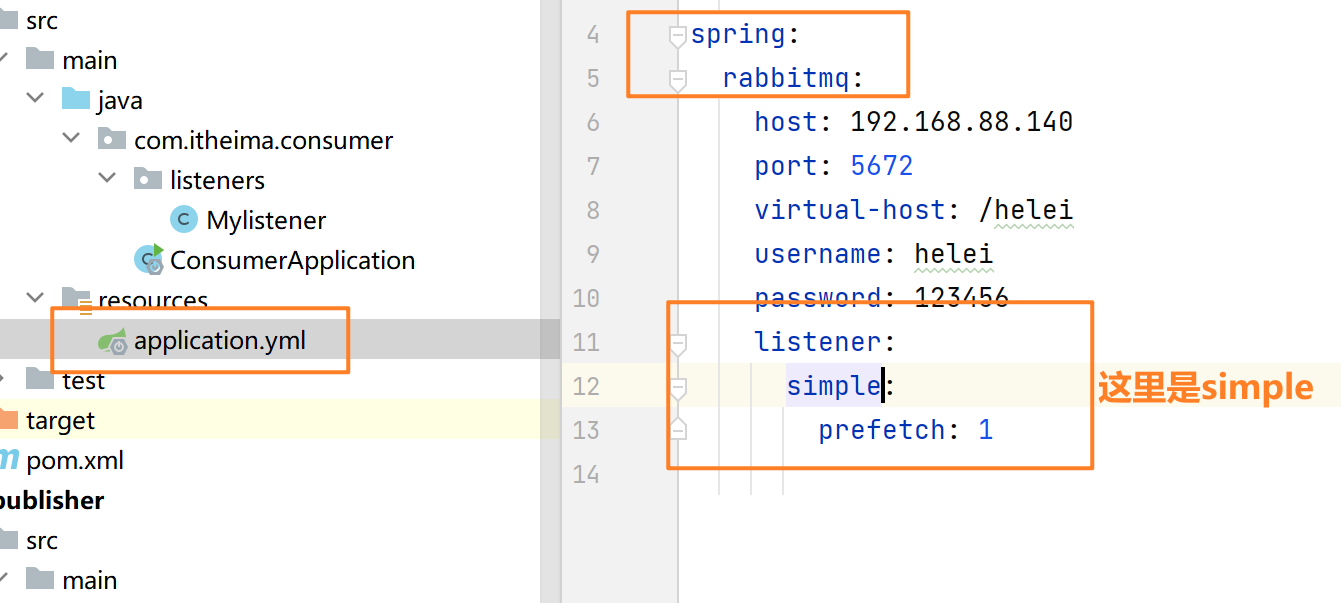
1.在消费者端的yml文件配置rabbitmq.地址(与生产者端相同)
spring:
  rabbitmq:
    host: 192.168.88.140
    port: 5672
    virtual-host: /helei
    username: helei
    password: 123456
2.编写消费者端监听队列的代码
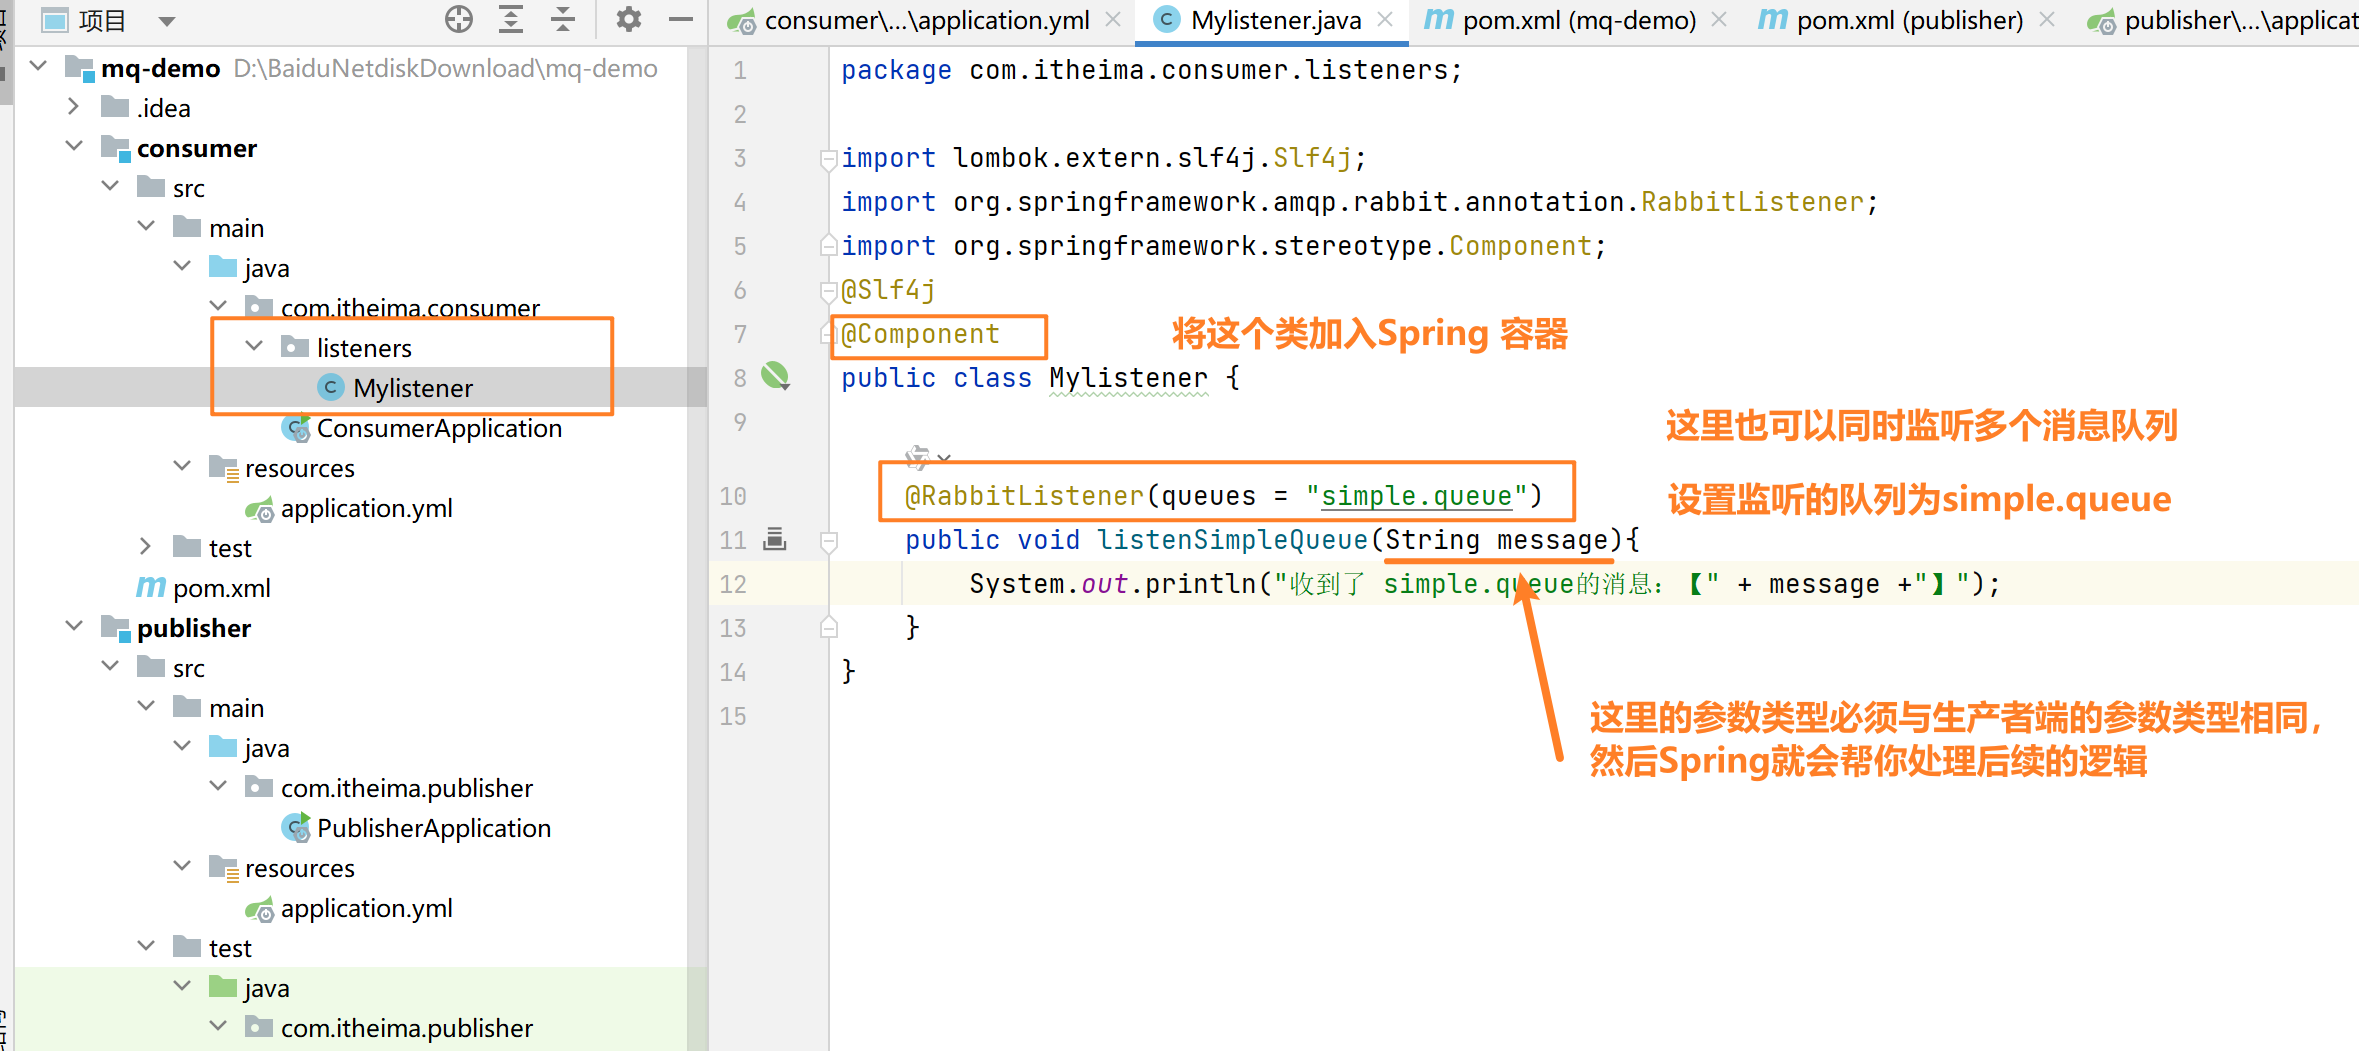
package com.itheima.consumer.listeners;

import lombok.extern.slf4j.Slf4j;
import org.springframework.amqp.rabbit.annotation.RabbitListener;
import org.springframework.stereotype.Component;
@Slf4j
@Component
public class Mylistener {

    @RabbitListener(queues = "simple.queue")
    public void listenSimpleQueue(String message){
        System.out.println("收到了 simple.queue的消息:【" + message +"】");
    }
}
3.测试代码,看看是否能监听到生产者端的信息(需要启动消费者端的Springboot服务)
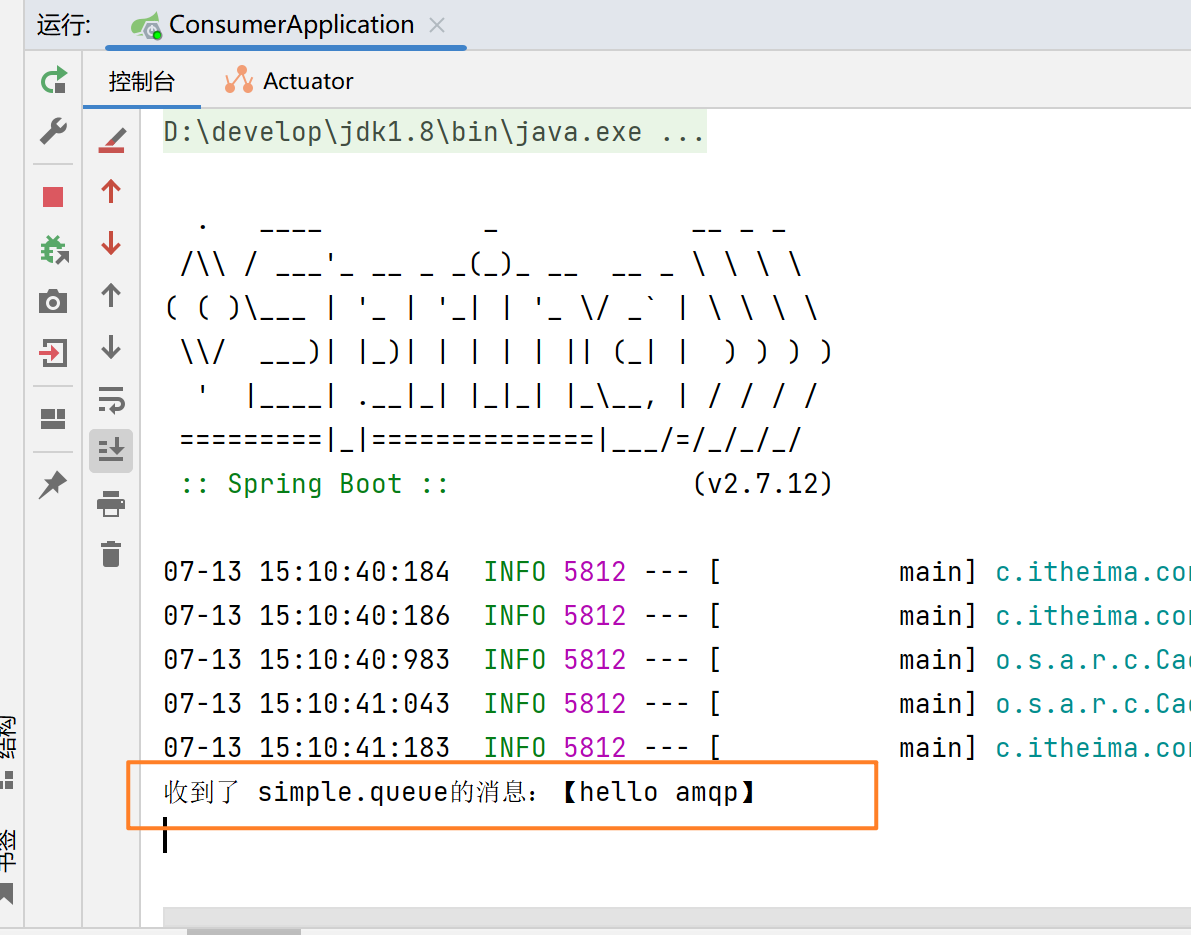
注意:在生产者发送完消息,并且消费者成功监听到生产者发送到队列中的消息之后,这条消息就会从消息队列中移除
(3)Work Queues(能者多劳)
Work Queues(任务模型) 就是一个生产者发送任务给一个队列,由多个消费者共同“轮流”处理这些任务,实现工作负载的分担。
引入的前提:
如果有一个生产者发送消息,有两个消费者监听这一个队列,无论两个消费者的处理信息的能力如何,最终结果都只会是平分所有的消息,这样的话效率不高;我们想要的是处理能力快的多处理一些数据,处理能力慢的相应地少处理一些数据,提高效率,因此使用Work Queues来实现上面的需求
解决方法(处理的快的继续处理,处理的慢的等到手里消息处理完之后,才能接收新的消息)
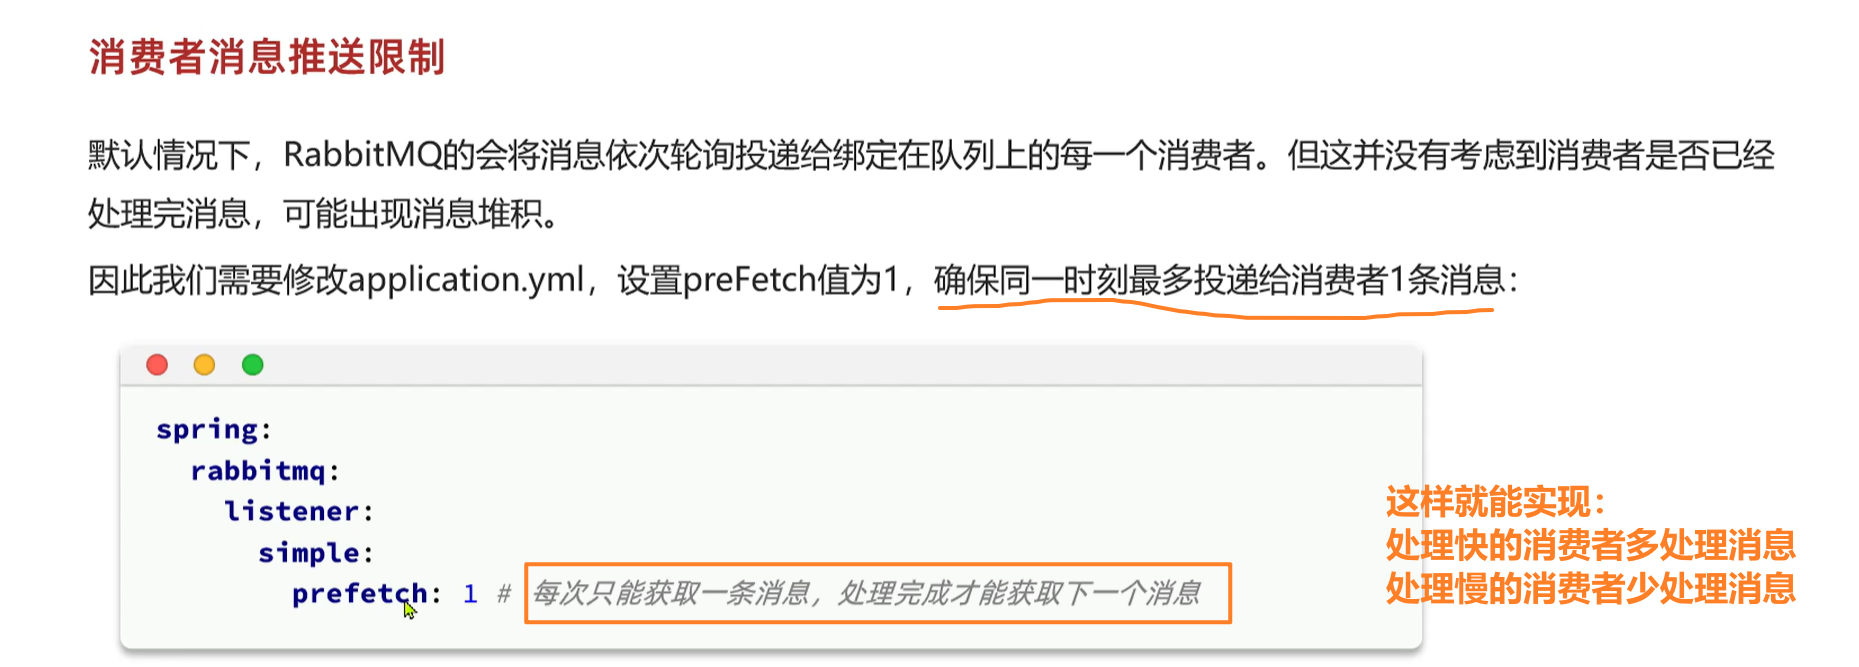
spring.rabbitmq.listener.simple.prefetch
结果如下:(因为设置了消费者1在每处理完一条消息之后,休眠20ms,消费者2在每处理完一条消息后,休眠200ms
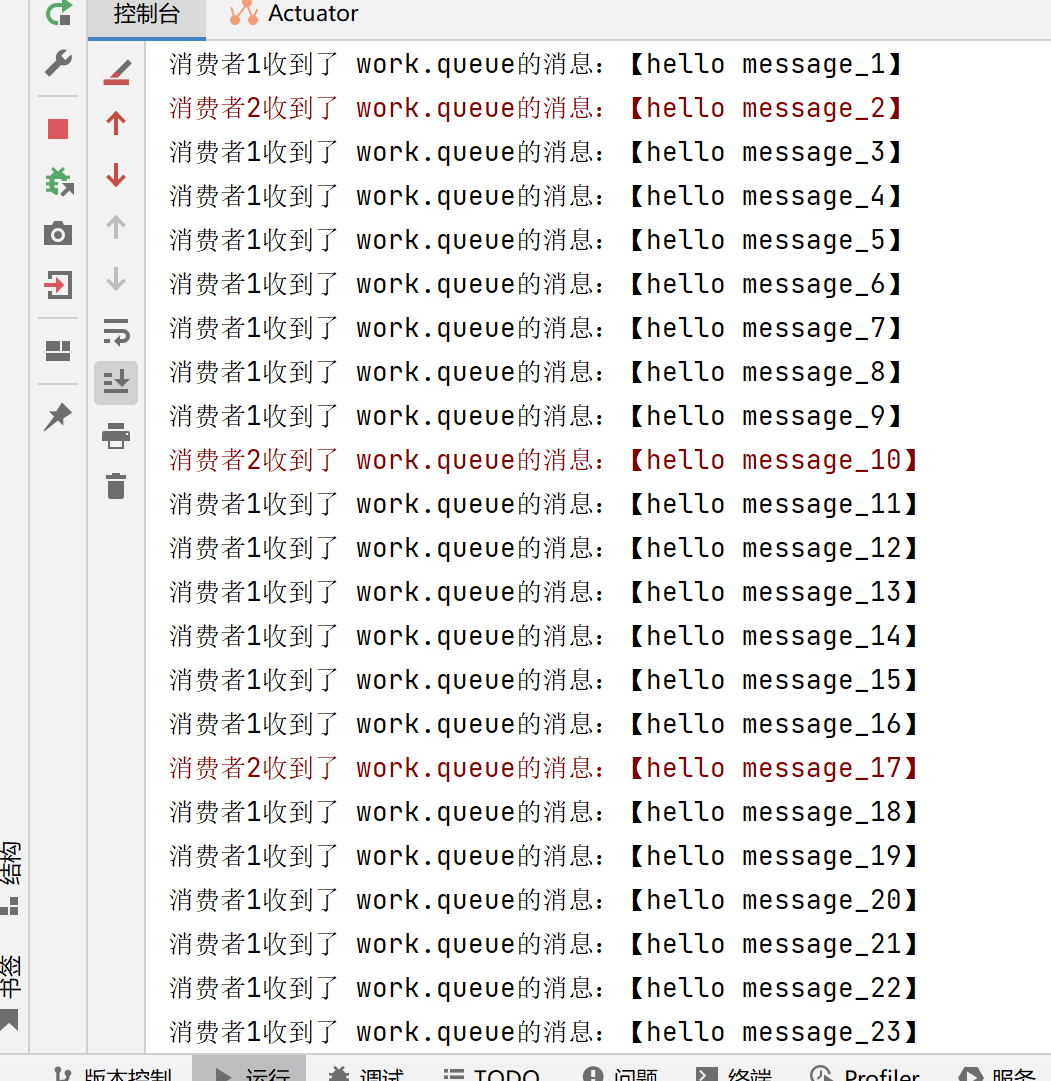
处理消息堆积问题:
为一个队列绑定多个消费者,提高效率
优化消费者代码的逻辑,提高处理速度
(4)三种不同的交换机(exchange)
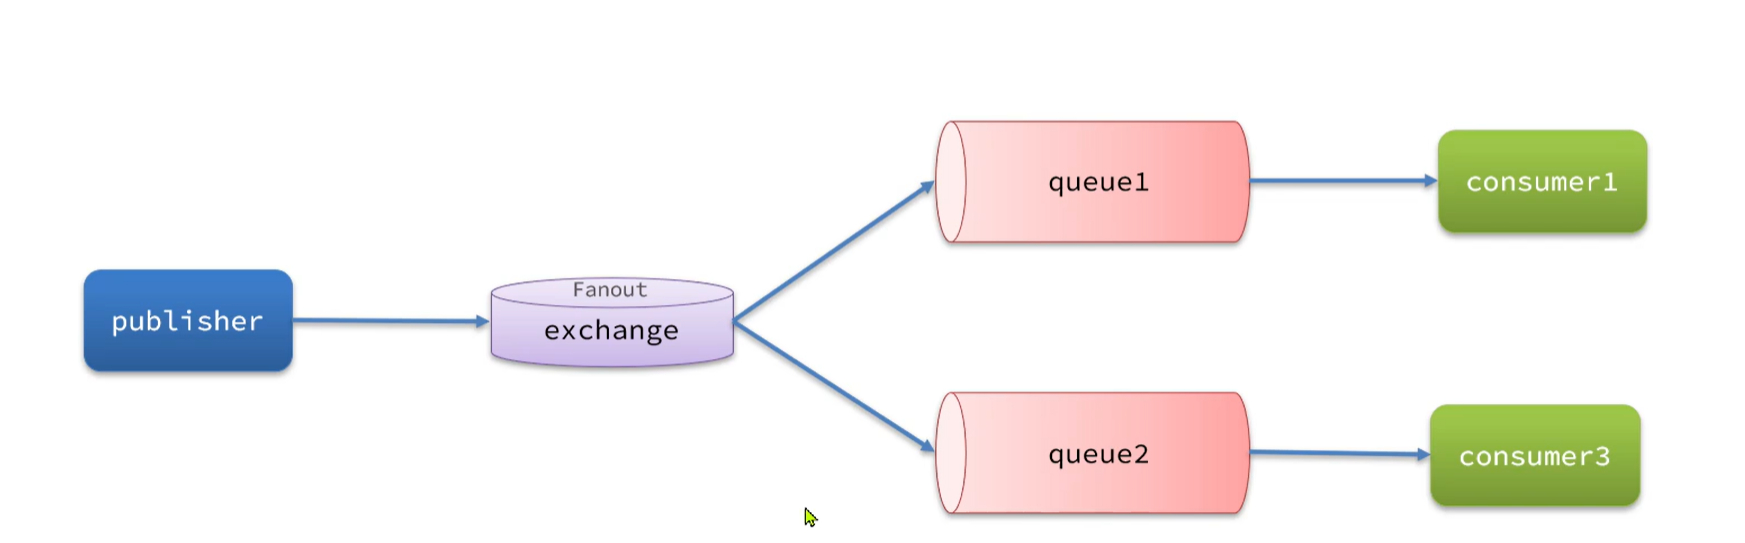
①Fanout交换机(广播) Fanout Exchange会将接收到的消息广播到每一个跟其绑定的queue,所以也叫广播模式
使用方法:
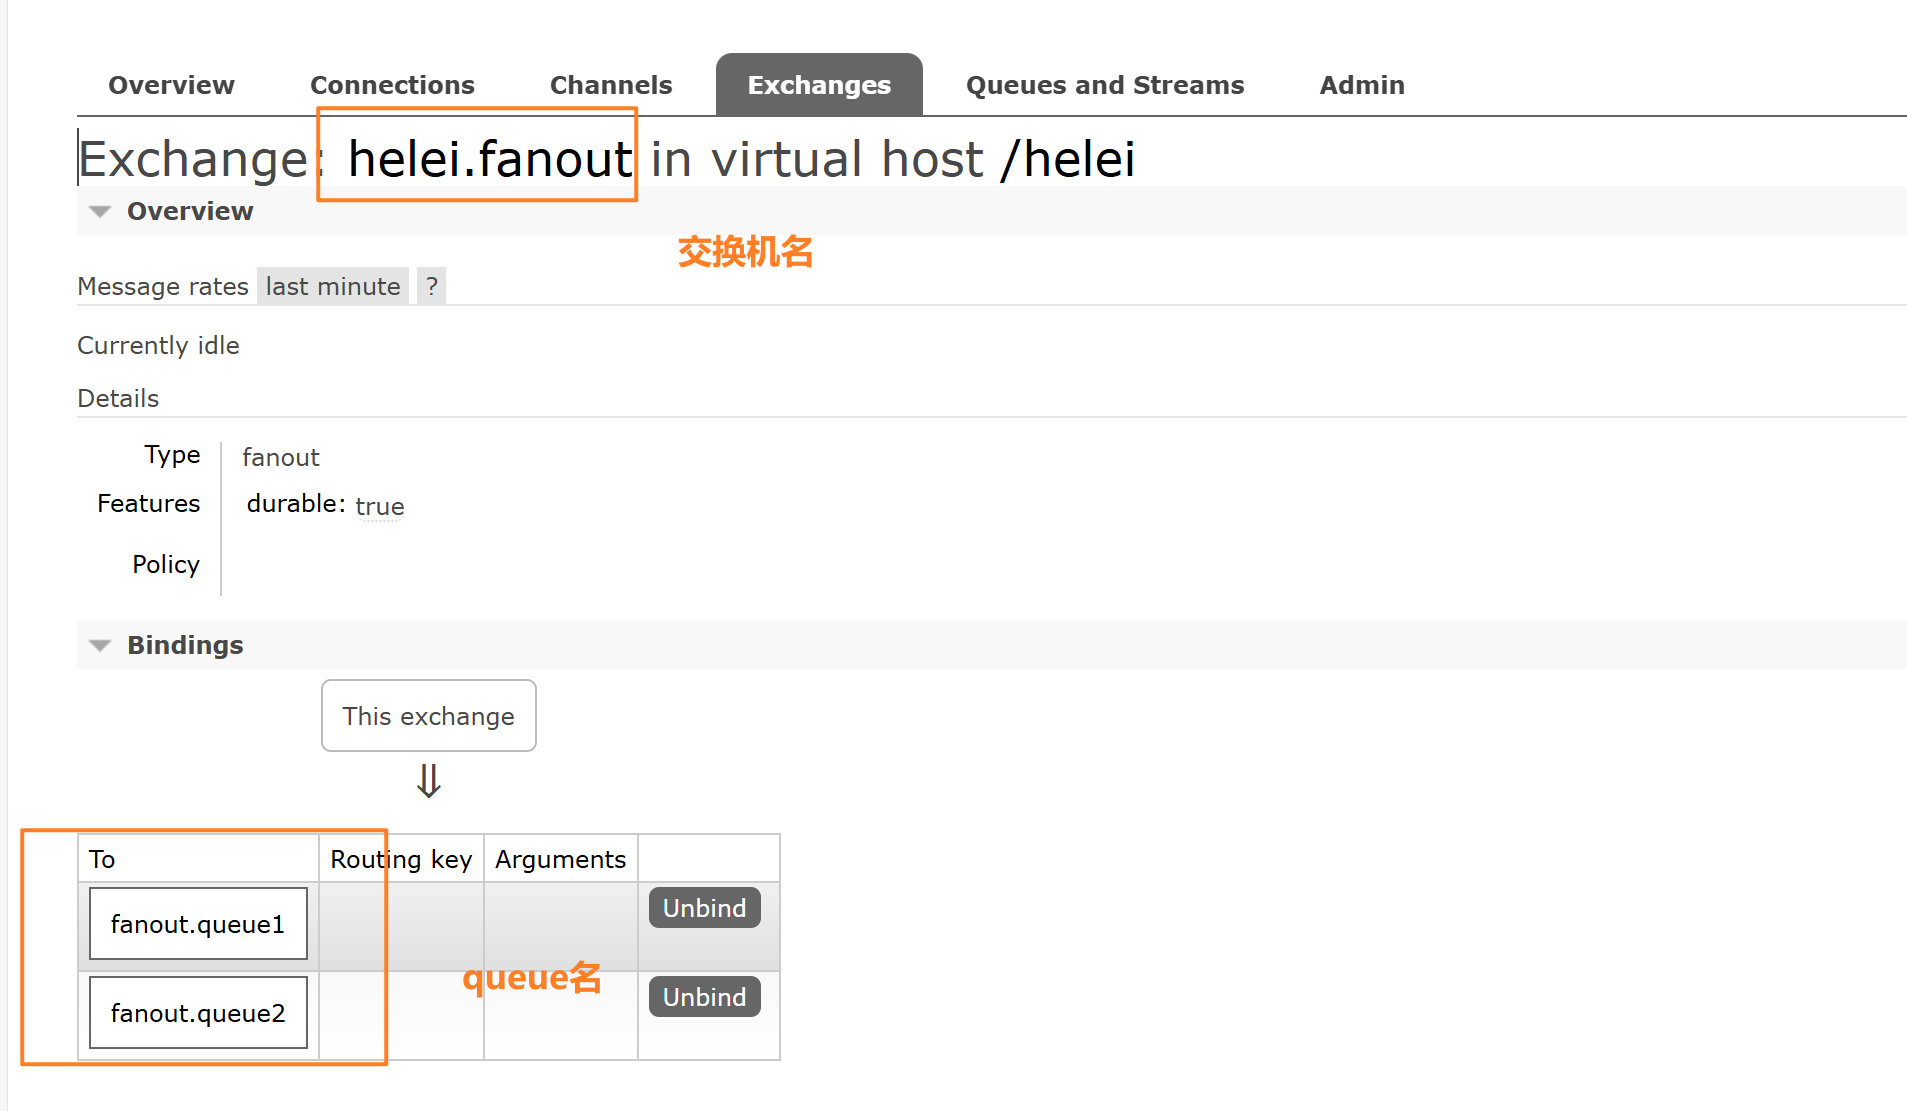
1.添加一个fanout类型的交换机,并且添加2个queue,将交换机与两个queue进行绑定
2.编写java代码实现
在生产者端,对交换机发送消息(任务模型是向队列发送消息)
    @Test
    public void testFanoutQueue() {
        String exchangeName = "helei.fanout";
        String msg="hello everyone";
        rabbitTemplate.convertAndSend( exchangeName,"", msg);
        //这里传递的第一个参数是交换机名字,第二个参数是路由键(这里因为队列已经与交换机绑定了,所以第二个参数可以不写)
        //第三个参数是消息内容
    }
在消费者端,监听不同的队列
    @RabbitListener(queues = "fanout.queue1")
    public void listenFanoutQueue1(String message) throws InterruptedException {
        System.err.println("消费者1收到了 fanout.queue1的消息:【" + message +"】");
    }

    @RabbitListener(queues = "fanout.queue2")
    public void listenFanoutQueue2(String message) throws InterruptedException {
        System.err.println("消费者2收到了 fanout.queue2的消息:【" + message +"】");
    }
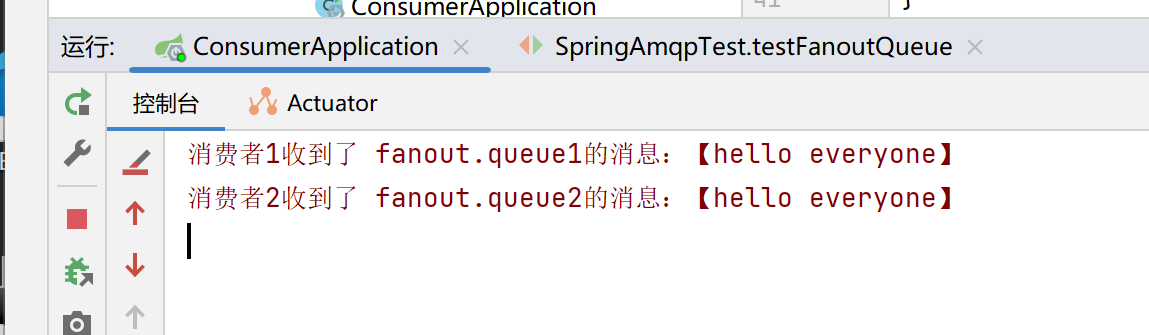
预期的效果:在生产者向消费者发送请求后,由于使用的是fanout交换机,因为会向所有队列广播消息——queue1和queue2都可以接收到消息
实际结果:(两个队列都接收到了经过fanout交换机传递过来的消息)
②Direct交换机(定向) 将接收到的消息根据规则路由到指定的Queue,因此被称为定向路由 (匹配消息的RoutingKey和Queue的BindingKey,如果相同,就转发消息到对应的Queue)
每一个Queue都与exchange指定一个BindingKey
每一个生产者发送消息时,指定消息的RoutingKey
Exchange把消息路由到BindingKey和RoutingKey一致的队列(Queue)
使用方法:
1.添加一个direct类型的交换机,并为这个交换机绑定两个Queue,并指定Queue的BindingKey
在绑定exchange和queue时,添加Queue的Routing Key
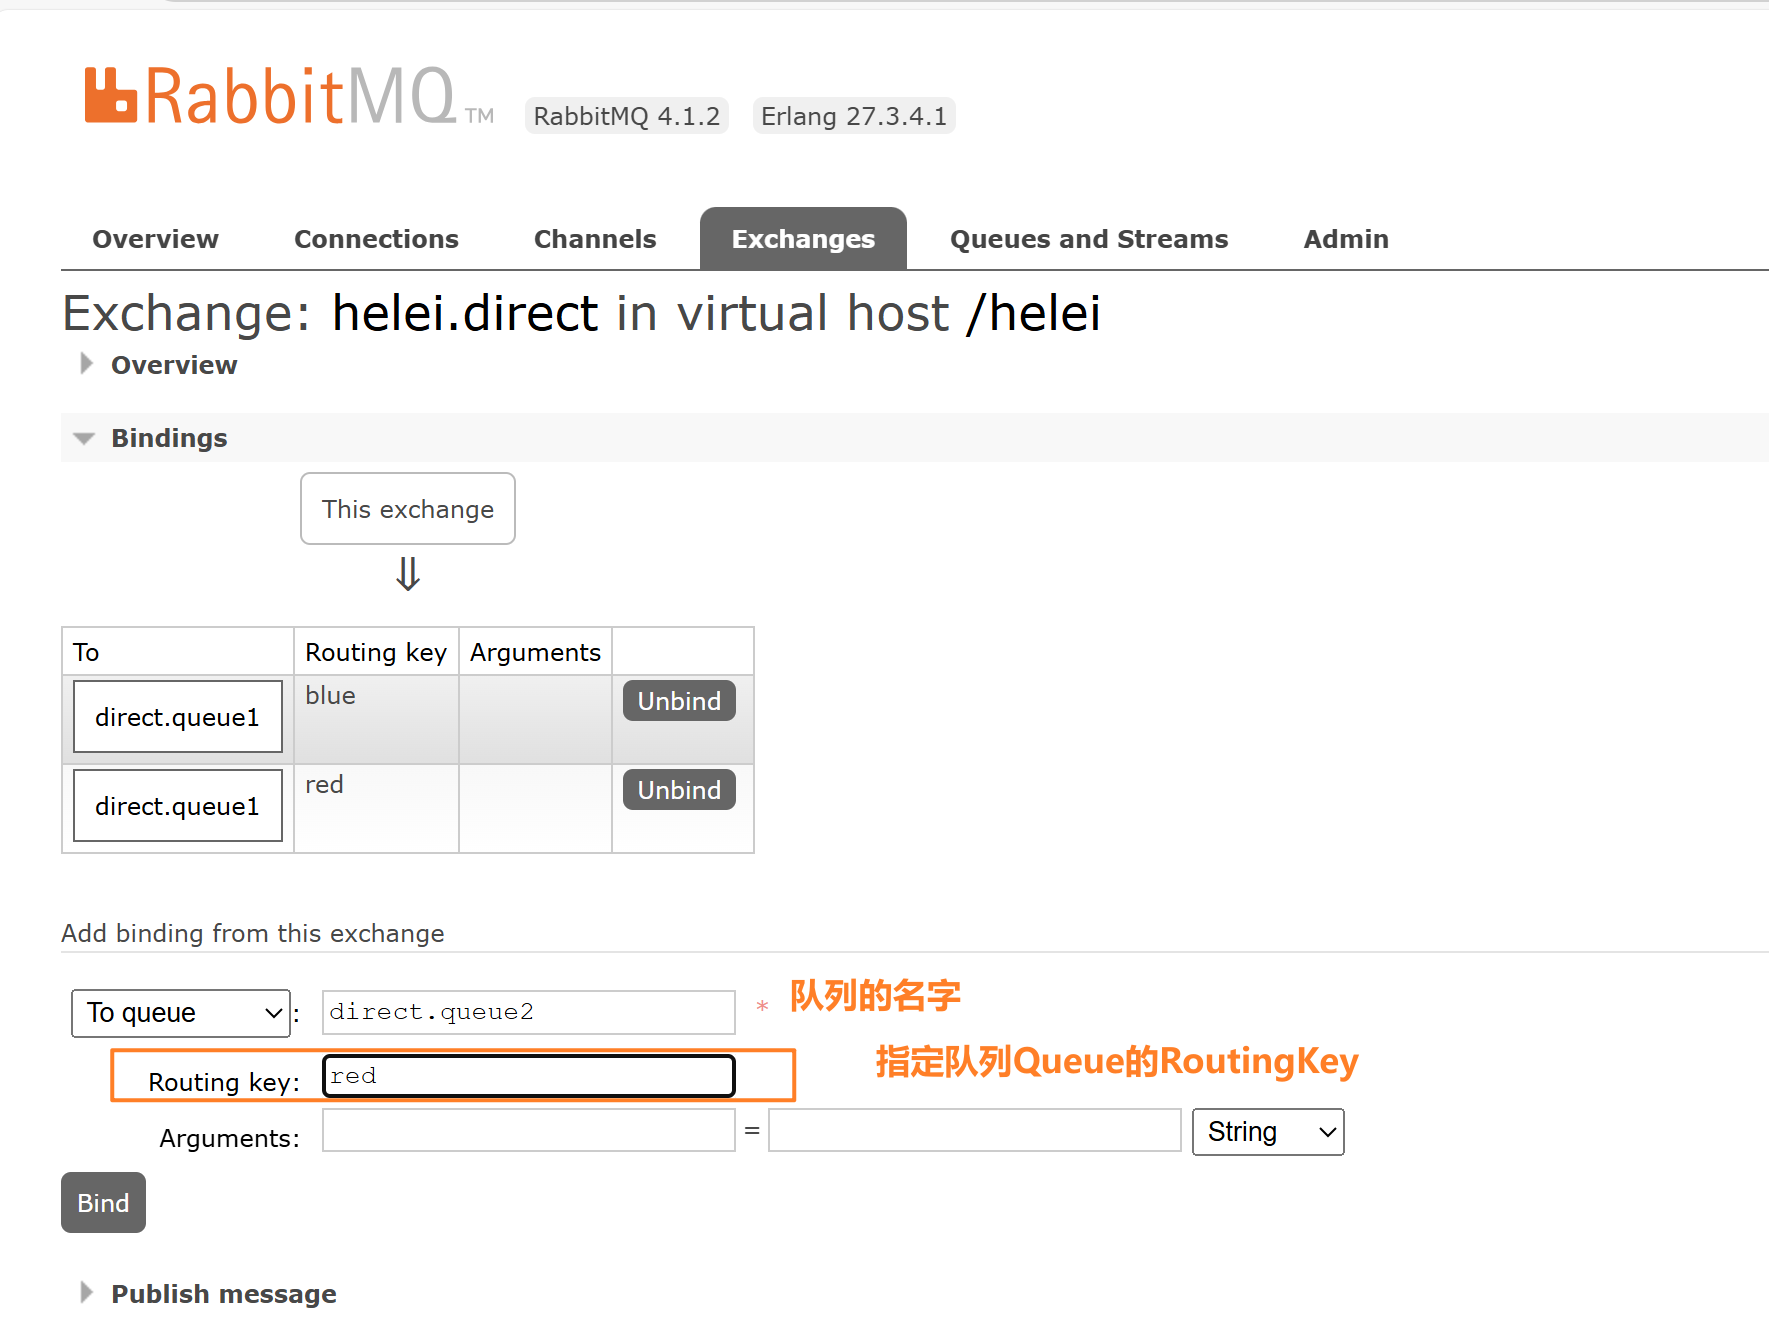
绑定完的结果:
2.编写java代码,
在生产者端通过指定exchange的名字,Queue的RoutingKey,和msg来发送消息
    @Test
    public void testDirectQueue(){
        String exchangeName = "helei.direct";
        String msg="红色警报,注意安全!";
        rabbitTemplate.convertAndSend(exchangeName,"red",msg);
    }
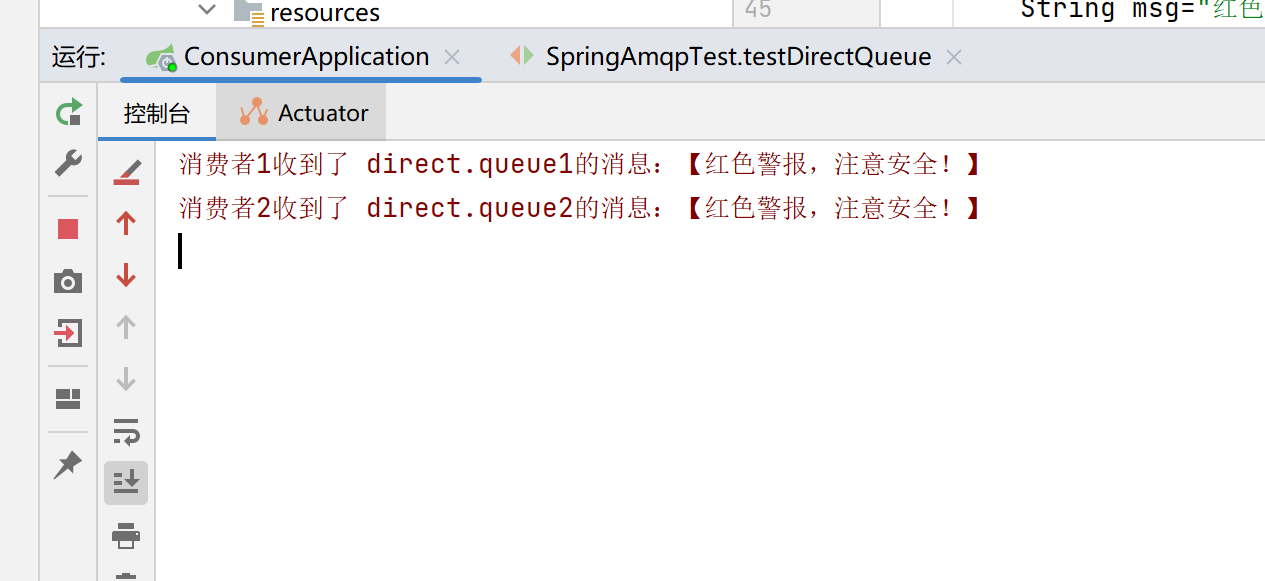
在消费者端监听相应的队列(消费者只关心队列)
    @RabbitListener(queues = "direct.queue1")
    public void listenDirectQueue1(String message) throws InterruptedException {
        System.err.println("消费者1收到了 direct.queue1的消息:【" + message +"】");
    }

    @RabbitListener(queues = "direct.queue2")
    public void listenDirectQueue2(String message) throws InterruptedException {
        System.err.println("消费者2收到了 direct.queue2的消息:【" + message +"】");
    }
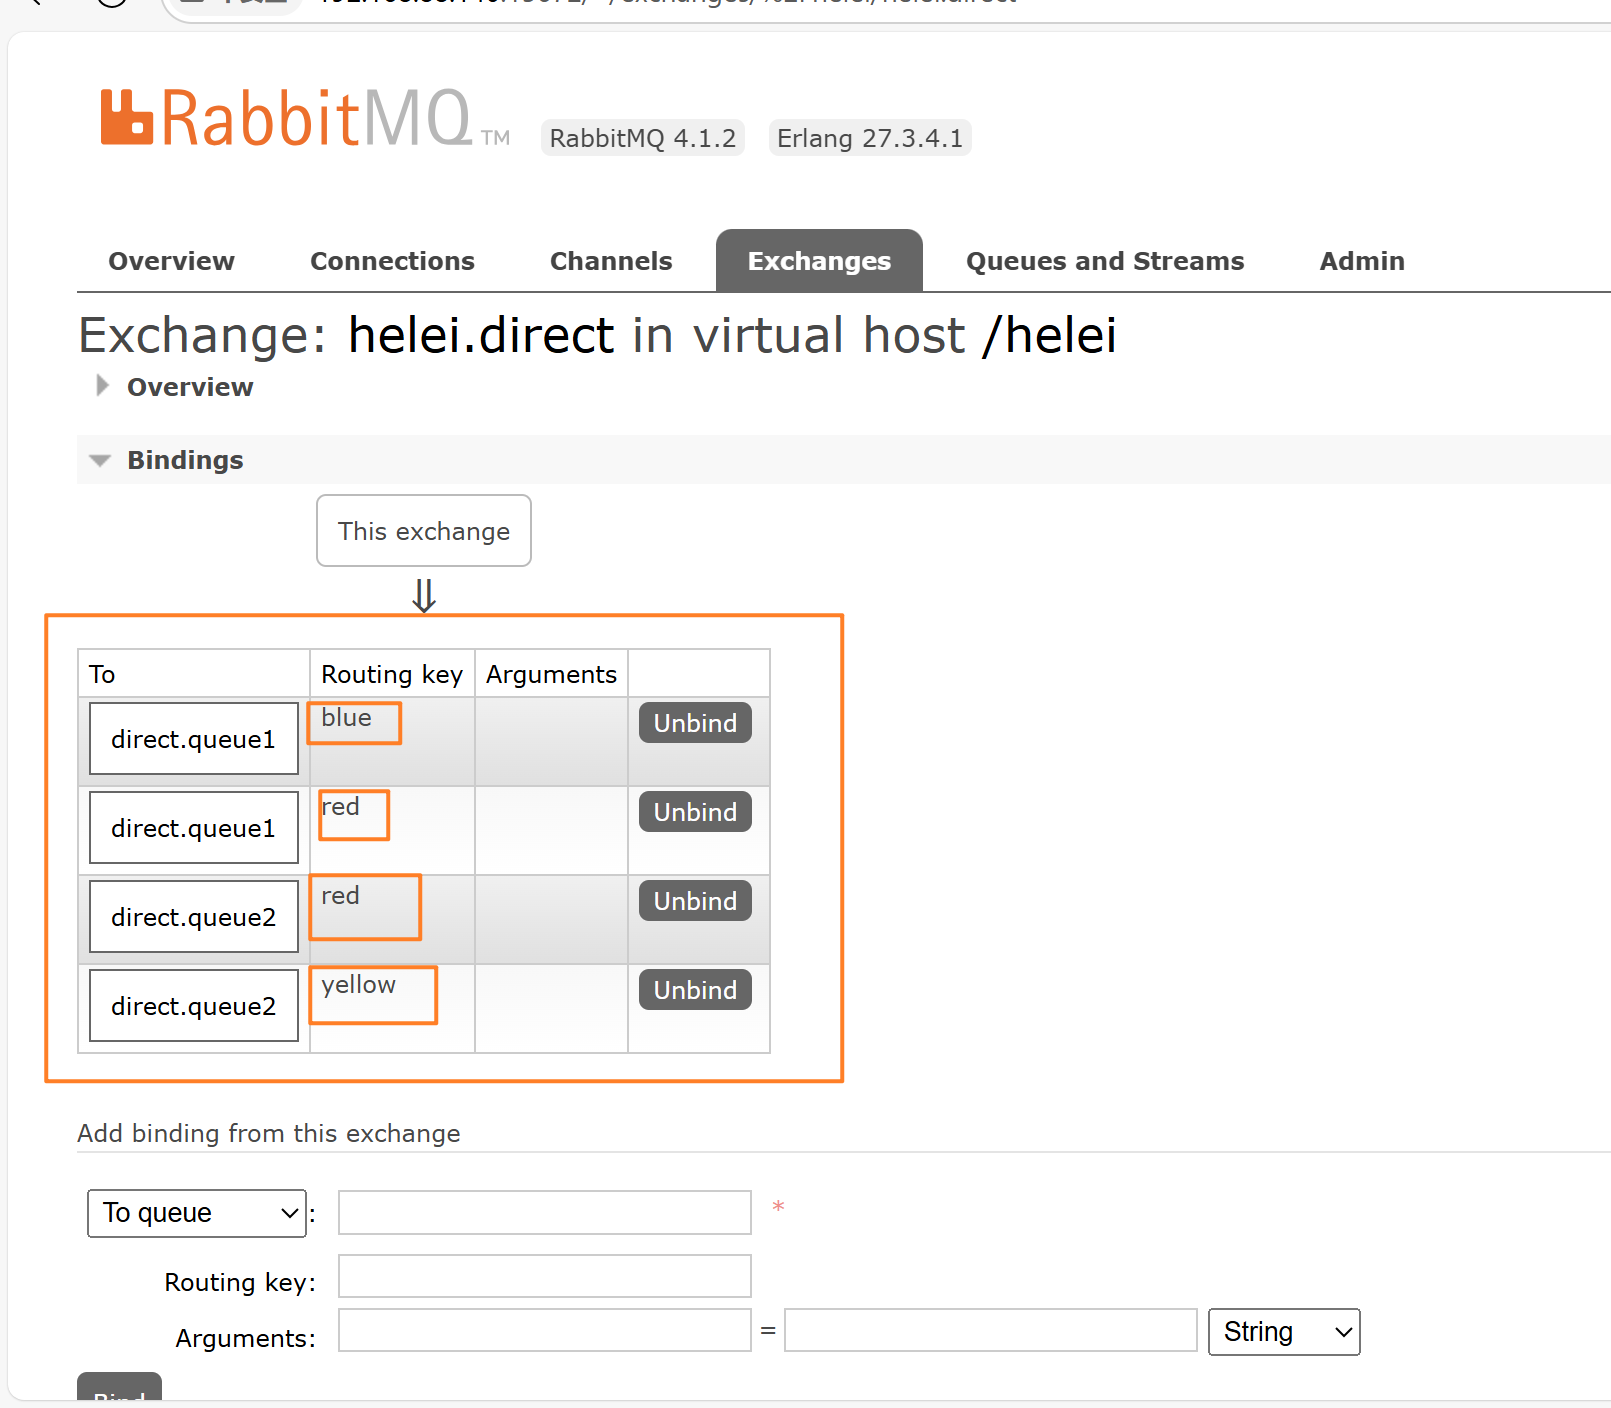
预期结果:生产者端传递的RoutingKey是red,因此去匹配队列的BindingKey,发现direct.queue1和direct.queue2都有BindingKey=red的形式,因此queue1和queue2都会接收到生产者发送的消息
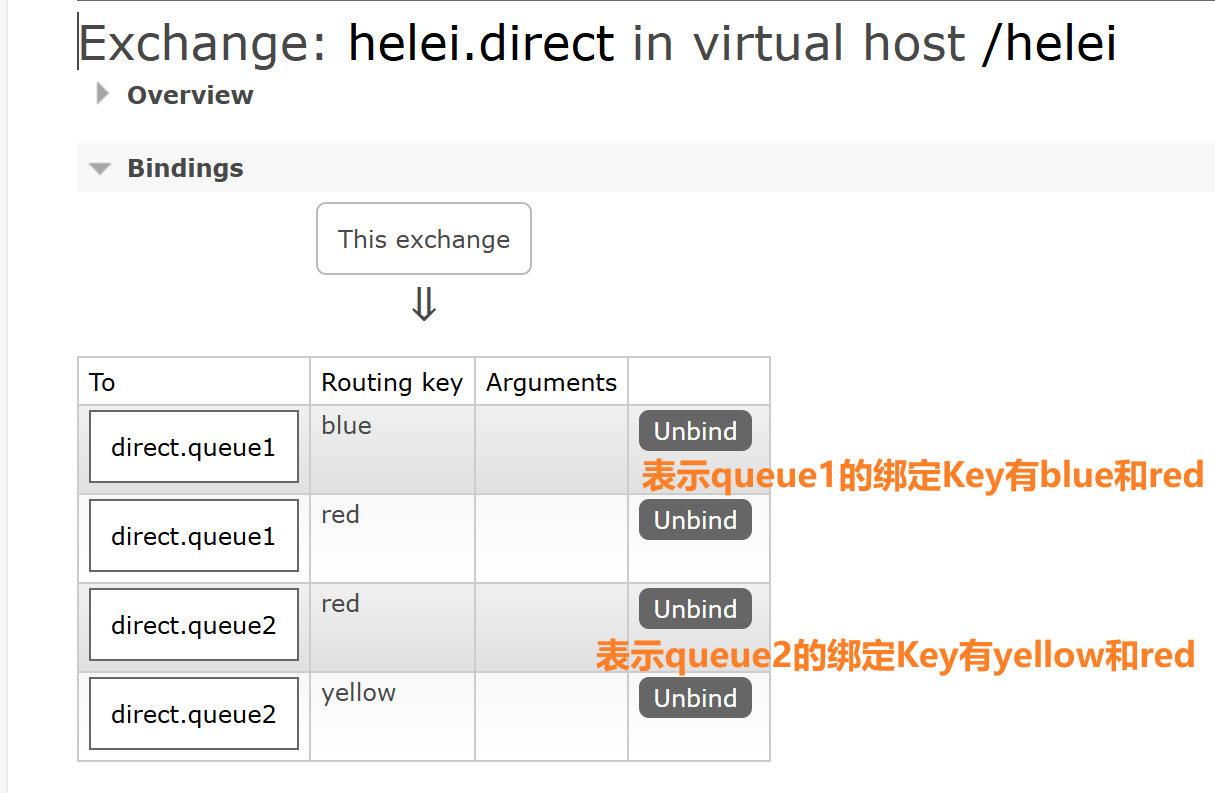
Queue的BindingKey信息
实际结果:
举一反三:如果生产者端传递的RoutingKey为yellow——只有queue2能收到消息,
如果生产者端传递的RoutingKey为blue——只有queue1能收到消息
③Topic交换机(主题)TopicExchange与DirectExchange类似,区别在于routingKey可以是多个单词的列表,并且以.分割(小数点)
同时,Queue与Exchange指定BindingKey时可以使用通配符 可以是*.* 或者#.#
❖ #:代指0个或多个单词
❖ *:代指一个单词
例如:
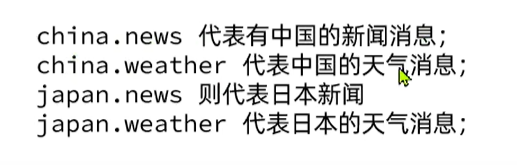
使用方法:
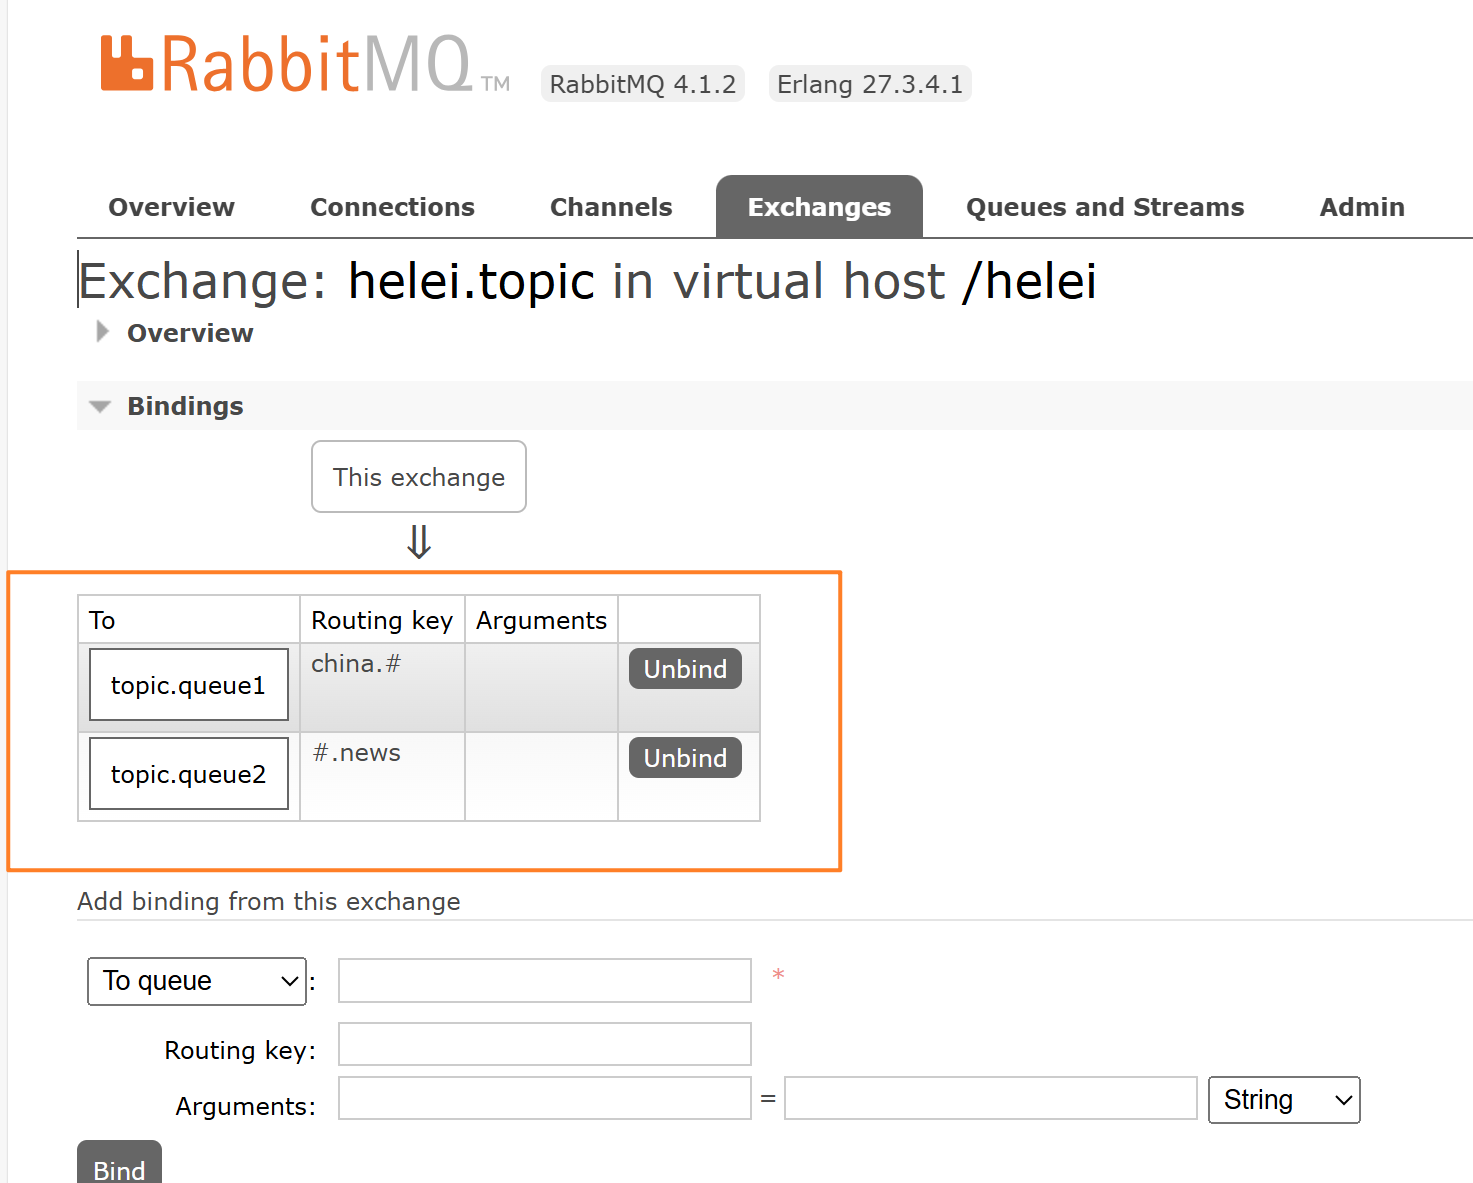
1.创建一个topic交换机和两个队列Queue,并将交换机和Queue进行绑定,绑定关系如下:
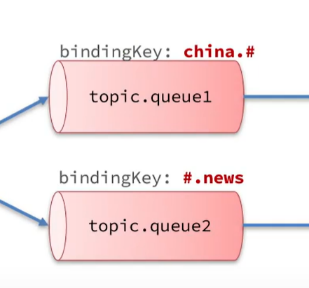
绑定结果:
2.编写java代码测试
《1》编写生产者端的代码:
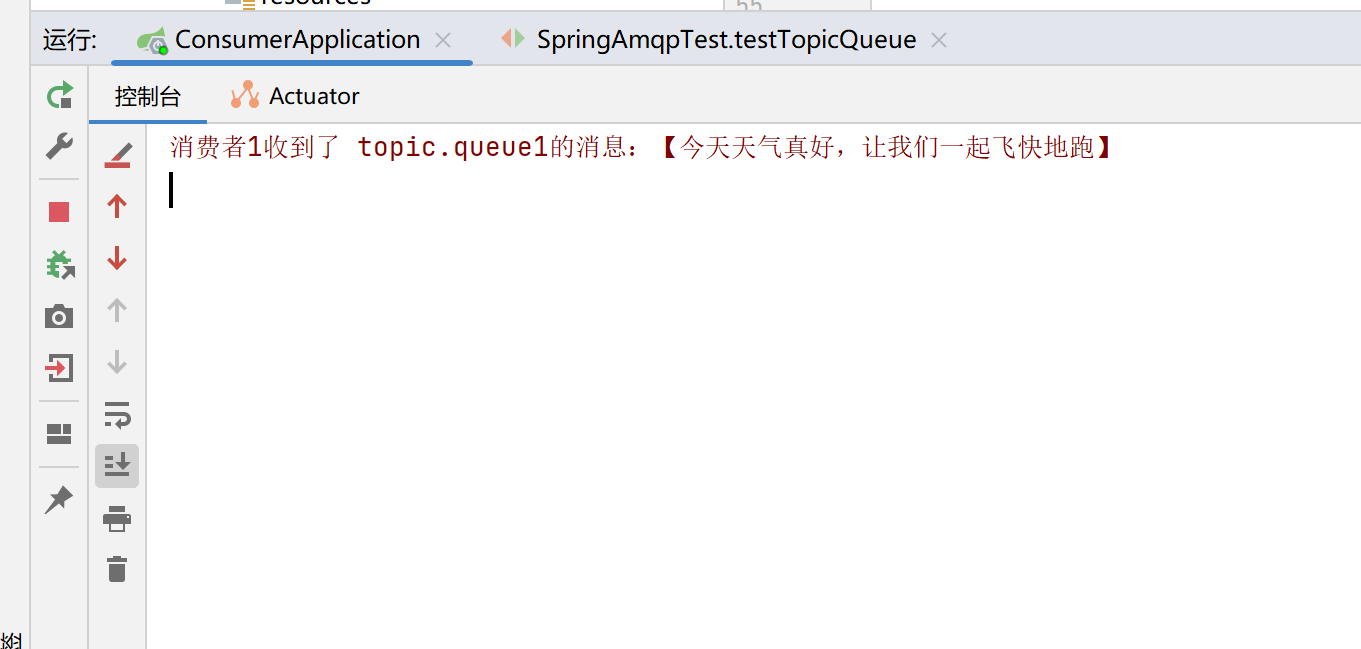
    @Test
    public void testTopicQueue(){
        String exchangeName = "helei.topic";
        String msg="今天天气真好,让我们一起飞快地跑";
        rabbitTemplate.convertAndSend(exchangeName,"china.weather",msg);
    }
编写消费者端代码:
    @RabbitListener(queues = "topic.queue1")
    public void listenTopicQueue1(String message) throws InterruptedException {
        System.err.println("消费者1收到了 topic.queue1的消息:【" + message +"】");
    }

    @RabbitListener(queues = "topic.queue2")
    public void listenTopicQueue2(String message) throws InterruptedException {
        System.err.println("消费者2收到了 topic.queue2的消息:【" + message +"】");
    }
预期结果:生产者端指定的RoutingKey是“china.weather”,只与queue1的china.#匹配,因此,queue1可以接收到消息
实际结果:符合预期
《2》如果生产者端的代码改成下边这样
    @Test
    public void testTopicQueue(){
        String exchangeName = "helei.topic";
        String msg="二十大胜利召开";
rabbitTemplate.convertAndSend(exchangeName,"china.news",msg);
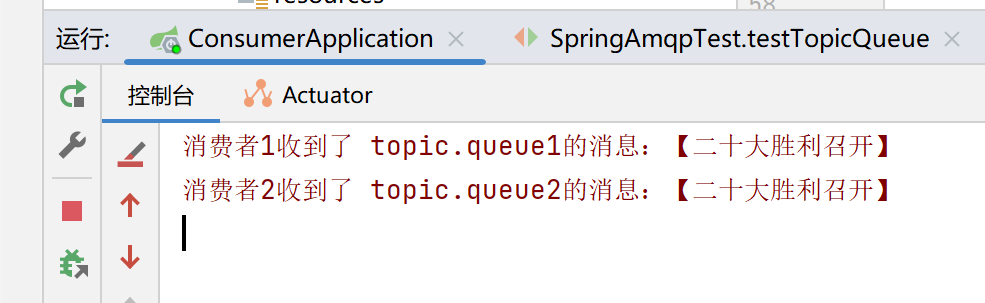
}
预期结果:发送消息的RoutingKey是“china.news”,既符合queue1的china.#,又符合queue2的#.news,因此两个消费者都可以得到消息
实际结果:
《3》在设置的规则为china.#和#.news的情况下,如果在生产者端传递的RoutingKey为china,是否可以匹配,代码如下:
    @Test
    public void testTopicQueue(){
        String exchangeName = "helei.topic";
        String msg="中国万岁";
        rabbitTemplate.convertAndSend(exchangeName,"china",msg);
    }
实际结果:
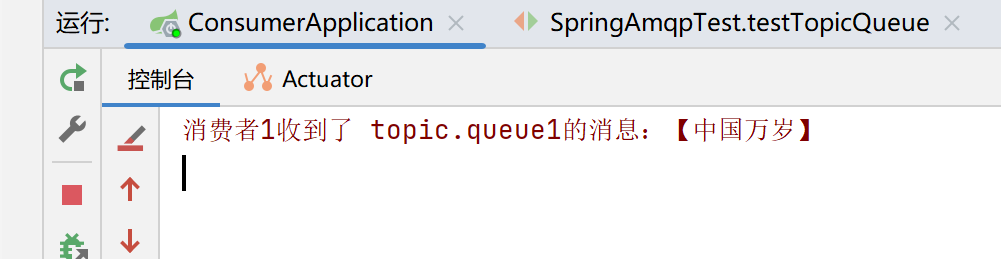
解释一下:因为#代表0个或多个词,上面的RoutingKey只有china,也就是#代表的0个词,因此queue1还是可以接收到消息
(5)Direct交换机和Topic交换机的差异

(6)声明队列交换机和绑定关系的方式之一(基于Bean)
使用 (直接生命或者使用工厂类进行构建) 一般写在configuration中,通过bean注解来实现
①直接使用类进行声明
package com.itheima.consumer.config;

import org.springframework.amqp.core.*;
import org.springframework.context.annotation.Bean;
import org.springframework.context.annotation.Configuration;

@Configuration
public class DirectConfiguration {
    //声明交换机
    @Bean
    public DirectExchange directExchange(){
        return new DirectExchange("helei-direct2");
    }

    //声明队列
    @Bean
    public Queue directQueue10(){
        return new Queue("direct.queue10");
    }
    //声明绑定关系
    @Bean
    public Binding directBinding10(){
        return BindingBuilder.bind(directQueue10()).to(directExchange()).with("china");
    }
}
②使用工厂类实现
package com.itheima.consumer.config;

import org.springframework.amqp.core.*;
import org.springframework.context.annotation.Bean;
import org.springframework.context.annotation.Configuration;

@Configuration
public class DirectConfiguration {
    //声明交换机   使用工厂类
    @Bean
    public DirectExchange directExchange()
    {
        //需要在最后面加上.build(),否则无法成功声明
        return ExchangeBuilder.directExchange("helei.direct2").build();
    }


    //声明队列
    @Bean
    public Queue directQueue10()
    {
        return QueueBuilder.durable("direct.queue10").build();
    }
    //声明绑定关系
    @Bean
    public Binding directBinding1()
    {
//这里的directQueue10()和directExchange()并不是调用的上面的方法,而是这些方法在调用过一次后,会加载到spring的容器中,然后这里是使用了spring中的动态代理实现的
        return BindingBuilder.bind(directQueue10()).to(directExchange()).with("china");
//每次只能指定一个RoutingKey
    }
}
这些声明会在服务启动时启动,要注意:在第一次启动之后,会把声明的队列,交换机,绑定关系成功写入rabbitmq,但是后面如果更改了bean,再次启动服务的时候,已经有的声明不会被删除,如果跟原来的Bean有重复的(交换机,队列,绑定关系),不会重复添加,只会把目前没有的(交换机,队列,绑定关系)加入到rabbitmq中
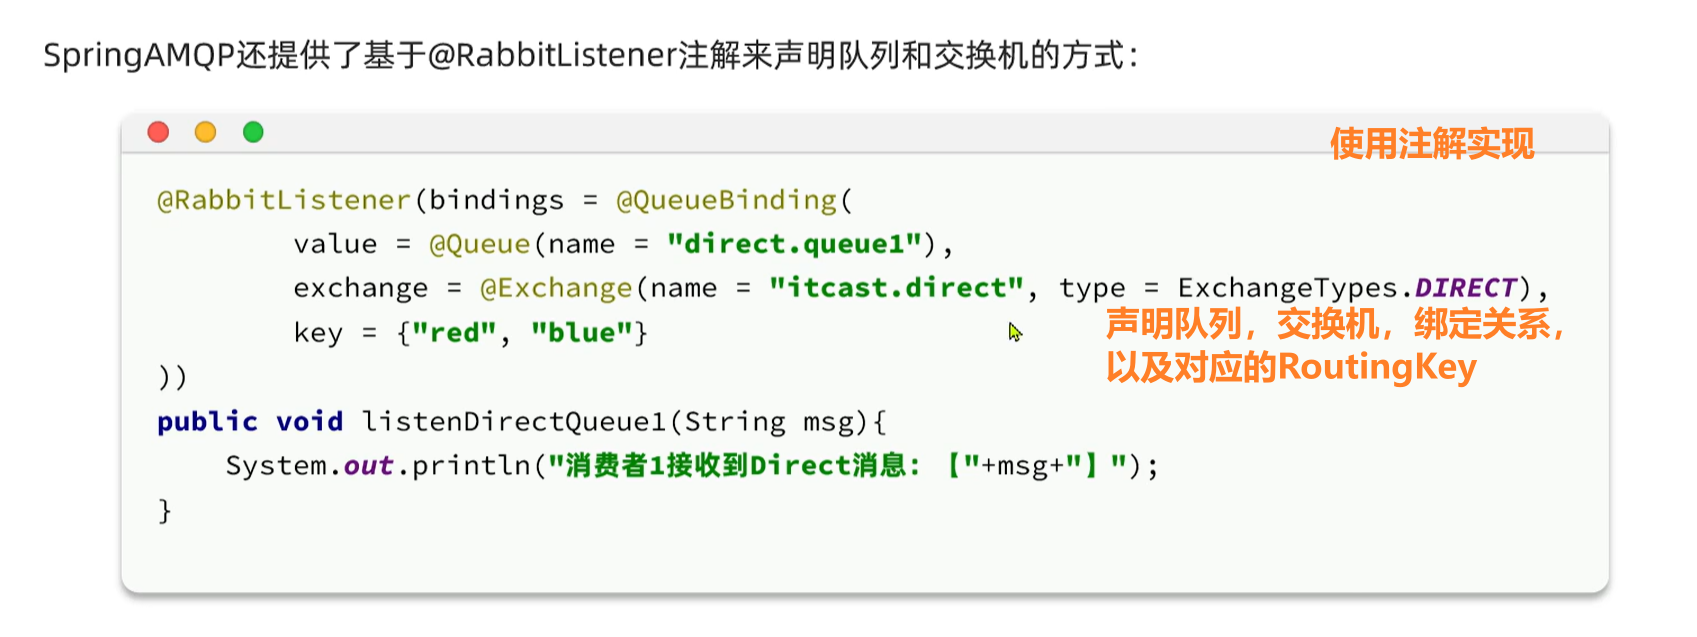
(7)声明队列交换机和绑定关系的方式之二(基于注解)
ctrl+p,参数提示
直接在Listener的方法中通过注解实现
注解包括:
@QueueBinding
@Queue
@Exchange
    @RabbitListener(bindings = @QueueBinding(
            value=@Queue(name = "topic.queue1",durable = "true"),   //durable表示是否持久化,当 RabbitMQ 服务重启时,队列是否会继续存在
            exchange = @Exchange(name="helei.topic",type = ExchangeTypes.TOPIC),    //ExchangeTypes是spring-rabbitmq提供的枚举类
            key = {"china.#","*.news"}
    ))
    public void listenTopicQueue1(String message) throws InterruptedException {
        System.err.println("消费者1收到了 topic.queue1的消息:【" + message +"】");
    }

    @RabbitListener(bindings = @QueueBinding(
            value=@Queue(name = "topic.queue2",durable = "true"),
            exchange = @Exchange(name="helei.topic",type = ExchangeTypes.TOPIC),
            key = {"#.china","news.*"}
    ))
    public void listenTopicQueue2(String message) throws InterruptedException {
        System.err.println("消费者2收到了 topic.queue2的消息:【" + message +"】");
    }
(8)消息转换器
使用jackson消息转换器,注入到spring容器中,可以自动实现对象类型的消息转换
1.引入依赖
        <!--Jackson-->
        <dependency>
            <groupId>com.fasterxml.jackson.dataformat</groupId>
            <artifactId>jackson-dataformat-xml</artifactId>
        </dependency>
2.在生产者和消费者端的启动类中声明消息转换器的Bean对象,
@Bean
    public MessageConverter jacksonMessageConvertor(){
        return new Jackson2JsonMessageConverter();
    }
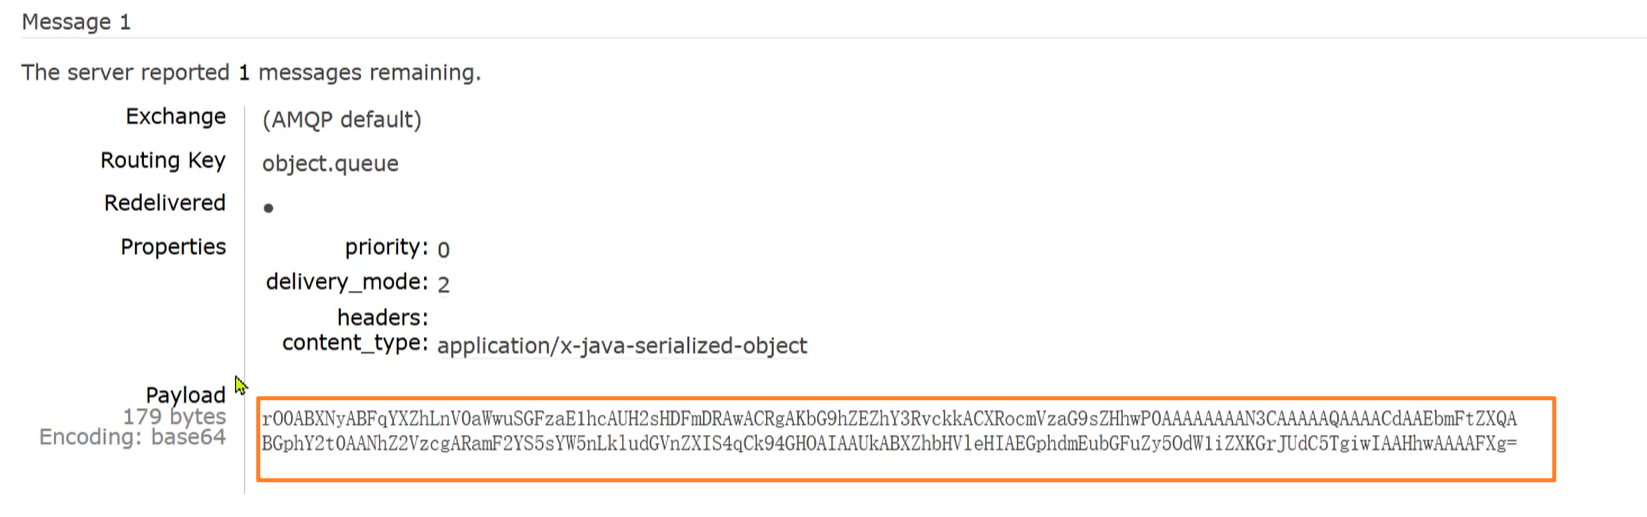
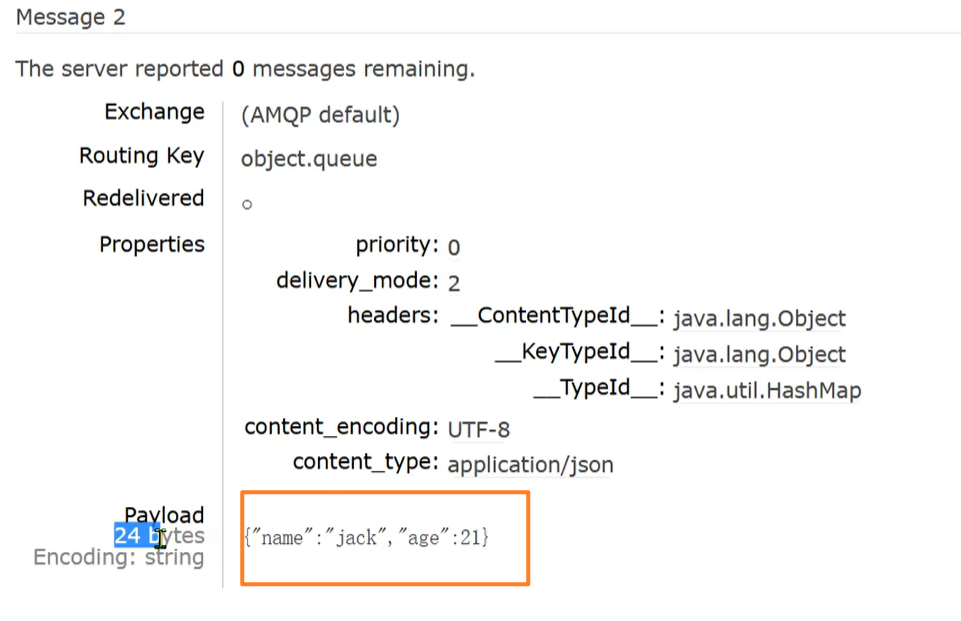
传递的对象类型是Map<String,Object> msg=new HashMap<>(2);
msg.put("name","Jack");
msg.put("age","20");
实现的效果:
①不加消息转换器
②加了消息转换器

 浙公网安备 33010602011771号