


pytorch实现vgg-16
import torch
from torch.autograd import Variable
import torchvision
from torchvision import datasets, transforms, models
import os
import matplotlib.pyplot as plt
import time
%matplotlib inline
data_dir = "E:/01-论文指导/04-代码/莫烦/PyTorch-Tutorial-master/kaggle_DogsVSCats"
# 定义要对数据进行的处理
data_transform = {x: transforms.Compose([transforms.Resize([224, 224]),
transforms.ToTensor(),
transforms.Normalize(mean=[0.5, 0.5, 0.5], std=[0.5, 0.5, 0.5])])
for x in ["train"]}
# 数据载入
image_datasets = {x: datasets.ImageFolder(root=os.path.join(data_dir, x),
transform=data_transform[x])
for x in ["train"]}
# 数据装载
dataloader = {x: torch.utils.data.DataLoader(dataset=image_datasets[x],
batch_size=16,
shuffle=True)
for x in ["train"]}
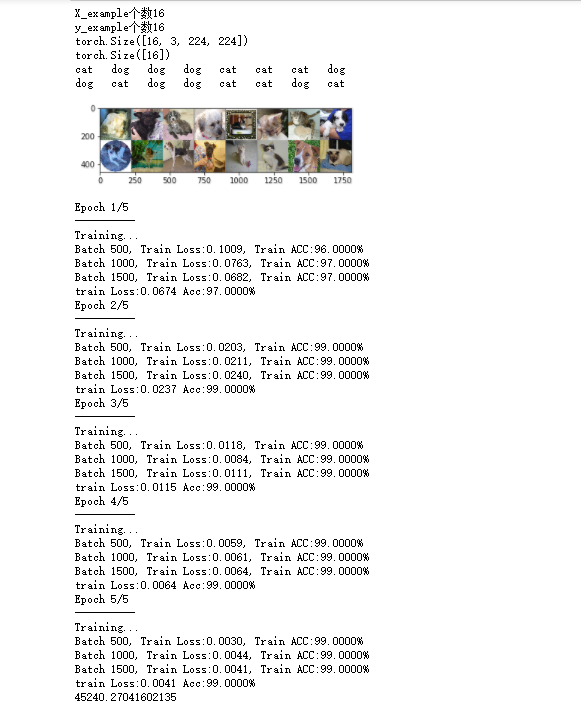
X_example, y_example = next(iter(dataloader["train"]))
print(u'X_example个数{}'.format(len(X_example)))
print(u'y_example个数{}'.format(len(y_example)))
print(X_example.shape)
print(y_example.shape)
#torch.Size([16, 3, 224, 224])第一位表示batchsize,第二维表示输入的channels,第三位表示图片height,第四位表示图片的width
# 验证独热编码的对应关系
index_classes = image_datasets["train"].class_to_idx
# print(index_classes)
# 使用example_classes存放原始标签的结果
example_classes = image_datasets["train"].classes
# print(example_classes)
# 图片预览
img = torchvision.utils.make_grid(X_example)
# print(img.shape)
img = img.numpy().transpose([1, 2, 0])
for i in range(len(y_example)):
index = y_example[i]
print(example_classes[index], end=' ')
if (i + 1) % 8 == 0:
print()
# print(img.max())
# print(img.min())
# print(img.shape)
std = [0.5, 0.5, 0.5]
mean = [0.5, 0.5, 0.5]
img = img * std + mean
# print(img.max())
# print(img.min())
# print(img.shape)
plt.imshow(img)
plt.show()
# 下载已经具备最优参数的VGG16模型
model = models.vgg16(pretrained=True)
# 查看迁移模型细节
# print("迁移VGG16:\n", model)
# 对迁移模型进行调整
for parma in model.parameters():
parma.requires_grad = False
model.classifier = torch.nn.Sequential(torch.nn.Linear(25088, 4096),
torch.nn.ReLU(),
torch.nn.Dropout(p=0.5),
torch.nn.Linear(4096, 4096),
torch.nn.ReLU(),
torch.nn.Dropout(p=0.5),
torch.nn.Linear(4096, 2))
# 查看调整后的迁移模型
# print("调整后VGG16:\n", model)
# 判断计算机的GPUs是否可用
Use_gpu = torch.cuda.is_available()
if Use_gpu:
model = model.cuda()
# 定义代价函数和优化函数
loss_f = torch.nn.CrossEntropyLoss()
optimizer = torch.optim.Adam(model.classifier.parameters(), lr=0.00001)
# 模型训练和参数优化
epoch_n = 5
time_open = time.time()
for epoch in range(epoch_n):
print("Epoch {}/{}".format(epoch + 1, epoch_n))
print("-" * 10)
for phase in ["train"]:
if phase == "train":
print("Training...")
# 设置为True,会进行Dropout并使用batch mean和batch var
model.train(True)
else:
print("Validing...")
# 设置为False,不会进行Dropout并使用running mean和running var
model.train(False)
running_loss = 0.0
running_corrects = 0
# enuerate(),返回的是索引和元素值,数字1表明设置start=1,即索引值从1开始
for batch, data in enumerate(dataloader[phase], 1):
# X: 图片,16*3*224*224; y: 标签,16
X, y = data
# 修改处
if Use_gpu:
X, y = Variable(X.cuda()), Variable(y.cuda())
else:
X, y = Variable(X), Variable(y)
# y_pred: 预测概率矩阵,16*2
y_pred = model(X)
# pred,概率较大值对应的索引值,可看做预测结果
_, pred = torch.max(y_pred.data, 1)
# 梯度归零
optimizer.zero_grad()
# 计算损失
loss = loss_f(y_pred, y)
# 若是在进行模型训练,则需要进行后向传播及梯度更新
if phase == "train":
loss.backward()
optimizer.step()
# 计算损失和
running_loss += float(loss)
# 统计预测正确的图片数
running_corrects += torch.sum(pred == y.data)
# 共20000张测试图片,1250个batch,在使用500个及1000个batch对模型进行训练之后,输出训练结果
if batch % 500 == 0 and phase == "train":
print("Batch {}, Train Loss:{:.4f}, Train ACC:{:.4F}%".format(batch, running_loss / batch,
100 * running_corrects / (16 * batch)))
epoch_loss = running_loss * 16 / len(image_datasets[phase])
epoch_acc = 100 * running_corrects / len(image_datasets[phase])
# 输出最终的结果
print("{} Loss:{:.4f} Acc:{:.4f}%".format(phase, epoch_loss, epoch_acc))
# 输出模型训练、参数优化用时
time_end = time.time() - time_open
print(time_end)
结果:
遇到的问题很多。。。
import torch
from torch.autograd import Variable
import torchvision
from torchvision import datasets, transforms, models
import os
import matplotlib.pyplot as plt
import time

%matplotlib inline
1、导包
报错:ModuleNotFoundError: No module named 'matplotlib'
之前还可以运行,后来就报错这句,解决办法是cmd到当前环境下,然后运行pip install matplotlib安装后重启不管是jupyter notebook还是pycharm都可以了
另外%matplotlib inline前面%后不要空格
# 数据载入
image_datasets = {x: datasets.ImageFolder(root=os.path.join(data_dir, x),
                                          transform=data_transform[x])
                  for x in ["train"]}
2、数据载入
报错:Found 0 files in subfolders....
开始还以为是读不到文件。后来才知道这句代码和数据集不匹配有问题:
ImageFolder假设所有的文件按文件夹保存好,每个文件夹下面存贮同一类别的图片,文件夹的名字为分类的名字
数据集中是猫和狗的图片,没有分文件夹,不能从train中文件夹获得标签,手动建了文件夹就可以了。
3、数据装载
dataloader = {x: torch.utils.data.DataLoader(dataset=image_datasets[x],
                                             batch_size=16,
                                             shuffle=True)
              for x in ["train"]}
PyTorch中数据读取的一个重要接口是torch.utils.data.DataLoader。
只要是用PyTorch来训练模型基本都会用到该接口,该接口主要用来将自定义的数据读取接口的输出或者PyTorch已有的数据读取接口的输入按照batch size封装成Tensor,后续只需要再包装成Variable即可作为模型的输入
(1)dataset,这个就是PyTorch已有的数据读取接口(比如torchvision.datasets.ImageFolder)或者自定义的数据接口的输出,该输出要么是torch.utils.data.Dataset类的对象,要么是继承自torch.utils.data.Dataset类的自定义类的对象。
(2)batch_size,根据具体情况设置即可。
(3)shuffle,一般在训练数据中会采用。
(4)collate_fn,是用来处理不同情况下的输入dataset的封装,一般采用默认即可,除非你自定义的数据读取输出非常少见。
(5)batch_sampler,从注释可以看出,其和batch_size、shuffle等参数是互斥的,一般采用默认。
(6)sampler,从代码可以看出,其和shuffle是互斥的,一般默认即可。
(7)num_workers,从注释可以看出这个参数必须大于等于0,0的话表示数据导入在主进程中进行,其他大于0的数表示通过多个进程来导入数据,可以加快数据导入速度。
(8)pin_memory,注释写得很清楚了: pin_memory (bool, optional): If True, the data loader will copy tensors into CUDA pinned memory before returning them. 也就是一个数据拷贝的问题。
(9)timeout,是用来设置数据读取的超时时间的,但超过这个时间还没读取到数据的话就会报错。
4、遍历图片?
打印#torch.Size([16, 3, 224, 224])第一位表示batchsize,第二维表示输入的channels,第三位表示图片height,第四位表示图片的width
X_example, y_example = next(iter(dataloader["train"]))
print(u'X_example个数{}'.format(len(X_example)))
print(u'y_example个数{}'.format(len(y_example)))
print(X_example.shape)
print(y_example.shape)

 浙公网安备 33010602011771号