3.全志H616基于官方外设开发
全志H616基于官方外设开发
1.安装wiringPi外设SDK安装
1.1.安装外设
git clone https://github.com/orangepi-xunlong/wiringOP -b master #下载源码
cd wiringOP #进入文件夹
sudo ./build clean #清除编译信息
sudo ./build #编译
#通过windows浏览器打开https://github.com/orangepi-xunlong/wiringOP
#下载压缩包
#把压缩包通过xterm传到开发板
#解压 unzip xxx.zip
cd xxx
sudo ./build
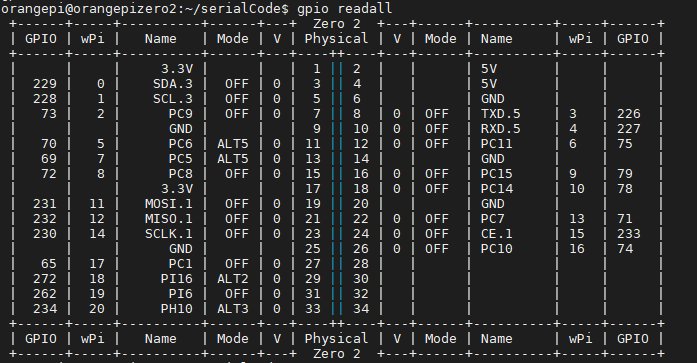
gpio readall
(Orangepizero2_3.0.6默认没有打开ttyS5)根据Zero2可知,有ttyS0、ttyS5两个串口,查看串口是否打开
dmesg | grep tty
orangepi@orangepizero2:~/serialCode$ dmesg | grep tty
[ 5.373869] systemd[1]: Created slice Slice /system/serial-getty.
[ 7.220129] mtty_probe init device addr: 0x(ptrval)
[ 7.525904] systemd[1]: Found device /dev/ttyS0.
[ 33.609038] mtty_open device success!
显示ttyS5没有打开
1.2手动启动ttyS5
如果使用的为 Linux5.16 内核的系统,uart5*默认是关闭的,需要手动打开才能
使用。
**在/boot/orangepiEnv.txt **中加入下面红色字体部分的配置,然后重启 Linux 系统就
可以打开 uart5。
orangepi@orangepi:~$ sudo vim /boot/orangepiEnv.txt
overlays=uart5
编辑 /boot/armbianEnv.txt:
sudo vi /boot/orangepiEnv.txt
在 overlays= 后添加 uart5,例如:
overlays=uart5 i2c3
更新引导配置并重启:
sudo reboot
连接,查看
ls /dev/ttyS5
然后开始测试 uart5 接口,先使用杜邦线短接要测试的 uart5 接口的 rx 和 tx
| uart5 | |
|---|---|
| tx 引脚 | 对应 8 号引脚 |
| rx 引脚 | 对应 10 号引脚 |
gpio serial /dev/ttyS5
测试:
cd /home/orangepi/wiringOP/examples
vim serialTest.c
make serialTest
sudo ./serialTest
不使用sudo执行串口时,需要授权
sudo chmod 777 /dev/ttyS5
或通过
sudo -E ./serialTest #不对环境变量进行改变
2.蜂鸣器的使用
beep.c
#include <stdio.h>
#include <wiringPi.h>
#include <unistd.h>  // For sleep() in Linux/Unix
#define BEEP 0   //0pin:设置针这么快脚0为控制蜂鸣器
int main (void)
{
	wiringPiSetup () ;//初始化wiringPi库
	pinMode (BEEP, OUTPUT) ;//设置针脚IO为输入输出
	while(1){
		//sleep(1);
		usleep(500000);
		digitalWrite (BEEP, LOW) ;	// 设置IO为低电平,蜂鸣器响
		//sleep(1);
		usleep(500000);
		digitalWrite (BEEP, HIGH) ; //设置高电平,蜂鸣器不响
	}
	return 0;
}
编译需要连接到wiringPi:可以通过
bulid.sh
gcc $1 -lwiringPi -lwiringPiDev -lpthread -lm -lcrypt -lrt
增加可执行权限
chmod +x bulid.sh
编译build.sh
./bulid.sh beep.c
3.超声波测距
3.1.测距原理:
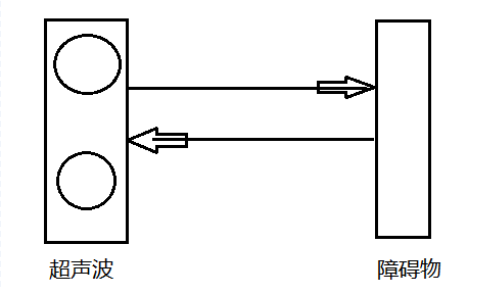
超声波测距模块是用来测量距离的一种产品,通过发送和收超声波,利用时间差和声音传播速度,
计算出模块到前方障碍物的距离
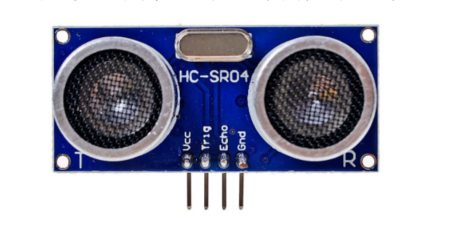
型号:HC-SR04
接线参考:模块除了两个电源引脚外,还有TRIG,ECHO引脚
-
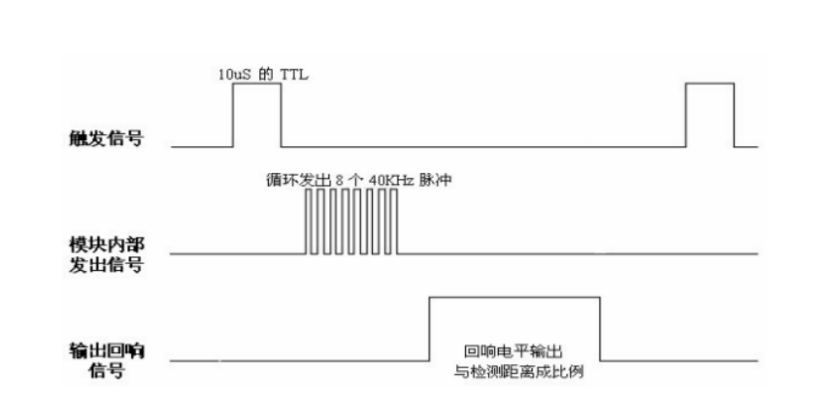
怎么让它发波
Trig,给Trig端口至少10us的高电平
-
怎么知道开始发了
Echo信号,由低电平跳转到高电平,表示开始发送波
-
怎么知道接收了返回波
Echo,由高电平跳转回低电平,表示波回来了
-
怎么算时间
Echo引脚维持高电平的时间!
-
波发出去的那一下,开始启动定时器
波回来的拿一下,我们开始停止定时器,计算出中间经过多少时间
-
怎么算距离
距离=速度(340m/s)*时间/2
3.2.时序
3.3.时间函数
函数原型
#include<sys/time.h>

int gettimeofday(struct timeval *tv,struct timezone *tz )
gettimeofday()会把目前的时间用tv 结构体返回,当地时区的信息则放到tz所指的结构中
struct timeval
{
    long tv_sec;/*秒*/
    long tv_usec;/*微妙*/
};
测试代码:
//计算程序在当前环境中数数10万次耗时多少
#include <sys/time.h>
#include <stdio.h>
//int gettimeofday(struct timeval *tv,struct timezone *tz )
void mydelay()
{
    int i,j;
    for(i=0;i<100;i++){
    	for(j=0;j<1000;j++);
	}
}
int main()
{
    struct timeval startTime;
    struct timeval stopTime;
    gettimeofday(&startTime,NULL);
    mydelay();
    gettimeofday(&stopTime,NULL);
    long diffTime = 1000000*(stopTime.tv_sec - startTime.tv_sec) +
    (stopTime.tv_usec - startTime.tv_usec);
    printf("全志H6的Linux数100000耗时%ldus\n",diffTime);
    return 0;
}
3.4.代码实现
hcsr04.c
#include <stdio.h>
#include <wiringPi.h>
#include <unistd.h>  // For sleep() in Linux/Unix
#include <sys/time.h>
#include <stdlib.h>

#define TRIG  1   //trig的scl引脚1
#define	ECHO  0	  //echo的sda引脚0

double getDistance()
{
	double dis;
	struct timeval start;
	struct timeval stop;

	pinMode (TRIG, OUTPUT) ;//设置针脚IO为输入输出
	pinMode (ECHO, INPUT) ;//设置针脚IO为输入输出

	digitalWrite (TRIG, LOW) ; //设置低电平
	usleep(5);
	digitalWrite (TRIG, HIGH) ; //设置高电平
	usleep(10);
	digitalWrite(TRIG, LOW);
	while(!digitalRead(ECHO));
	gettimeofday(&start,NULL);
	while(digitalRead(ECHO));
	gettimeofday(&stop,NULL);

	long difftime = 1000000*(stop.tv_sec-start.tv_sec)+(stop.tv_usec-start.tv_usec);
	printf("difftime:%ld\n",difftime);

	dis = (double)difftime * 0.017;//340m/s 34000cm/s 34cm/ms 0.034cm/us  超声波的距离=(速度*时间)/2
	//dis = (double)difftime/1000000 * 34000 /2 ;//单位是cm/s
	return dis;
}

int main (void)
{
	double dis;
	if(wiringPiSetup () == -1){//初始化wiringPi库
		printf("wifingPiSetup error \n");
		exit(-1);
	}
	while(1){
		dis = getDistance();
		printf("dis:%.2f cm\n",dis);
		usleep(500000);
	}
	return 0;
}
4.SG90舵机开发
4.1.舵机基本介绍
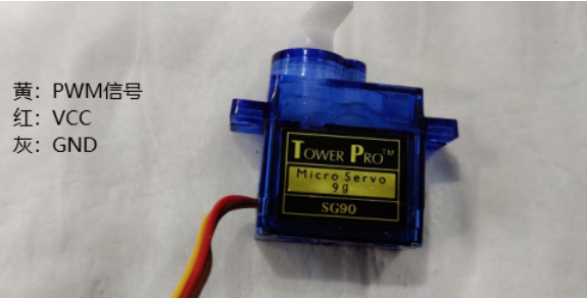
如下图所示,最便宜的舵机sg90,常用三根或者四根接线,黄色为PWM信号控制用处:垃圾桶项目开盖
用、智能小车的全比例转向、摄像头云台、机械臂等
常见的有0-90°、0-180°、0-360°
怎么控制转角
向黄色信号线“灌入”PWM信号。
PWM波的频率不能太高,50hz,即周期=1/频率=1/50=0.02s,20ms左右数据:
不同的PWM波形对应不同的旋转角度,以20ms为周期,50hz为频率的PWM波
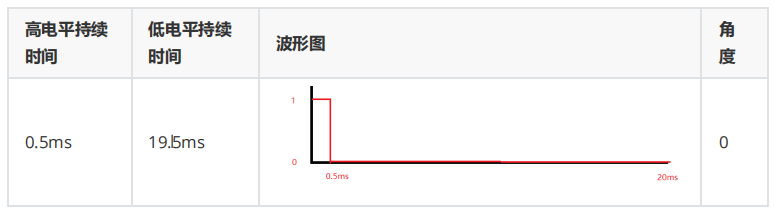
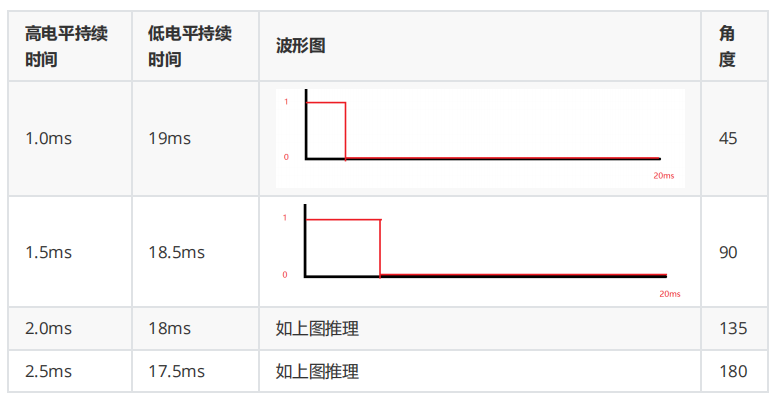
时器需要定时20ms,关心的单位0.5ms, 20ms = 0.5ms * 40;
4.2.Linux定时器
分析:实现定时器,通过itimerval结构体以及函数setitimer产生的信号,系统随之使用signal信号处理函
数来处理产生的定时信号。从而实现定时器。
先看itimerval的结构体
struct itimerval
{
    /* Value to put into `it_value' when the timer expires. */
    struct timeval it_interval;
    /* Time to the next timer expiration. */
    struct timeval it_value;
};
//it_interval:计时器的初始值,一般基于这个初始值来加或者来减,看控制函数的参数配置
//it_value:程序跑到这之后,多久启动定时器

struct timeval
{
    __time_t tv_sec; /* Seconds. */
    __suseconds_t tv_usec; /* Microseconds. */
};
int setitimer (__itimer_which_t __which,
const struct itimerval *__restrict __new,
struct itimerval *__restrict __old)
setitimer()将value指向的结构体设为计时器的当前值,如果ovalue不是NULL,将返回计时器原有值。
which:三种类型
ITIMER_REAL //数值为0,计时器的值实时递减,发送的信号是SIGALRM。
ITIMER_VIRTUAL //数值为1,进程执行时递减计时器的值,发送的信号是SIGVTALRM。
ITIMER_PROF //数值为2,进程和系统执行时都递减计时器的值,发送的信号是SIGPROF。
很明显,这边需要捕获对应的信号进行逻辑相关处理 signal(SIGALRM,signal_handler);
返回说明:
成功执行时,返回0。失败返回-1
clockTime.c
/*该代码实现的功能是: 1s后开启定时器,然后每隔1s向终端打印hello。*/
#include <stdio.h>
#include <sys/time.h>
#include <stdlib.h>
#include <signal.h>

static int i;
void signal_handler(int signum)
{
	i++;
//	printf("catch signal\n");
	if(i == 2000){
		printf("hello \n");
		i=0;
	}
}
int main(){
	struct itimerval itv;
	//设置定时器的时间
	itv.it_interval.tv_sec = 0;
	itv.it_interval.tv_usec = 500;

	//设置开始生效,启动定时器
	itv.it_value.tv_sec = 1;
	itv.it_value.tv_usec = 0;
	//设置定时方式
	if(setitimer(ITIMER_REAL,&itv,NULL) == -1){
		perror("error");
		exit(-1);
	}
	//信号处理
	signal(SIGALRM,signal_handler);
	while(1);
	return 0;
}
这种方法需要注意的是,一个进程只能创建一个定时器
4.3.SG90编程实现:键盘输入不同的值,让舵机转动,软件PWM实现
#include <stdio.h>
#include <sys/time.h>
#include <stdlib.h>
#include <signal.h>
#include <wiringPi.h>

#define SG90Pin 5
int jd;
static int i = 0;
void signal_handler(int signum)
{
	if(i <= jd){
		digitalWrite(SG90Pin,HIGH);
	}else {
		digitalWrite(SG90Pin,LOW);
	}
	if(i == 40){
		i = 0;
	}
	i++;
}

int main(){
	jd = 0;
	wiringPiSetup();
	pinMode(SG90Pin, OUTPUT);
	struct itimerval itv;
	//设置定时器的时间
	itv.it_interval.tv_sec = 0;
	itv.it_interval.tv_usec = 500;
	//设置开始生效,启动定时器
	itv.it_value.tv_sec = 1;
	itv.it_value.tv_usec = 0;
	//设置定时方式
	if(setitimer(ITIMER_REAL,&itv,NULL) == -1){
		perror("error");
		exit(-1);
	}
	//信号处理
	signal(SIGALRM,signal_handler);
	while(1){
		printf("input jd: 1-0 2-45 3-90 4-135 \n");
		scanf("%d",&jd);
	}
	return 0;
}
5.OLED屏应用-IIC协议
5.1.OLED屏幕
5.2.Orangepi的IIC接口
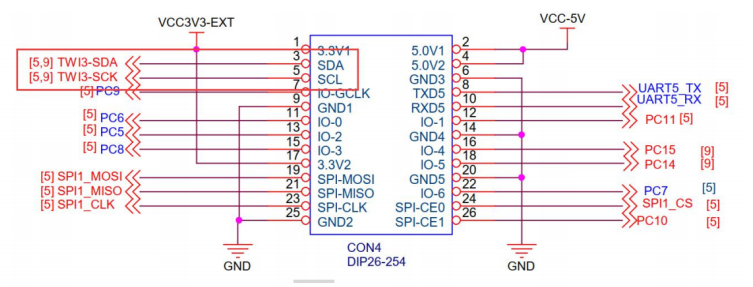
- 由 26pin 的原理图可知, Orange Pi Zero 2 可用的 i2c 为 i2c3
-
启动 linux 系统后, 先确认下/dev 下存在 i2c-3 的设备节点
从命令运行结果能观察到系统支持I2C-3和I2C-5的驱动,而H616的外设我们看到只有一个IIC接口,
用的是IIC-3
Linux一切皆文件,每个硬件设备“对应”一个文件,由驱动程序提供映射
![]()
-
开始测试 i2c,首先安装 i2c-tools
sudo apt-get install i2c-tools

由以下命令可知,该设备为i2c-3的设备

5.3源码查看
需要安装sourceInsight工具
5.4.代码实现
/*
 * Copyright (c) 2015, Vladimir Komendantskiy
 * MIT License
 *
 * SSD1306 demo of block and font drawing.
 */
#include <errno.h>
#include <string.h>
#include <stdio.h>
#include <stdlib.h>
#include <time.h>
#include <stdint.h>
#include "oled.h"
#include "font.h"

int oled_show(struct display_info *disp) {
	int i;
	char buf[100];
	//putstrto(disp, 0, 0, "Spnd spd  2468 rpm");
	//	oled_putstrto(disp, 0, 9+1, "Spnd cur  0.46 A");
	oled_putstrto(disp, 0, 9+5, "Welcome       to");
	disp->font = font1;
	oled_putstrto(disp, 0 , 18+5,"My HOME!");
	disp->font = font2;
	oled_send_buffer(disp);
	return 0;
}

void show_error(int err, int add) {
	//const gchar* errmsg;
	//errmsg = g_strerror(errno);
	printf("\nERROR: %i, %i\n\n", err, add);
	//printf("\nERROR\n");
}

void show_usage(char *progname) {
	printf("\nUsage:\n%s <I2C bus device node >\n", progname);
}

int main(int argc, char **argv) {
	int e;
	char filename[32];
	struct display_info disp;
	if (argc < 2) {
		show_usage(argv[0]);

		return -1;
	}
	memset(&disp, 0, sizeof(disp));
	sprintf(filename, "%s", argv[1]);
	disp.address = OLED_I2C_ADDR;
	disp.font = font2;
	e = oled_open(&disp, filename);
	if (e < 0) {
		show_error(1, e);
	} else {
		e = oled_init(&disp);
		if (e < 0) {
			show_error(2, e);
		} else {
			printf("---------start--------\n");
			if (oled_show(&disp) < 0)
				show_error(3, 777);
			printf("----------end---------\n");
		}
	}
	return 0;
}
6.Linux串口开发
通过tx、rx交叉接线进行通信
6.1.基于wringpi改造:
serialTest.c
#include <stdio.h>
#include <string.h>
#include <errno.h>
#include <pthread.h>
#include <wiringPi.h>
#include <wiringSerial.h>
#include <stdlib.h>
#include <unistd.h>
int fd ;
void *SendHandler()
{
	char *sendBuf;
	sendBuf = (char *)malloc(32*sizeof(32));
	while(1){
		memset(sendBuf,'\0',32);
		scanf("%s",sendBuf);
		while(*sendBuf){
			serialPutchar (fd, *sendBuf++) ;
		}
	}
}
void *RevHandler()
{
	while(1){
		printf ("%c", serialGetchar (fd)) ;
		fflush (stdout) ;
	}
}
int main ()
{
	int count ;
	unsigned int nextTime ;
	pthread_t idSend;
	if ((fd = serialOpen ("/dev/ttyS5", 115200)) < 0)
	{
		fprintf (stderr, "Unable to open serial device: %s\n", strerror (errno)) ;
		return 1 ;
	}
	pthread_create(&idSend,NULL,SendHandler,NULL);
	pthread_create(&idSend,NULL,RevHandler,NULL);

	if (wiringPiSetup () == -1)
	{
		fprintf (stdout, "Unable to start wiringPi: %s\n", strerror (errno)) ;
		return 1 ;
	}
	while(1){
		sleep(10);
	};
	printf ("\n") ;
	return 0 ;
}
6.2基于源码改造
uartTool.c
#include <stdio.h>
#include <stdlib.h>
#include <stdint.h>
#include <stdarg.h>
#include <string.h>
#include <termios.h>
#include <unistd.h>
#include <fcntl.h>
#include <sys/ioctl.h>
#include <sys/types.h>
#include <sys/stat.h>
#include "wiringSerial.h"

int mySerialOpen (const char *device, const int baud)
{
	struct termios options ;
	speed_t myBaud ;
	int 	status, fd ;
	switch (baud)
	{
		case    9600:	myBaud =    B9600 ; break ;
		case  115200:	myBaud =  B115200 ; break ;
		default:
      		return -2 ;
	}
	if ((fd = open (device, O_RDWR | O_NOCTTY | O_NDELAY | O_NONBLOCK)) == -1)
    return -1 ;
  fcntl (fd, F_SETFL, O_RDWR) ;

// Get and modify current options:

  tcgetattr (fd, &options) ;
    cfmakeraw   (&options) ;
    cfsetispeed (&options, myBaud) ;
    cfsetospeed (&options, myBaud) ;
    options.c_cflag |= (CLOCAL | CREAD) ;
    options.c_cflag &= ~PARENB ;
    options.c_cflag &= ~CSTOPB ;
    options.c_cflag &= ~CSIZE ;
    options.c_cflag |= CS8 ;
    options.c_lflag &= ~(ICANON | ECHO | ECHOE | ISIG) ;
    options.c_oflag &= ~OPOST ;
    options.c_cc [VMIN]  =   0 ;
    options.c_cc [VTIME] = 100 ;	// Ten seconds (100 deciseconds)
  tcsetattr (fd, TCSANOW, &options) ;
  ioctl (fd, TIOCMGET, &status);
  status |= TIOCM_DTR ;
  status |= TIOCM_RTS ;
  ioctl (fd, TIOCMSET, &status);
  usleep (10000) ;	// 10mS
  return fd ;

}

void serialSendString (const int fd, const char *s)
{
	int ret;
	ret = write (fd, s, strlen(s)) ;
	if (ret < 0)
		 printf("Serial Putchar Error\n");
}

int serialGetString (const int fd, char *buffer)
{
	int n_read;
  	n_read = read (fd,buffer,32);
  	return n_read;
}
uartTool.h
int mySerialOpen (const char *device, const int baud);
void serialSendString (const int fd, const char *s);
int serialGetString (const int fd, char *buffer);
uartTest.c
#include <stdio.h>
#include <stdlib.h>
#include <stdint.h>
#include <stdarg.h>
#include <string.h>
#include <termios.h>
#include <unistd.h>
#include <fcntl.h>
#include <sys/ioctl.h>
#include <sys/types.h>
#include <sys/stat.h>
#include "wiringSerial.h"
#include <pthread.h>
#include "uartTool.h"
#include <unistd.h>

int fd;
void *readSerial()
{
	char buffer[32];
	while(1){
		memset(buffer,'\0',sizeof(buffer));
		serialGetString(fd,buffer);
		printf("GET->%s\n",buffer);
	}
}
void *sendSerial()
{
	char buffer[32];
	while(1){
		memset(buffer,'\0',sizeof(buffer));
		scanf("%s",buffer);
		serialSendString(fd,buffer);
	}
}
int main(int argc, char **argv)
{
	char deviceName[32] = {'\0'};
	pthread_t sendt;
	pthread_t readt;
	if(argc<2){
		printf("uage:%s /dev/ttyS?\n",argv[0]);
		return -1;
	}
	strcpy(deviceName,argv[1]);
	if((fd=mySerialOpen(deviceName, 115200)) == -1){
		printf("open %s error\n",deviceName);
		return -1;
	}
	pthread_create(&readt,NULL,readSerial,NULL);
	pthread_create(&sendt,NULL,sendSerial,NULL);

	while(1){
	 	sleep(10);
	}
	return 0;
}
编译执行:
gcc uartTest.c uartTool.c -o uartTest -lpthread
./uartTest /dev/ttyS5

 浙公网安备 33010602011771号