自己实现 一个 Vue框架,包含了Vue的核心原理
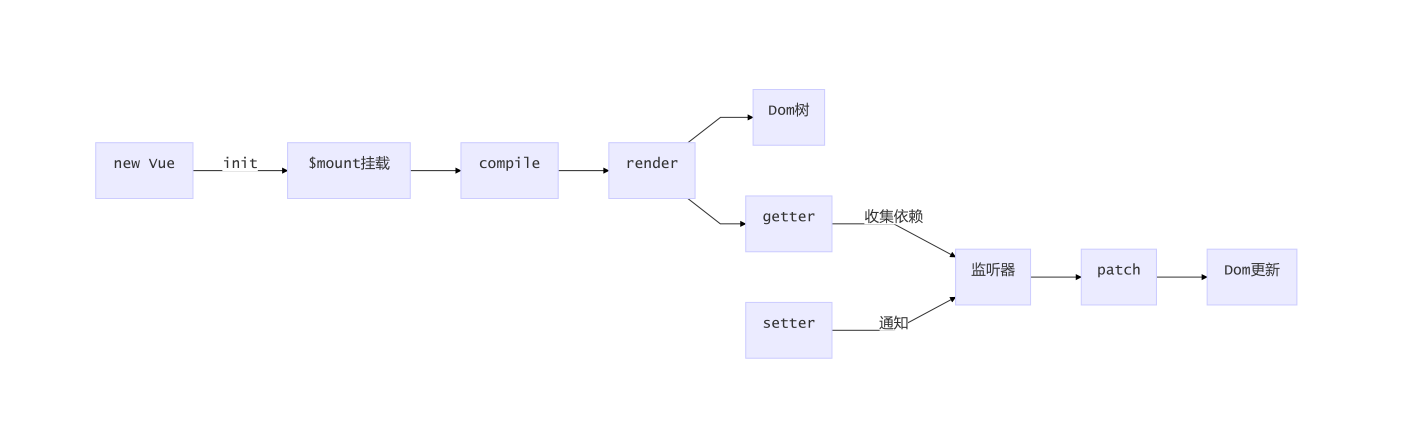
Vue工作机制
- vue工作机制
- Vue响应式的原理
- 依赖收集与追踪
- 编译compile
html:
<!DOCTYPE html>
<html lang="en">

<head>
    <meta charset="utf-8">
</head>

<body>
    <div id="app">
        <!-- 插值绑定 -->
        <p>{{name}}</p>
        <!-- 指令系统 -->
        <p k-text="name"></p>
        <p>{{age}}</p>
        <p>{{doubleAge}}</p>
        <!-- 双向绑定 -->
        <input type="text" k-model="name">
        <!-- 事件处理 -->
        <button @click="changeName">呵呵</button>
        <!-- html内容解析 -->
        <div k-html="html"></div>
    </div>
    <script src='./compile.js'></script>
    <script src='./kvue.js'></script>
    <script>
    new KVue({
        el: '#app',
        data: {
            name: "I am test.",
                age: 17,
                html: '<button>这是一个按钮</button>'
        },
        created() {
            console.log('开始啦');
            setTimeout(() => {
                this.name = '我是异步事件'
            }, 1500)
        },
        methods: {
            changeName() {
                this.name = '哈喽,哈哈哈哈';
                this.age = 20;
                this.id = 'xx' ;
                console.log(1, this)   ;
            }
        }
    })
    </script>
</body>

</html>
kvue.js
/*
 * @Author: liguowei01
 * @Date:   2019-12-31 11:17:12
 * @Last Modified by:   liguowei01
 * @Last Modified time: 2020-01-02 17:55:53
 */

// 用法: new KVue({data:{...}})
class KVue {
    constructor(options) {
        this.$options = options;
        //数据的响应化
        this.$data = options.data;
        this.observe(this.$data); //观察数据

        //模拟一下watcher创建
        // new Watcher();        //实例一
        // this.$data.test;
        // new Watcher();        //实例二    实例二不等于实例一
        // this.$data.foo.bar;
        new Compile(options.el, this);
        //生命周期函数
        //created
        if (options.created) {
            //options.created();    //本来是这样执行,下面的调用call()方法,为函数指定执行作用域
            options.created.call(this); //这样就可以在created函数中用this了。
        }
    }
    observe(obj) {
            //检验数据类型必须是对象
            if (!obj || typeof obj !== 'object') {
                return;
            }
            //遍历该对象
            Object.keys(obj).forEach(key => {
                this.defineReactive(obj, key, obj[key]);
                //代理配置项 data 中的属性到vue实例上
                this.proxyData(key);
            })
        }
        //数据响应化(数据劫持)
    defineReactive(obj, key, val) {
        this.observe(val); //递归解决数据的嵌套
        const dep = new Dep();
        Object.defineProperty(obj, key, {
            get() {
                Dep.target && dep.addDep(Dep.target);
                return val
            },
            set(newVal) {
                if (newVal === val) {
                    return;
                }
                val = newVal;
                // console.log(`${key}属性更新了:${newVal}`)
                dep.notify();
            }
        })
    }
    //代理函数()
    proxyData(key) {
        Object.defineProperty(this, key, {
            get() {
                return this.$data[key];
            },
            set(newVal) {
                this.$data[key] = newVal;
            }
        })
    }

}
//vue 数据绑定的原理是什么?
//首先,把vue选项里的data中的每个属性都利用了Object.defineProperty()定义了一个属性,
//都定义了get和set这样的话让我们的机会监听数据和变化,
//当这些属性发生变化时,我们可以通知那些需要更新的地方去更新

//依赖搜集
//Dep: 用来管理 Watcher
class Dep {
    constructor() {
            //这里存在若干依赖(watcher,一个watcher对应一个属性)
            this.deps = [];
        }
        //添加依赖的方法,搜集依赖时,往这里面放东西
    addDep(dep) {
            this.deps.push(dep)
        }
        //通知方法,用来通知所有的watcher 去更新
    notify() {
        this.deps.forEach(dep => dep.updata())
    }

}

//Watcher 用来做具体更新的对象
class Watcher {
    constructor(vm, key, cb) {
        this.vm = vm;
        this.key = key;
        this.cb = cb;
        //将当前watcher实例指定到Dep静态属性target
        Dep.target = this;
        this.vm[this.key]; //触发getter,添加依赖
        Dep.target = null;
    }
    updata() {
        // console.log('属性更新了');
        this.cb.call(this.vm, this.vm[this.key])
    }
}
Compile.js
/*
 * @Author: liguowei01
 * @Date:   2020-01-02 10:34:50
 * @Last Modified by:   liguowei01
 * @Last Modified time: 2020-01-03 09:18:12
 */
//用法 new Compile(el,vm)

class Compile {
    constructor(el, vm) {
            //要遍历的宿主节点
            this.$el = document.querySelector(el);
            this.$vm = vm; //在其他方法中方便使用
            //编译
            if (this.$el) {
                //转换内部内容为片段Fragment
                this.$fragment = this.node2Fragment(this.$el);
                //执行编译
                this.compile(this.$fragment);
                //将编译完的html追加到$el
                this.$el.appendChild(this.$fragment);
            }
        }
        //将宿主元素中的代码片段拿出来遍历,这样做比较高效
    node2Fragment(el) {
        //创建一个代码块
        const frag = document.createDocumentFragment();
        //将el中所有子元素“搬家”(移动)到frag中
        let child;
        while (child = el.firstChild) {
            frag.appendChild(child);
        }
        return frag;
    }
    compile(el) {
        const childNodes = el.childNodes;
        Array.from(childNodes).forEach(node => {
            //判断类型
            if (this.isElement(node)) {
                //元素
                console.log('编译元素', node.nodeName);
                //查找k-, @, :
                const nodeAttrs = node.attributes;
                Array.from(nodeAttrs).forEach(attr => {
                    const attrName = attr.name;
                    const exp = attr.value;
                    if (this.isDirective(attrName)) {
                        //k-text
                        const dir = attrName.substring(2);
                        //执行指令
                        this[dir] && this[dir](node, this.$vm, exp);
                    }
                    if (this.isEvent(attrName)) {
                        //@click
                        let dir = attrName.substring(1); // text
                        this.eventHandler(node, this.$vm, exp, dir);
                    }
                })
            } else if (this.isInterpolation(node)) {
                //插值文本{{}}
                console.log('编译文本', node.nodeName);
                this.compileText(node);
            }
            //递归子节点
            if (node.childNodes && node.childNodes.length > 0) {
                this.compile(node)
            }
        })
    }
    isDirective(attr) {
        return attr.indexOf('k-') == 0;
    }
    isEvent(attr) {
        return attr.indexOf('@') == 0;
    }
    isElement(node) {
            return node.nodeType === 1;
        }
        //插值文本
    isInterpolation(node) {
            return node.nodeType === 3 && /\{\{(.*)\}\}/.test(node.textContent);
        }
        //编译文本
    compileText(node) {
            //console.log(RegExp.$1);    //正则对象RegExp的静态属性$1就是第一个匹配的值 就是上面'name'
            //node.textContent = this.$vm.$data[RegExp.$1];
            this.updata(node, this.$vm, RegExp.$1, 'text');
        }
        /*
         * @作用: 更新函数 根据指令决定是哪个更新器 它将来需要知道(参数)
         * @params: node 更新的节点
         * @params: vm    kvue的实例
         * @params: exp 正则表达式    匹配的结果 如:name
         * @params: dir    指令(文本、事件、其他) 如:text,html,model
         * 这个方法是个通用方法,将来要被调用很多次
         */
    updata(node, vm, exp, dir) {
            const updaterFn = this[dir + 'Updater']; //在当前的类里面组合一个函数名
            /*这种写法和 this.a 一样,this是代表当前对象,也是一个对象,
            对象名.方法名 或 对象名.属性名 调用对象中的属性和方法
            还有一种调用方式:对象名['方法名'] 或 对象名['属性名']
            也可以使用 对象名['方法名']() 执行此方法
            */
            //先判断updaterFn是否存在,如果存在则执行
            updaterFn && updaterFn(node, vm[exp]); //初始化(第一次)
            //依赖收集
            new Watcher(vm, exp, function(value) {
                //观察vm 里的exp(属性),并在属性变化时,如何更新
                updaterFn && updaterFn(node, value);
            })
        }
        //更新的具体操作
    textUpdater(node, value) {
        node.textContent = value;
    }
    text(node, vm, exp) {
            this.updata(node, vm, exp, 'text');
        }
        // 事件处理
    eventHandler(node, vm, exp, dir) {
        let fn = vm.$options.methods && vm.$options.methods[exp];
        if (dir && fn) {
            node.addEventListener(dir, fn.bind(vm), false);
        }
    }
    model(node, vm, exp) {
        this.updata(node, vm, exp, 'model');
        let val = vm.exp;
        node.addEventListener('input', (e) => {
            let newValue = e.target.value;
            vm[exp] = newValue;
            val = newValue;
        })
    }
    modelUpdater(node, value) {
        node.value = value;
    }
    html(node, vm, exp) {
        this.updata(node, vm, exp, 'html');
    }
    htmlUpdater(node, value) {
        node.innerHTML = value;
    }


}
/*
问题1:vue编译过程是怎样的?
遵循3W1H原则,什么是编译,为什么要编译。
首先写的这些模板的语句,html根本就不能识别,
我们通过编译的过程,可以进行依赖的收集,
进行依赖收集以后,我们就把data中的数据模型和视图之间产生了绑定关系
产生了依赖关系,那么以后模型发生变化的时候,
我们就会通知这些依赖的地方让他们进行更新,
这就是我们执行编译的目的,这样就做到了模型驱动视图的变化。

问题2:双向绑定的原理是什么?
做双向绑定时,通常在表单元素上绑定一个v-model,
我们在编译的时候,可以解析到v-model
操作时做了两件事:
1.在表单元素上做了事件监听(监听input、change事件)
2.如果值发生变化时,在事件回调函数把最新的值设置到vue的实例上
3.因为vue的实例已经实现了数据的响应化,
它的响应化的set函数会触发,通知界面中所有模型的依赖的更新。
所以界面中的,跟这个数据相关的部分就更新了

*/

 浙公网安备 33010602011771号